How to Configure Clusters to Use Kerberos for Authentication
Cloudera clusters can use Kerberos to authenticate services running on the cluster and the users who need access to those services. This How To guide provides the requirements, pre-requisites, and high-level summary of the steps needed to integrate clusters with Kerberos for authentication.
The following are the general steps for integrating Kerberos with Cloudera clusters without using the Cloudera Manager configuration wizard.
Step 1: Verify Requirements and Assumptions
- The Kerberos instance has been setup, is running, and is available during the configuration process.
- The Cloudera cluster has been installed and is operational, with all services fully-functional—Cloudera Manager Server, CDP, and Cloudera Manager Agent processes on all cluster nodes.
Hosts Configured for AES-256 Encryption
By default, CentOS and RHEL 6 (and higher) use AES-256 encryption for Kerberos tickets.
If you use either of these platforms for your cluster, the Java Cryptography Extension
(JCE) Unlimited Strength Jurisdiction Policy File
must be installed on all cluster
hosts.
- Download the
jce_policy-x.zip - Unzip the file
- Follow the steps in the
README.txtto install it.
Required Administrator Privileges
- Cluster Administrator or Full Administrator
- Kerberos administrator privileges:
someone/admin@YOUR-DOMAIN.FQDN.EXAMPLE.COM
If you do not have administrator privileges on the Kerberos instance, you will need help from the Kerberos administrator before you can complete the process.
Required User (Service Account) Directories
During installation, the cloudera-scm account is
created on the host system. When Cloudera Manager and CDP services are
installed at the same time, Cloudera Manager creates other accounts as
needed to support the service role daemons. However, if the CDP
services and Cloudera Manager are installed separately, you may need
to specifically set directory permissions for certain Hadoop user
(service daemon) accounts for successful integration with Kerberos.
The following table shows the accounts used for core service roles.
Note that hdfs acts as superuser for the system.
| User | Service Roles |
|---|---|
hdfs |
NameNode, DataNodes, Secondary NameNode (and HDFS superuser) |
mapred |
JobTracker, TaskTrackers (MR1), Job History Server (YARN) |
yarn |
ResourceManager, NodeManager (YARN) |
oozie |
Oozie Server |
hue |
Hue Server, Beeswax Server, Authorization Manager, Job Designer |
- For newly installed Cloudera clusters (Cloudera Manager and CDP installed at the same time)—The Cloudera Manager Agent process on each cluster host automatically configures the appropriate directory ownership when the cluster launches.
- For existing CDP clusters using HDFS and running MapReduce jobs prior to Cloudera Manager installation—The directory ownership must be manually configured, as shown in the table below. The directory owners cannot differ from those shown in the table to ensure that the service daemons can set permissions as needed on each directory.
| Directory Specified in this Property | Owner |
|---|---|
dfs.name.dir |
hdfs:hadoop |
dfs.data.dir |
hdfs:hadoop |
mapred.local.dir |
mapred:hadoop |
mapred.system.dir in HDFS |
mapred:hadoop |
yarn.nodemanager.local-dirs |
yarn:yarn |
yarn.nodemanager.log-dirs |
yarn:yarn |
oozie.service.StoreService.jdbc.url (if
using Derby) |
oozie:oozie |
[[database]] name |
hue:hue |
javax.jdo.option.ConnectionURL |
hue:hue |
Step 2. Create Principal for Cloudera Manager Server in the Kerberos KDC
Cloudera Manager Server has its own principal to connect to the Kerberos KDC and import user and service principals for use by the cluster.
The steps below summarize the process of adding a principal specifically for Cloudera Manager Server to an MIT KDC and an Active Directory KDC. See documentation from MIT, Microsoft, or the appropriate vendor for more detailed information.
Creating a Principal in Active Directory
- Create an Organizational Unit (OU) in your Active Directory KDC service that will contain the principals for use by the CDP cluster.
- Add a new user account to Active Directory, for example,
username@YOUR-REALM.EXAMPLE.COM. Set the password for the user to never expire. - Use the Delegate Control wizard of Active Directory and grant this new user permission to Create, Delete, and Manage User Accounts.
Creating a Principal in an MIT KDC
admin designate a user account with
administrator privileges. For example:
username/admin@YOUR-REALM.EXAMPLE.COM Create the Cloudera Manager Server principal as shown in one of the examples below, appropriate for the location of the Kerberos instance and using the correct REALM name for your setup.
For MIT Kerberos KDC on a remote host:
kadmin: addprinc -pw password cloudera-scm/admin@YOUR-REALM.EXAMPLE.COMkadmin.local: addprinc -pw password cloudera-scm/admin@YOUR-REALM.EXAMPLE.COM
Step 3: Add the Credentials for the Principal to the Cluster
- Log in to the Cloudera Manager Admin Console.
- Select .
- Click the Kerberos Credentials tab.
- Click the Import Kerberos Account Manager Credentials button.
- Enter the credentials for the principal added to the
Kerberos KDC in the previous step
:- For Username, enter the primary and realm portions of the
Kerberos principal. Enter the realm name in all upper-case only
(
YOUR-REALM.EXAMPLE.COM) as shown below. - Enter the Password for the principal.

- For Username, enter the primary and realm portions of the
Kerberos principal. Enter the realm name in all upper-case only
(
- Click Import.
Cloudera Manager encrypts the username and password into a keytab and uses it to create new principals in the KDC as needed.
Click Close when complete.
Step 4: Identify Default Kerberos Realm for the Cluster
default_realm) specified in the
libdefaults section of its Kerberos configuration
file (/etc/krb5.conf).
[libdefaults]
default_realm = FQDN.EXAMPLE.COM
After adding the default realm to the configuration file for all hosts in the cluster, configure the same default realm for Cloudera Manager Server.
In the Cloudera Manager Admin Console:
- Select .
- Select Kerberos for the Category filter.
- In the Kerberos Security Realm field, enter the
default realm name set in the Kerberos configuration file
(
/etc/krb5.conf) of each host in the cluster. For example:
- Click Save Changes.
Step 5: Stop all Services
All service daemons in the cluster must be stopped so that they can be restarted at the same time and start as authenticated services in the cluster. Service daemons running without authenticating to Kerberos first will not be able to communicate with other daemons in the cluster that have authenticated to Kerberos, so they must be shut down and restarted at the end of the configuration process, as a unit.
Stop all running services and the Cloudera Management Service as follows:
In the Cloudera Manager Admin Console:
- Select .
- Click the Actions drop-down menu and select Stop to stop all services on the cluster.
- Click Stop on the warning message to stop all services on the cluster. The Command Details window displays the progress as each service shuts down. When the message All services successfully stopped displays, close the Command Details window.
- Select .
- Click the Actions drop-down menu and select Stop to stop the Cloudera Management Service. The Command Details window displays the progress as each role instance running on the Cloudera Management Service shuts down. The process is completed when the message Command completed with n/n successful subcommands displays.
- Click Close.
Step 6. Specify Kerberos for Security
Kerberos must be specified as the security mechanism for Hadoop infrastructure, starting with the HDFS service. Enable Cloudera Manager Server security for the cluster on an HDFS service. After you do so, the Cloudera Manager Server automatically enables Hadoop security on the MapReduce and YARN services associated with that HDFS service.
In the Cloudera Manager Admin Console:
- Select .
- Click the Configuration tab.
- Select HDFS-n for the Scope filter.
- Select Security for the Category filter.
- Scroll (or search) to find the Hadoop Secure Authentication property.
- Click the kerberos button to select
Kerberos:
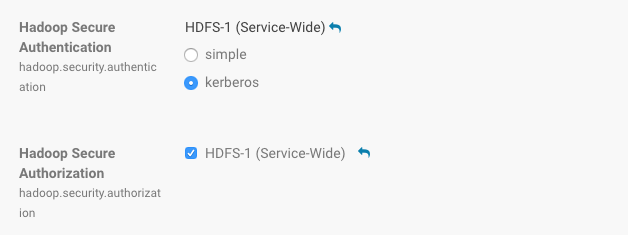
- Click the value for the Hadoop Secure
Authorization property and select the checkbox to enable
service-level authorization on the selected HDFS service. You can
specify comma-separated lists of users and groups authorized to use
Hadoop services or perform admin operations using the following
properties under the Service-Wide
Security section:
- Authorized Users: Comma-separated list of users authorized to use Hadoop services.
- Authorized Groups: Comma-separated list of groups authorized to use Hadoop services.
- Authorized Admin Users: Comma-separated list of users authorized to perform admin operations on Hadoop.
- Authorized Admin Groups: Comma-separated list of groups authorized to perform admin operations on Hadoop.
- In the Search field, type DataNode Transceiver to find the DataNode Transceiver Port property.
- Click the value for the DataNode Transceiver Port property and specify a privileged port number (below 1024). Cloudera recommends 1004.
- In the Search field, type DataNode HTTP to find the DataNode HTTP Web UI Port property and specify a privileged port number (below 1024). Cloudera recommends 1006.
- In the Search field type Data Directory Permissions to find the DataNode Data Directory Permissions property.
- Reset the value for the DataNode Data Directory
Permissions property to the default value of
700if not already set to that. - Make sure you have changed the DataNode Transceiver Port, DataNode Data Directory Permissions and DataNode HTTP Web UI Port properties for every DataNode role group.
- Click Save Changes to save the configuration settings.
To enable ZooKeeper security:
- Go to the ZooKeeper Service Configuration tab and click View and Edit.
- Click the value for Enable Kerberos Authentication property.
- Click Save Changes to save the configuration settings.
To enable HBase security:
- Go to the tab and click View and Edit.
- In the Search field, type HBase Secure to show the Hadoop security properties (found under the category).
- Click the value for the HBase Secure Authorization property and select the checkbox to enable authorization on the selected HBase service.
- Click the value for the HBase Secure Authentication property and select
kerberosto enable authorization on the selected HBase service. - Click Save Changes to save the configuration settings.
- Go to the tab and click View and Edit.
- In the Search field, type Solr Secure to show the Solr security properties (found under the Service-WideSecurity category).
- Click the value for the Solr Secure
Authentication property and select
kerberosto enable authorization on the selected Solr service. - Click Save Changes to save the configuration settings.
Credentials Generated
After you enable security for any of the services in Cloudera Manager, a command called Generate Credentials will be triggered automatically. You can watch the progress of the command on the top right corner of the screen that shows the running commands. Wait for this command to finish (indicated by a grey box containing "0" in it).
Step 7: Restart All Services
Start all services on the cluster using the Cloudera Manager Admin Console:
- Select .
- Click the Actions drop-down button menu and select Start. The confirmation prompt displays.
- Click Start to confirm and continue. The Command Details window displays progress. When All services successfully started displays, close the Command Detailswindow.
- Select .
- Click the Actions drop-down menu and select Start. The Command Details window displays the progress as each role instance running on the Cloudera Management Service starts up. The process is completed when the message Command completed with n/n successful subcommands displays.
Step 8: Deploy Client Configurations
Deploy client configurations for services supported on the cluster using the Cloudera Manager Admin Console:
- Select .
- Click the Actions drop-down button menu and select Deploy Client Configuration.
Step 9: Create the HDFS Superuser Principal
To be able to create home directories for users, you will need access to
the HDFS superuser account. (CDP automatically created the HDFS superuser
account on each cluster host during CDP installation.) When you enabled
Kerberos for the HDFS service, you lost access to the default HDFS
superuser account using sudo -u hdfs commands. Cloudera
recommends you use a different user account as the superuser, not the
default hdfs account.
Designating a Non-Default Superuser Group
To designate a different group of superusers instead of using the
default hdfs account, follow these steps:
- Go to the Cloudera Manager Admin Console and navigate to the HDFS service.
- Click the Configuration tab.
- Select .
- Select .
- Locate the Superuser Group property and change the value to the appropriate group name for your environment. For example, superuser.
- Click Save Changes.
- Restart the HDFS service.
To enable your access to the superuser account now that Kerberos is enabled, you must now create a Kerberos principal or an Active Directory user whose first component is superuser:
For Active Directory
Add a new user account to
Active Directory,
superuser@YOUR-REALM.EXAMPLE.COM
. The
password for this account should be set to never expire.
For MIT KDC
- In the
kadmin.localorkadminshell, type the following command to create a Kerberos principal called superuser:
This command prompts you to create a password for the superuser principal. You should use a strong password because having access to this principal provides superuser access to all of the files in HDFS.kadmin: addprinc superuser@YOUR-REALM.EXAMPLE.COM - To run commands as the HDFS superuser, you must obtain Kerberos
credentials for the superuser principal.
To do so, run the following command and provide the appropriate
password when
prompted.
kinit superuser@YOUR-REALM.EXAMPLE.COM
Step 10: Get or Create a Kerberos Principal for Each User Account
Now that Kerberos is configured and enabled on your cluster, you and every other Hadoop user must have a Kerberos principal or keytab to obtain Kerberos credentials to be allowed to access the cluster and use the Hadoop services. In the next step of this procedure, you need to create your own Kerberos principals to verify that Kerberos security is working on your cluster. If you and the other Hadoop users already have a Kerberos principal or keytab, or if your Kerberos administrator can provide them, you can skip ahead to the next step.
To create Kerberos principals for all users:
Active Directory
Add a new AD user account,
<username>@EXAMPLE.COM for each Cloudera
Manager service that should use Kerberos authentication. The password
for these service accounts should be set to never expire.
MIT KDC
- In the kadmin.local or kadmin shell, use the following command to
create a principal for your account by replacing
EXAMPLE.COMwith the name of your realm, and replacingusernamewith a username:kadmin: addprinc username@EXAMPLE.COM - When prompted, enter the password twice.
Step 11: Prepare the Cluster for Each User
- Each host in the cluster must have a Unix user account with the same name as primary
component of the user's principal name. For example, the principal
jcarlos@YOUR-REALM.EXAMPLE.COMneeds the Linux accountjcarloson each host system. Use LDAP (OpenLDAP, Microsoft Active Directory) for this step if possible. - Create a subdirectory under
/useron HDFS for each user account (for example,/user/jcarlos). Change the owner and group of that directory to be the user.hadoop fs -mkdir /user/jcarlos hadoop fs -chown jcarlos /user/jcarlos
Step 12: Verify Successful Kerberos Integration
sleep or pi, for example) provided
at:
/usr/lib/hadoop/hadoop-examples.jarThis assumes you have the fully-functional cluster as recommended in Step 1: Verify
Requirements and
Assumptions
and that the client configure files have been generated as detailed in Step 8: Deploying
Client Configuration
Files
.
To verify that Kerberos security is working:
- Obtain Kerberos credentials for your user
account.
$ kinit youruserid@YOUR-REALM.EXAMPLE.COM - Enter a password when prompted.
- Submit a sample pi calculation as a test MapReduce job. Use the following
command if you use a package-based setup for Cloudera Manager:
If you have a parcel-based setup, use the following command instead:$ hadoop jar /usr/lib/hadoop-0.20/hadoop-0.20.2*examples.jar pi 10 10000 Number of Maps = 10 Samples per Map = 10000 ... Job Finished in 38.572 seconds Estimated value of Pi is 3.14120000000000000000$ hadoop jar /opt/cloudera/parcels/CDH/lib/hadoop-0.20-mapreduce/hadoop-examples.jar pi 10 10000 Number of Maps = 10 Samples per Map = 10000 ... Job Finished in 30.958 seconds Estimated value of Pi is 3.14120000000000000000
You have now verified that Kerberos security is working on your cluster.