Installing Ranger KMS backed with a Key Trustee Server and HA

The tasks and steps for installing the Ranger Key Management System (KMS) with High Availability (HA) that uses Key Trustee Server (KTS) as the backing key store.

This task uses the Set up HDFS Data At Rest Encryption wizard to install a Ranger KMS with HA that uses KTS as the backing key store.

The following image shows the Set up HDFS Data At Rest Encryption page. When you select your encryption keys root of trust option, a list of tasks that you must do to enable encryption to-and-from HDFS is displayed.

You complete each task independently from the other tasks. Where, the task’s Status column indicates whether the step has been completed and the Notes column provides additional context for the task. If your Cloudera Manager user account does not have sufficient privileges to complete a task, the Notes column indicates the privileges that are required.
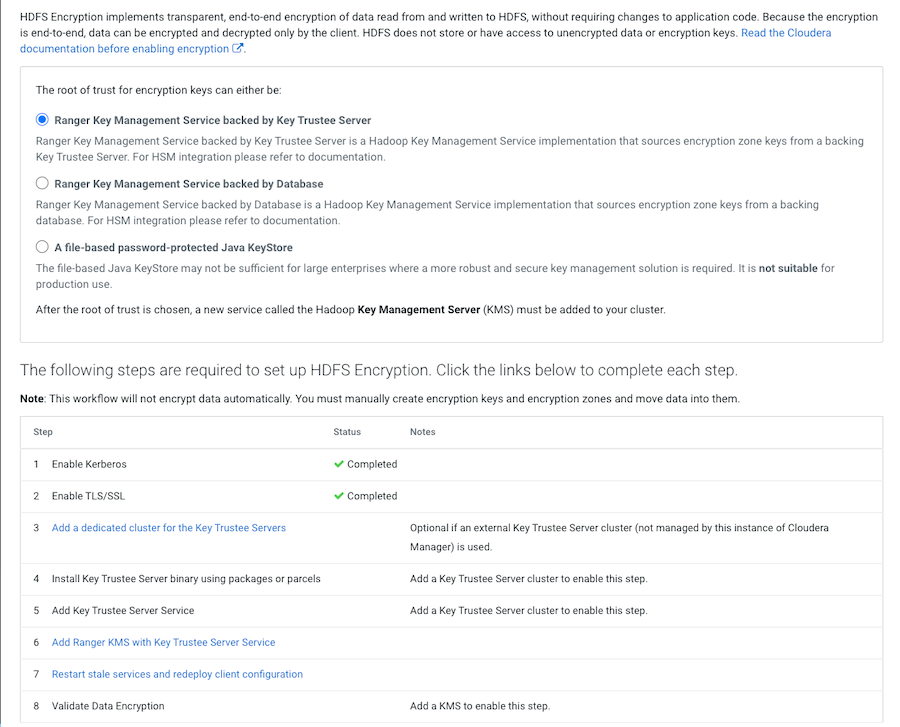
When selected, each task contains links to wizards or documentation that help you complete the task. If a task is unavailable, due to insufficient privileges or an incomplete prerequisite step, no links are present and the Notes column displays the reason.


The Wizard steps are as follows and must be completed in the order listed:
  1. Enable Kerberos
  2. Enable TLS/SSL
  3. Add a dedicated cluster for the Key Trustee Servers
  4. Install the Key Trustee Server binary using packages or parcels
  5. Add the Key Trustee Service
  6. Add the Ranger KMS with Key Trustee Server Service
  7. Restart the stale services and redeploy the client configuration
  8. Validate the Data Encryption
The following lists the post installation tasks for Installing the Ranger KMS backed with a Key Trustee Server and HA:
  • Update the KMS with Key Trustee Server service's URL
  • Create a Ranger Audit Directory
  • Update the Ranger KMS with Key Trustee Server configuration settings
Verify the following:
  • The cluster in which Cloudera Manager and the Cloudera Ranger service is installed, is up and running.
  • The Cloudera Manager host has access to your internal repository hosting the Key Trustee Server (KTS) software.
  • Communication through secure connections is enabled with the Transport Layer Security (TLS) protocol and your network authentication is enabled with the Kerberos protocol.
  1. In a supported web browser on the cluster in which the Ranger service is installed, log in to Cloudera Manager as a user with full administrative privileges.
  2. From the Cloudera Manager navigation side-bar, select Administration > Security.
  3. On the Security Status page, click Set up HDFS Data At Rest Encryption.
  4. In the Set up HDFS Data At Rest Encryption page, select the Ranger Key Management Service backed by Key Trustee Server option.
    A list of tasks are displayed at the bottom of the page. To successfully set up HDFS Data at Rest encryption, these tasks must be completed.
  5. To set up HDFS Encryption, follow the instructions as described below for each of the Set up HDFS Data At Rest Encryption Wizard's steps.

Adding an External Dedicated Cluster for the Key Trustee Server Service

The Set up HDFS Data At Rest Encryption wizard's installation step adds a dedicated cluster for the Key Trustee Server (KTS) service.

Describes the steps that add a dedicated cluster for the Key Trustee Server service, which sets up the Cloudera Manager agent and Key Trustee Server parcel and creates a new cluster specifically for the Key Trustee Server hosts. Isolating the Key Trustee Server host from other services adds another layer of security.

  1. From the Step column in the Set up HDFS Data at Rest Encryption for Cluster page, click Add a dedicated cluster for the Key Trustee Servers.
    The Add a dedicated cluster for the Key Trustee Servers Wizard opens.
  2. In the Getting Started page, verify that the Enable High Availability check box is selected and then click Continue.
    The Specify Host page opens.
  3. In the Hostname field of the Specify Host page, enter the fully qualified domain name (FQDN) of the host on which the Key Trustee Server is to be installed.
  4. Click Search.
  5. Depending on your Key Trustee Server requirements, select one or multiple host check boxes and then click Continue.
    The Select Repository page opens.
  6. In the Select Repository page, select the required repository option and in the text field, enter the full path to its location.
  7. Click Continue.
    The Select JDK page opens.
  8. In the Select JDK page, select the required JDK option and then click Continue.
    The Enter Login Credentials page opens.
  9. In the Enter Login Credentials page, select a secure user option and an authentication method. In the Password field, enter the secure user's password and then click Continue.
    The Install Agents page and opens.
  10. Monitor the installation of the Agents and Parcels and when completed successfully, click Continue.
    The Summary page opens.
  11. In the Summary page, click Finish, which returns you to the Set up HDFS Data at Rest Encryption for Cluster page.
Follow the steps to add the Key Trustee Server Service.

Installing the Key Trustee Server to the Dedicated Cluster

The Set up HDFS Data At Rest Encryption wizard's installation step adds the Key Trustee Server service to dedicated cluster created in the previous step.

Describes the steps that add the Key Trustee Server service, which enables you to select each Active and Passive Key Trustee Servers for HA, synchronizes the server's Private Keys, and starts them.

The Active Key Trustee Server host is the primary server and the Passive Key Trustee Server host is the backup server that takes over when the primary server disconnects or fails. The primary and backup combination provides a highly-available and continuous operation.

  1. From the Step column in the Set up HDFS Data at Rest Encryption for Cluster page, click Add Key Trustee Server Service.
    The Add Key Trustee Server Service to Key Trustee Server Cluster Wizard opens.
  2. In the Getting Started page, verify that you understand that the Key Trustee Server service is not added to a cluster with existing services by selecting the I understand the risks. Let me proceed. check box and then click Continue.
    The Assign Roles page opens.
  3. In the Assign Roles page, verify that the hostname is the required server for the Active Key Trustee Server role by clicking inside the Active Key Trustee Server field. By default,this field is populated with the Active Key Trustee Server name.
    The Hosts Selected page opens.
  4. In the Hosts Selected page, scroll down and from the Hostname column, locate the Active hostname that was selected by the Wizard. Notice in the Added Roles column the Key Trustee Server Active Key Trustee Server (AK...) role icon. This role is added during the installation.
  5. Do one of the following:
    • If the pre-selected host is correct, confirm the Wizard's choice by clicking OK.
    • If the pre-selected host is incorrect, deselect the check box of the Wizard's choice, select the hostname check box of the required Active server, and then click OK.
  6. Back in the Assign Roles page, click inside the Passive Key Trustee Server field.
    The Hosts Selected page opens.
  7. In the Hosts Selected page, scroll down and from the Hostname column, locate and select the required Passive hostname check box. Notice in the Added Roles column the Key Trustee Server Passive Key Trustee Server (PK...) role icon. This role is added during the installation.
  8. Click OK, which takes you back to the Assign Roles page.
  9. (Optional) If you require multiple Key Trustee Server services, select the Active and Passive hostname check box for each server where a Key Trustee Server service is to be installed.
  10. Click Continue.
    The Setup Entropy page opens, which displays a list of commands that determine if the available entropy on the Key Trustee Server service is low and provides instructions and commands for installing an entropy generator that increases the entropy for cryptographic operations.
  11. In a terminal, determine the amount of available entropy on your target machines, by entering the following:
    ssh root@Active_FQDN
    cat /proc/sys/kernel/random/entropy_avail
    

    Where, Active_FQDN is the fully qualified domain name of the Active host.

    If the result is below 500, consider installing an entropy generator, such as the rng-tools utilities. Before proceeding, consult the security policies, procedures, and practices in your organization.
  12. If you require the rng-tools utilities, do the following:
    1. To install the rng-tools utility, in a terminal, enter one of the following:
      • For Centos/RHEL 6, 7+ systems, enter:
        yum install rng-tools
      • For Debian systems, enter:
        apt-qet install rng-tools
      • For SLES systems, enter:
        zypper install rng-tools
    2. Enable the rng-tools utility, by entering one of the following:
      • For Centos/RHEL 6, Debian and SLES systems, enter:
        echo 'EXTRAOPTIONS="-r /dev/urandom"' >> /etc/sysconfig/rngd
        service rngd start
        chkconfig rngd on
        cat /proc/sys/kernel/random/entropy_avail
        
      • For For Centos/RHEL 7+ systems, enter:
        cat /proc/sys/kernel/random/entropy_avail
        cp /usr/lib/systemd/system/rngd.service/etc/systemd/system/
        sed -i -e 's/ExecStart=\/sbin\/rngd -f/ExecStart=\/sbin\/rngd -f -r /dev\/urandom/' /etc/systemd/system/rngd.service
        systemctl daemon-reload
        systemctl start rngd
        systemctl status rngd
        # if the status command returns the service is loaded and enabled, skip the following step
        systemctl enable rngd
        
  13. When completed, click Continue.
    The Synchronize Active and Passive Key Trustee Server Private Keys page opens, which displays a list of instructions and commands for initializing and generating a private key that will be used by both the Active and Passive Key Trustee Server service.
  14. In a terminal, initialize the Active Key Trustee Server and generate the private key, by entering the following commands:
    ssh root@Active_FQDN
    ktadmin init

    Where, Active_FQDN is the fully qualified domain name of the Active host.

  15. Copy the Active Key Trustee Server private key to the Passive Key Trustee Server by doing one of the following:
    • For production environments, Cloudera recommends transferring the private key using offline media, such as a removable USB drive.
    • For environments where maximum security is not required, such as testing or development, you can copy the private key over the network using the rsync command:
      rsync -zav --exclude .ssl /var/lib/keytrustee/.keytrustee Passive_FQDN:/var/lib/keytrustee/
  16. In a terminal, initialize the Passive Key Trustee Server with the private key generated previously, by entering the following:
    ssh root@Passive_FQDN
    ktadmin init
  17. Verify that the Active and Passive ktadmin commands output the same initialized directory.
  18. When completed, select the I have synchronized the private keys check box and click Continue.
    The Setup TLS for Key Trustee Server page opens, which displays a list of instructions for generating CA-signed certificates.
  19. Follow the instructions and perform the required steps. When completed, click Continue.
    The Review Changes page opens.
  20. Review the settings and make any required changes before clicking Continue.
    Table 1. TLS/SSL Settings
    Property Default value Description

    Database Storage Directory

    db_root

    /var/lib/keytrustee/db The directory on the local filesystem where the Key Trustee Server database is stored.

    Active Key Trustee Server TLS/SSL Server Private Key File (PEM Format)

    sll.privatekey.location

    /var/lib/keytrustee/.keytrustee/.ssl/ssl-cert-keytrustee-pk.pem

    The path to the Active Key Trustee Server TLS certificate's private key, which must be in the PEM format.

    • To use the Cloudera auto-generated private key, do nothing.
    • To use your company's Certificate Authority (CA) signed certificate, enter the path to its location.

    Active Key Trustee Server TLS/SSL Server Certificate File (PEM Format)

    ssl.cert.location

    /var/lib/keytrustee/.keytrustee/.ssl/ssl-cert-keytrustee.pem

    The path to the Active Key Trustee Server TLS certificate, which must be in the PEM format.

    • To use the Cloudera auto-generated private key, do nothing.
    • To use your company's CA-signed certificate, enter the path to its location.

    Active Key Trustee Server TLS/SSL Server CA Certificate (PEM Format)

    ssl.cacert.location

    none

    The path to the file that contains the CA certificate, if applicable, its intermediate certificates, and the SSL/TLS Certificate, which are used to sign the Active Key Trustee Server certificate and enable the receiver to verify that the sender and all CA's are trustworthy. The file must be in the PEM format.

    Enter path to the location of the CA certificate chain.

    Active Key Trustee Server TLS/SSL Private Key Password

    ssl.privatekey.password

    none

    The password for the Active Key Trustee Server private key's file.

    If the file is not password-protected, leave this field blank.

    Passive Key Trustee Server TLS/SSL Server Private Key File (PEM Format)

    ssl.privatekey.location

    /var/lib/keytrustee/.keytrustee/.ssl/ssl-cert-keytrustee-pk.pem

    The path to the Passive Key Trustee Server TLS certificate's private key, which must be in the PEM format.

    • To use the Cloudera auto-generated private key, do nothing.
    • To use your company's CA-signed certificate, enter the path to its location.

    Passive Key Trustee Server TLS/SSL Server Certificate File (PEM Format)

    ssl.cert.location

    /var/lib/keytrustee/.keytrustee/.ssl/ssl-cert-keytrustee.pem

    The path to the Passive Key Trustee Server TLS certificate, which must be in the PEM format.

    • To use the Cloudera auto-generated private key, do nothing.
    • To use your company's CA-signed certificate, enter the path to its location.

    Passive Key Trustee Server TLS/SSL Server CA Certificate (PEM Format)

    ssl.cacert.location

    none

    The path to the file that contains the CA certificate, if applicable, its intermediate certificates, and the SSL/TLS Certificate, which are used to sign the Passive Key Trustee Server certificate and enable the receiver to verify that the sender and all CA's are trustworthy. The file must be in the PEM format.

    Enter path to the location of the CA certificate chain.

    Passive Key Trustee Server TLS/SSL Private Key Password

    ssl.privatekey.password

    none

    The password for the Passive Key Trustee Server private key's file.

    If the file is not password-protected, leave this field blank.

  21. In the Command Details page, monitor the installation of the Key Trustee Server service. When the Status displays Finished the Key Trustee Server service is installed and tested on the dedicated cluster created in the previous step.
  22. Click Continue.
    The Summary page opens.
  23. Click Finish, which returns you to the Set up HDFS Data at Rest Encryption for Cluster page.
Follow the steps to add the Ranger KMS with Key Trustee Server service.

Installing the Ranger KMS with Key Trustee Server Service

The Set up HDFS Data At Rest Encryption wizard's installation step adds the Ranger KMS with Key Trustee Server service.

Describes the steps that add the Ranger KMS with KTS service, which enables the HDFS encryption to use the Key Trustee Server for cryptographic key management.

  1. From the Step column in the Set up HDFS Data at Rest Encryption for Cluster page, click Add Ranger KMS with Key Trustee Server Service.
    The Add Ranger KMS with Key Trustee Server Service Wizard opens.
  2. In the Getting Started page, verify that the hostnames are the required Key Trustee Server service's Active and Passive hosts that you previously set up. By default, the Key Trustee Server fields are populated by the Wizard.
    If you have an existing Key Trustee Server pair outside of the Cloudera Manager's control, in the External Key Trustee Server field, enter the fully-qualified domain names (FQDNs) of the Active and Passive hosts.
  3. Click Continue.
    The Assign Roles page opens.
  4. In the Assign Roles page, verify that the hostname is the required server for the Ranger KMS with KTS service role by clicking inside the Ranger KMS Server with KTS field. By default, this field is populated by the Wizard.
    The Hosts Selected page opens.
  5. In the Hosts Selected page, scroll down and from the Hostname column, locate the hostname that was selected by the Wizard. Notice in the Added Roles column, the Ranger KMS with Key Trustee Server Ranger KMS Server with KTS (RK...) role icon. This role is added during the installation.
  6. Do one of the following:
    • If the pre-selected host is correct, confirm the Wizard's choice by clicking OK.
    • If the pre-selected host is incorrect, deselect the check box of the Wizard's choice, select the hostname check box of the required server, and then click OK.
  7. Back in the Assign Roles page, click Continue.
    The Setup Entropy page opens, which displays a list of commands that determine if the available entropy on the Key Trustee Server service is low and provides instructions and commands for installing an entropy generator that increases the entropy for cryptographic operations.
  8. In a terminal, determine the amount of available entropy on your target machines, by entering the following:
    ssh root@Active_FQDN
    cat /proc/sys/kernel/random/entropy_avail
    

    Where, Active_FQDN is the fully qualified domain name of the Active host.

    If the result is below 500, consider installing an entropy generator, such as the rng-tools utilities. Before proceeding, consult the security policies, procedures, and practices in your organization.
  9. If you require the rng-tools utilities, do the following:
    1. To install the rng-tools utility, in a terminal, enter one of the following:
      • For Centos/RHEL 6, 7+ systems, enter:
        yum install rng-tools
      • For Debian systems, enter:
        apt-qet install rng-tools
      • For SLES systems, enter:
        zypper install rng-tools
    2. Enable the rng-tools utility, by entering one of the following:
      • For Centos/RHEL 6, Debian and SLES systems, enter:
        echo 'EXTRAOPTIONS="-r /dev/urandom"' >> /etc/sysconfig/rngd
        service rngd start
        chkconfig rngd on
        cat /proc/sys/kernel/random/entropy_avail
        
      • For For Centos/RHEL 7+ systems, enter:
        cat /proc/sys/kernel/random/entropy_avail
        cp /usr/lib/systemd/system/rngd.service/etc/systemd/system/
        sed -i -e 's/ExecStart=\/sbin\/rngd -f/ExecStart=\/sbin\/rngd -f -r /dev\/urandom/' /etc/systemd/system/rngd.service
        systemctl daemon-reload
        systemctl start rngd
        systemctl status rngd
        # if the status command returns the service is loaded and enabled, skip the following step
        systemctl enable rngd
        
  10. When completed, click Continue.
    The Setup Authorization Secret page opens, which displays a list of instructions and commands for naming an organization and retrieving the secret authentication code that is required to register with the Key Trustee Server.
  11. In the Org Name field, enter a name for the organization and then click Generate Instruction.
    A list of commands are generated and displayed.
  12. Open a terminal and run the displayed commands.
  13. From the terminal output, copy the auth_secret value into the displayed text field and click Continue.
    The Setup TLS for Ranger KMS with Key Trustee Server page opens, which provides high-level instructions for where TLS communication must be enabled.
  14. Read and take note of the provided information and then click Continue.
    The Review Changes page opens.
  15. Review the settings and make any required changes before clicking Continue.
  16. In the Command Details page, monitor the installation of the Ranger KMS with KTS service. When the Status displays Finished the Ranger KMS with KTS service is installed and tested.
  17. Click Continue.
    The Synchronized Private Keys and HDFS Dependency page opens, which provides instructions for copying the private key from one Key Management Server Proxy role to all other roles.
  18. Follow the instructions and perform the required steps. When completed, select the I have synchronized the private keys check box and click Continue.
    The Summary page opens.
  19. Click Finish, which returns you to the Set up HDFS Data at Rest Encryption for Cluster page.
  20. (Optional) Verify that the Ranger KMS with Key Trustee Server service appears in the Cloudera Manager Clusters components list and that the service has been started.
    If the Ranger KMS with Key Trustee Server service was not started by the installation wizard, do the following:
    1. Go to Cloudera Manager's Home page by clicking the Cloudera Manager icon.
    2. In the Cloudera Manager Clusters components list, locate and click Ranger KMS with Key Trustee Server.
    3. From the Actions menu, click Start.
Adding Ranger KMS to a cluster triggers additional property updates for other services. Cloudera Manager may flag these with stale configuration warnings. Restart the stale services and redeploy the client configuration.

Restarting the Stale Services and Redeploying the Client Configuration

The Set up HDFS Data At Rest Encryption wizard's step for restarting stale services and redeploying the client configuration.

Describes the steps that restart stale services after installing the Data-at-Rest HDFS Ranger KMS service option on your cluster.

  1. From the Step column in the Set up HDFS Data at Rest Encryption for Cluster page, click Restart stale services and redeploy client configuration..
    The Stale Configurations page opens.
  2. Click Restart Stale Services.
    The restart Stale Services page opens.
  3. Verify that the Re-deploy client configuration check box is selected and click Restart Now.
  4. In the Command Details page, monitor the restart process. When the Status displays Finished, click Continue, which returns you to the Set up HDFS Data at Rest Encryption for Cluster page.
Validate that the Data-at-Rest HDFS Ranger KMS service option can successfully encrypt your data to-and-from HDFS.

Validating Data Encryption to-and-from HDFS

The Set up HDFS Data At Rest Encryption wizard's step for validating the data encryption to-and-from HDFS.

Describes the steps which verify that the Data-at-Rest HDFS Ranger KMS service option can successfully encrypt your data to-and-from HDFS.

  1. From the Step column in the Set up HDFS Data at Rest Encryption for Cluster page, click Validate Data Encryption.
    The Validate Data Encryption page opens, which displays a list of commands and instructions for creating an encryption zone and adding data.
  2. In a terminal, log in to one of the hosts in your cluster and run each of the following commands:
    1. Create a key and directory by entering the following:
      kinit KEY_ADMIN_USER 
      hadoop key create mykey1 
      hadoop fs -mkdir /tmp/zonel
      Where, KEY_ADMIN_USER is the key administrator whose role can perform the following actions:
      • Configure HDFS encryption, administer Key Trustee Server, and manage encryption keys
      • Start, stop, and restart Ranger KMS
      • Configure Ranger KMS Policies
      • View configuration and monitoring information in Cloudera Manager
      • View service and monitoring information
      • View events and logs
      • View Replication jobs and snapshot policies
      • View YARN applications and Impala queries
    2. Create a zone and link to the key, by entering the following:
      kinit hdfs hdfs 
      crypto -createZone -keyName mykey1 -path /tmp/zone1 
    3. Create a file, put it in your zone, and verify that the file can be decrypted, by entering the following:
      kinit KEY ADMIN_USER
      echo "Hello World" > /tmp/helloWorld.txt
      hadoop fs -put /tmp/helloWorld.txt /tmp/zone1
      hadoop fs -cat /tmp/zonel/helloWorld.txt
      rm /tmp/helloWorld.txt
      
    4. Verify that the stored file is encrypted, by entering the following:
      kinit hdfs
      hadoop fs -cat /.reserved/raw/tmp/zonel/helloWorld.txt
      hadoop fs -rm -R / tmp/zone1
      
  3. When completed, click Close, which returns you to the Set up HDFS Data at Rest Encryption for Cluster page.

Post-Tasks for the Data-at-Rest HDFS Ranger KMS Service

The post-tasks that you must perform after you have set up the Data-at-Rest HDFS Ranger KMS service option.

Describes the post-task steps.

Depending on which Data-at-Rest HDFS Ranger KMS service option was set up, two or more of the following post-tasks must be completed:
  • Update the Data-at-Rest HDFS Ranger KMS service's URL
  • Create a Ranger Audit Directory
  • (Ranger KMS with Key Trustee Server service only) Update the Authentication Properties and KMS Hadoop cache settings
  1. Update the Data-at-Rest HDFS Ranger KMS service's URL by doing the following:
    1. In the Cloudera Manager Clusters components list, locate and click the Ranger service.
    2. Log in to the Ranger Web UI as the Ranger KMS user, whose default user name credential is keyadmin and default password is admin123.
    3. In the cm_kms service, click the Edit icon and update the KMS URL field value as follows:
      1. In the KMS URL field, enter the URL value using the following syntax:

        kms://http@kms_host1;http@:kms_host2:kms_port/kms

        Where,
        • kms_host is the host where either the Ranger KMS with Key Trustee Server or the Ranger KMS backed by a database is installed.
        • kms_port is the port number. By default, this is 9292. For example,

          kms://http@kms_host1;http@:kms_host2:9292/kms

      2. To confirm your URL setting, click Test Connection.
      3. Click Save.
  2. Create a Ranger Audit Directory by doing the following:
    1. Depending on which Data-at-Rest HDFS Ranger KMS service you set up, in the Cloudera Manager Clusters components list, locate and click either the Ranger KMS with Key Trustee Server service or the Ranger KMS service.
    2. From the Actions menu, click Create Ranger Plugin Audit Directory.
    3. When the Create Ranger Plugin Audit Directory message appears, confirm its creation by clicking Create Ranger Plugin Audit Directory.
    4. Monitor the creation process. When the Status displays Finished, click Close.

Updating the Ranger KMS with KTS Service Configuration Properties

Describes the authentication and other property settings that you update after you have set up the Ranger KMS backed with a Key Trustee Server and HA service.

Describes the steps that update the Ranger KMS with Key Trustee Server service's authentication and KMS Hadoop cache settings.

  1. In the Cloudera Manager Clusters components list, locate and click the Ranger KMS with Key Trustee Server service.
  2. From the Ranger KMS with Key Trustee Server services page, select the Configuration tab.
  3. In the Search field, enter Ranger KMS Server with KTS Advanced Configuration Snippet (Safety Valve) for conf/kms-site.xml.
  4. Create a new property value by clicking the Add (+) icon and then depending on your requirements, do one or more of the following:
    • To override the ZooKeeper connection string's default value:
      1. In the Name field, enter hadoop.kms.authentication.zk-dt-secret-manager.zkConnectionString
      2. In the Value field, enter zookeeper_hostname:2181
      3. Click Save Changes.
    • To override the ZooKeeper path's default value:
      1. Create a new property value by clicking the Add (+) icon.
      2. In the Name field, enter hadoop.kms.authentication.zk-dt-secret-manager.znodeWorkingPath
      3. In the Value field, enter the znode_working path. To avoid collision do not use /zkdtsm.
        Example: hadoop.kms.authentication.zk-dt-secret-manager.znodeWorkingPath = testzkkms
      4. Click Save Changes.
    • To override the ZooKeeper authentication type:
      1. Create a new property value by clicking the Add (+) icon.
      2. In the Name field, enter hadoop.kms.authentication.zk-dt-secret-manager.zkAuthType
      3. In the Value field, enter sasl.

        By default the value is none, which gives all the permissions to the default node created in ZooKeeper. Cloudera recommends using the Simple Authentication and Security Layer (SASL) protocol.

      4. If you set SASL as the hadoop ZooKeeper authentication value then you must also set the Kerberos authentication by creating a new property value. In the Name field, enter Kerberos hadoop.kms.authentication.zk-dt-secret-manager.kerberos.keytab and in the Value field, enter {{CMF_CONF_DIR}}/ranger_kms_kts.keytab.
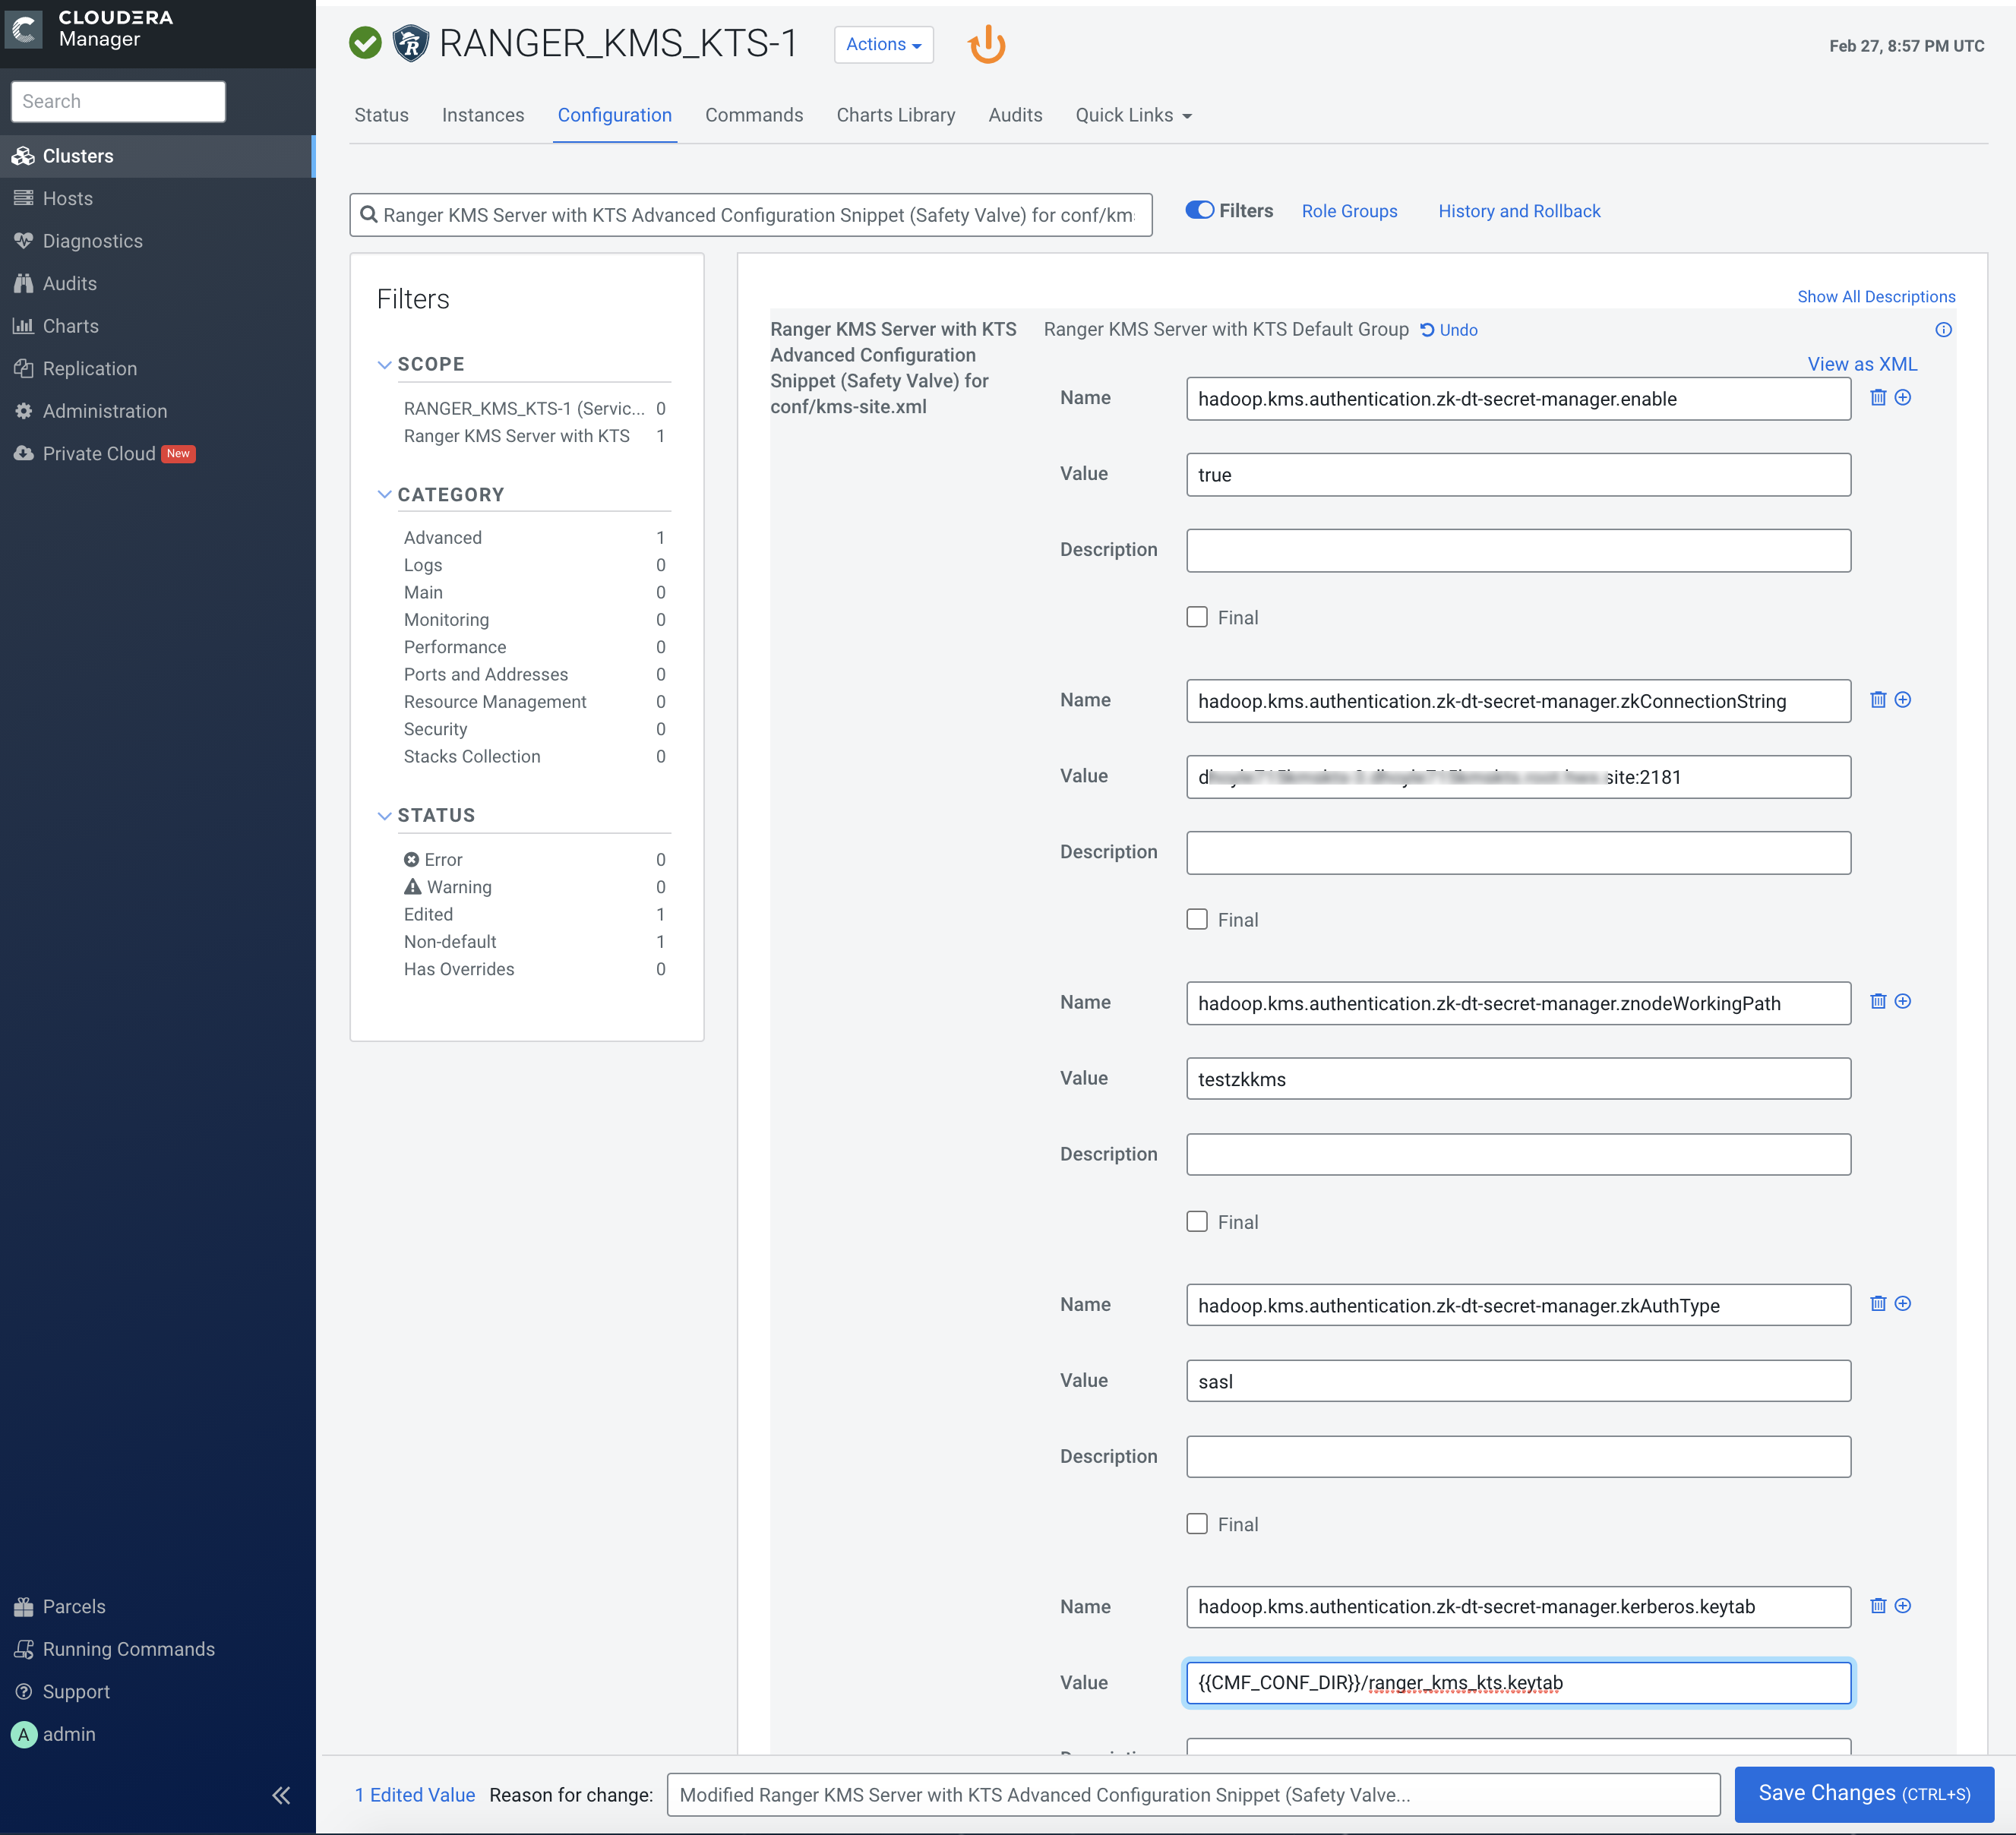
      5. Click Save Changes.
  5. In the Search field, enter Hadoop KMS Authentication Signer Secret Provider Zookeeper Auth Type and in the property select the sasl option.
  6. Click Save Changes.
  7. In the Search field, enter Hadoop KMS Cache Enable and verify that the Ranger KMS Server Default Group check box is selected.
  8. Click the Stale Configuration Restart icon and then on the Stale Configurations page, click Restart Stale Services.
  9. On the Restart Stale Services page, verify that the Re-deploy client configuration check box is selected and then click Restart Now.
  10. In the Command Details page, monitor the restart process. When the Status displays Finished, click Finish.