Configuring a resource-based policy using Ranger
Using Ranger, you can setup new Ozone policies that will help you to set right access permissions to various Ozone objects like volumes and buckets.
Cloudera recommends you to create permissions at the Ranger Service Manager, and to have restrictive permissions at the Ozone level.
- On the Service Manager page, select an existing Ozone service. The List of Policies page appears.
-
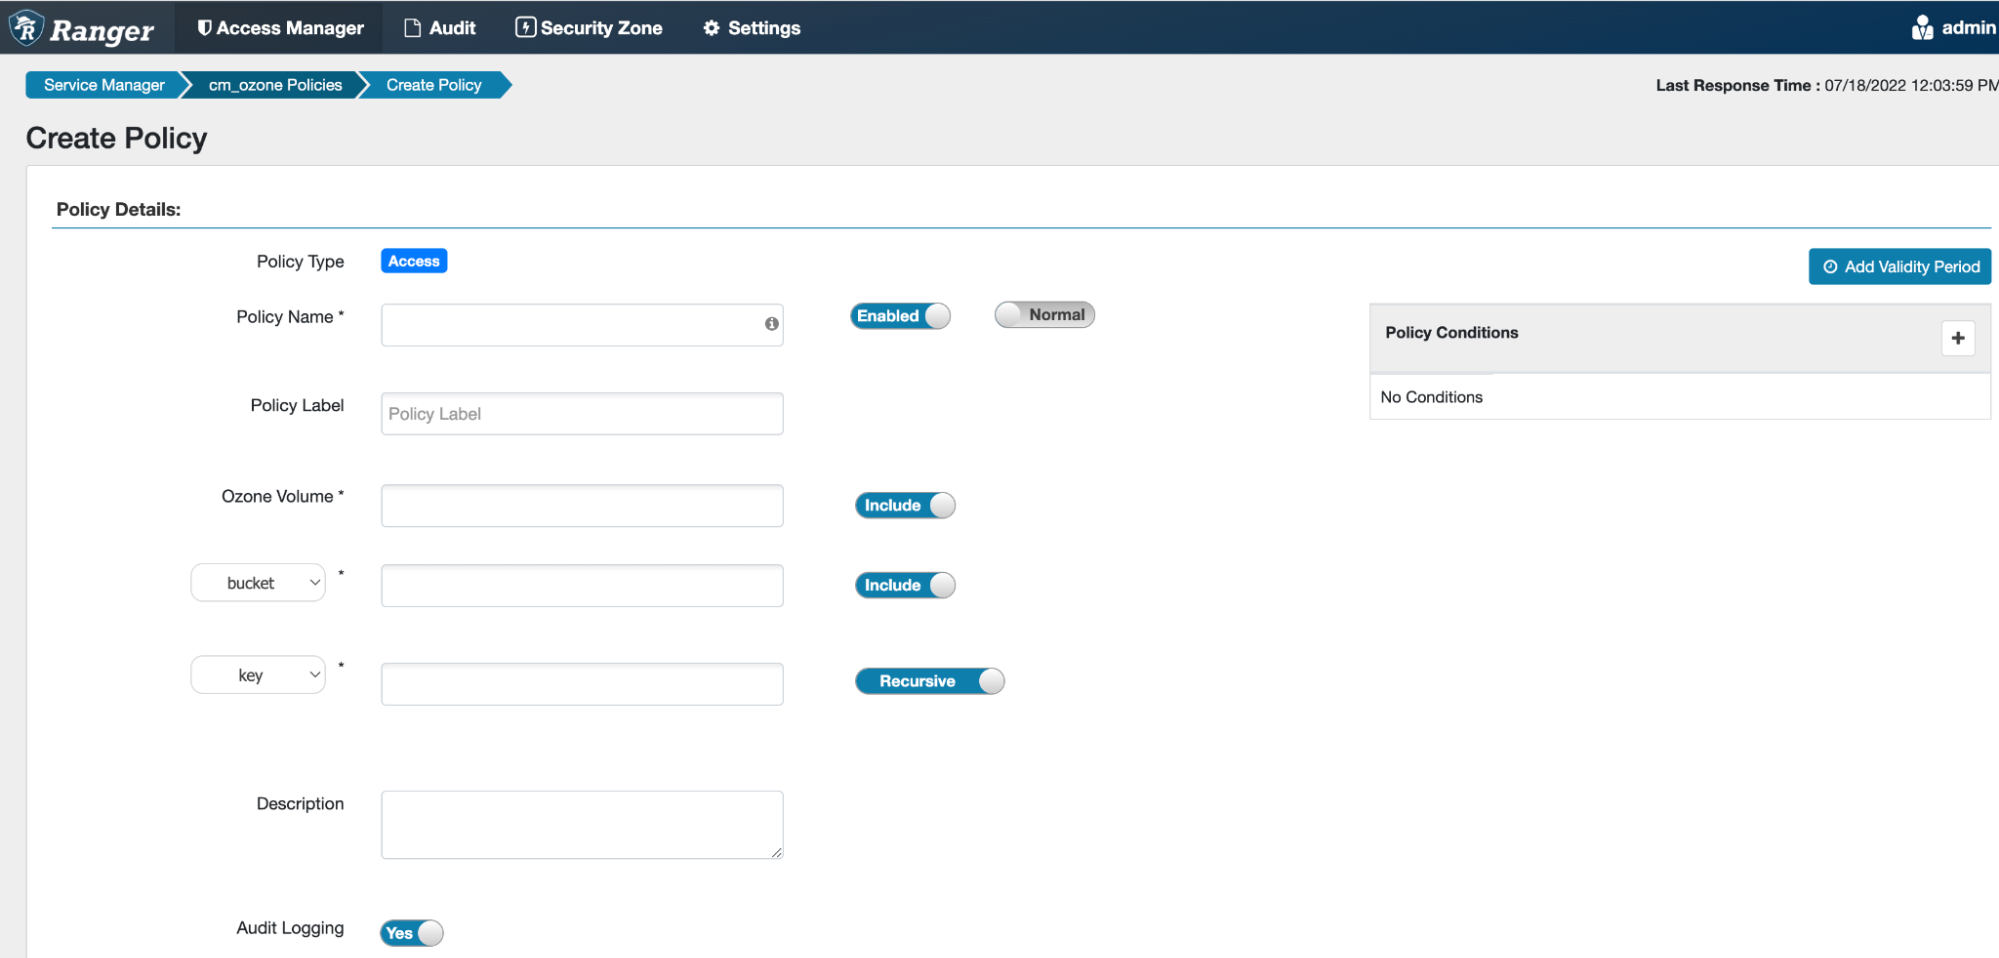
Click Add New Policy. The Create
Policy page appears.
-
Complete the Create Policy page as follows:
Field Description Policy Name Enter a unique name for this policy. The name cannot be duplicated anywhere in the system.
Normal or Override
Enables you to specify an override policy. When override is selected, the access permissions in the policy override the access permissions in existing policies. This feature can be used with Add Validity Period to create temporary access policies that override existing policies.
Add Validity Period
Specify a start and end time for the policy.
Policy Label (Optional) Specify a label for this policy. You can search reports and filter policies based on these labels. Ozone Volume
Specify volumes that can be accessed. Ensure that the Ozone volume key is set to Include.
If you want to deny access at the volume level, then disable this option by turning off using the Ozone Volume key to Exclude.
Bucket Specify buckets that can be accessed. Ensure that the Ozone Bucket key is set to Include.
If you want to deny access at the bucket level, then disable this option by turning off using the bucket key. Or, select None from the Bucket drop-down.
Key Provide the Key
Recursive or Non Recursive Recursive or Non recursive function
Description (Optional) Describe the purpose of the policy.
Audit Logging Specify whether this policy is audited. To disable auditing, turn off the Audit Logging key.
-
Allow Conditions
Label Description Select Role
Specify the roles to which this policy applies.
To designate a role as an Administrator, select the Delegate Admin check box. Administrators can edit or delete the policy, and can also create child policies based on the original policy.
Select Group Specify the groups to which this policy applies.
To designate a group as an Administrator, select the Delegate Admin check box. Administrators can edit or delete the policy, and can also create child policies based on the original policy.
The public group contains all users, so granting access to the public group grants access to all users.
Select User Specify the users to which this policy applies.
To designate a user as an Administrator, select the Delegate Admin check box. Administrators can edit or delete the policy, and can also create child policies based on the original policy.
Policy Conditions Provide the IP address range
Permissions Add or edit permissions: All, Read, Write,, Create, List, Delete, Read_ACL, Write_ACL, Select/Deselect All.
Delegate Admin You can use Delegate Admin to assign administrator privileges to the roles, groups, or users specified in the policy. Administrators can edit or delete the policy, and can also create child policies based on the original policy.
- You can use the Deny All Other Accesses toggle key to deny access to all other users, groups, and roles other than those specified in the allow conditions for the policy.
-
If you wish to deny access to a few or specific users, groups, or roles, then
use must set Deny Conditions.
You can use the Plus (+) symbol to add deny conditions. Conditions are evaluated in the order listed in the policy. The condition at the top of the list is applied first, then the second, then the third, and so on. Similarly, you can also exclude certain Deny Conditions by adding them to the Exclude from Deny Conditions list.
- Click Add.