Use case 3: Enabling Auto-TLS with Existing Certificates
You can manually generate the certificates signed by an existing Root CA and upload them to Cloudera Manager
- Create the Auto-TLS directory /opt/cloudera/AutoTLS in the Cloudera Manager server. The directory must be owned by the cloudera-scm user.
- Create a public/private key for each host and generate the corresponding Certificate
Signing request (CSR). Have these CSRs signed by the company’s Certificate Authority (CA).
You can generate private keys and CSRs by using your existing PKI tools and processes, or
manually with common utilities like keytool or openssl. In this example using openssl, the
private key and CSR files are located under the /tmp/auto-tls directory. The password used
for the private key is stored in key.pwd.
The same procedure is used for all cluster hosts.openssl req -newkey rsa:4096 -sha256 -days 365 \ -keyout /tmp/auto-tls/keys/host1.example.com-key.pem \ -out /tmp/auto-tls/host1.example.com.csr \ -passout file:/tmp/auto-tls/keys/key.pwd \ -subj '/CN=host1.example.com, O=Cloudera Test, C=US' \ -extensions san -config <( echo '[req]'; echo 'distinguished_name=req'; echo 'req_extensions=san';echo '[san]'; echo 'subjectAltName=DNS:host1.example.com DNS:loadbalancer.example.com') - Prepare all the certificates signed by the company’s CA on the Cloudera Manager server. In this example, all the certificates are located under the /tmp/auto-tls directory. The password used for keystore and truststore are present in key.pwd and truststore.pwd files respectively.
- Set the ownership of the /tmp/auto-tls directory to cloudera-scm.
chown --recursive cloudera-scm:cloudera-scm /tmp/auto-tls - Refer the following example API. Customize this API to match the deployment that is set
up and then run the API.
The following section explains each of the API call in detail:curl -i -v -uadmin:admin -X POST --header 'Content-Type: application/json' --header 'Accept: application/json' -d '{ "location" : "/opt/cloudera/AutoTLS", "customCA" : true, "interpretAsFilenames" : true, "cmHostCert" : "/tmp/auto-tls/certs/<CM_FQDN>.pem", "cmHostKey" : "/tmp/auto-tls/keys/<CM_FQDN>-key.pem", "caCert" : "/tmp/auto-tls/ca-certs/cfssl-chain-truststore.pem", "keystorePasswd" : "/tmp/auto-tls/keys/key.pwd", "truststorePasswd" : "/tmp/auto-tls/ca-certs/truststore.pwd", "trustedCaCerts" : "/tmp/auto-tls/ca-certs.pem", "hostCerts" : [ { "hostname" : "<NODE1_FQDN>", "certificate" : "/tmp/auto-tls/certs/<NODE1_FQDN>.pem", "key" : "/tmp/auto-tls/keys/<NODE1_FQDN>-key.pem" }, { "hostname" : "<NODE2_FQDN>", "certificate" : "/tmp/auto-tls/certs/<NODE2_FQDN>.pem", "key" : "/tmp/auto-tls/keys/<NODE2_FQDN>-key.pem" }, { "hostname" : "<NODE3_FQDN>", "certificate" : "/tmp/auto-tls/certs/<NODE3_FQDN>", "key" : "/tmp/auto-tls/keys/<NODE3_FQDN>.pem" } ], "configureAllServices" : "true", "sshPort" : 22, "userName" : "root", "password" : "cloudera" }' '<http://<CM_FQDN>>:7180/api/v41/cm/commands/generateCmca'-
curl -i -v -uadmin:admin -X POST --header 'Content-Type: application/json' --header 'Accept: application/json' -d 'Curl command, -d indicates the beginning of content
-
"location" : "/opt/cloudera/AutoTLS",Set a location that cloudera-scm can access and does not already exist (to avoid known issues with picking up old truststores)
-
"customCA" : true,
"interpretAsFilenames" : true,
Setting customCA to false will run AutoTLS use case 1 (CMCA) instead, and does not need to specify any keys, certs or related values
-
"cmHostCert" : "/tmp/auto-tls/certs/ccycloud-7.vcdp71.root.hwx.site.pem",The CM host can also be a host in the cluster, so these files will likely need to be referenced again in the hostCerts section. We begin providing the Cert(tificate) and Key for the CM host and other nodes. The certificate is the just the host's signed cert (not a chain)
-
"cmHostKey" : "/tmp/auto-tls/keys/ccycloud-7.vcdp71.root.hwx.site-key.pem",The key is created initially for hosts along with the CSR. Do not be confused by .key, .crt, .pem suffixes, they are all PEM files.
-
"caCert" : "/tmp/auto-tls/ca-certs/cfssl-chain-truststore.pem",This is the Certificate Authority Certificate Chain, which means that if there are any intermediate CAs, they must be included here and in a certain order, which I will express with this command, cat inter[n] rootca > cfssl-chain-truststore.pem.
-
"keystorePasswd" : "/tmp/auto-tls/keys/key.pwd",The keystore and truststore do not exist yet, but they must be password protected. CM must be given a password to set for each of them, which is an arbitrary value (a strong password) that is stored in a file. For example,
echo strong_password
                  > /tmp/auto-tls/keys/key.pwd
The pre-existing passwords may need to be used, which can be found in the backend db, psql.\c select * from CONFIGS where attr like '%keystore_password'; select * from CONFIGS where attr like '%truststore_password';-
"truststorePasswd" : "/tmp/auto-tls/ca-certs/truststore.pwd",This one can even be set to changeit or changeme, which is default for Java Truststores (see the cacerts file) as this file can be read with or without a password
-
trustedCaCerts is completely optional and typically not used. It's a feature that allows you to let CM distribute cacerts across all nodes if they need to act as clients to other organizational CAs. You can safely omit this line:
"trustedCaCerts" : "/tmp/auto-tls/ca-certs.pem", //This is a path to a PEM file on the Cloudera Manager host which containsa list of CA certificates that should be imported into the truststores of all hosts. This is an optional field.
- This block contains the certificate and key for each host. This is where the naming
convention comes in handy to make sure the hostname matches the correct files. All
hosts must have certificate and key files provided, including the CM host if it's in
the cluster (it usually
is)
"hostCerts" : [ { "hostname" : "ccycloud-7.vcdp71.root.hwx.site", "certificate" : "/tmp/auto-tls/certs/ccycloud-7.vcdp71.root.hwx.site.pem", "key" : "/tmp/auto-tls/keys/ccycloud-7.vcdp71.root.hwx.site-key.pem" }, { "hostname" : "ccycloud-3.vcdp71.root.hwx.site", "certificate" : "/tmp/auto-tls/certs/ccycloud-3.vcdp71.root.hwx.site.pem", "key" : "/tmp/auto-tls/keys/ccycloud-3.vcdp71.root.hwx.site-key.pem" }, { "hostname" : "ccycloud-2.vcdp71.root.hwx.site", "certificate" : "/tmp/auto-tls/certs/ccycloud-3.vcdp71.root.hwx.site.pem", "key" : "/tmp/auto-tls/keys/ccycloud-3.vcdp71.root.hwx.site-key.pem" }, { "hostname" : "ccycloud-1.vcdp71.root.hwx.site", "certificate" : "/tmp/auto-tls/certs/ccycloud-1.vcdp71.root.hwx.site.pem", "key" : "/tmp/auto-tls/keys/ccycloud-1.vcdp71.root.hwx.site-key.pem" } ], -
A passwordless sudo user account that exists on all cluster hosts can be used instead of "root" if necessary
"configureAllServices" : "true", "sshPort" : 22, "userName" : "root", -
This password should not be cloudera of course, and all hosts must allow NOPASSWD sudo access to remote clients because CM cannot handle a sudo password prompt (it still requires a password for the initial ssh connection).
"password" : "cloudera" -
If a private key is used instead of a password, the "privateKey" option can be used instead of "password", it must be the entire content from the RSA key and must be in the "BEGIN RSA PRIVATE KEY" format. If you cat the key file and it has a different banner, convert to the correct one with:
ssh-keygen -p -P "" -N "" -m pem -f <key_path>The key must be on a single line and newlines represented with \n. This command shows the exact output to use as the privateKey value:awk 'NF {sub(/\r/, ""); printf "%s\\n",$0;}' <key_path>
-
Change the hostname to point to your CM host (which will need to be https and 7183 if TLS is already enabled)
If a new deployment is set up without TLS encryption, the API uses HTTP and port 7180. If you are converting the deployment to an Auto-TLS setup from an existing Manual TLS setup, the Cloudera Manager UI is converted to HTTPS. In such cases, the URL for the API calls has to be modified.
Table 1. JSON file key properties Property Data type Description customCA boolean Option to generate an internal Cloudera Manager CA (false) or use user-provided certificates (true). When set to true (user-provided certificates), the following other arguments must be given: * cmHostCert * cmHostKey * caCert * keystorePasswd * truststorePasswd cmHostCert string The certificate for the Cloudera Manager host in PEM format. Only used if customCA == true. cmHostKey string The private key for the Cloudera Manager host in PEM format. Only used if customCA == true. caCert string The certificate for the user-provided certificate authority in PEM format. Only used if customCA == true. trustedCaCerts string A list of CA certificates that will be imported into the Auto-TLS truststore and distributed to all hosts. -
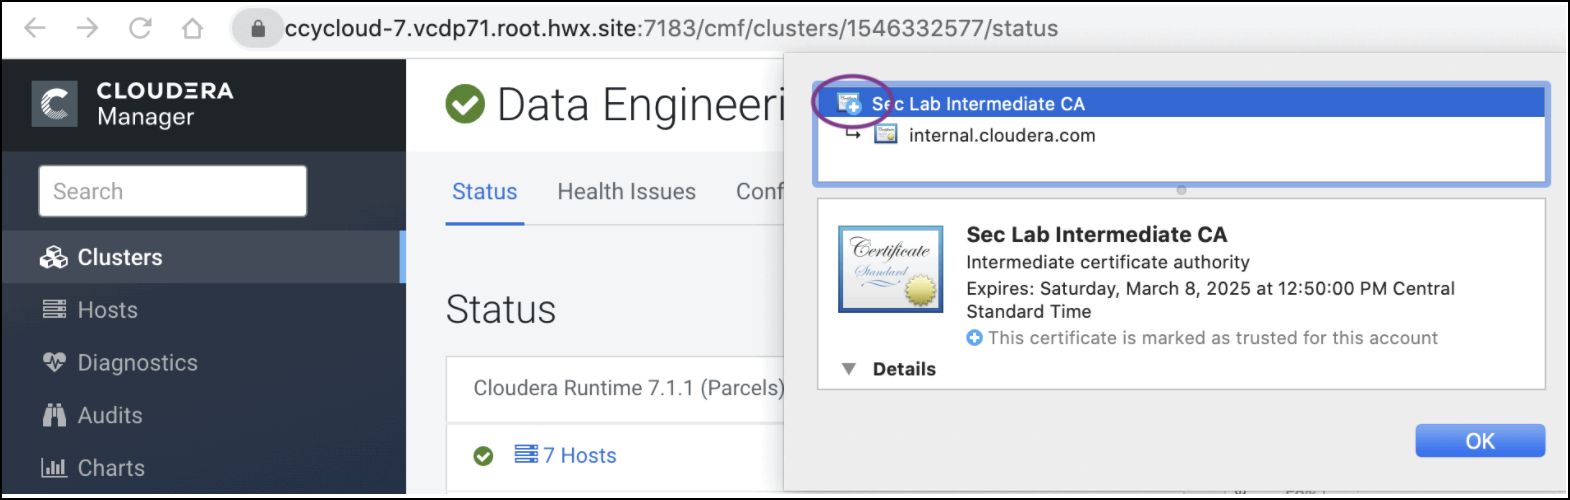
- When this API returns successfully, you should see the recent command run as
follows.

- When this API is executing you can check /var/log/cloudera-scm-server/cloudera-scm-server.log for API logs.
- Restart the Cloudera Manager service. Then restart the Cloudera Manager agents on all cluster servers.
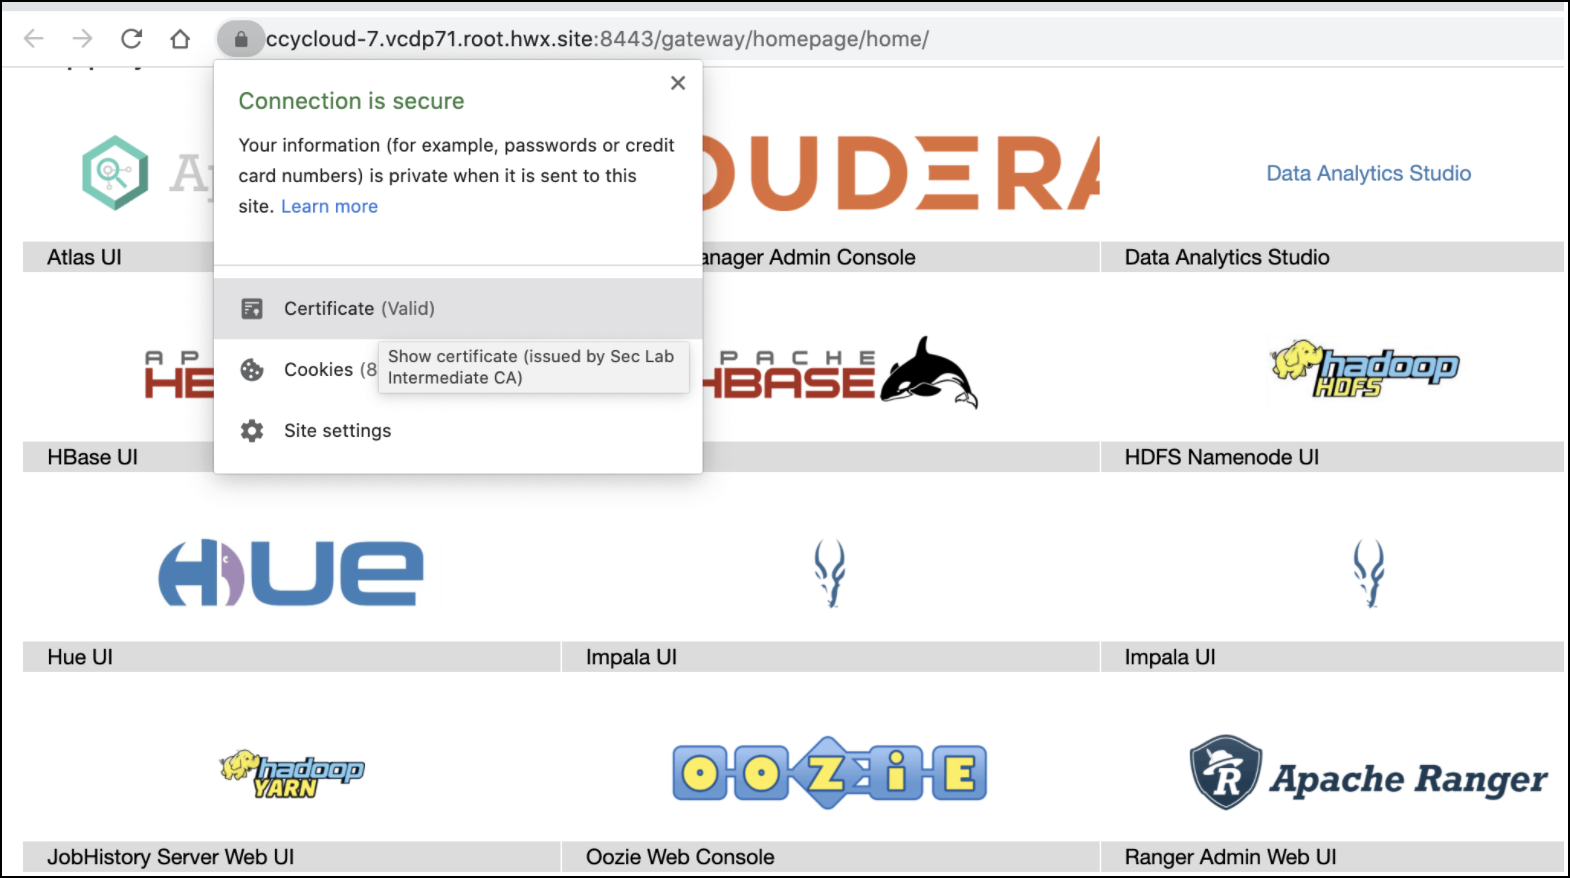
- The Cloudera Manager UI/API is now available on the TLS port. Now restart all the Cloudera Manager management services.
- Restart the Cluster services. Now all the services are configured for wire encryption.
- When adding new hosts to this cluster, the following additional steps need to be
performed to upload the CA signed host certificates to Cloudera Manager.
- The add hosts wizard will prompt the following screen with instructions to upload
the certificates.
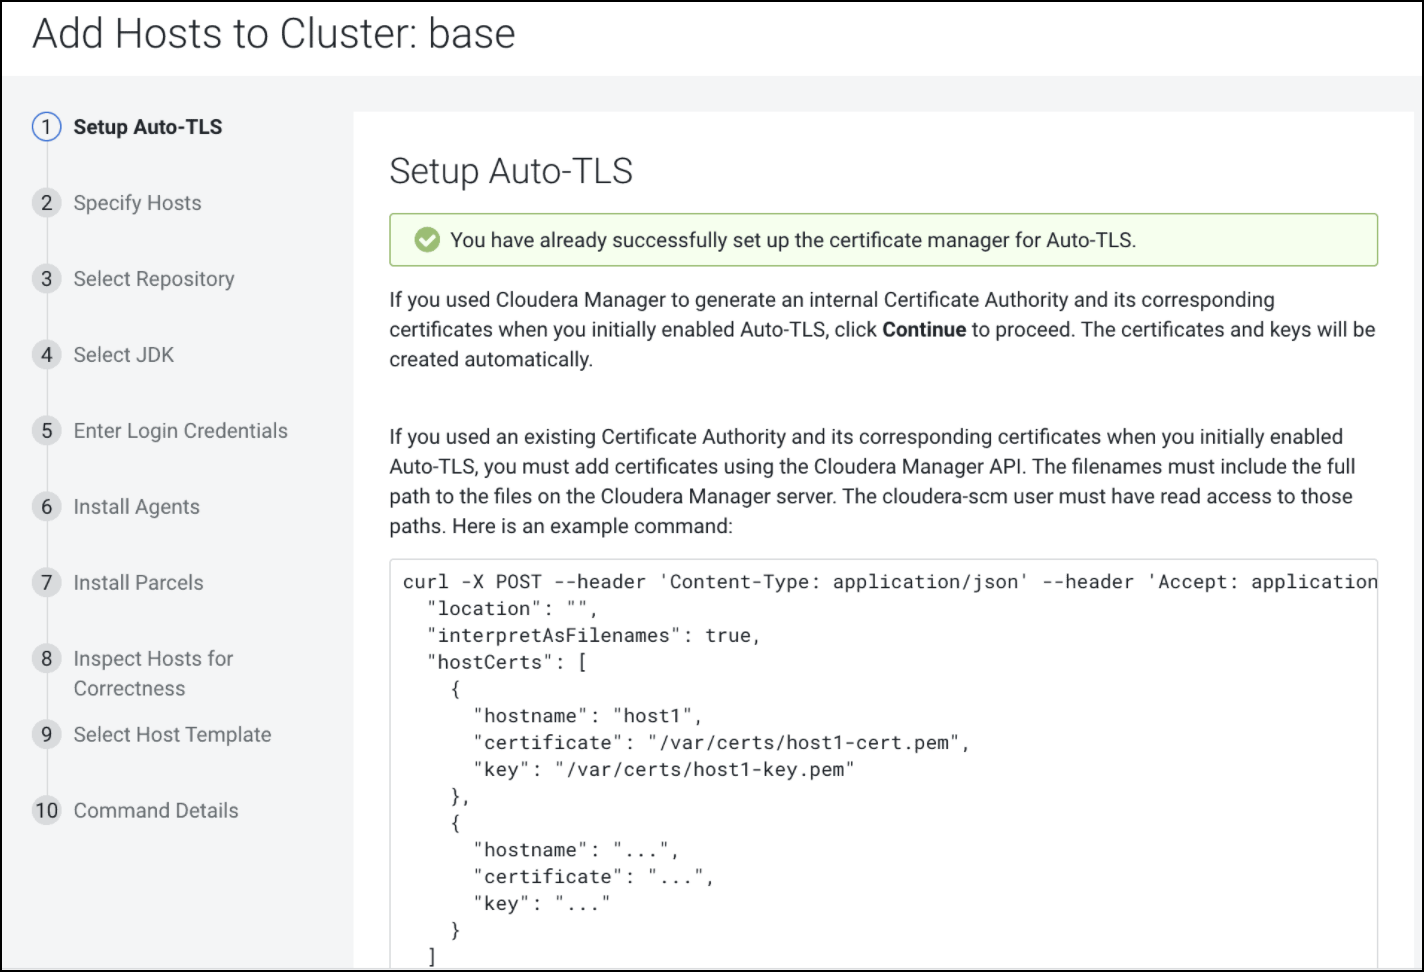
- Upload the certificates to Cloudera Manager using the following example
command:
In the curl command example above, the "location" should be omitted if Auto-TLS was enabled or rotated after 7.1, and the file paths should point to files on the CM server host.curl -u admin:admin -X POST --header 'Content-Type: application/json' --header 'Accept: application/json' -d '{ "location": "/opt/cloudera/AutoTLS", "interpretAsFilenames": true, "hostCerts": [ { "hostname": "ccycloud-10.vcdp71.root.hwx.site", "certificate": "/tmp/auto-tls/certs/ccycloud-10.vcdp71.root.hwx.site.pem", "key": "/tmp/auto-tls/certs/ccycloud-10.vcdp71.root.hwx.site.pem" } ] }' 'https://ccycloud-7.vcdp71.root.hwx.site:7183/api/v41/cm/commands/addCustomCerts' - Continue to add hosts.
- The add hosts wizard will prompt the following screen with instructions to upload
the certificates.
Rotate Auto-TLS Certificate Authority and Host Certificates
After the certificate files in the specified paths have been replaced with the new certificates, run the API calls that were used when enabling Auto-TLS. Refer Step 5 in this use case to run the Cloudera Manager API. You do not need to run the addCustomCerts API if you are performing the steps given in this use case.