Use case 2: Enabling Auto-TLS with an intermediate CA signed by an existing Root CA
You can make the Cloudera Manager CA an intermediate CA to an existing Root CA.
This is a three-step process. First, make Cloudera Manager generate a Certificate Signing Request (CSR). Second, have the CSR signed by the company’s Certificate Authority (CA). Third, provide the signed certificate chain to continue the Auto-TLS setup.
Customizing the certmanager before execution
While creating a CSR using the certmanager, ensure that you use the correct values. Hence, you need to override some of the defaults the script uses (which can be seen in Certmanager Options - Using CM's GenerateCMCA API), as those might work fine in case of Use Case 1 (where everything is self-signed and made by the certmanger), but will not work in case of Use Case 2.
As an example, you can see the default value of cn_name (“SCM Local CA on
<host_fqdn>”) which can not be used (as cn_name should contain only FQDN
name).
One of the most important parameters required is the size of the key. By default (as seen in the above referenced page), certmanager uses a size of 3072 bit, however, in case you need a different size (usually it is 2048 bit) you need to configure it accordingly. For such cases, you prepare a configuration file to customize the certmanager and overwrite its values.
[General]
ca_key_args=2048
host_key_args=2048
ca_dn=CN=server_name.example.com,DC=Cloudera,DC=DEV- With that file at hand, execute the certmanager script (from the Cloudera Manager
node).
Ensure that the Cloudera Manager is not running, and initialize the script using either of the two options (depending on your openjdk version and assuming the config.ini file you created is in the current folder):
For OpenJDK 1.8 based systems:export JAVA_HOME=/usr/lib/jvm/java-1.8.0-openjdk; /opt/cloudera/cm-agent/bin/certmanager --location /var/lib/cloudera-scm-server/certmanager setup --config ./config.ini --configure-services --stop-at-csrFor OpenJDK 11 based systems:export JAVA_HOME=/usr/lib/jvm/java-11-openjdk; /opt/cloudera/cm-agent/bin/certmanager --location /var/lib/cloudera-scm-server/certmanager setup –config ./config.ini --configure-services --stop-at-csrThe result of the execution should look like the following:INFO:root:Logging to /var/log/cloudera-scm-agent/certmanager.log Stopping after signing the CSR, continue Auto-TLS setup by rerunning certmanager setup and passing in --signed-ca-cert <signed_ca_chain.pem> - The CSR (Certificate Signing Request) file will be created under
/var/lib/cloudera-scm-server/certmanager/CMCA/private/ca_csr.pem. To check the content of the file and validate that it is according to what you configured, you can run the following command on the file:openssl req -in ca_csr.pem -noout -textAs this is a request for signing, you use the openssl flag
req, and see the content of the file. You will see that it was created with 2048 bit, under the protocol of x509v3 which is what is required. - Send that file to the customer. The customer should take that CSR, sign it using its
Root Certificate Authority (Root CA), and add the Cloudera Manager CSR as the last part of
its Intermediate certificate authority chain.
By adding the CSR to its Intermediate chain, and returning the Root CA and the updated Intermediate CA to Cloudera, the customer grants Cloudera Manager the ability to be an approved CA, hence Cloudera Manager could create and sign certificates on behalf of the customer to all the cluster nodes.
- Proceed with the installation with the following command (replace java-1.8.0-openjdk
with java-11-openjdk if you have OpenJDK 11 on your platform):
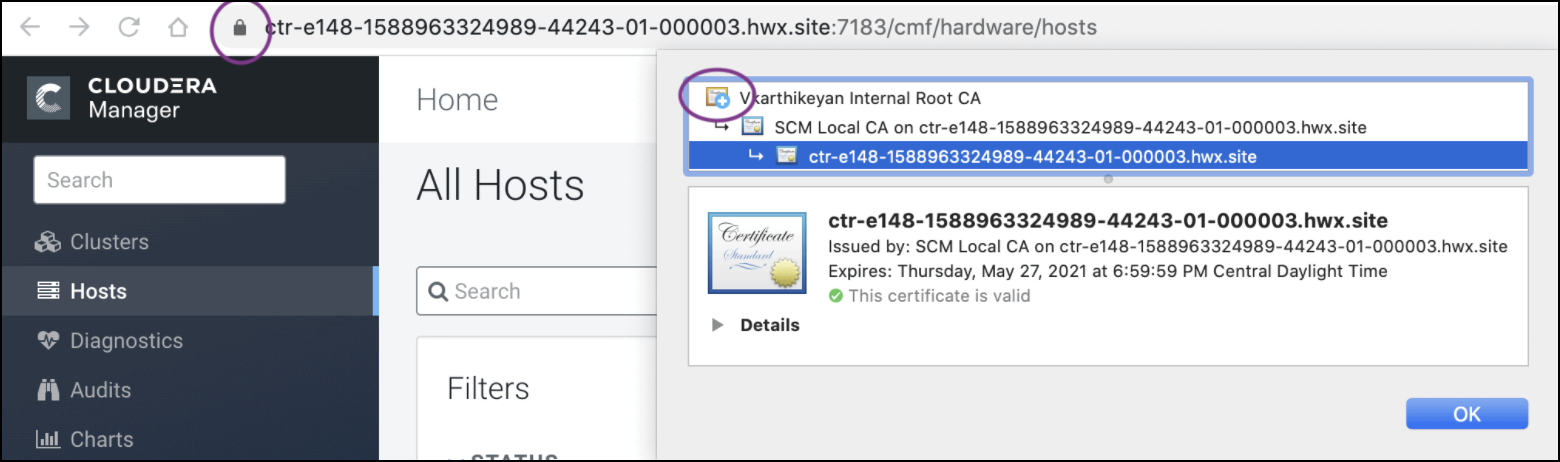
export JAVA_HOME=/usr/lib/jvm/java-1.8.0-openjdk; /opt/cloudera/cm-agent/bin/certmanager --location /var/lib/cloudera-scm-server/certmanager setup --configure-services --trusted-ca-certs /path/to/ca-certs.pem --signed-ca-cert /path/to/cm_cert_chain.pem X509v3 Basic Constraints: critical CA:TRUE, pathlen:0 X509v3 Key Usage: critical Digital Signature, Certificate Sign, CRL Sign - Once the execution is done, start Cloudera Manager on TLS port 7183. If the signed
Intermediate certificate is already imported into your browser’s truststore, then you
should not see any warnings. In the screenshot below, “Vkarthikeyan Internal Root CA” is
the root certificate. This certificate is already trusted by the system and has signed by
the Cloudera intermediate CA.