Dynamic resource-based column masking in Hive with Ranger policies

You can use Apache Ranger dynamic resource-based column masking capabilities to protect sensitive data in Hive in near real-time. You can set policies that mask or anonymize sensitive data columns (such as PII, PCI, and PHI) dynamically from Hive query output. For example, you can mask sensitive data within a column to show only the first or last four characters.

Dynamic column masking policies are similar to other Ranger access policies for Hive. You can set filters for specific users, groups, and conditions. With dynamic column-level masking, sensitive information never leaves Hive, and no changes are required at the consuming application or the Hive layer. There is also no need to produce additional protected duplicate versions of datasets.

The following conditions apply when using Ranger column masking policies to mask data returned in Hive query results:

  • A variety of masking types are available, such as show last 4 characters, show first 4 characters, Hash, Nullify, and date masks (show only year).

  • You can specify a masking type for specific users, groups, and conditions.

  • Wildcard matching is not supported.

  • Each column should have its own masking policy.

  • Masks are evaluated in the order listed in the policy.

  • An audit log entry is generated each time a masking policy is applied to a column.
  1. On Service Manager > Resource , select an existing Hadoop SQL service.
  2. Select Masking , then click Add New Policy.
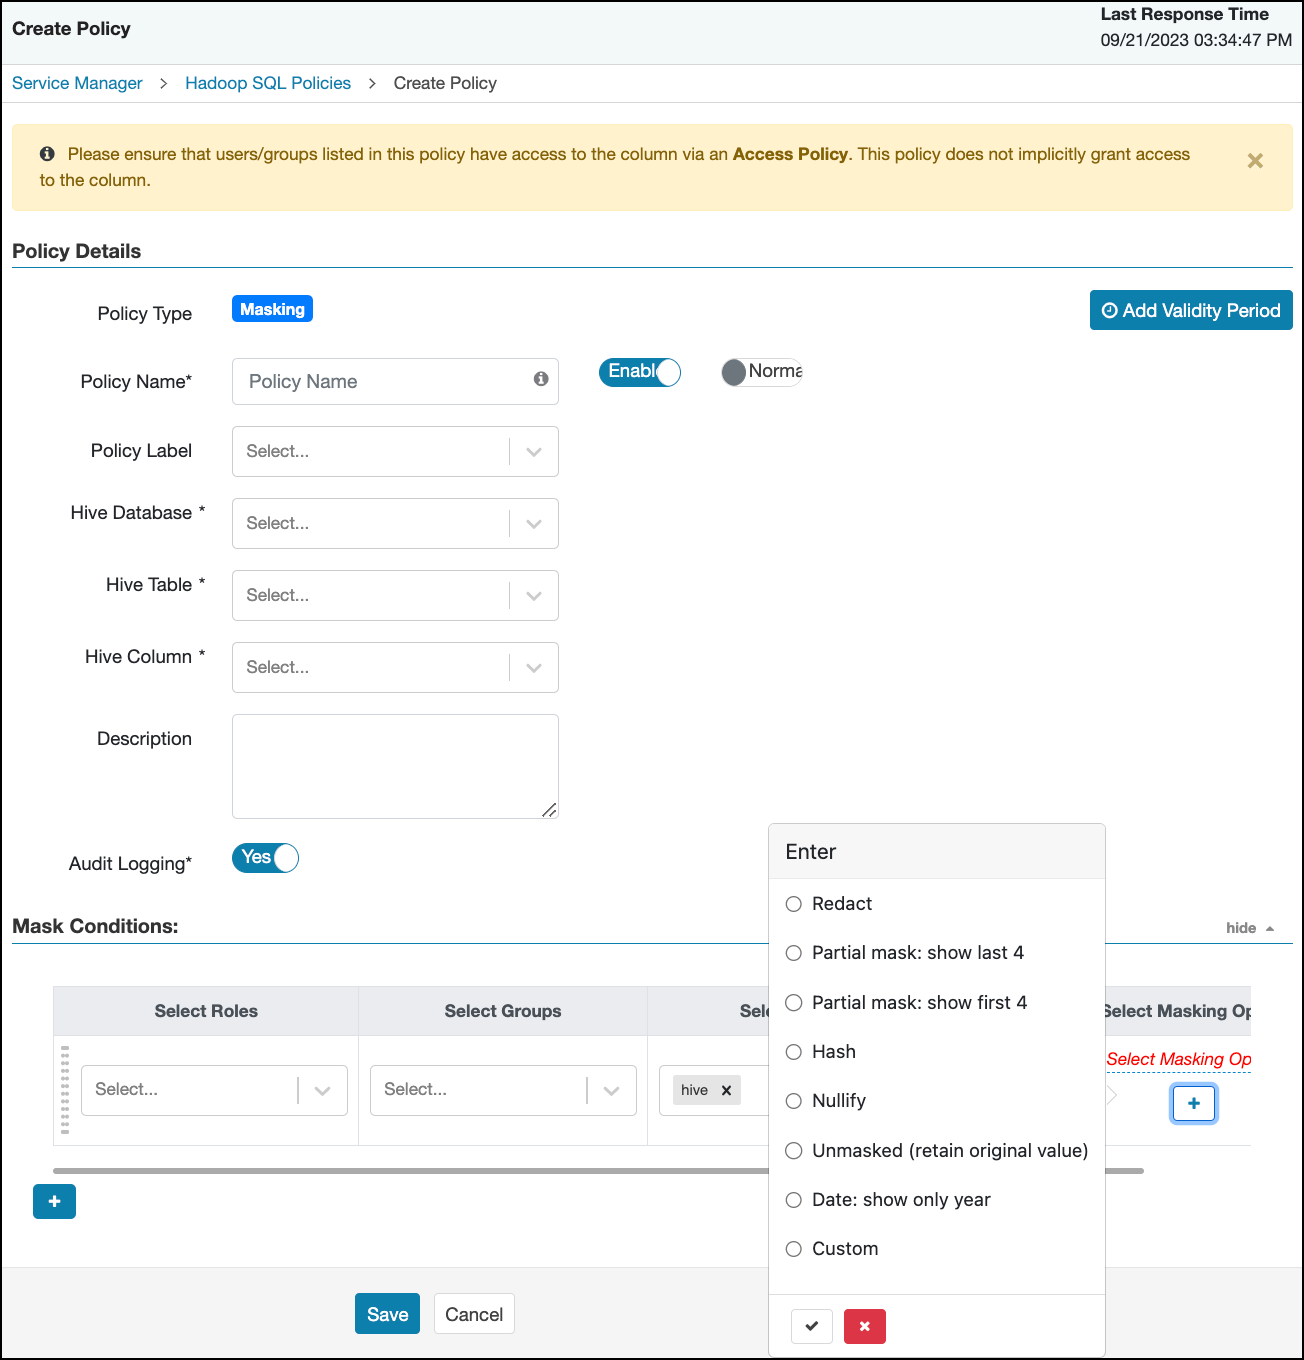
  3. On Create Policy, add the following information for the column-masking filter:
    Table 1. Policy Details
    Field Description

    Policy Name

    (required)

    Enter an appropriate policy name. This name cannot be duplicated across the system. The policy is enabled by default.
    normal/override Enables you to specify an override policy. When override is selected, the access permissions in the policy override the access permissions in existing policies. This feature can be used with Add Validity Period to create temporary access policies that override existing policies.

    Hive Database

    (required)

    Type in the applicable database name. The auto-complete feature displays available databases based on the entered text.

    Hive Table

    (required)

    Type in the applicable table name. The auto-complete feature displays available tables based on the entered text.

    Hive Column

    (required)

    Type in the applicable column name. The auto-complete feature displays available columns based on the entered text.

    Audit Logging Audit Logging is set to Yes by default. Select No to turn off audit logging.
    Description Enter an optional description for the policy.
    Add Validity Period Specify a start and end time for the policy.
    Table 2. Mask Conditions
    Label Description
    Select Role Specify the roles to which this policy applies.
    Select Group

    Specify the groups to which this policy applies.

    The public group contains all users, so granting access to the public group grants access to all users.

    Select User Specify one or more users to which this policy applies.
    Access Types Currently select is the only available access type.
    Select Masking Type
    To create a row filter for the specified users, groups, and roles, click Select Masking Option, then select a masking type:
    • Redact – mask all alphabetic characters with "x" and all numeric characters with "n".
    • Partial mask: show last 4 – Show only the last four characters.
    • Partial mask: show first 4 – Show only the first four characters.
    • Hash – Replace all characters with a hash of entire cell value.
    • Nullify – Replace all characters with a NULL value.
    • Unmasked (retain original value) – No masking is applied.
    • Date: show only year – Show only the year portion of a date string and default the month and day to 01/01
    • Custom – Specify a custom masked value or expression. Custom masking can use any valid Hive UDF (Hive that returns the same data type as the data type in the column being masked).

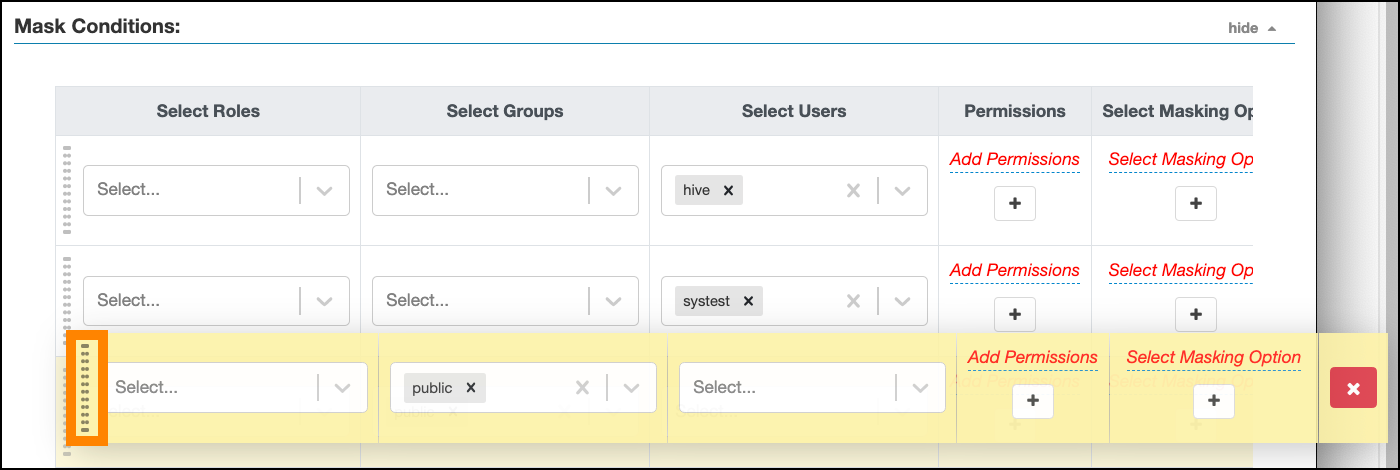
    Masking conditions are evaluated in the order listed in the policy. The condition at the top of the Masking Conditions list is applied first, then the second, then the third, and so on.

  4. To move a condition in the Mask Conditions list (and therefore change the order in which the list is evaluated), click the dotted rows icon at the left of the condition row, then drag the condition to a new position in the list.
  5. On Create Policy, click Add to add the new column masking filter policy.