Describes how to connect to Impala Virtual Warehouses using ODBC with your BI tool,
with Tableau as an example.
Before you can use Tableau with Impala Virtual Warehouses, you must have created a
Database Catalog that is populated with data. You have the option to populate your
Database Catalog with sample data when you create it. You must also create an Impala
Virtual Warehouse, which is configured to connect to the Database Catalog that is
populated with data.
-
Download the latest version of the Impala ODBC driver from Downloads page or
alternatively, on the Virtual Warehouses page, click the
options menu for the warehouse you want to connect to your BI tool, and select
Download JDBC/ODBC Driver and install it.
-
Install the driver on the local host where you intend to use Tableau Desktop.
-
Log in to the web interface and
navigate to the Data Warehouse service.
-
Click Virtual Warehouse in the left navigation
panel.
-
On the Virtual Warehouses page, click
 for the Impala warehouse you want to connect to
with Tableau, and select Copy JDBC URL:
for the Impala warehouse you want to connect to
with Tableau, and select Copy JDBC URL:
This copies the JDBC URL to your system clipboard.
-
Paste the copied JDBC URL into a text file. It should look similar to the
following:
jdbc:hive2://<your-virtual-warehouse>.<your-environment>.<dwx.company.com>/default;transportMode=http;httpPath=cliservice;ssl=true;retries=3
-
From the text file where you just pasted the URL, copy the host name from the
JDBC URL to your system clipboard. For example, in the URL shown in Step 6, the
host name is:
<your-virtual-warehouse>.<your-environment>.<dwx.company.com>
-
Start Tableau and navigate to :
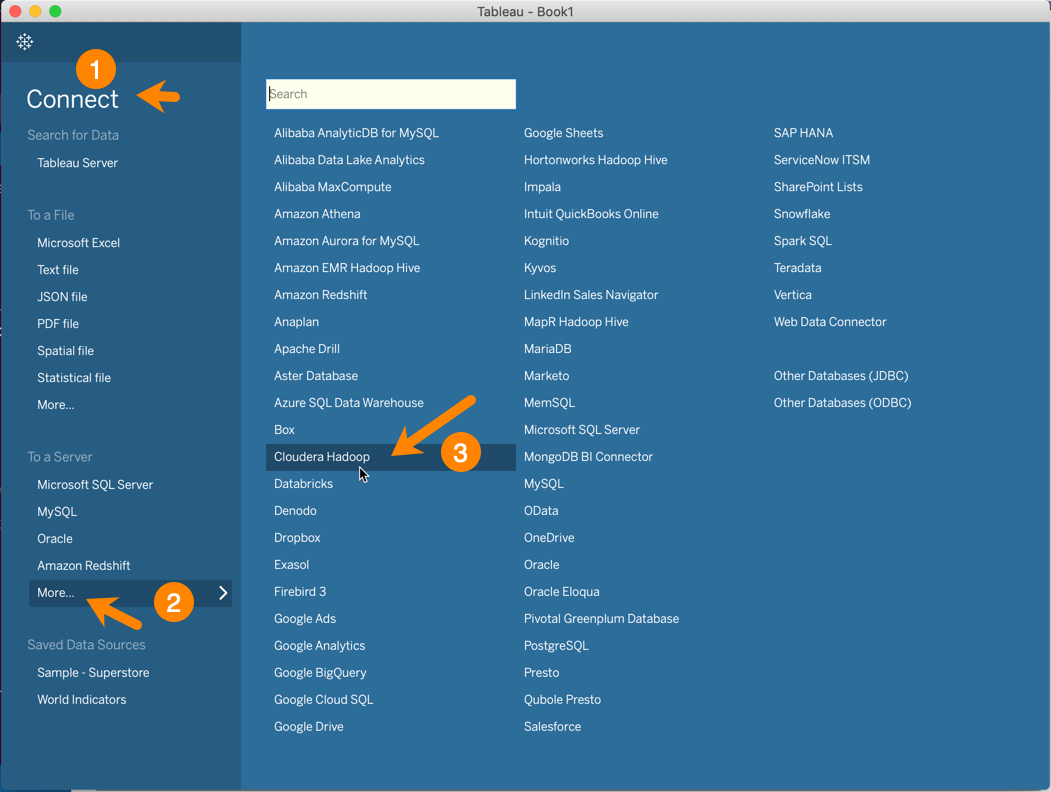
This launches the Hadoop
dialog box.
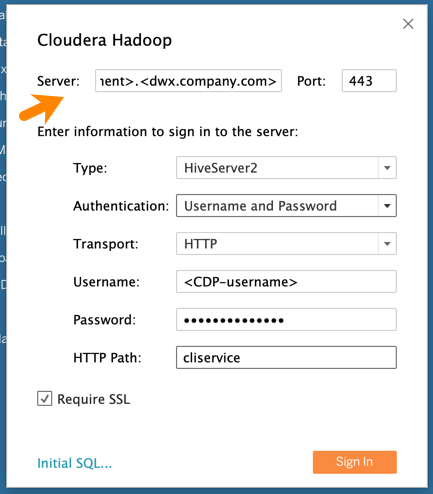
-
In the Tableau Hadoop dialog
box, paste the host name you copied to your clipboard in Step 7 into the
Server field:
-
Then in the Tableau Hadoop
dialog box, set the following options:
- Port: 443
- Type: HiveServer2
- Authentication: Username and
Password
- Transport: HTTP
- Username: Username to connect to the CDP Data
Warehouse service.
- Password: Password to connect to the CDP Data
Warehouse service.
- HTTP Path: cliservice
- Require SSL: Make sure this is selected.
-
Click Sign In.