Use the fs2cs conversion utility
You can use the fs2cs conversion utility to automatically convert certain Fair Scheduler configuration to Capacity Scheduler configuration as part of the Upgrade Cluster Wizard in Cloudera Manager.
From the Cloudera Base on premises 7.1 release, Cloudera provides a
conversion tool, called fs2cs conversion utility. This utility is a CLI
application that is part of the yarn CLI command. It generates
capacity-scheduler.xml and yarn-site.xml as output files.
- Be aware of the Fair Scheduler properties that are auto-converted, those that require manual configuration, and those that do not have an equivalent feature in Capacity Scheduler.
- You must have downloaded and distributed parcels for the target version of CDP.
- In VPC, to use your current Compute Cluster queue configurations in your new installation
after the upgrade, you must have manually saved them before starting the update process
and then added the configurations to your new installation. Else, your Compute Cluster
queue configurations will be lost because the Upgrade Wizard transitions only the queues
from your Base Cluster.
- In Cloudera Manager, navigate to .
- Find the host with the ResourceManager role and click the YARN ResourceManager role.
- Click the Processes tab.
- Find and save the
fair-scheduler.xmlandyarn-site.xmlconfiguration files for future reference.
- Ensure that the configuration is not stale, there is no unsaved changes. Ensure that there is no unsaved changes on the Dynamic Resource Pools view, meaning that the Refresh Dynamic Resource Pools button is inactive.
- Reach the Copy Scheduler Settings part of the upgrade process using the Upgrade Cluster
Wizard in Cloudera Manager. That is the first step when you add YARN Queue Manager
service:
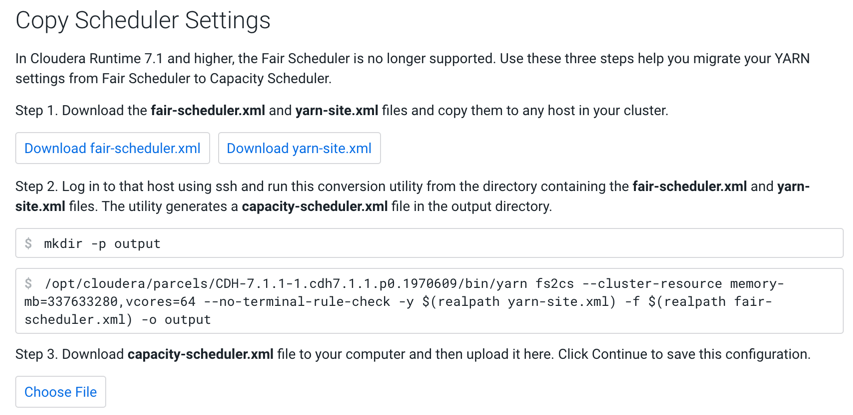
yarn-site.xml and the fair-scheduler.xml configuration
file.After the upgrade is completed,
manually add the yarn-site.xml configurations using Cloudera Manager
Advanced configuration snippet (Safety Valves), and tune the configuration generated by the
fs2cs conversion utility using Queue Manager UI and Cloudera Manager
Advanced configuration snippet (Safety Valves).