Onboarding Cloudera users and groups for AWS cloud storage (no RAZ)
The minimal setup defined earlier spins up a Cloudera environment and Data Lake with no end user access to cloud storage. Adding users and groups to a Cloudera environment involves ensuring they are properly mapped to IAM roles to access cloud storage.
In general, to onboard a new user or group to be onboarded you should have the following IAM roles and policies pre-created in AWS:
- One IAM role for the user/group
- One IAM policy for the user/group role to access the required S3 bucket(s) and path(s)
In the example below, we are adding a data engineering group and a data science group to the Cloudera environment. The final goal is to have the following that builds on the minimal setup:
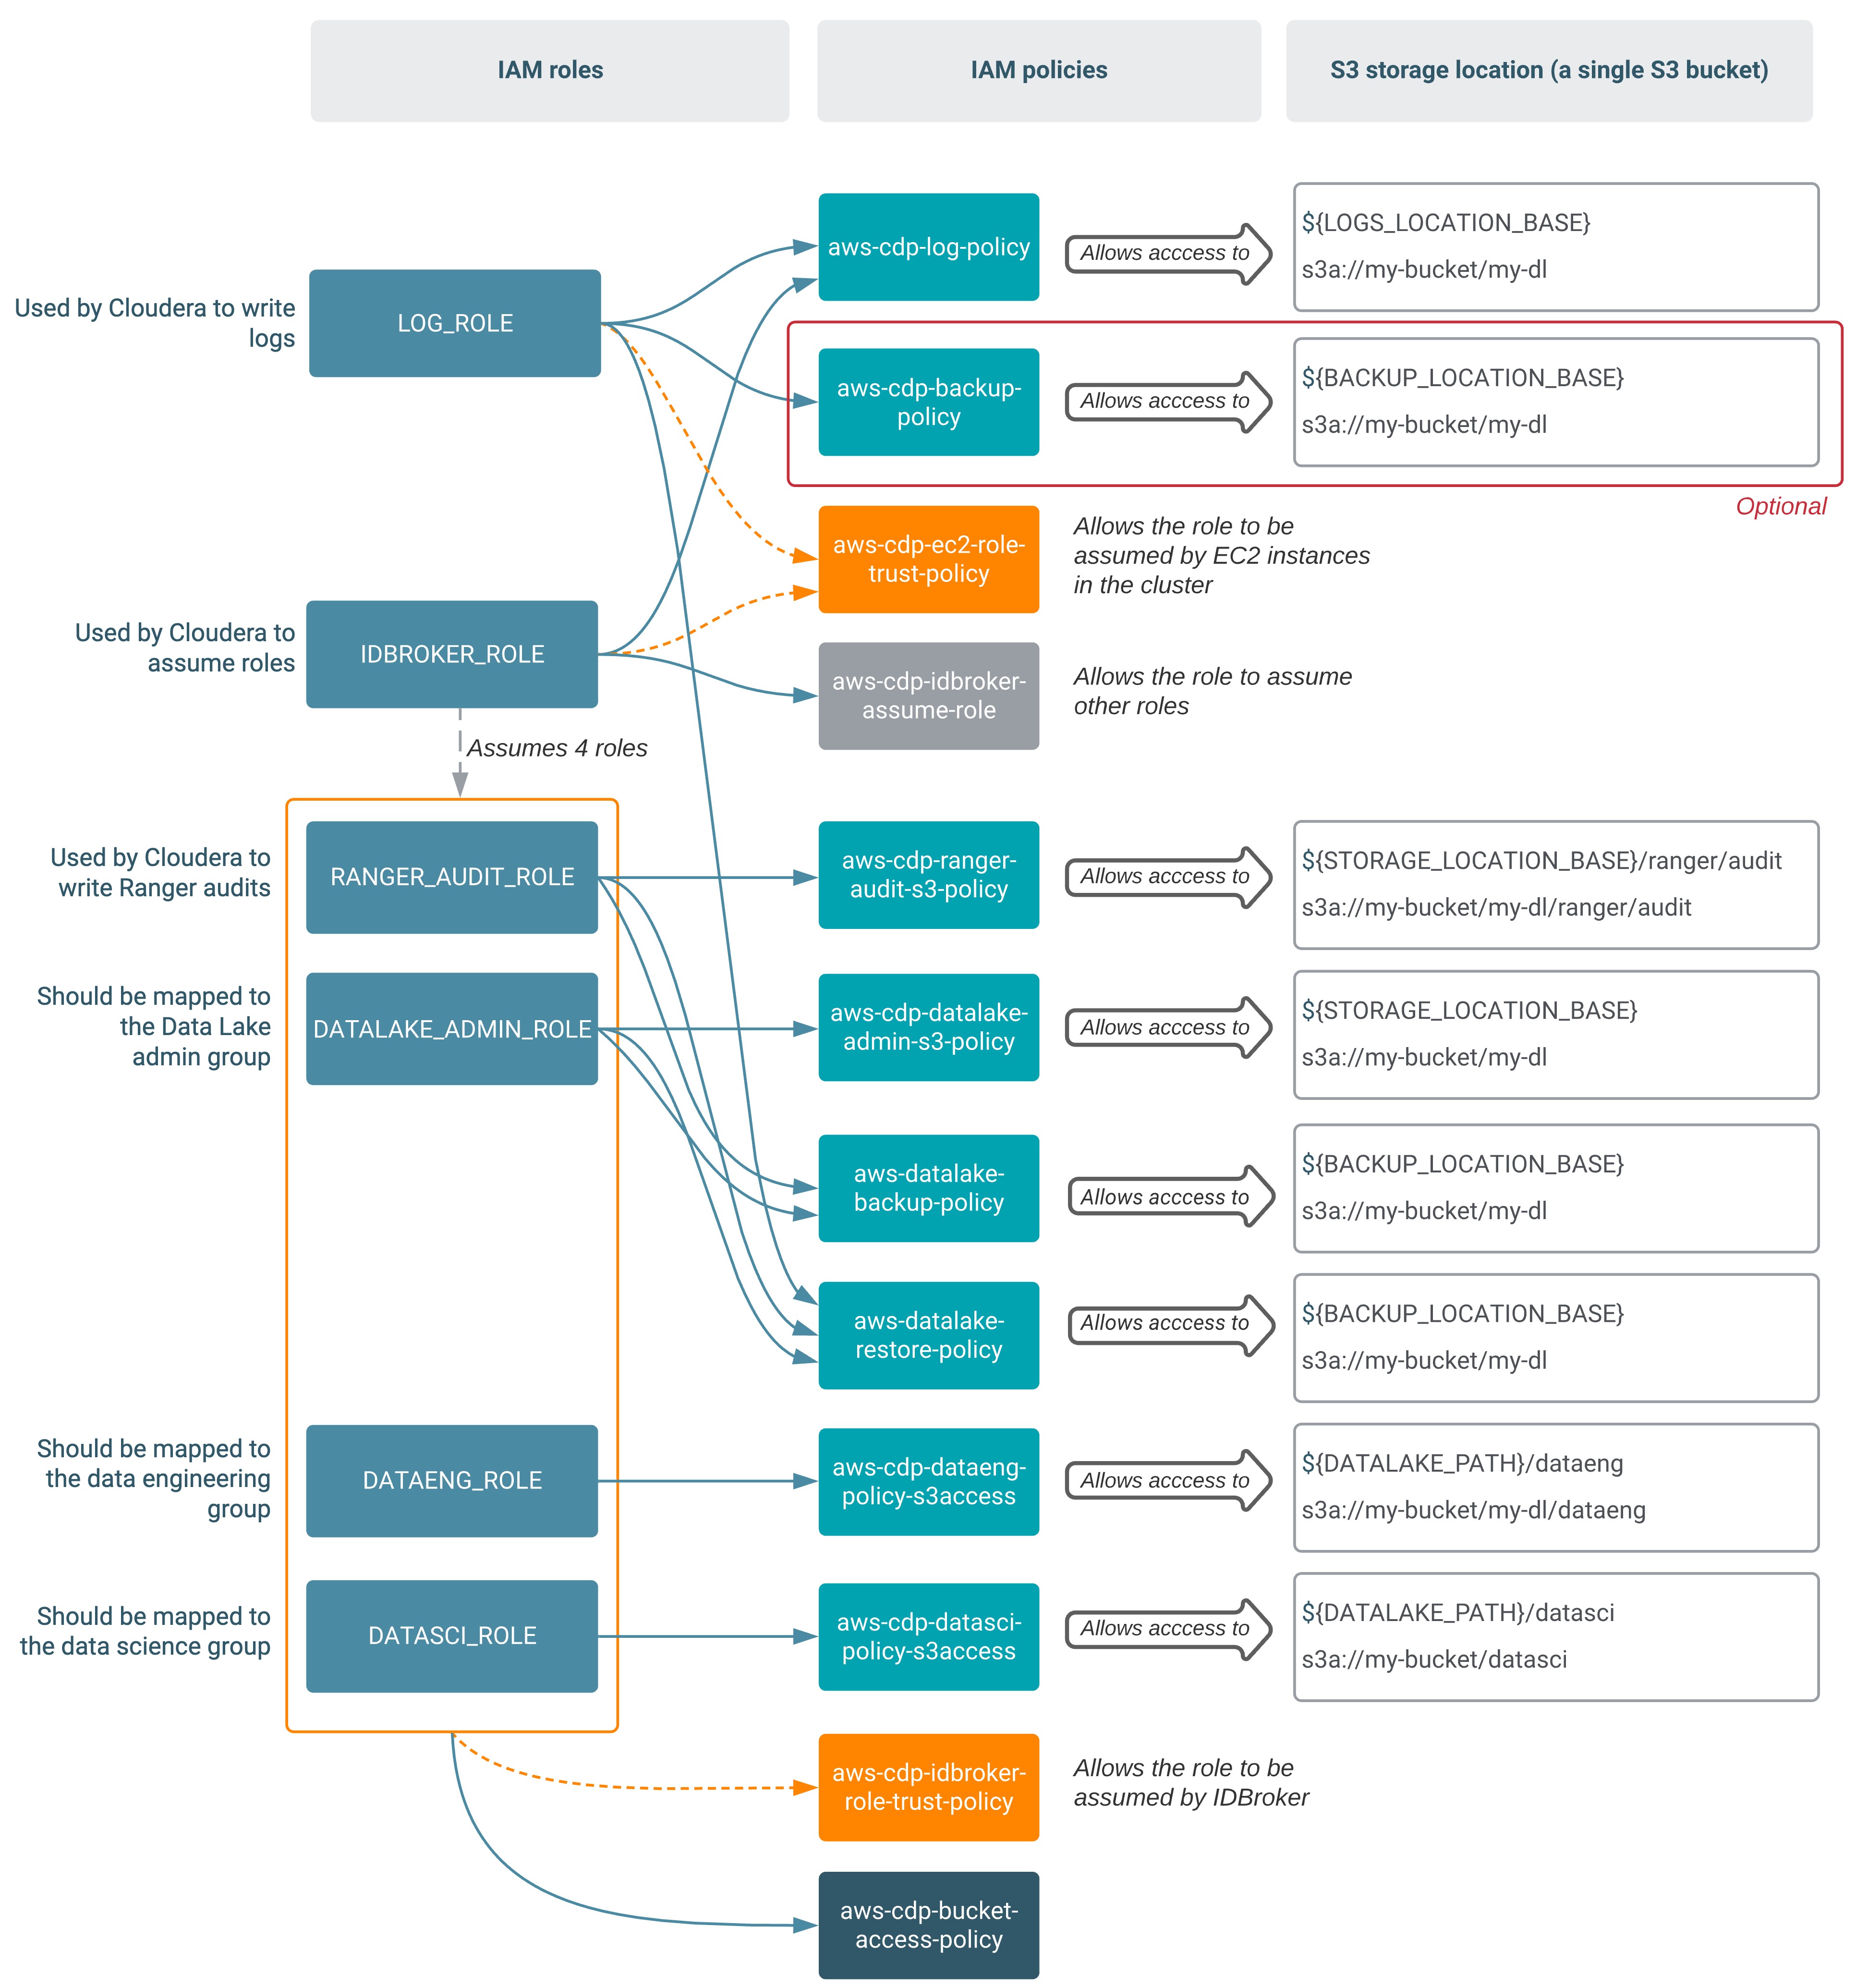
In the table below, bolded names are new compared to the minimal setup. The definitions for the policies mentioned in the table can be found in IAM policy definitions.
| Role | Permissions policy | Trust policy | Description |
|---|---|---|---|
DATAENG_ROLE |
aws-cdp-dataeng-policy-s3access
|
aws-cdp-idbroker-role-trust-policy |
This role uses the three permissions policies to provide data engineers with
access to a specific S3 location (s3://my-bucket/my-dl/dataeng). The trust policy allows the role to be assumed by IDBroker. |
DATASCI_ROLE |
aws-cdp-datasci-policy-s3access
|
aws-cdp-idbroker-role-trust-policy |
This role uses the three permissions policies to provide data scientists with
access to a specific S3 location (s3://my-bucket/my-dl/datasci). The trust policy allows the role to be assumed by IDBroker. |
- Creating the additional permissions policies for the minimal setup
- Creating the required IAM roles and their associated trust policies
- Creating the mappings in Cloudera
Create permissions policies for user access
You can create the IAM permissions policies required for user access to the data storage S3 location from the IAM console or AWS CLI.
Before you begin
For IAM policy definitions, refer to IAM policy definitions. Make sure to replace all the placeholders in the policy with actual values.
Steps
- In the AWS web interface, navigate to the IAM console.
- From the navigation pane, select Policies and then click on Create Policy
- Choose the JSON tab.
- Paste the appropriate JSON policy document.
- Click Next.
- Add tags if required by your organization.
- Click Next.
- Type a Name and an optional Description.
- Click Create policy.
aws iam create-policy --policy-name <NAME> --policy-document <JSON-DOCUMENT> Repeat these steps for all permissions policies that need to be created. For more detailed instructions on how to create IAM policies, refer to the AWS documentation linked below.
Create the IAM roles and establish trust relationships: DATAENG_ROLE and DATASCI_ROLE
Use the following steps to create the DATAENG_ROLE and
DATASCI_ROLE. These roles allow end users to access specific subsets of S3 cloud
storage that you configure in Cloudera.
Before you begin
Review the setup described above and make sure that you understand which policies you need to attach to which roles.
Steps

- In the AWS web interface, navigate to the IAM console.
- From the navigation pane, select Roles.
- Click on Create Role.
- Under "Select type of trusted entity" select Another AWS account.
- Under "Account ID", enter your AWS account ID. You can obtain it by clicking on your user
name in the top bar.
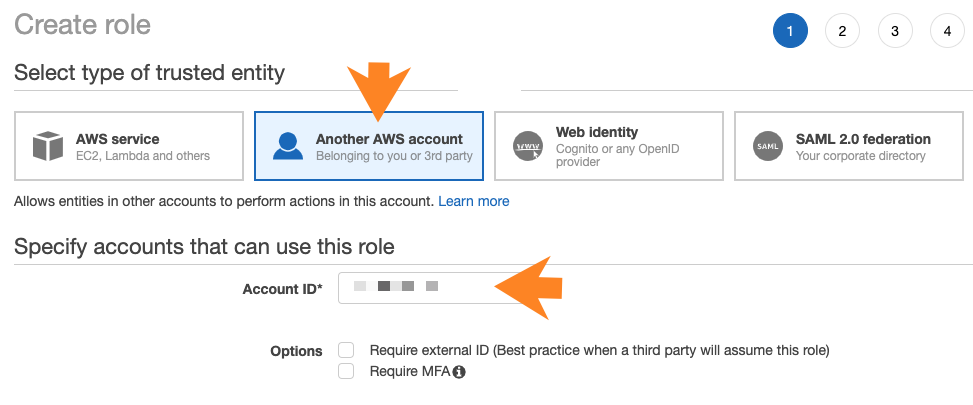
- Click Next.
- Attach the permissions policies required for the role that you are creating. Make sure to attach all required policies.
- Click Next.
- Add tags if required by your organization.
- Click Next.
- Provide a name and an optional description for your role, and verify that you have attached all required permissions policies.
- Click on Create role. This creates an IAM role. No instance profile is created in this case.
- Click on the role to see its details.
- Click on the Trust relationships tab.
- Click on Edit trust relationship.
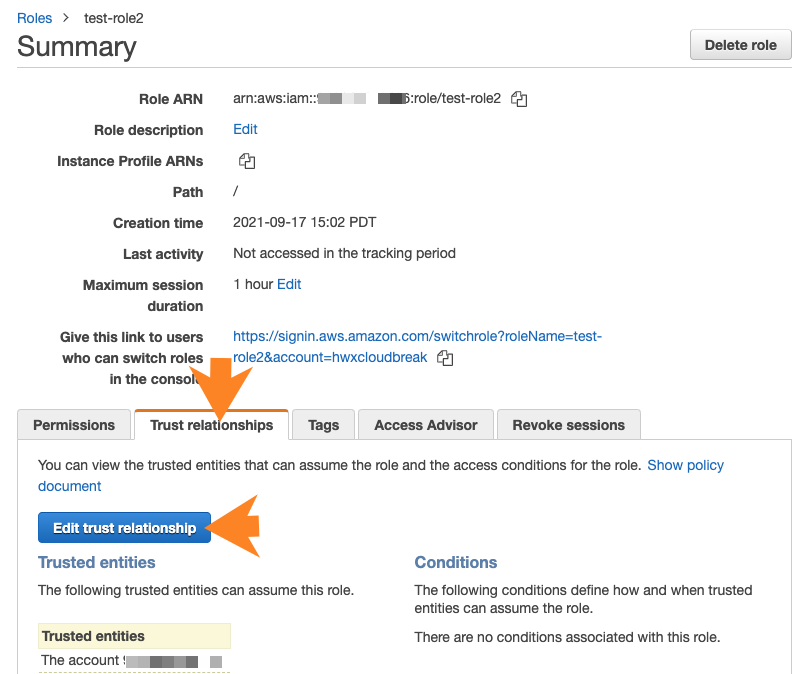
- Paste the JSON declaring a trust policy in place of the default policy. Use the appropriate policy described above.
- Click on Update trust policy.
Repeat these steps for both roles.
Use these commands to create the required IAM roles via AWS CLI:
aws iam create-role --role name <ROLE-NAME> --assume-role-policy-document <TRUST-POLICY>
aws iam attach-role-policy --role name <ROLE-NAME> --policy-arn <PERMISSIONS-POLICY-ARN> aws iam attach-role-policy command needs to be repeated if there are
multiple policies to attach. You should assign the appropriate policies described above.Once these resources have been created, you can provide them be editing an existing environment in Cloudera.
Adding Cloudera user/group to IAM role mappings
After creating the two additional IAM roles, one for data engineers and one data scientists, map them to specific user/group in Cloudera.
Required role: DataSteward, EnvironmentAdmin, or Owner
Steps
- The option to add/modify these mappings is available from the Cloudera Management Console under Environments > click on an environment > Actions > Manage Access > IDBroker Mappings > Edit.
- Under Current Mappings, click Edit.
- Click + to display a new field for adding a mapping.
- Provide the following:
- The User or Group dropdown is pre-populated with Cloudera users and groups. Select the user or group that you would like to map.
- Under Role, specify the role ARN (copied from the IAM role page on AWS).
You should select your
DATAENG_ROLEhere.
- Repeat the previous two steps to add additional mapping for the
DATASCI_ROLE. - For example, in the example setup we created the following roles:
DATAENG_ROLE- We created this role while onboarding users and we assume that there is a DataEngineers group that was created in Cloudera.DATASCI_ROLE- We created this role while onboarding users and we assume that there is a DataScientists group that was created in Cloudera.
Based on the roles and groups created in this example, the mappings that need to be created are:

- Click Save and Sync.
If you would like to create the mappings via CDP CLI, you can:
- Use the
cdp environments get-id-broker-mappingscommand to obtain your current mappings. - Use the
cdp environments set-id-broker-mappingscommand to set additional mappings. The only way to use this command is to:- Pass all the current mappings
- Add the new mappings
- Next, sync IDBroker mappings. For
example:
cdp environments sync-id-broker-mappings --environment-name demo3 - Finally, check the sync status. For
example:
cdp environments get-id-broker-mappings-sync-status --environment-name demo3