Onboarding Cloudera users and groups for Azure cloud storage (No RAZ)
The minimal setup defined earlier spins up a Cloudera environment and Data Lake with no end user access to cloud storage. Adding users and groups to a Cloudera environment involves ensuring that they are properly mapped to managed identities to access cloud storage.
In general, to have new users or groups onboarded, you need to have the following pre-created in Azure:
- First, you need to create two more containers within the storage account
(
mydatalake) created earlier, one for data engineers (for example,dataeng) and one for data scientists (for example,datascience). - Next, you need to create two more managed identities, one for data engineers (for example,
data-eng-mi) and one for data scientists (for example,data-science-mi) and assign the Storage Blob Data Owner role on the scope of one these two nearly created containers. Thedata-eng-mimanaged identity will need the Storage Blob Data Owner role on the scope of thedataengcontainer and thedata-science-mimanaged identity will need the Storage Blob Data Owner role on the scope of thedatasciencecontainer. - Finally, you also need to grant the Data Lake Admin managed identity created earlier the Storage Blob Data Owner role on the scope of these two newly created containers.
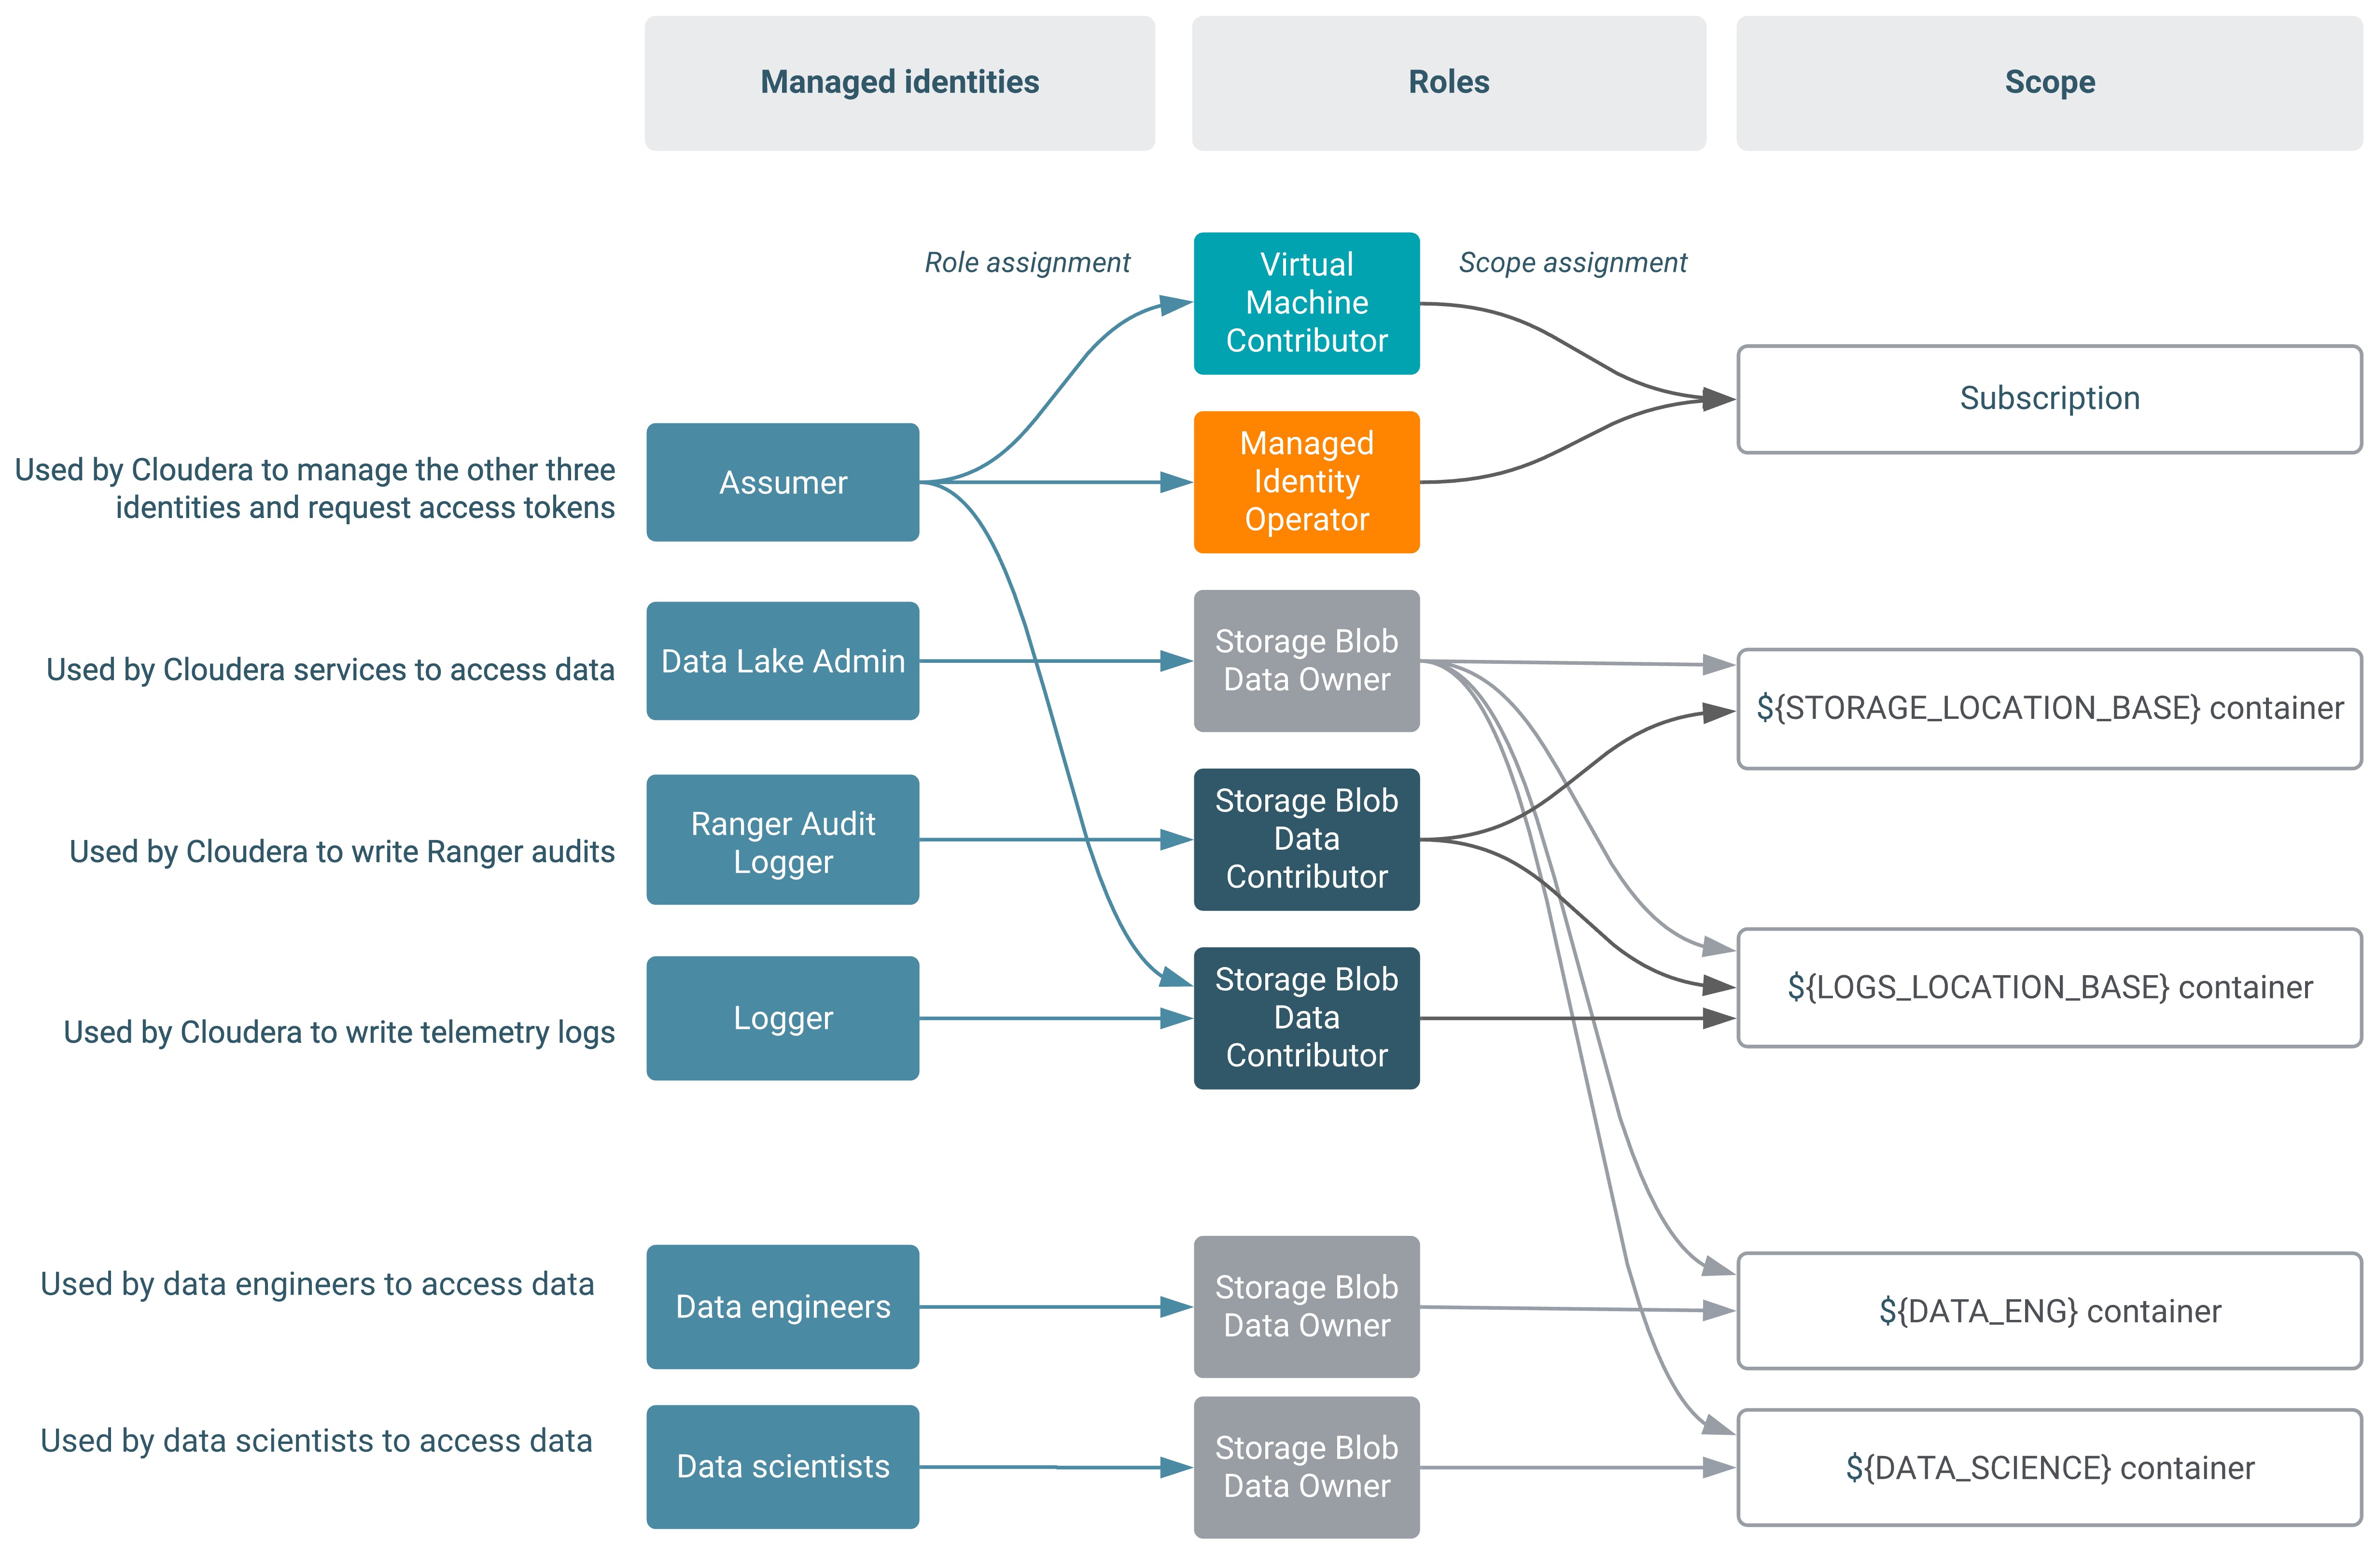
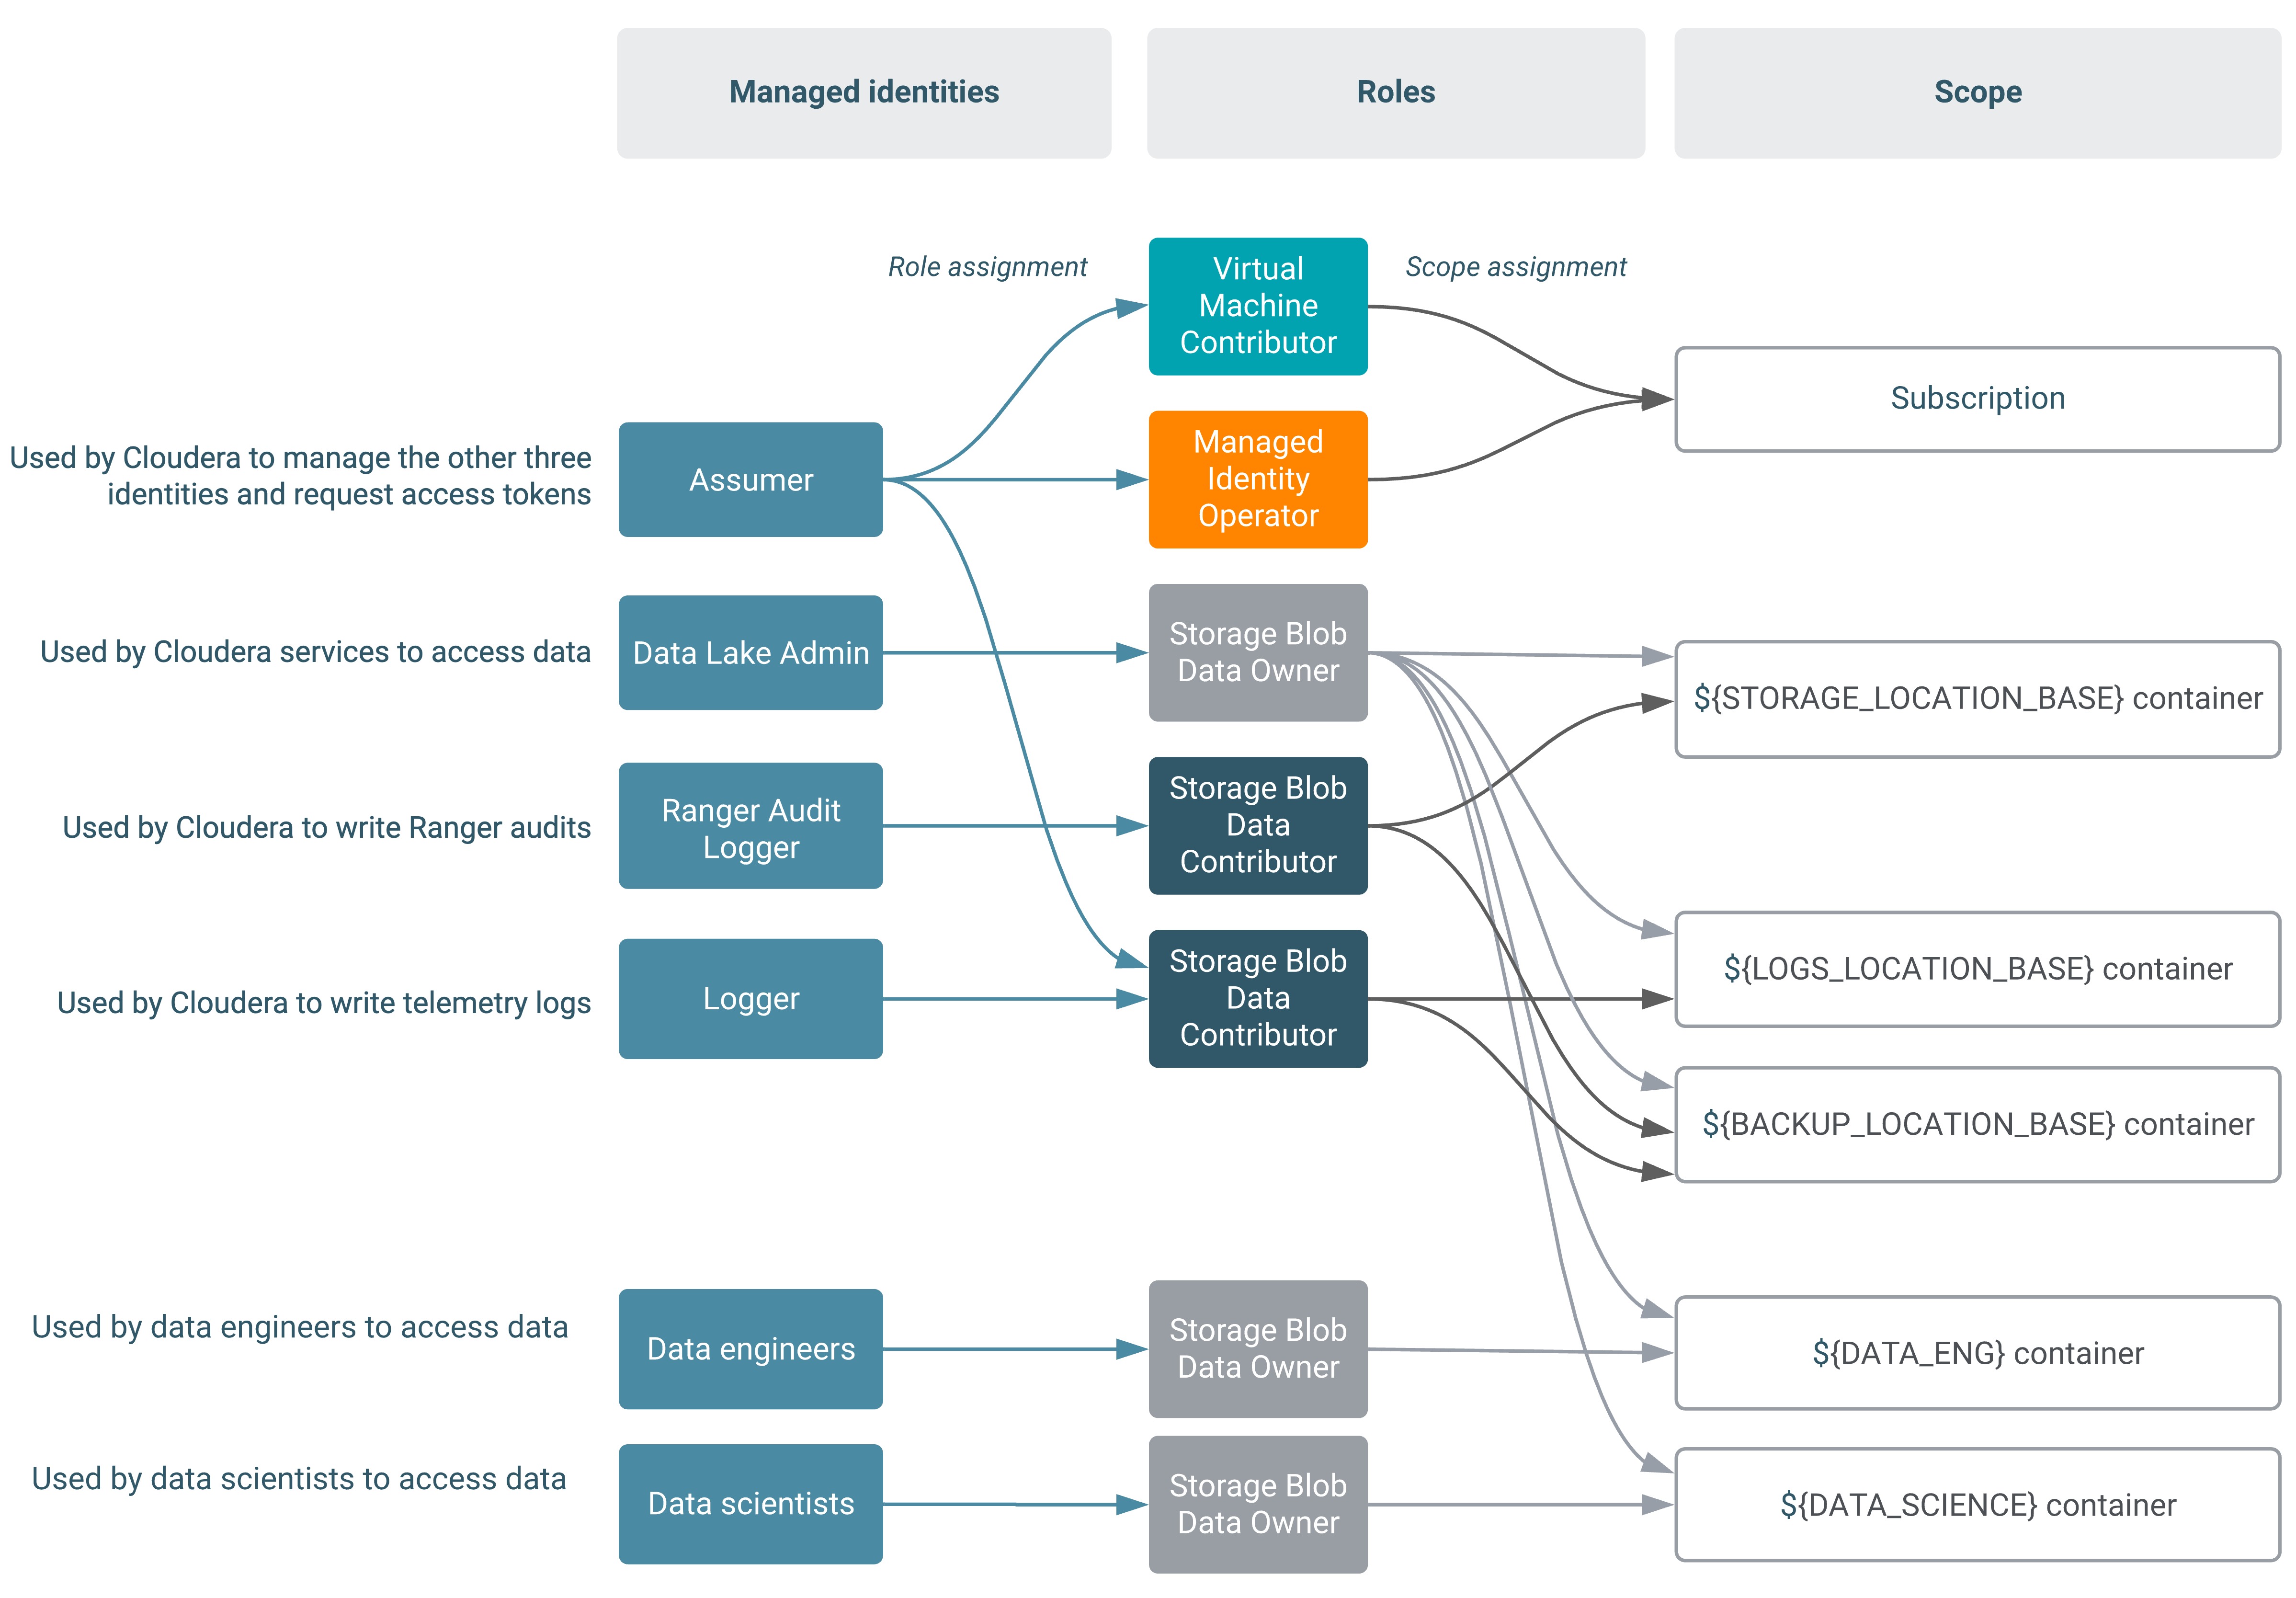
The final goal is to have the following that builds on the minimal setup presented earlier.
The first diagram illustrates the scenario where Backup Location Base is in the same location as the Logs Location Base:
The second diagram illustrates the scenario where Backup Location Base and Logs Location Base are separate:
- Creating additional containers
- Crating additional managed identities
- Creating mappings in Cloudera
- Updating the Data Lake Admin managed identity
Creating additional containers
Within the ADLS Gen 2 storage account (mydatalake) created earlier,
create two more containers (dataeng and
datascience).
To create a file system, perform the following steps:
- On Azure Portal, navigate to Storage Accounts > your newly created storage account > Containers > +Container.
- Provide a name for your container and click OK.
Repeat these steps to create both containers.
Creating additional managed identities
After creating the two additional container, create two additional managed identities,
one for data engineers (data-eng-mi) and one data scientists
(data-science-mi).
To create the two new managed identities, perform the following steps:
- On Azure Portal, navigate to Managed Identities.
- Click +Add.
- Specify managed identity name and select the resource group that you created earlier.
Repeat these steps to create each of the two managed identities. Once you’ve created these managed identities, assign roles with specific scopes (limited to one of the two containers, dataeng or datascience respectively) to these identities as follows:
- Navigate to Storage accounts > your storage account > Containers > your container > Access Control (IAM).
- Click +Add > Add role assignment.
- Under Add role assignment:
- Under Role, select Storage Blob Data Owner.
- Under Assign access to, select User assigned managed identity.
- Under Select, select the managed identity.
- Click Save.
After performing these steps for each of the two managed identities, you should have the required managed identities created and their roles assigned on the correct scope.
Adding Cloudera user/group to managed identity mappings
After creating the two additional managed identities, one for data engineers
(data-eng-mi) and one data scientists (data-science-mi), map
them to specific user/group in Cloudera.
Required role: DataSteward, EnvironmentAdmin, or Owner
Steps
- The option to add/modify these mappings is available from the Management Console under Environments > click on an environment > Actions > Manage Access > IDBroker Mappings > Edit.
- Under Current Mappings, click Edit.
- Click + to display a new field for adding a mapping.
- Provide the following:
- The User or Group dropdown is pre-populated with Cloudera users and groups. Select the user or group that you would like to map.
- Under Role, specify the resource ID of a managed identity (copied from
Azure Portal). You should select your
data-eng-mihere.
- Repeat the previous two steps to add additional mapping for the
data-science-mi. - Click Save and Sync.
If you would like to create the mappings via CDP CLI, you can:
- Use the
cdp environments get-id-broker-mappingscommand to obtain your current mappings. - Use the
cdp environments set-id-broker-mappingscommand to set additional mappings. The only way to use this command is to:- Pass all the current mappings
- Add the new mappings
- Next, sync IDBroker mappings. For
example:
cdp environments sync-id-broker-mappings --environment-name demo3 - Finally, check the sync status. For
example:
cdp environments get-id-broker-mappings-sync-status --environment-name demo3
Updating access for the Data Lake Admin managed identity
Grant the Data Lake Admin identity created earlier the Storage Blob Data Owner role on the scope of the two newly created containers.
Perform the following steps for both dataeng or datascience
containers to grant the Data Lake Admin managed identity access to them:
- Navigate to Storage accounts > your storage account > Containers > your container > Access Control (IAM).
- Click +Add > Add role assignment.
- Under Add role assignment:
- Under Role, select Storage Blob Data Owner.
- Under Assign access to, select User assigned managed identity.
- Under Select, select the Data Lake Admin Identity created earlier.
- Click Save.
Repeat these steps to provide Data Lake admin with access to both containers.