Minimum setup for GCP cloud storage
The minimal setup recommended for production includes two GCS buckets (one for storing workload data and another for storing logs) and four service accounts. Additionally, you can create a third bucket for storing FreeIPA and Data Lake backup data separately. If the third bucket is not provided, FreeIPA and Data Lake backup data is stored in the Logs bucket.
You need to create service accounts mentioned in the table and while creating them:
-
The Service account name column lists all the service accounts that need to be created. You may choose different service account names. The ones provided here follow the same terminology as Cloudera web interface and CDP CLI making it easier to understand where to provide them to Cloudera.
-
The Required IAM roles column explains what IAM role each service account needs over the item listed in the Scope column. For example, the Logger service account requires that you create a custom role with storage.buckets.get and storage.objects.create permissions. Next, you navigate to the Logs bucket permissions and add the Logger service account as a member with the custom role that you created earlier.
| Service account name | Description | Required IAM roles | Scope |
|---|---|---|---|
| Logger | This service account will be assigned to all the workload instances in Cloudera. It will be used by Cloudera to:
|
A custom role with the following permissions:
|
Logs bucket and Backups bucket (if created) |
| Data Lake Admin | This service account will be used by Cloudera services to access workload data. It provides full access to the data storage location. | Storage Admin
(roles/storage.admin) IAM role Alternatively, you can create a custom role and assign the following permissions:
|
Data storage bucket For Data Lake backup and restore: Backups bucket, if different from the main data storage bucket |
| Ranger Audit | This service account will be used by Cloudera to write Ranger audits to the storage bucket. | Storage Object Admin (roles/storage.objectAdmin) IAM role Alternatively, you can create a custom role and assign the following permissions:
|
Data storage bucket For Data Lake backup and restore: Backups bucket, if different from the main data storage bucket |
| Other service account for data access by users | Depending on your requirements, you may want to create a set of service accounts for
data access by different user groups. For example, you may want to have one service account to assign to data science users and another service account for data engineering users. |
Depending on your requirements, you should assign a custom role or a predefined role from Cloud Storage roles > Predefined roles on the bucket used for data storage. | Data storage bucket |
| IDBroker | This service account will be used by Cloudera to assume the other service accounts. | Workload Identity User (roles/iam.workloadIdentityUser) IAM role Alternatively, you can create a custom role and assign the following permissions:
|
Service accounts (All of the above service accounts except Logger) |
| Additionally, assign the same permissions as those assigned to the Logger service account. | Logs bucket |
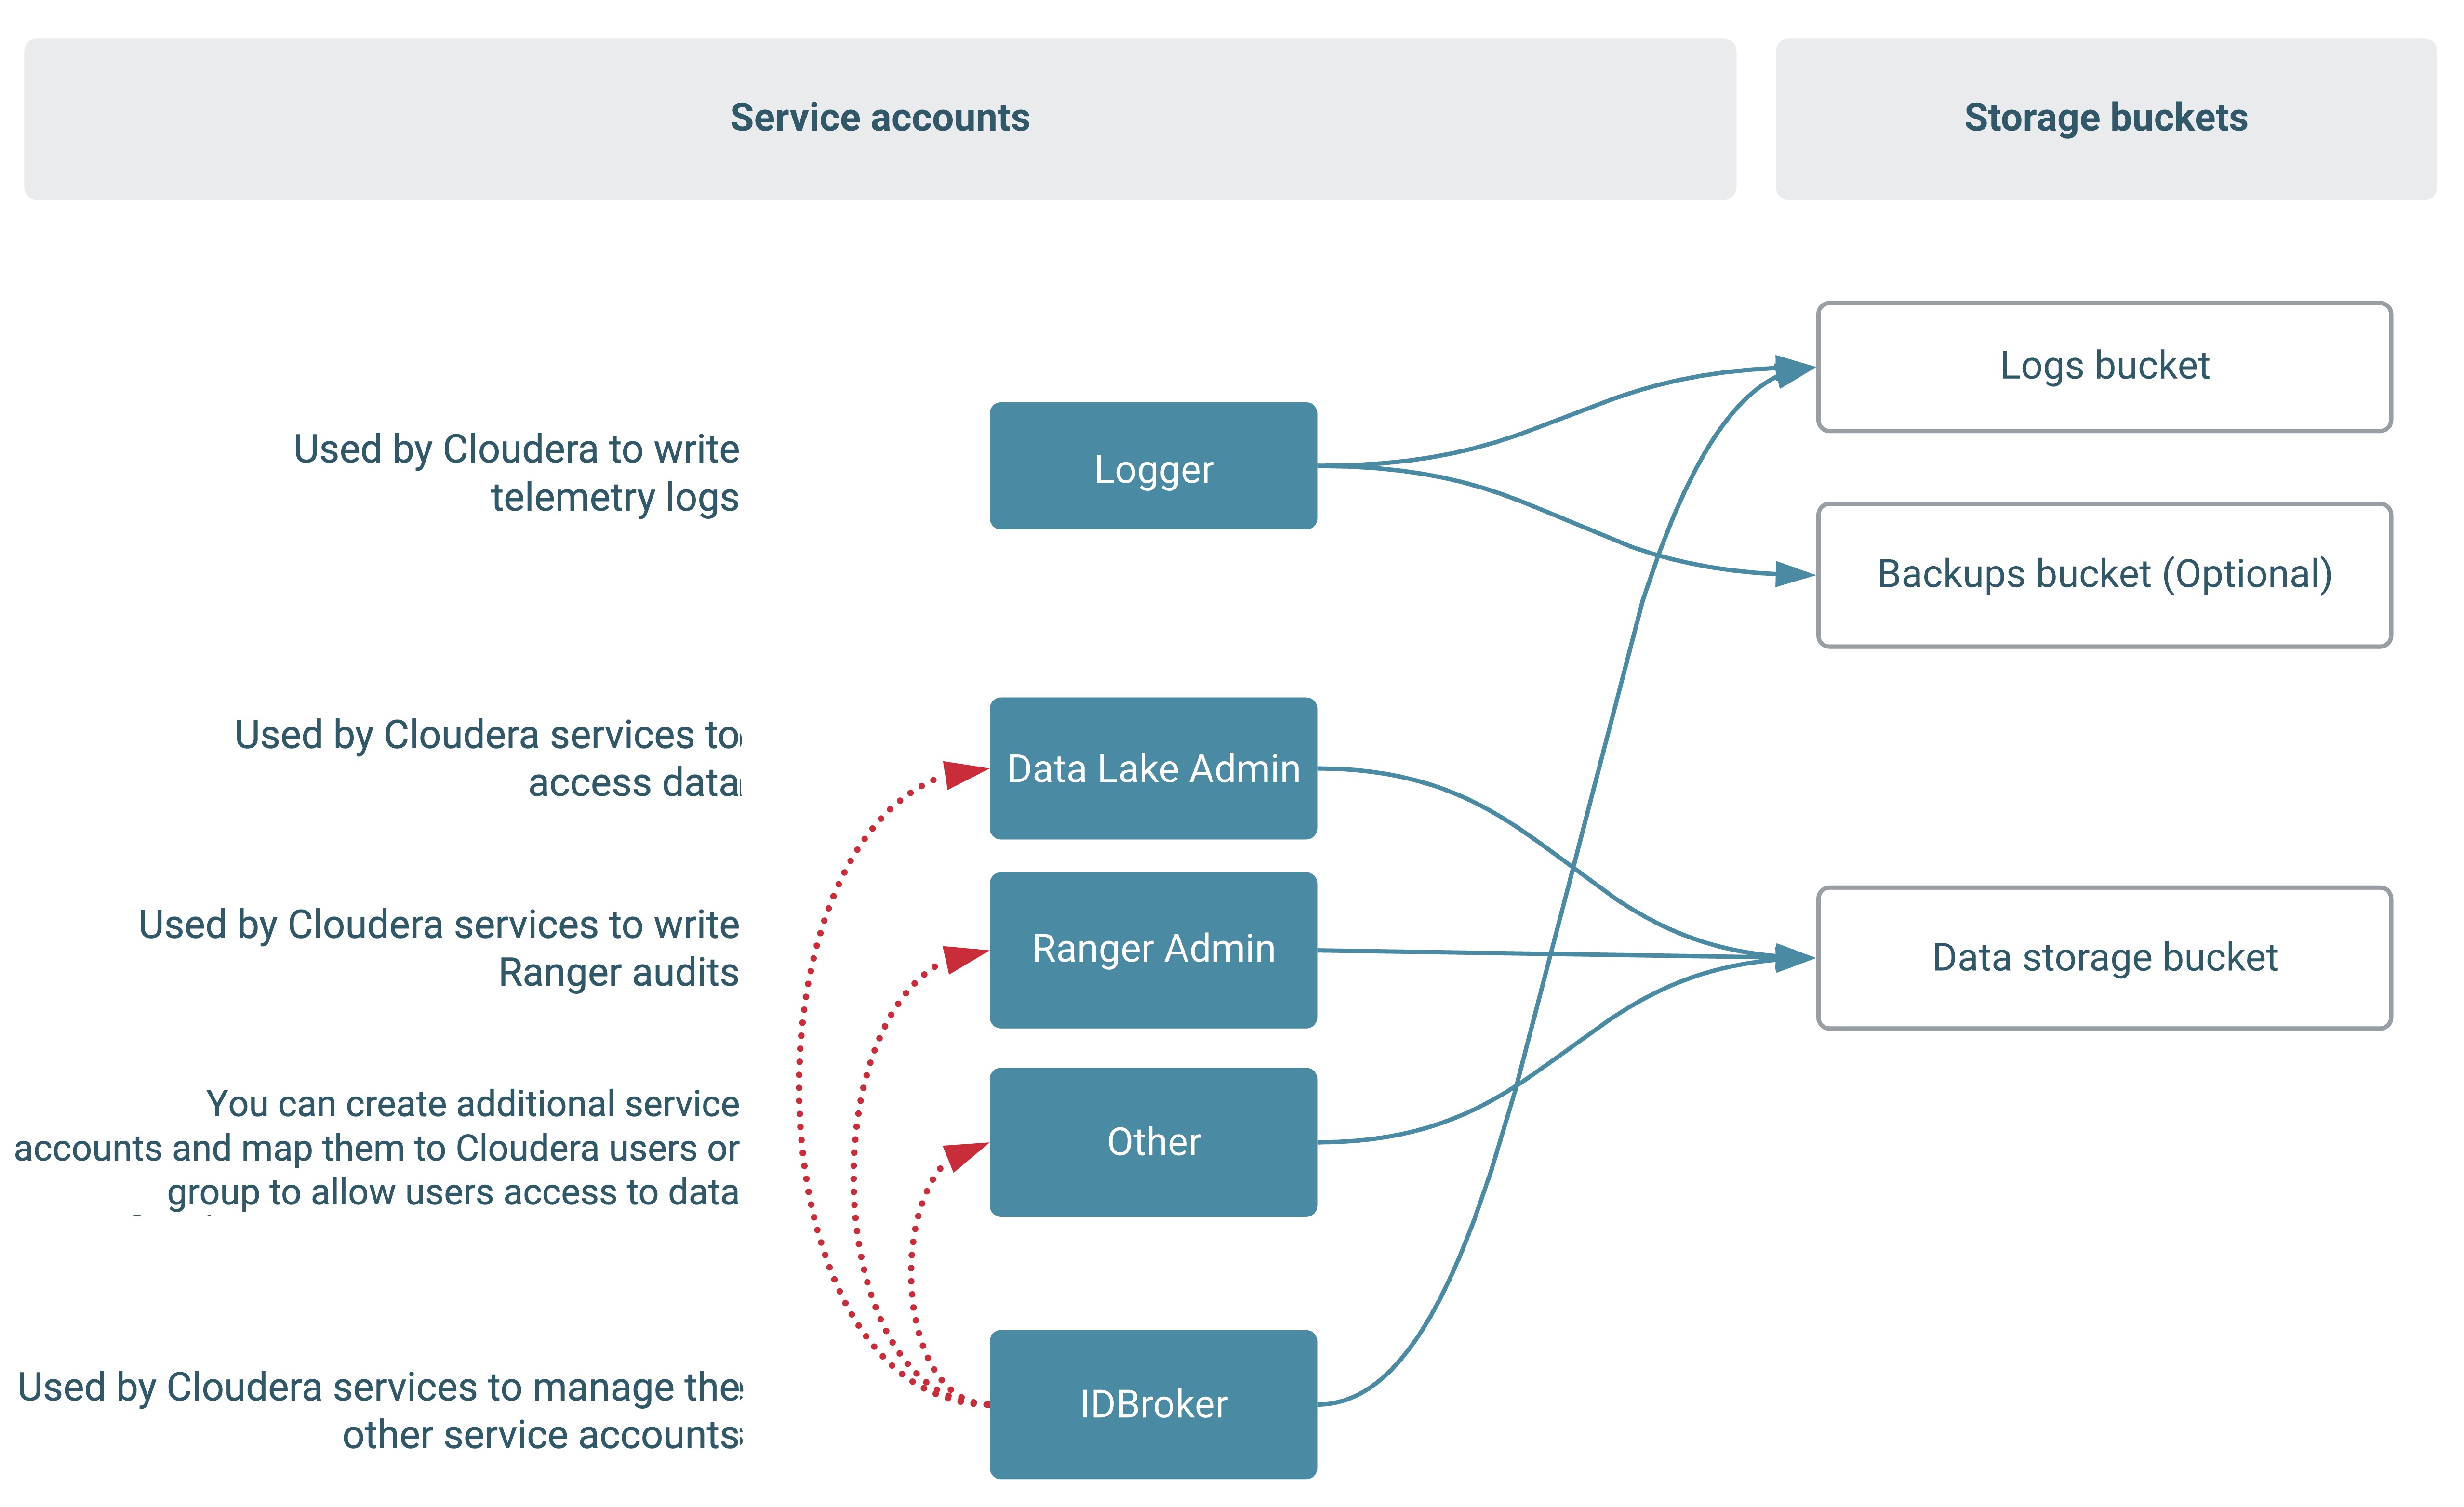
The following diagram illustrates the relationships between service accounts and buckets and between the IDBroker service account and other service accounts. The dotted arrows signify which entity needs access to what. For example, the Data Lake admin role must be able to access the Logs bucket:
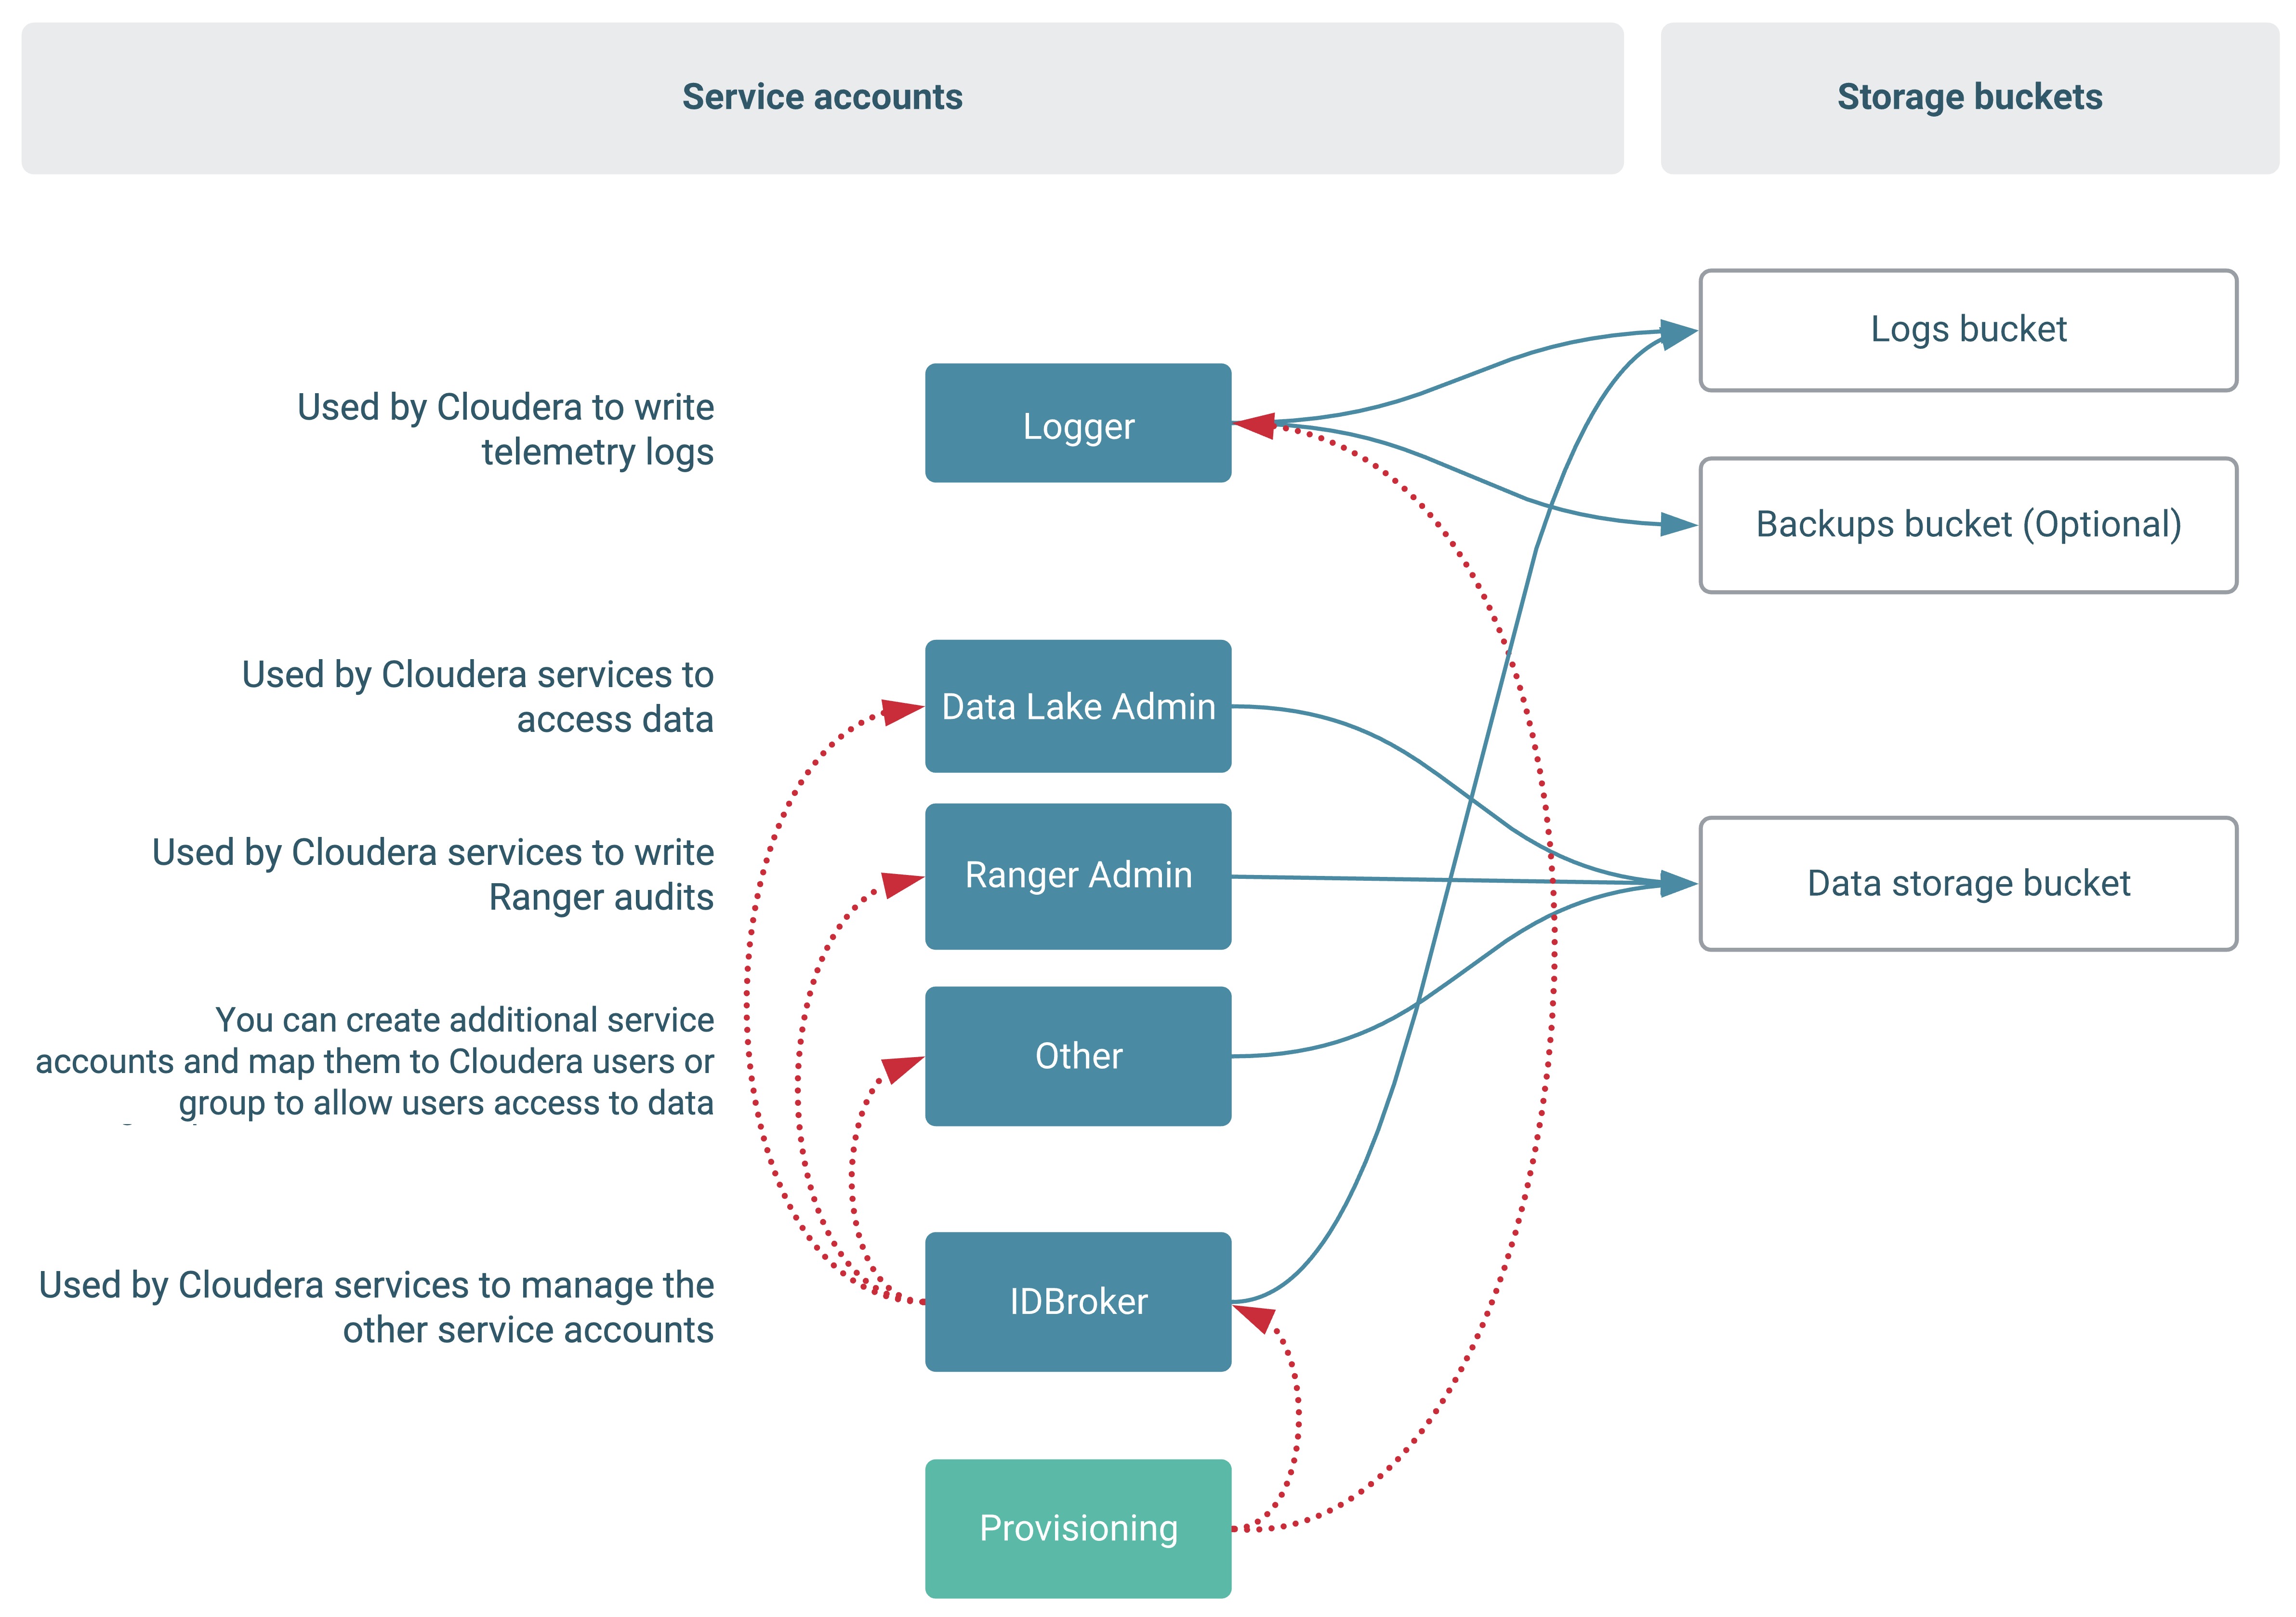
In addition, Cloudera provisioning credential's service account (that you create as part of Create provisioning service account and generate access key) needs to have the Service Account User role to access to the Logger and IDBroker service accounts:
- You should create the required Logs and Data storage GCS buckets. You can also create a separate Backups bucket.
- Create the required service accounts.
- Create the required custom roles.
- Add service accounts as members to the Logs and Data Storage buckets.
- Add the IDBroker service account as a member to other service accounts.
- Add the provisioning service account as a service account user to the Logger and IDBroker service accounts.
- Once you have met all of the GCS prerequisites, you can register a GCP environment in Cloudera.
Create the GCS buckets
Use these steps to create the two required GCS buckets.
Steps
- In Google Cloud console, navigate to Cloud Storage > Browser.
- Click on +Create bucket.
- Name your bucket.
- Click Create.
Repeat these steps for both buckets. Note the bucket names. You will need to provide them to Cloudera later.
For more information, see GCP docs linked below.
Create the service accounts
Use these steps to create the required service account.
Steps
- In Google Cloud console, navigate to the project used for Cloudera.
- Navigate to IAM > Service accounts.
- Click on +Create service account.
- Provide a name.
- Click Create.
Repeat these steps for all service accounts. Copy and save the email addresses
identifying the created service accounts. You will need to provide them to Cloudera. Service account naming convention is
<service-account-name>@<project-id>.iam.gserviceaccount.com.
For more information, see GCP docs linked below.
Create the custom role for the Logger
Use these steps to create the custom role for the Logger service account.
Steps
- In Google Cloud console, in the same project, navigate to IAM > Roles
- Click on +Create Role
- Enter a name
- Click +Add permissions and add all the permissions mentioned in the respective entry in the above table.
- When done adding permissions, click Create.
For more information, see GCP docs linked below.
(Optional) Create other custom roles
If you would like to create custom roles for other service accounts, follow the same instructions as above. You only need to do this if you don't want to use the predefined roles listed in the table.
Add service accounts as members to buckets
Use the following steps to a add service account as a member to a bucket.
Steps
- In Google Cloud console, in the same project, navigate to Cloud Storage > Browser.
- Perform membership and role assignment for the Logs bucket:
- Find your Logs bucket.
- Click on
 >
Edit bucket permissions or double-click on the bucket and then click on the
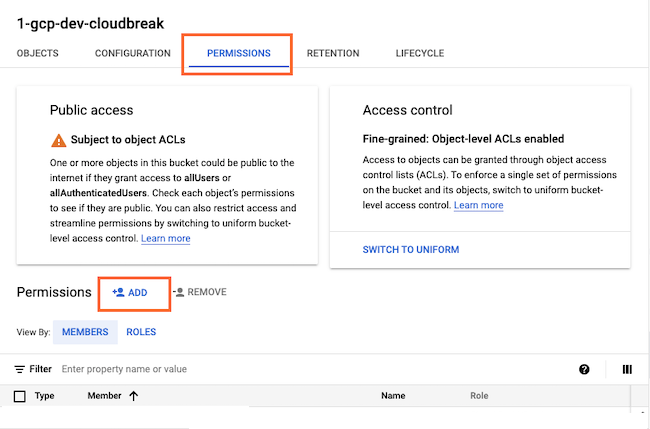
Permissions tab.
 - Next to Permissions, click +Add:
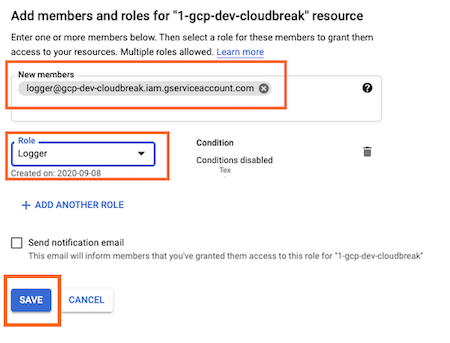
- Under New members, select the Logger service account and the IDBroker service account. Under Role, select the
custom role created earlier (in the screenshot the role is called Logger):
- Click Save.
- If you created the separate Backups bucket for FreeIPA backups, repeat the above steps for the Backups bucket. Use the same Logger service account, IDBroker service account and the custom Logger role created earlier.
- Repeat the above steps multiple times for the Data storage bucket. You need to add the Data Lake Admin, Ranger Audit, and other service accounts (if created) as members of the Data storage bucket and assign the respective roles mentioned in the above table. Each of these role assignments requires a separate set of steps, so you need to repeat the steps as many times as you have service accounts.
For more information, see GCP docs linked below.
Add IDBroker as a member to other service accounts
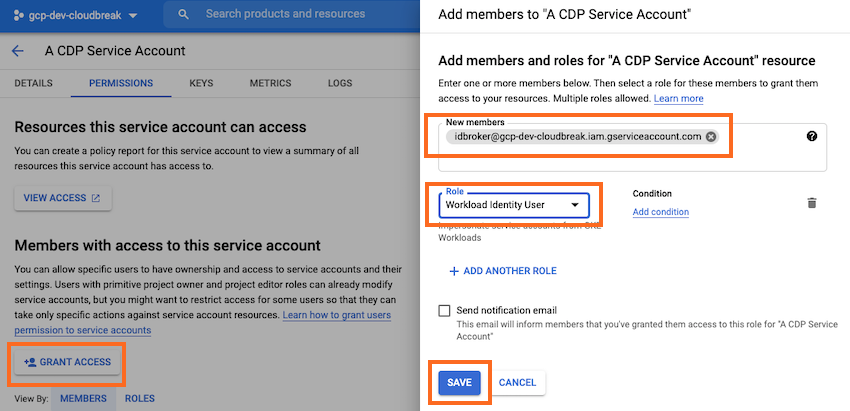
Similarly as with the buckets, you need to navigate to service account permissions and add the IDBroker service account as a member with the specified role.
Steps
- In Google Cloud console, in the same project, navigate to IAM > Service accounts.
- Double-click on the service account entry.
- Navigate to the Permissions tab.
- Click Grant Access and then add the IDBroker service account as a member with
the role specified in the above table:
- Click Save.
Repeat these steps for all service accounts except Logger.
For more information, see GCP docs linked below.
Add provisioning service account as a service account user
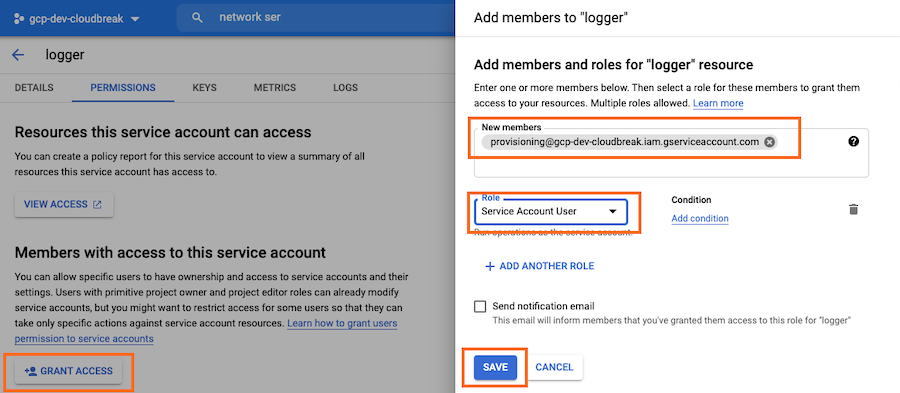
To complete the setup, you need to update the permissions of the Logger and IDBroker service accounts, granting the provisioning service account the Service Account User role.
Steps
- In GCP IAM console, navigate to Service Accounts.
- Find your Logger service account.
- Click Manage Permissions to access the Permissions tab.
- Click Grant Access and then add the provisioning service account as a member with
role Service Account User:
- Click Save.
- Repeat the steps for the IDBroker service account.
Providing the parameters in Cloudera
Once you've created the bucket and instance profiles, provide the information related to these resources in the Register Environment wizard as follows:
Data Access and Data Lake Scaling > Data Access:
| UI parameter | What to provide |
|---|---|
| Assumer Service Account | Select the IDBroker service account created earlier. |
| Storage Location Base | Enter the name of your Data storage bucket created earlier for the storage location base. |
| Data Access Service Account | Select the Data Lake Admin service account created earlier. |
| Ranger Audit Service Account | Enter the email address for the Ranger Audit service account created earlier.
The service account email address uses the following format:
<service-account-name>@<project-id>.iam.gserviceaccount.com. |
| Backup Location Base (Optional) | If you created it, enter the name of your Backups bucket for storing FreeIPA and Data Lake backups. This is optional. If you don't provide this, FreeIPA and Data Lake backups will be stored in the Logger bucket. |
Storage and Audit page > Logs
| UI parameter | What to provide |
|---|---|
| Logger Service Account - Logger | Select the Logger service account created earlier. |
| Logs Location Base | Enter the name of your Logger bucket created earlier for logs location base. |
Data Access and Data Lake Scaling > Mappings
You can use this section to set service account to Cloudera user/group mappings for the additional service accounts created for user access to data. Or you can do this once your environment is running, as part of Onboarding Cloudera users and groups for cloud storage.
