Tracking numerous agents scenario
You are a supervisor in an oil company that is engaged in exploration, development, and production of crude oil. Your company has deployed numerous oil rigs on site X and wants you to monitor data coming out for those oil rigs. Learn how to use parameters to solve such challenges.
Earlier, you needed to create one dataflow for each and every oil rig. So you created numerous dataflows to monitor numerous oil rigs.
Solution
- You use your tooling to create agent specific parameter contexts for the agent IDs of the newly added servers.
- With these items created, you then publish your flow and make the updates available to agents. Edge Flow Manager, when agents heartbeat in with a specific context, are given an update to a flow with the new V2 agent IDs provided. Those agents that have not had a specific context made will use the default, version 1 agent IDs.
Initial setup
You have a class with numerous MiNiFi agents deployed on all the oil rigs and running. You
have built a dataflow inside this class, and published this dataflow to all the MiNiFi
agents deployed on the oil rigs. The dataflow gathers logs from the desired location, for
example /opt/myapp/logs, on the machines and then performs the associated
logic to only get the content which is WARNING or ERROR. You are managing and monitoring the
warnings and errors that are collected at the Edge Flow Manager server for
every heartbeat from the oil rigs.
Actual steps
- To have the agents running the same flow assigned, assign them all to the same class, design your flow, establish your processors and controller services. In this example, the class is RigClass.
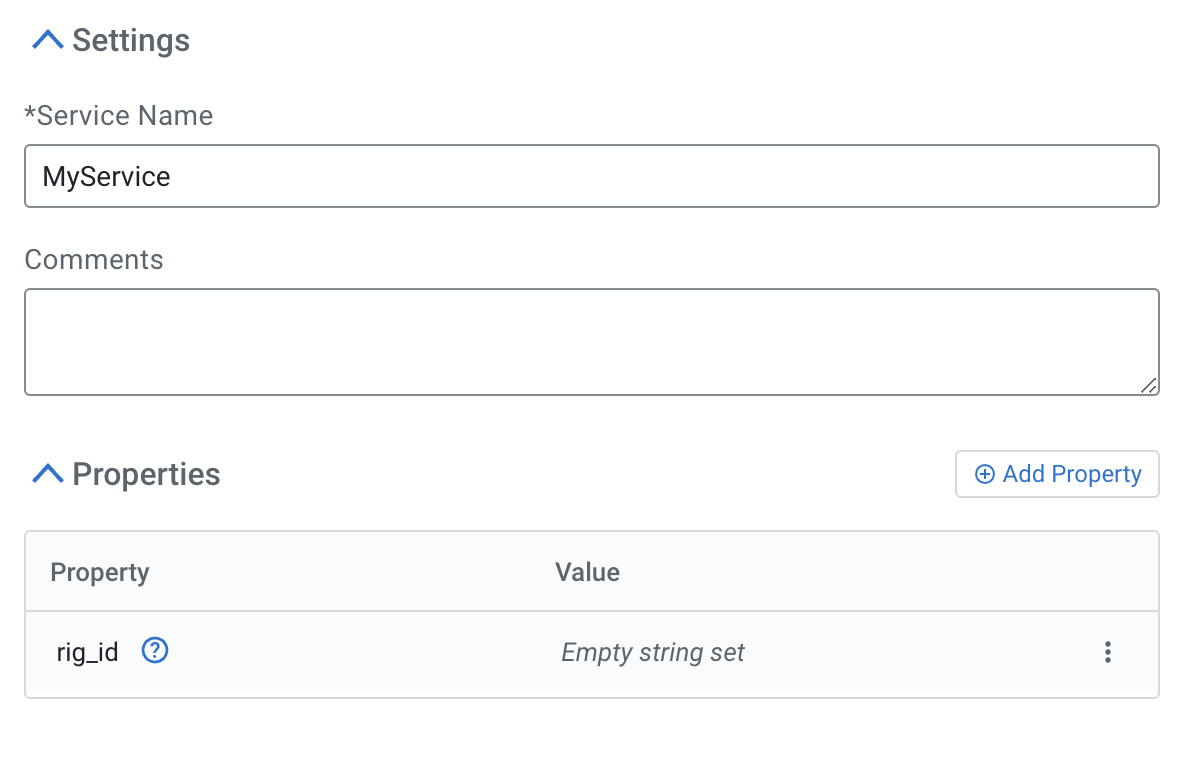
- Open the controller service you want to parameterize and click the blue arrow next to the
property of interest.

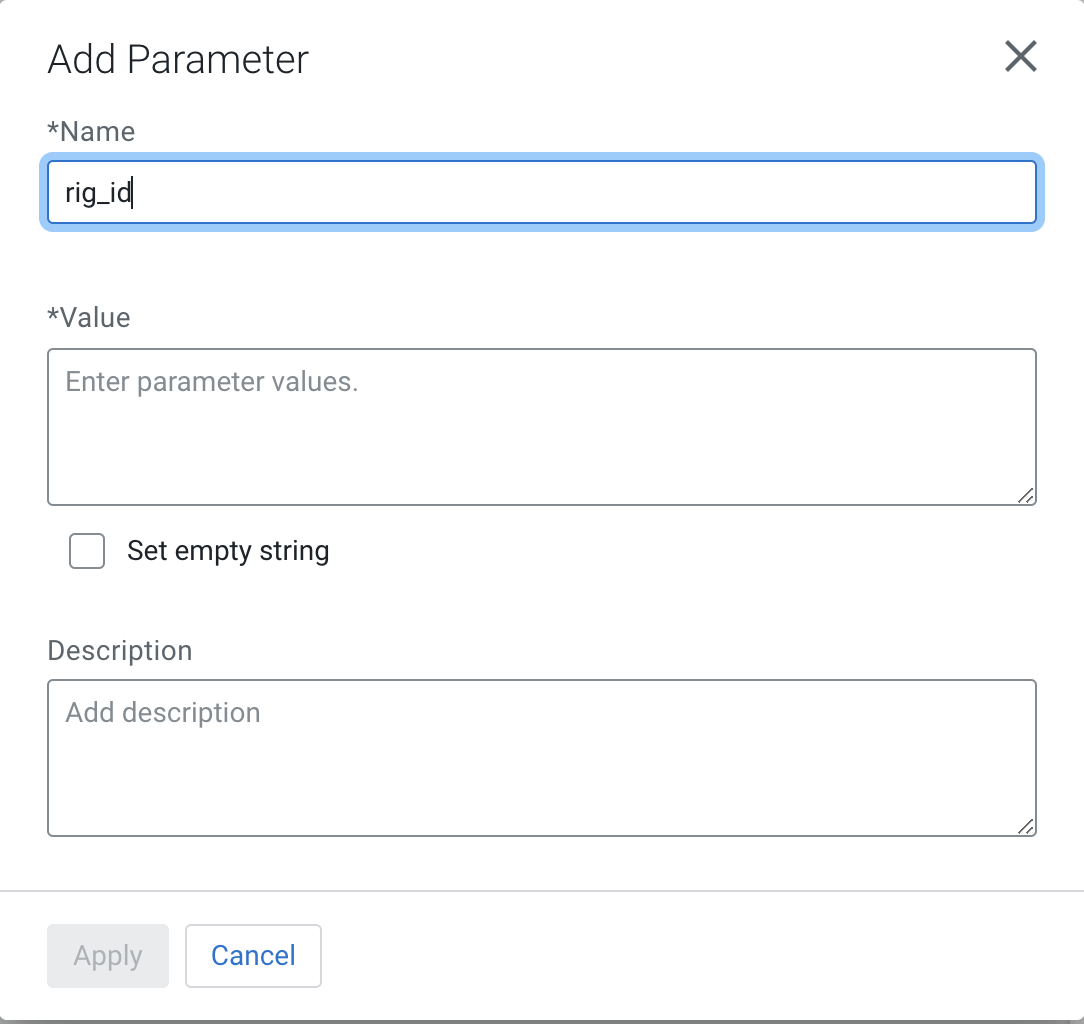
- Define the parameter.

- Specify the name as
rig_idfor the parameter. - Add a value for the parameter.
- Optonally, you can provide a description for the parameter.
- Once all fields are populated, click Apply.
- Specify the name as
- When you have added all the parameters that you need, click Apply on
the Controller Service pane to complete this configuration.
This establishes a parameter context for the flow. You can provide agent-specific values to override the default values of
rig_id. Alternatively, you can choose to deploy the flow with default values. - Given that there are potentially a large number of instances addressed, the design choice
was made to make this available programmatically without any specific UX at this
juncture. You can issue these commands from the command line, a REST client in your
program of choice, or through the Swagger UI (
http://<efm
              address:port>/efm/swagger/ui.html
). This example shows command line curl and Swagger approaches for addressing these items. If you manually assigned IDs to your agents, throughnifi.c2.agent.identifierinbootstrap.conf, compile your list of those entities. If you have not, we can collect the auto-generated identifiers.- For collecting the auto-generated IDs, use the REST API.
Through Swagger, use the following endpoint:
http://localhost/efm/swagger/ui.html#/Agents/getAgentsBy clicking Try it out, you can execute. Look through the results and extract the agent identifiers, such as:{ "identifier": "myagentidentifier1", "agentClass": "RigClass", "agentManifestId": "b472989e-705a-3125-a2dd-7f26bdd908b9", "status": { "uptime": 1572535845540 }, "state": "ONLINE", "firstSeen": 1572535764479, "lastSeen": 1572535845662 }Through the command line, usecurland thejqtool to extract these, such as highlighted in this script (get_agents_for_class.sh):
This gives a listing of all identifiers:#!/bin/bash -e # Specify the base location of the EFM server efm_address="http://c2652-node1.coelab.cloudera.com:10090" efm_api_base_url="${efm_address}/efm/api" [ -z "$1" ] && { echo "No class name supplied"; exit; } query_class=$1 # Select all agent identifiers for the provided query_class and class_agents=$(curl -s -X GET "${efm_api_base_url}/agents/page?agentClass="${query_class}"" -H "accept: application/json" | jq -r .elements[].identifier) echo "${class_agents}"./get_agents_for_class.sh RigClass Myagentidentifier1 - You would then like to assign values for each instance and formulate an update to
change these items. As you were thinking about scaling, you decided to opt for
programmatic changes in lieu of manually editing each item. Again, you can address
this in two manners, either through Swagger or command line.
Through Swagger, use the following endpoint:
http://localhost/efm/swagger/ui.html#/Agents/createAgentParametersBy clicking Try it out, you can generate the payload and hit execute. In the case of multiple overrides, additional JSON objects to this payload would be provided.
More likely however, you will have a repository/store of information you would like to impart on each asset. Doing this programmatically via CLI (or other tooling) is the most common path we have seen and could be accomplished through an interaction as shown in (create_params_for_agent.sh):
By iterating over the identifiers we found before with their associated values.#!/bin/sh -e efm_address='http://localhost' efm_api_base_url="${efm_address}/efm/api" [ -z "$1" ] && { echo "No agent ID specified"; exit; } agent_id=$1 agent_key=$2 agent_value=$3 # Update the agent i echo "Updating Agent ID: ${agent_id} parameter context to override value for ${agent_key} to ${agent_value}" curl -s -X DELETE "${efm_api_base_url}/agents/${agent_id}/parameters" curl -s -X POST "${efm_api_base_url}/agents/${agent_id}/parameters" \ -H "accept: application/json" \ -H "Content-Type: application/json" \ -d "[{ \"name\": \"${agent_id}\", \"sensitive\": false, \"description\": \"Agent overridden value\", \"value\": \"${agent_value}\" }]"./create_params_for_agent.sh myagentidentifier1 rig_id rigid1 Updating Agent ID: myagentidentifier1 parameter context to override value for rig_id to rigid1 {"id":"cfd553d8-fc2c-491d-af1b-9554a59c90d2","name":"Agent specific context for agent myagentidentifier1","parameters":[{"name":"myagentidentifier1","sensitive":false,"description":"Agent overridden value","value":"rigid1"}]}{"id":"038d0129-1150-4016-ab99-328ffbf09437","name":"Agent specific context for agent myagentidentifier1","parameters":[{"name":"myagentidentifier1","sensitive":false,"description":"Agent overridden value","value":"rigid1"}]}
- For collecting the auto-generated IDs, use the REST API.
- With everything configured, go back to the flow and publish.
Next time agents heartbeat in, the agents receive the updated flow with their associated overrides based on their identifiers. Do note that these parameter overrides are immutable, so if you want to adjust, add, or remove values for an agent, it will need to first be deleted for the agent before creating it.
