Getting started with Cloudera SQL Stream Builder
Get started with Cloudera SQL Stream Builder in Cloudera Streaming Community Edition.
- How to access Streaming SQL Console
- How to create a project
- How to create a SQL job
- How to generate data to Cloudera SQL Stream Builder
- How to create tables and views
- How to query data
- How to output the queried results using different solutions
1. Creating a project
As a first step to use Cloudera SQL Stream Builder, learn how to create a project with git synchronization where you can create and manage jobs, resources and experience the SDLC of Cloudera SQL Stream Builder applications.
After accessing Streaming SQL Console using http://localhost:18121 from your
browser and signing in, you are redirected to the Projects page of
Streaming SQL Console.
- Providing Software Development Lifecycle (SDLC)
- Projects allow you to group together resources for a task based on for example a business logic that you would like to solve with Cloudera SQL Stream Builder. Resources are data sources, tables, user-defined functions, and Materialized Views that are needed for SQL jobs in a project.
- Version control and backups with Git
- You can export and import the project to a Git repository, track versions using different branches and push your changes with commit messages as with any software project.
- Enabling collaboration within a project
- You can invite team members to your project to work together with the shared resources. The members you invite to a project can work with the same resources, and you can also assign an admin to the team who has the same privileges as the owner of the project.
- Customizing environments with variables
- You can create environment files that contain project-specific configurations as key-value pairs that are used for substituting cluster specific information.
As an example, you can create a transaction_monitoring project using the Community Edition in your local environment, set up the resources such as tables, data sources and jobs, and then migrate the project using a Git repository to a CDP cluster or environment.
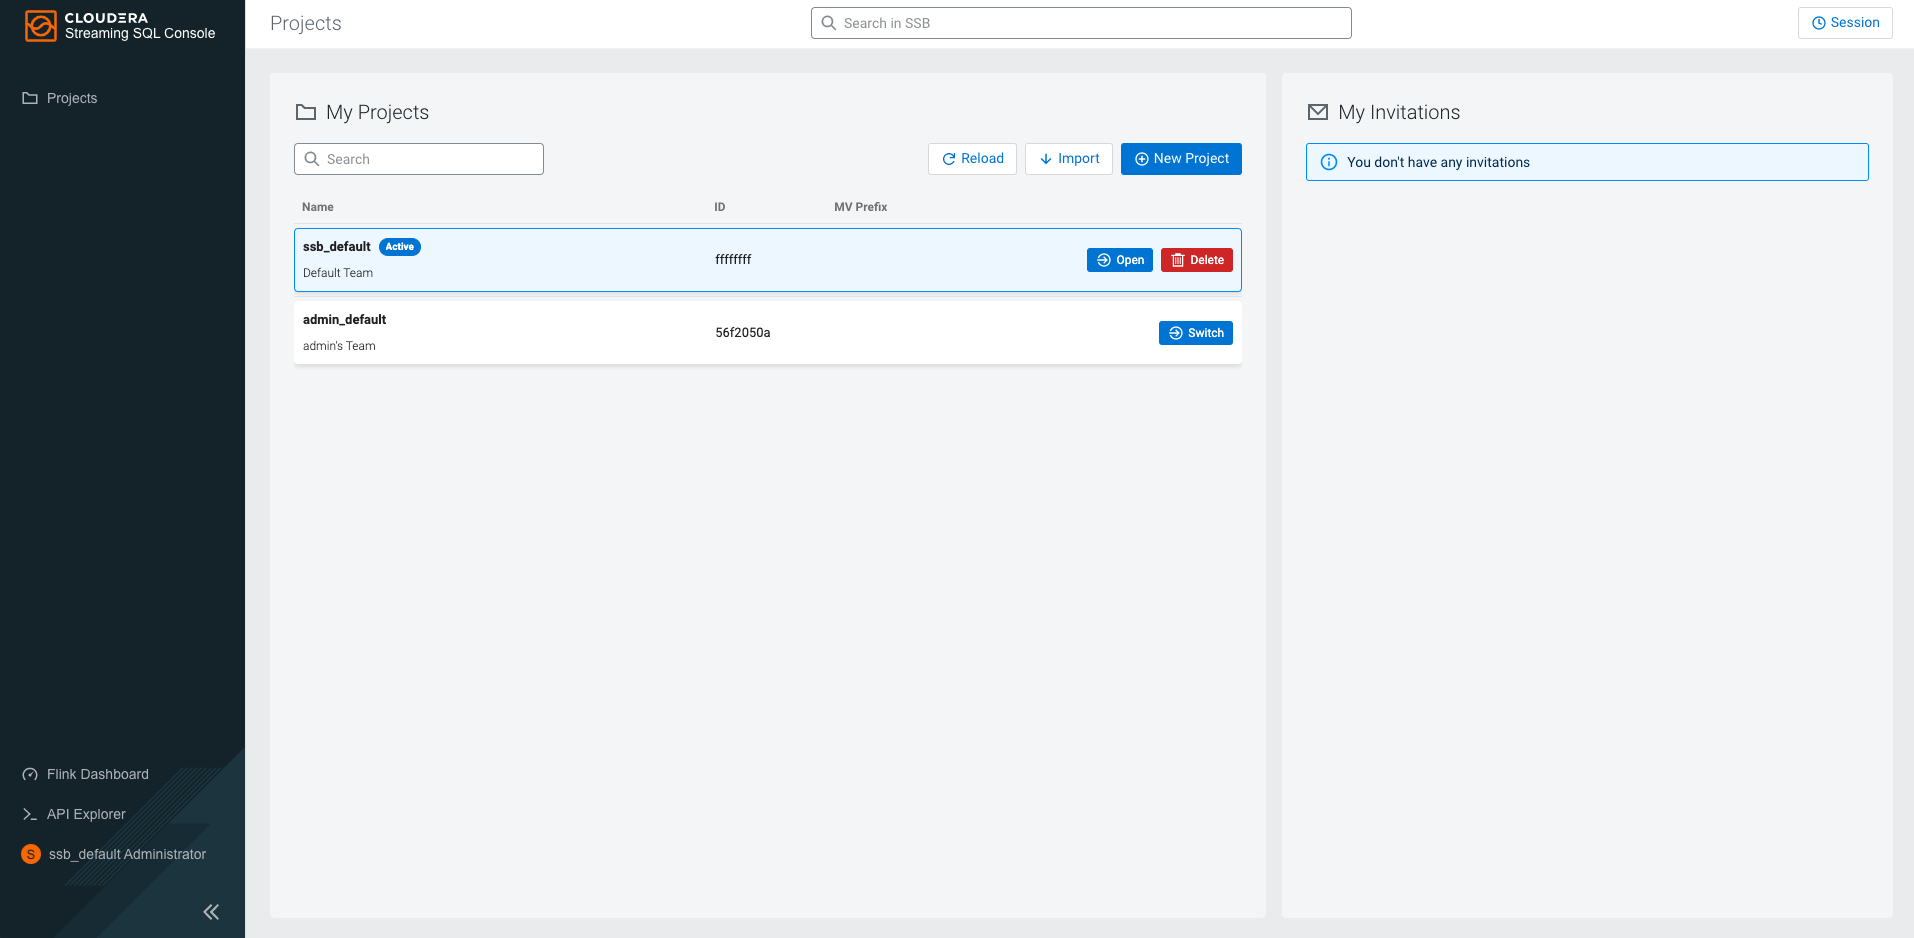
When you access the Streaming SQL Console, there are already existing projects on the
My Projects page. The ssb_default and
[***USERNAME***]_default projects are automatically
generated projects. The ssb_default project and its resources are visible to
every user, while the [***USERNAME***]_default project and
its resources are only visible to that user. Every user has its own project generated by
default where members can be invited.
To create a project in Streaming SQL Console, you need to click on New Project on the Projects page and provide the Name of the project, add a description if necessary and set up the dedicated Git repository for synchronization. For example, you can name the project transaction_monitoring, add Monitoring orders and transactions as description, and use a dedicated Git repository with a main branch.
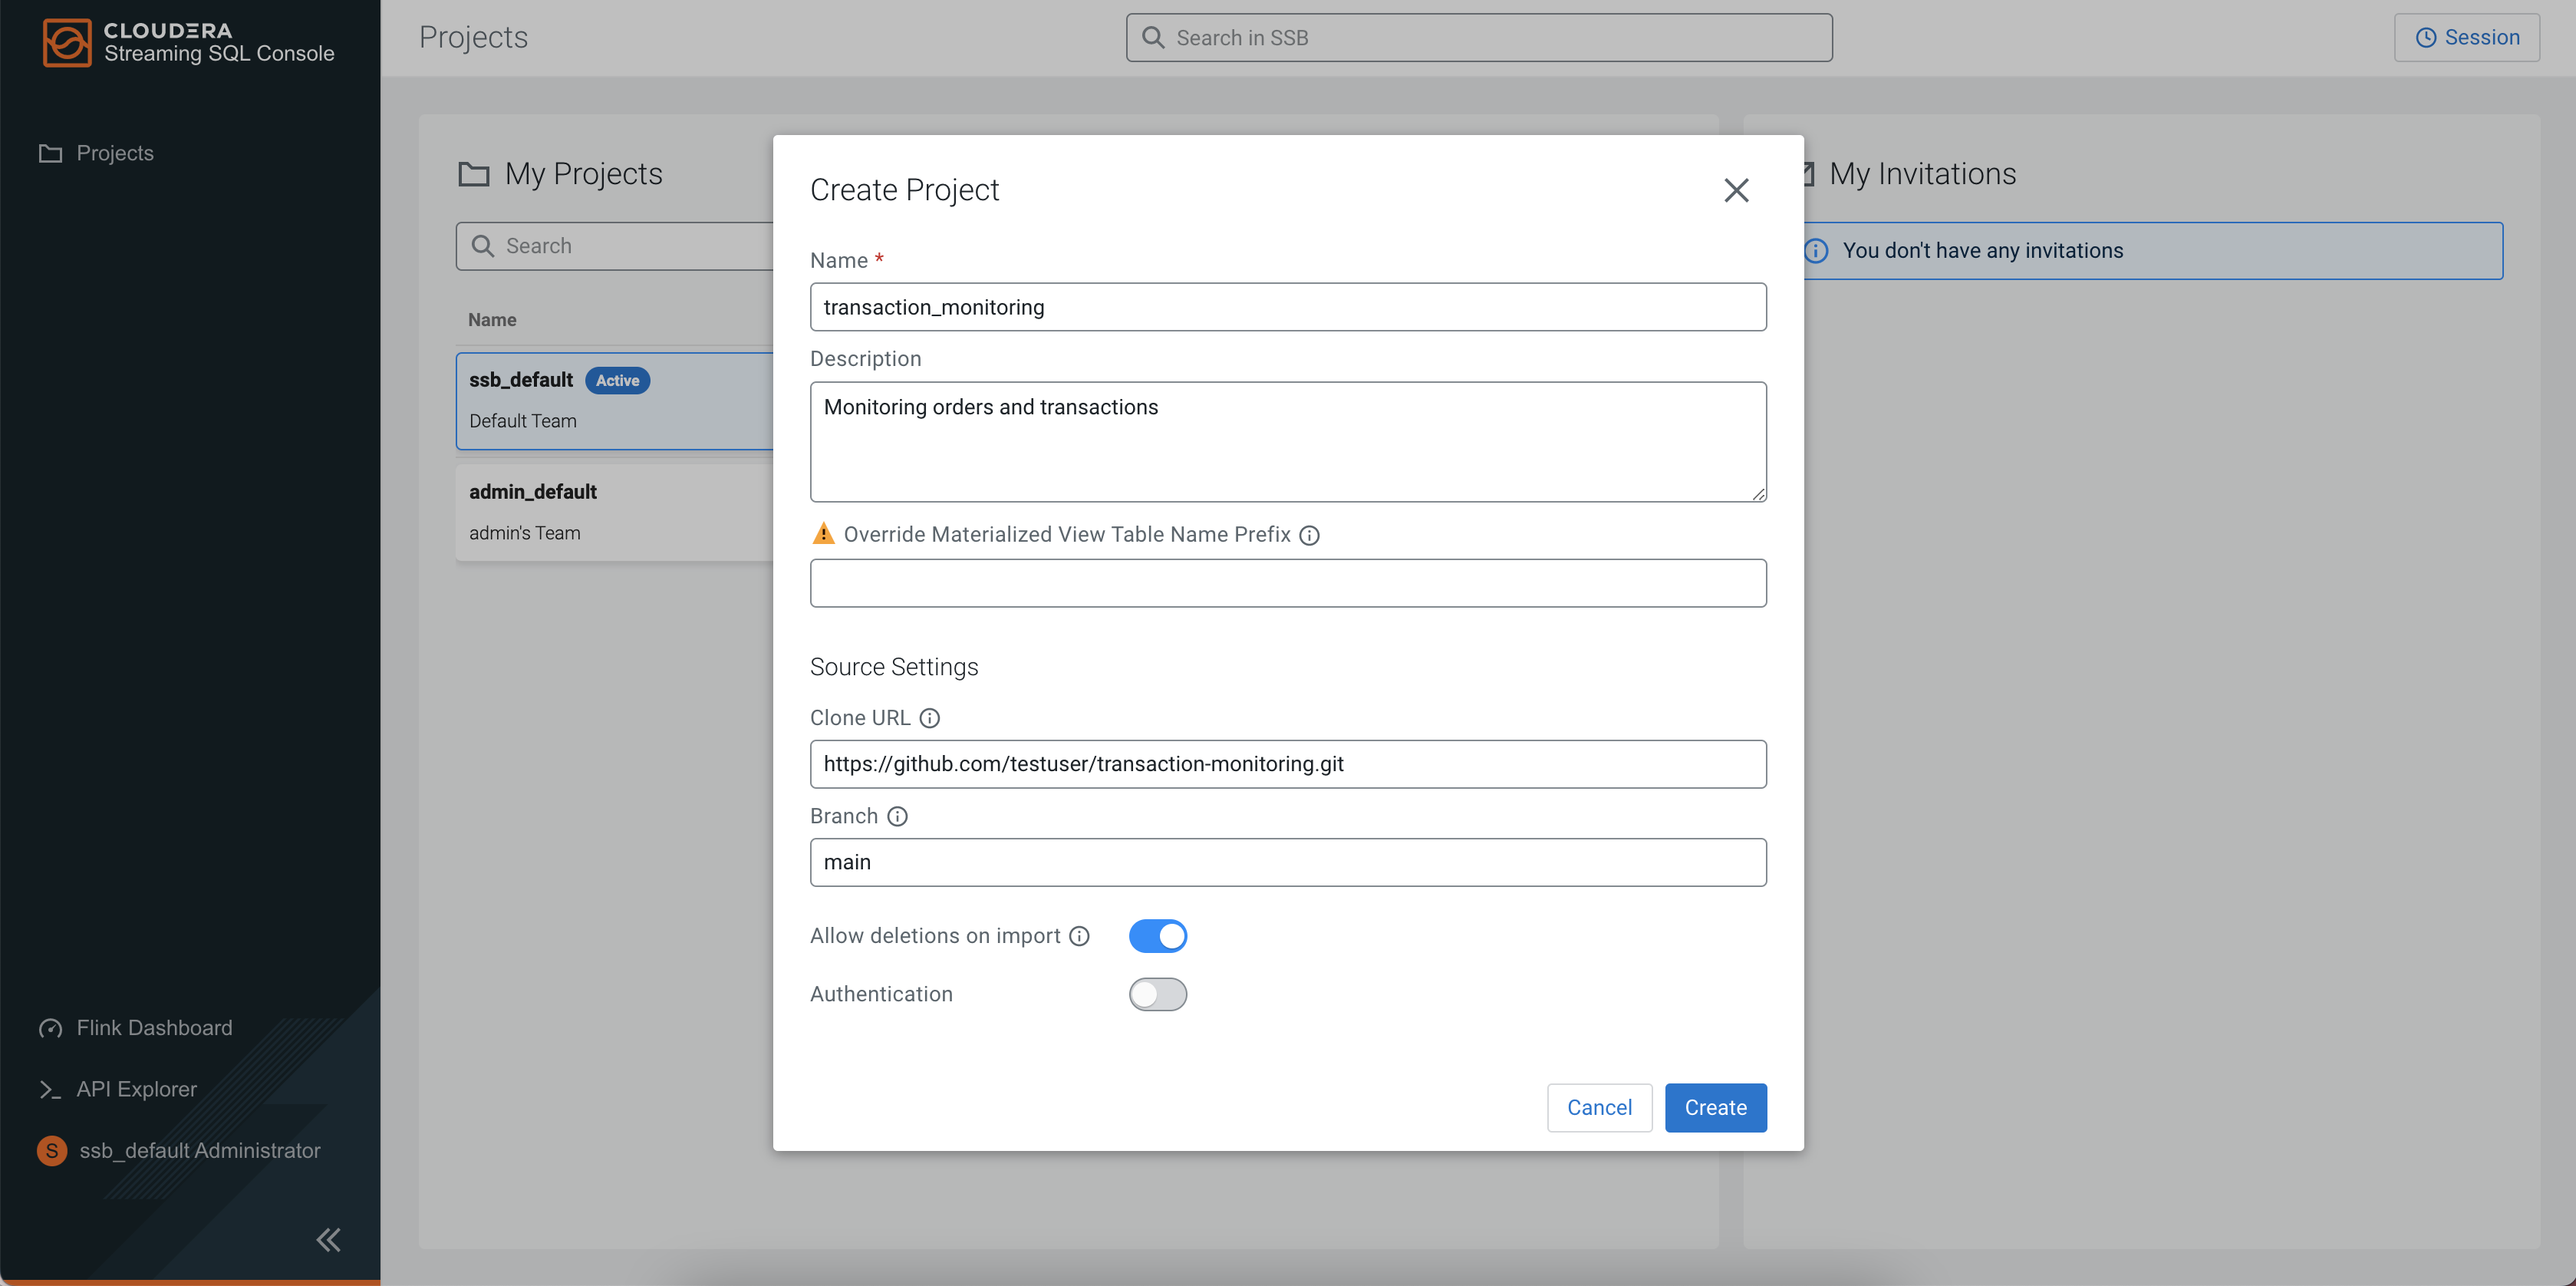
Click Create, and click to be redirected to the Explorer view of the created project.
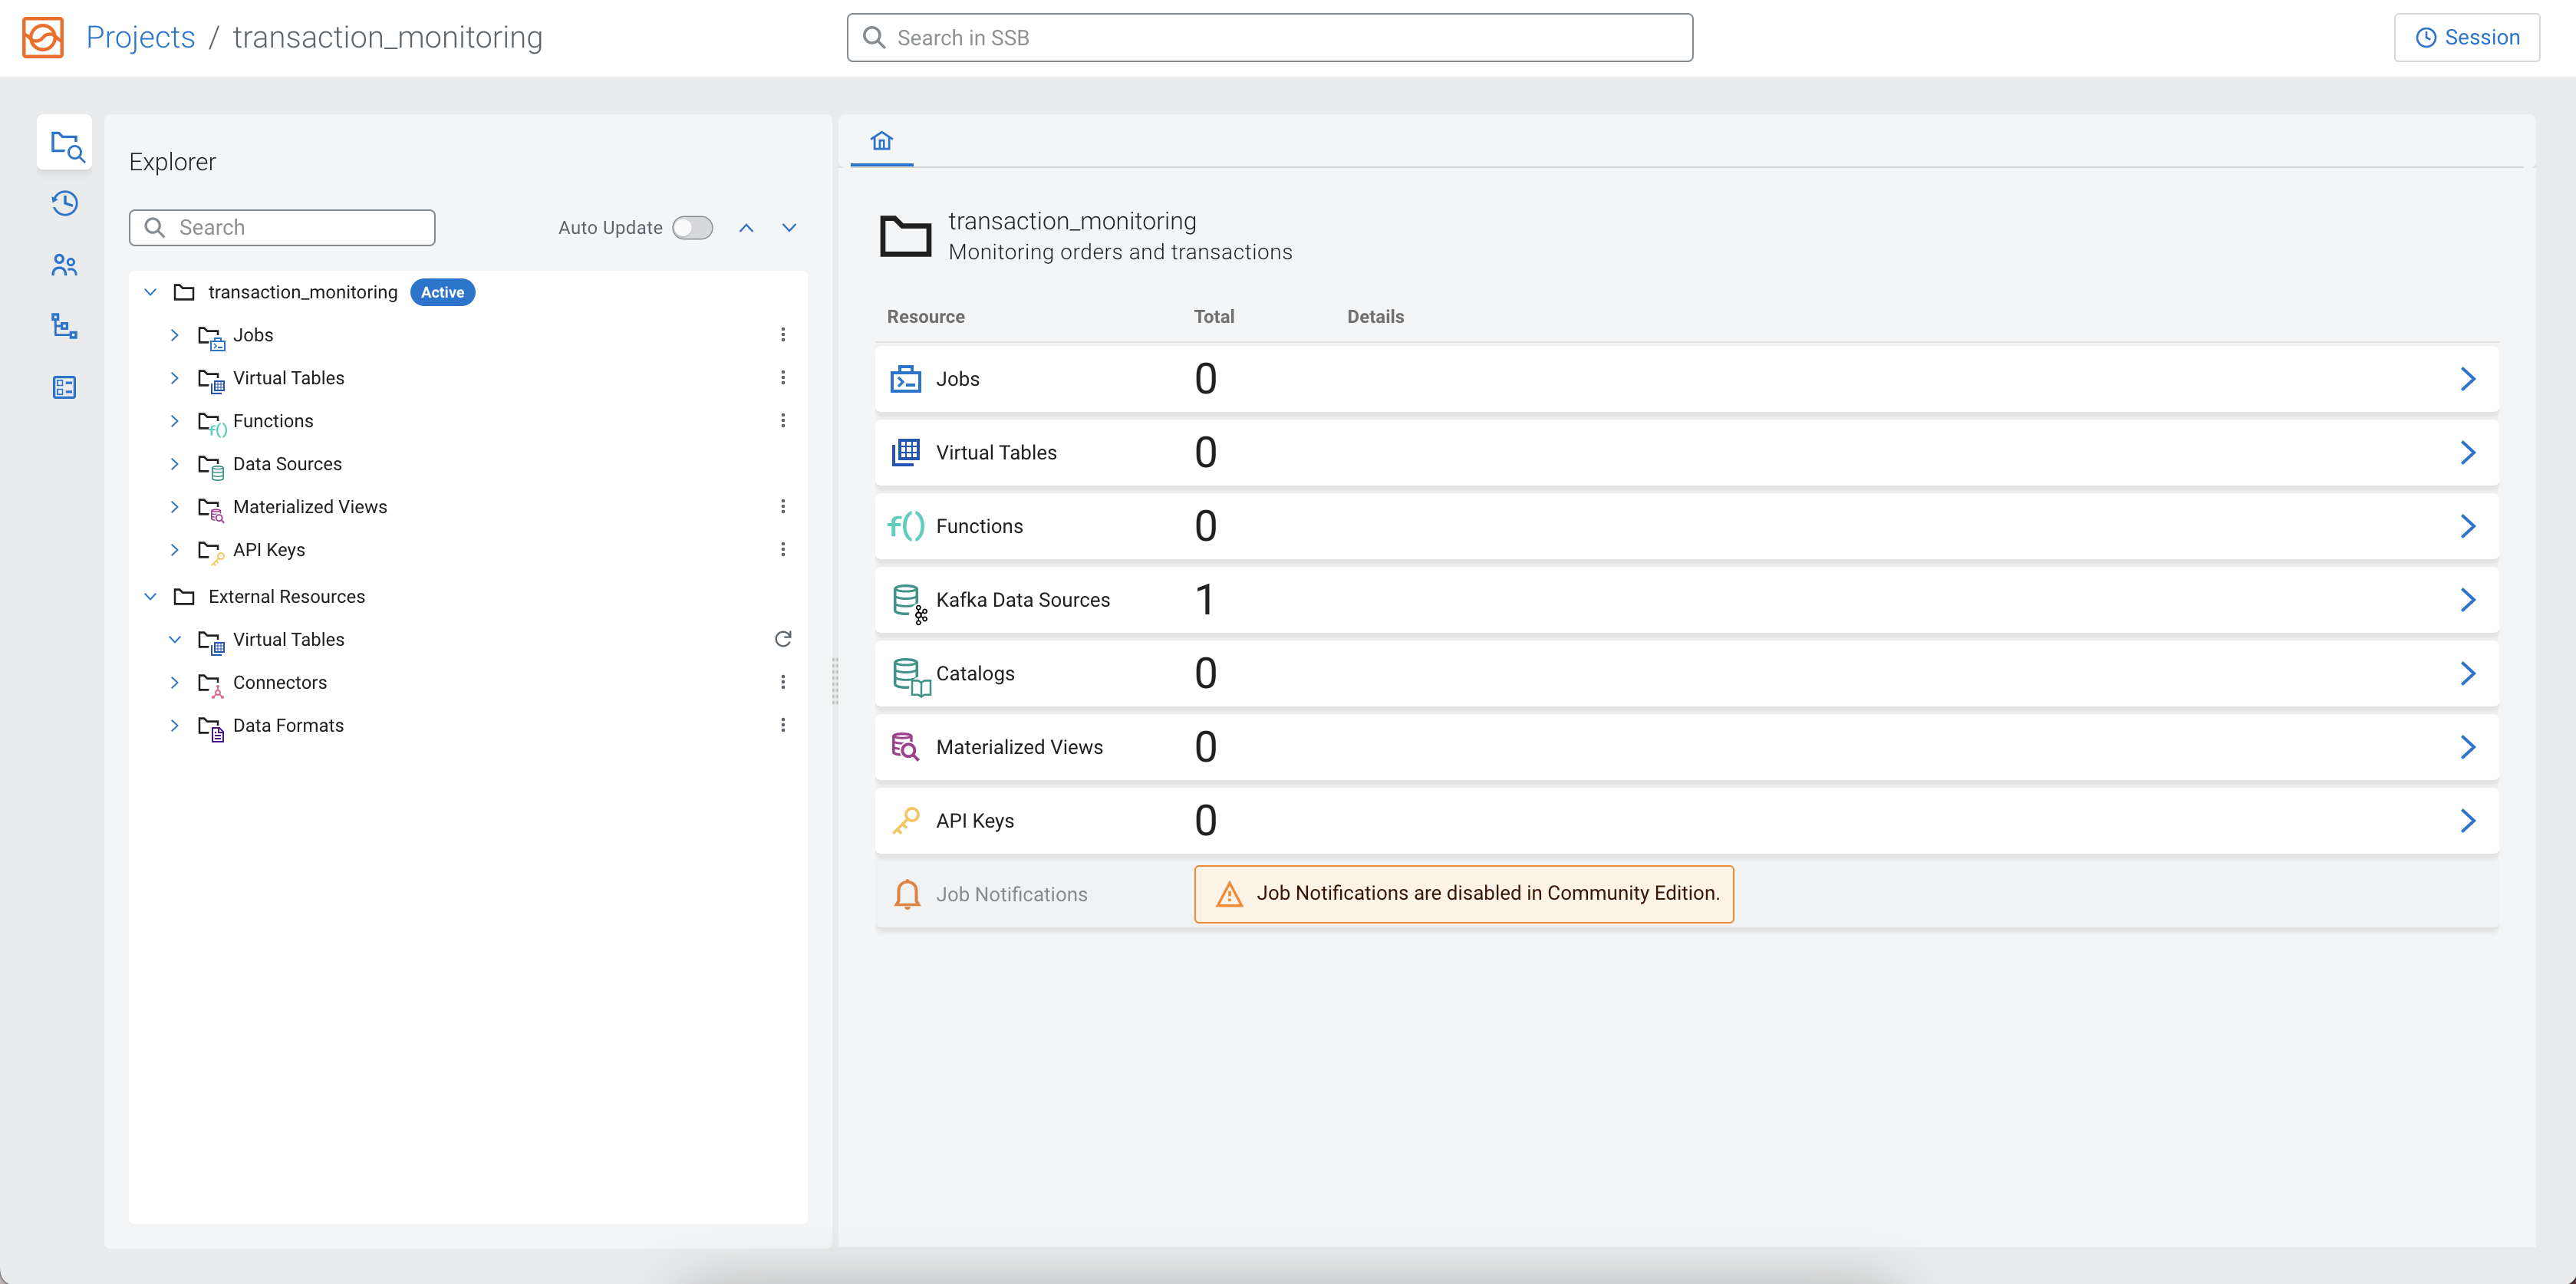
Within the created project, you can use the tree structure on the left side to review and manage the resources in a project. You can also use the home page of the project on the right side, and manage the resources of the project in a tab view.
2. Creating a job and table
When you created your project and set up Git for version control, learn how to create a job and a table that generates random data using the included Faker connector after accessing the Streaming SQL Console.
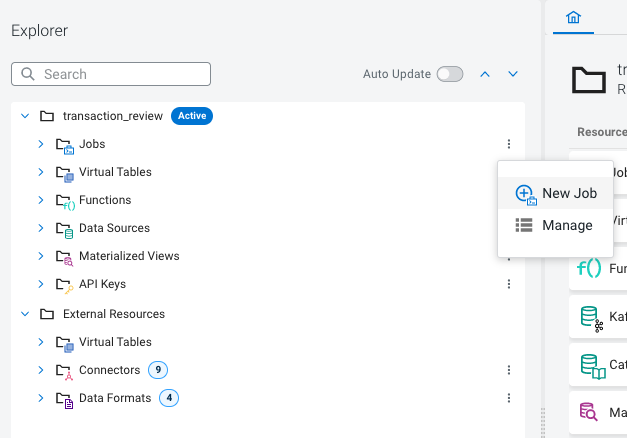
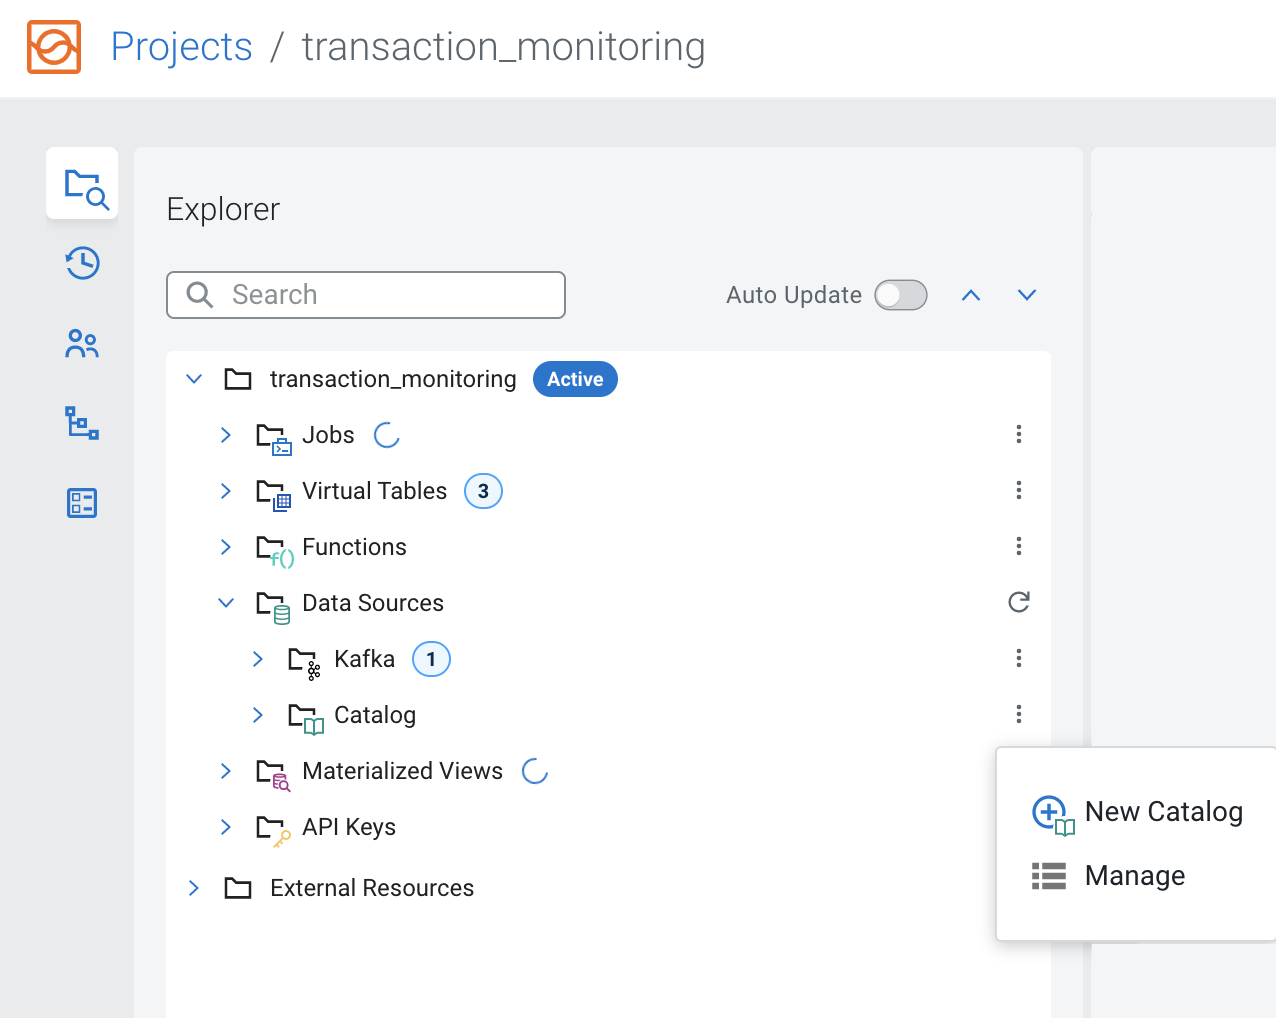
You can easily create a new job using the Explorer view of your project
by clicking on the ![]() button next to Jobs and select New
Job.
button next to Jobs and select New
Job.
- Use the predefined name in the Job Name field when opening the Streaming SQL Console
- Use the Generate Job Name button to generate a new random name for your job
- Manually provide the name of the job to the Job Name field
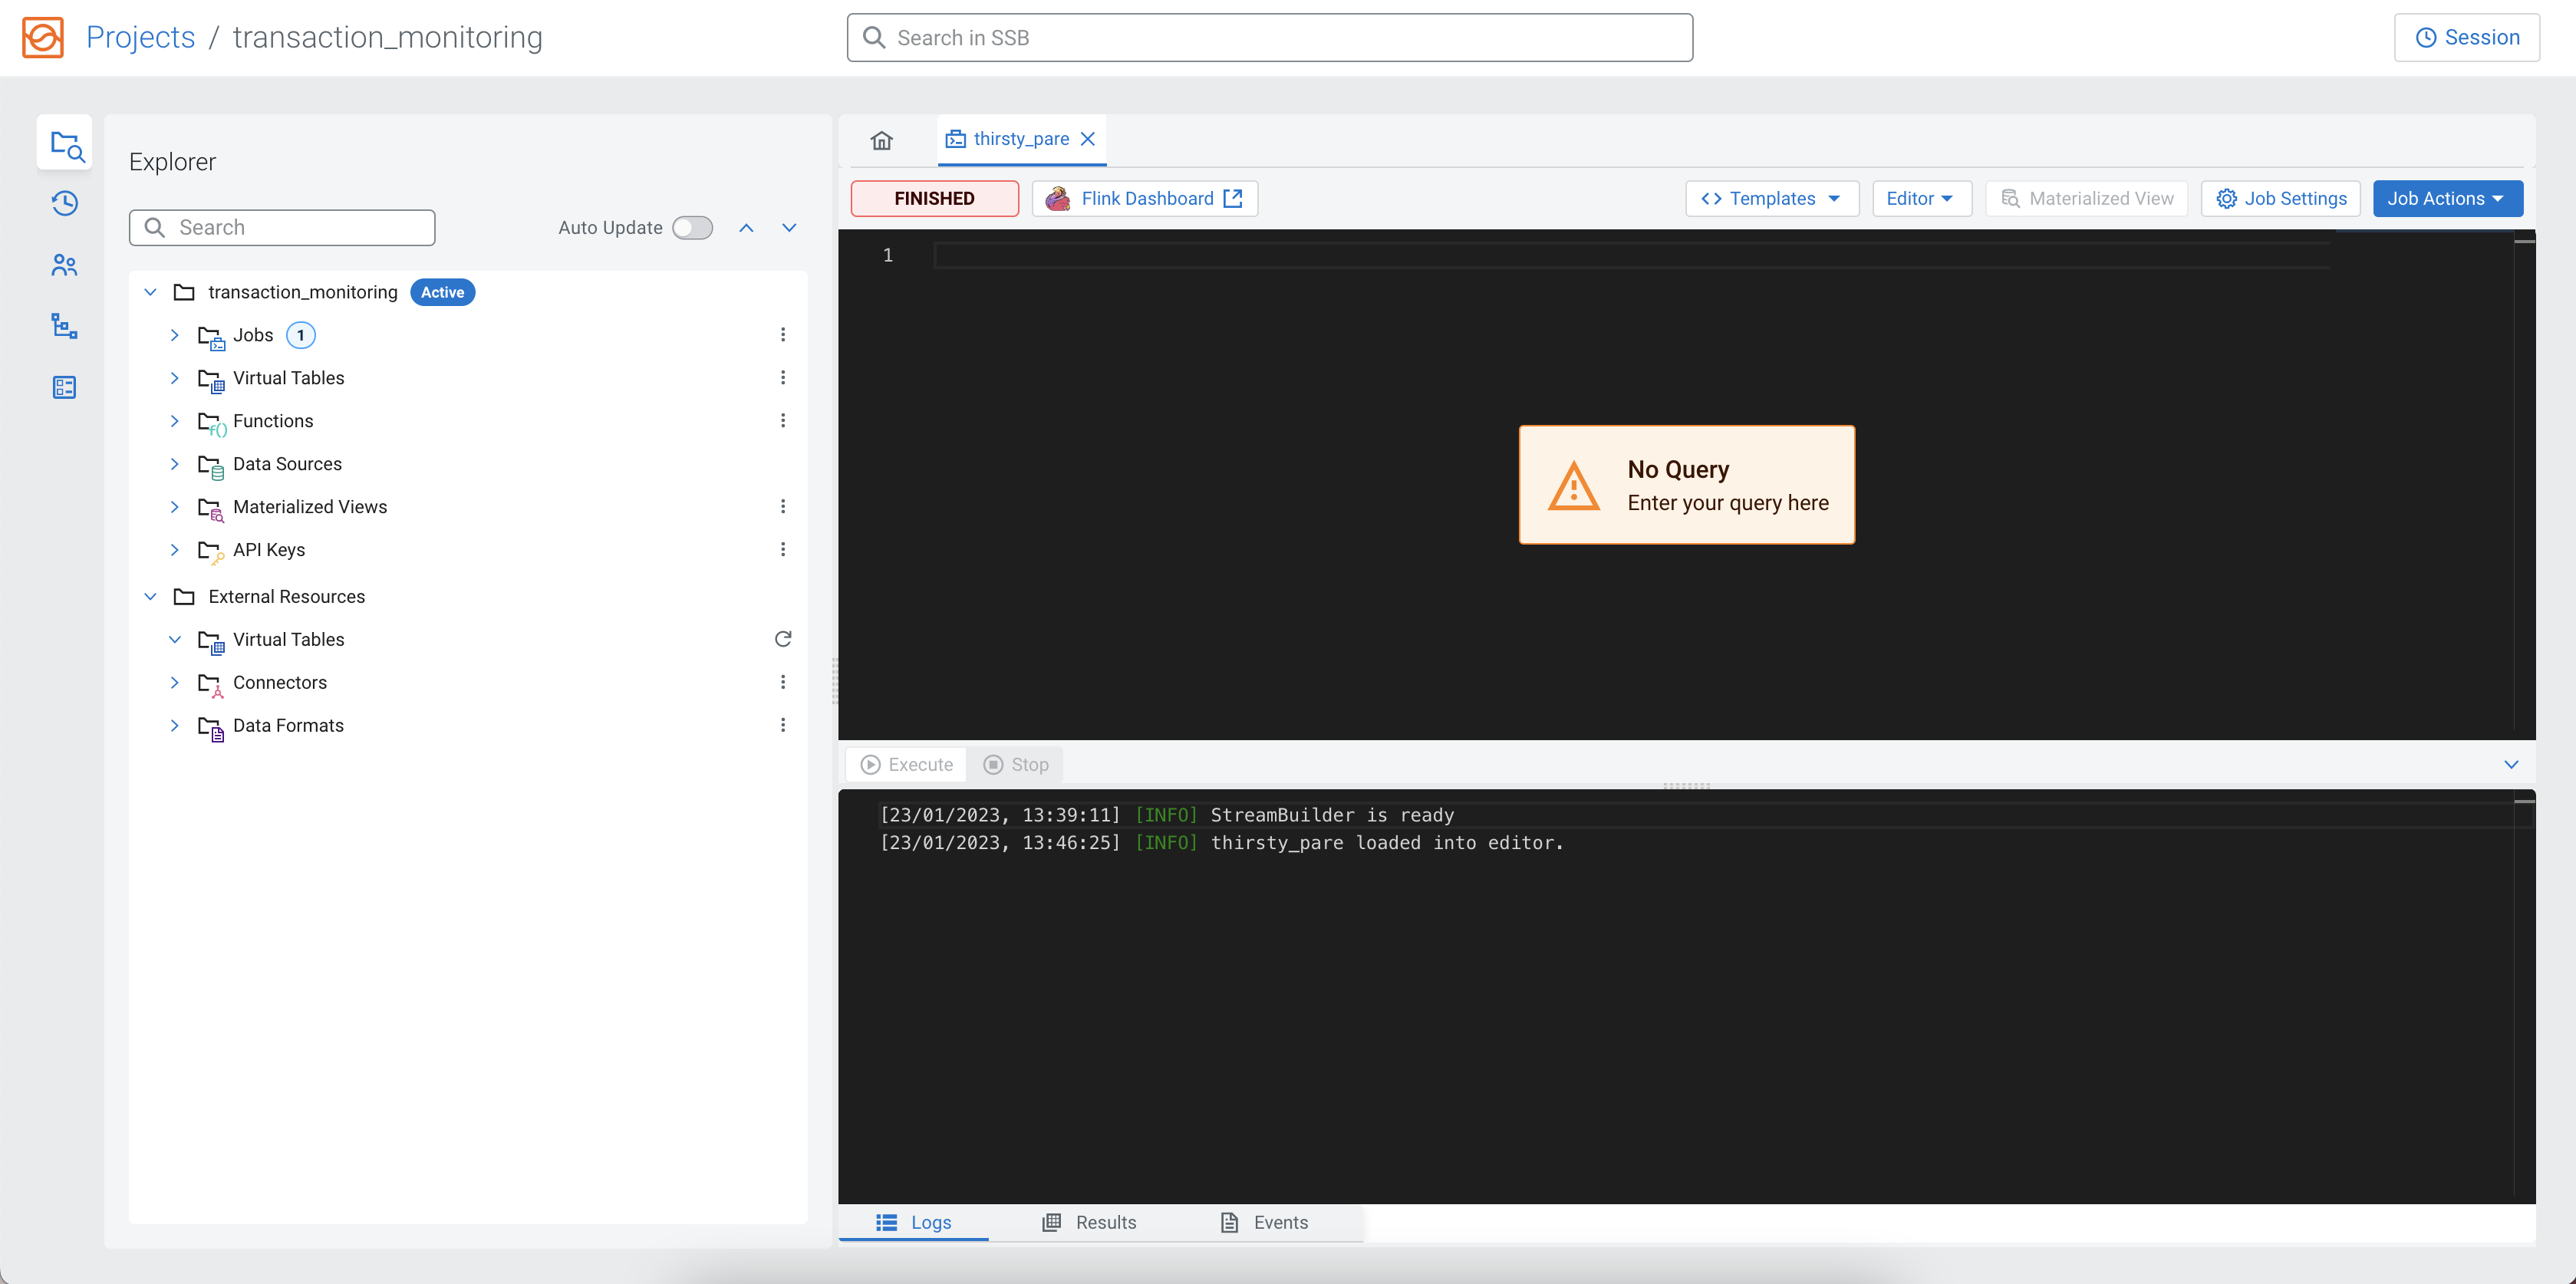
As a first step in executing a SQL query, you need to create a table. At this point, you can use the predefined templates under the SQL Editor.
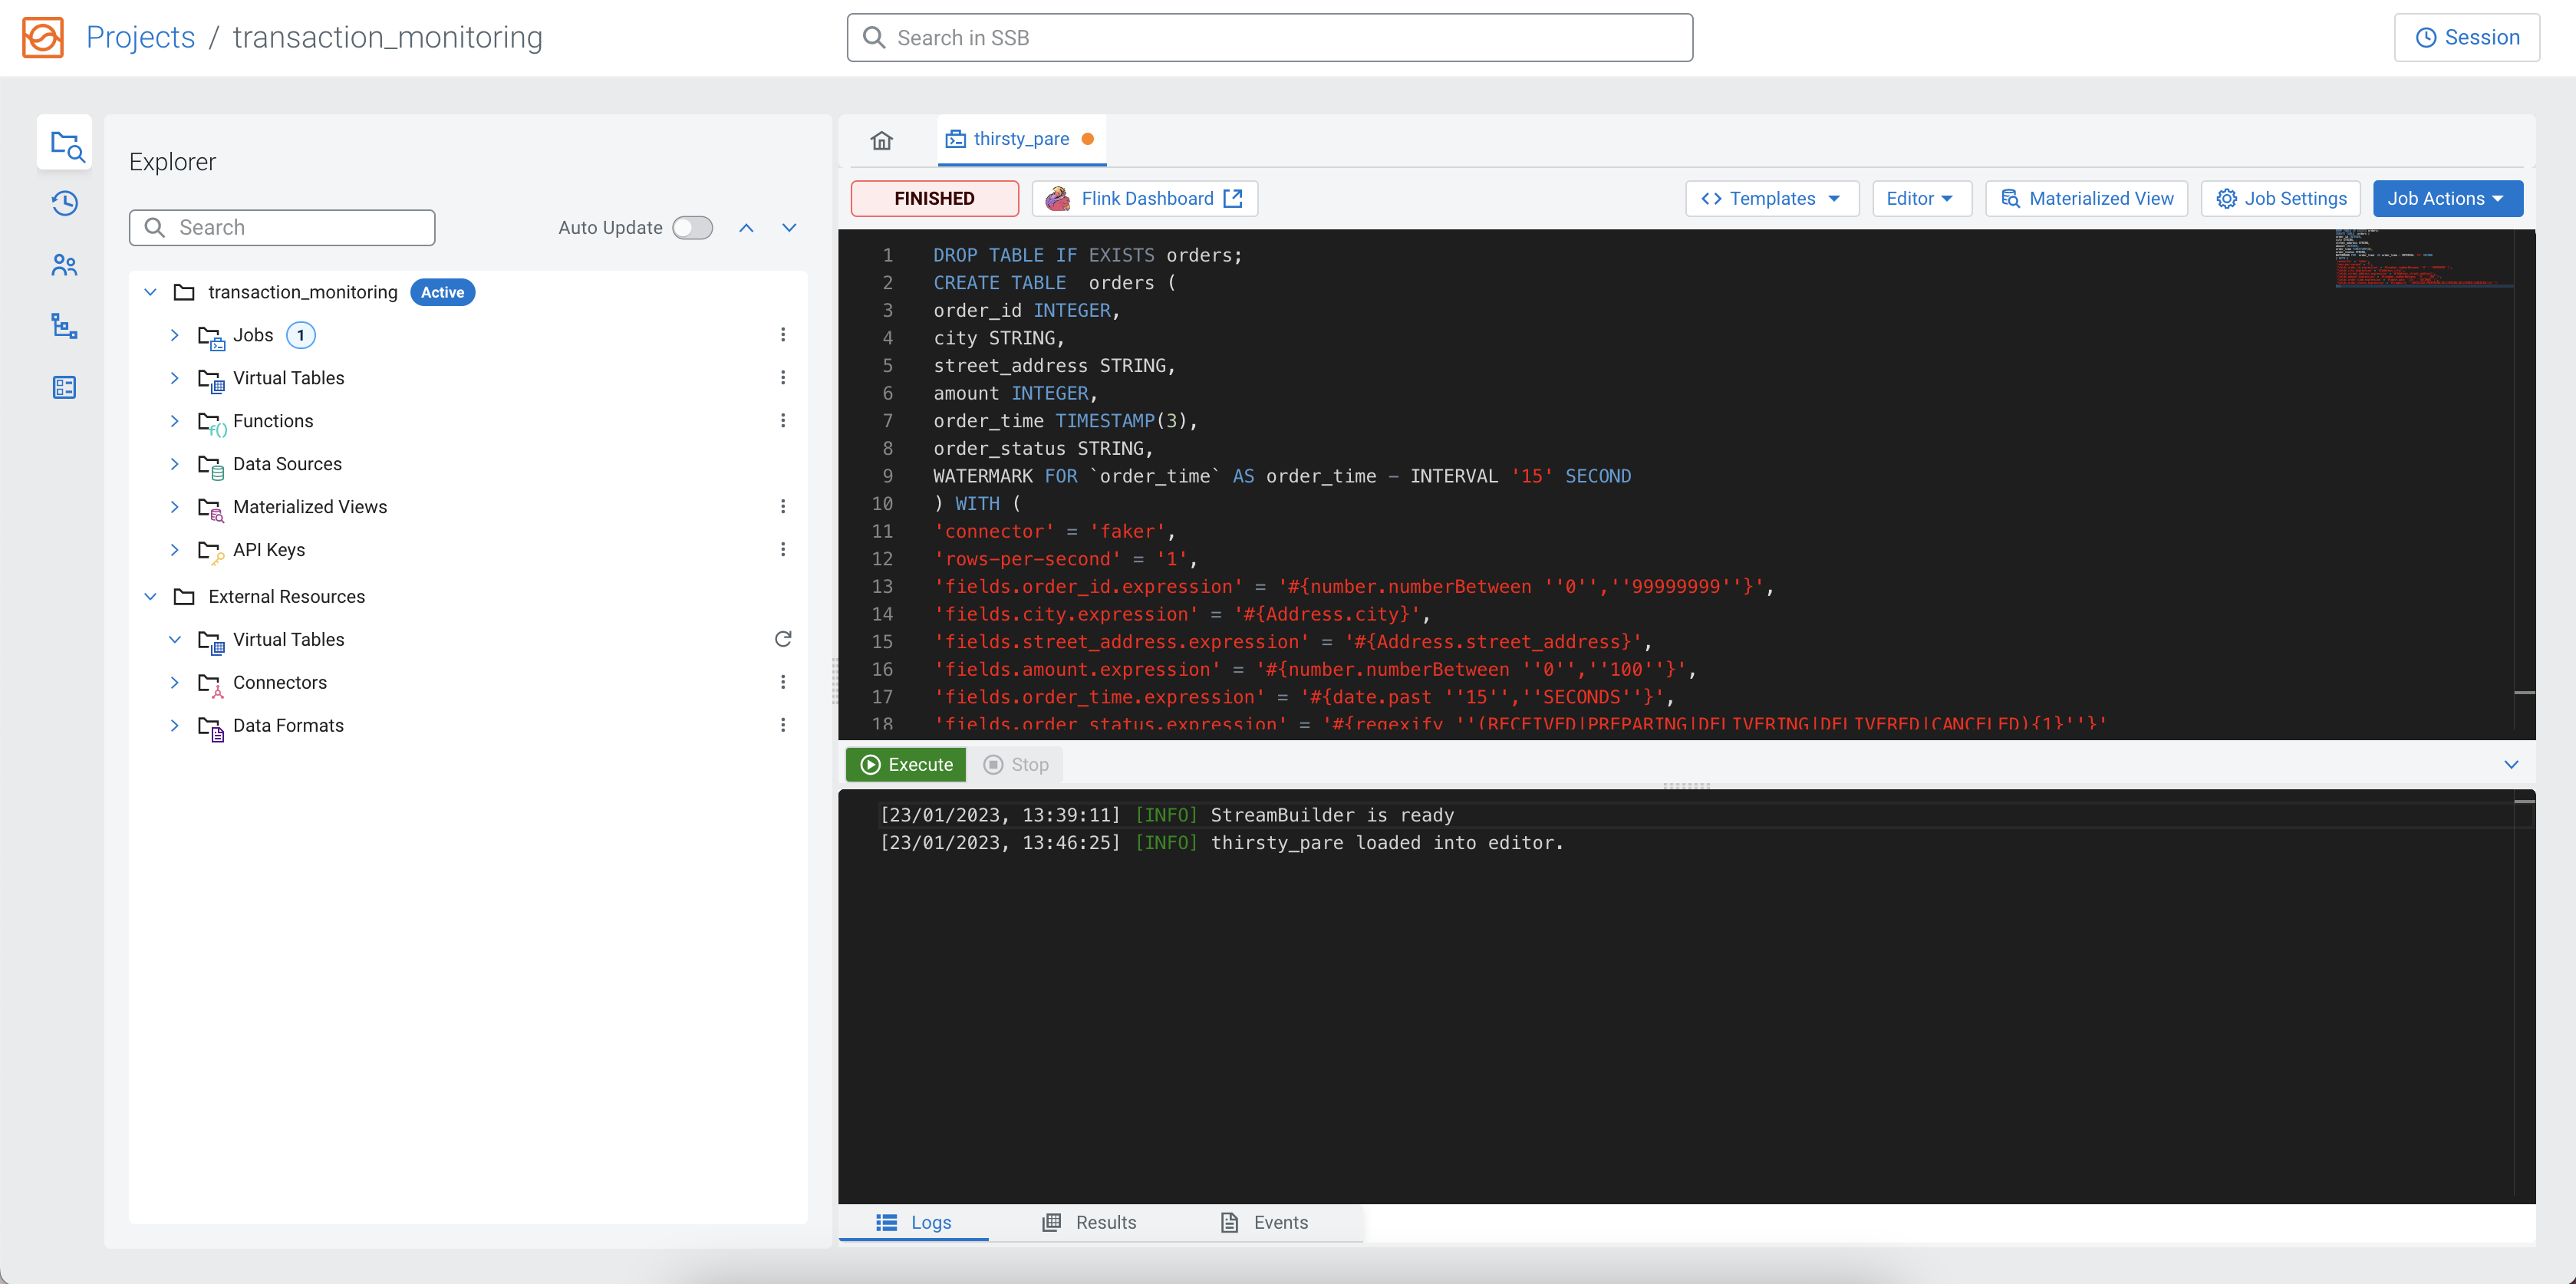
In the following CREATE TABLE statement, the faker template
is used, with the properties already filled out. You can copy and paste it to the
SQL Editor.
DROP TABLE IF EXISTS orders;
CREATE TABLE  orders (
    order_id INTEGER,
    city STRING,
    street_address STRING,
    amount INTEGER,
    order_time TIMESTAMP(3),
    order_status STRING,
    WATERMARK FOR `order_time` AS order_time - INTERVAL '15' SECOND
) WITH (
    'connector' = 'faker',
    'rows-per-second' = '1',
    'fields.order_id.expression' = '#{number.numberBetween ''0'',''99999999''}',
    'fields.city.expression' = '#{Address.city}',
    'fields.street_address.expression' = '#{Address.street_address}',
    'fields.amount.expression' = '#{number.numberBetween ''0'',''100''}',
    'fields.order_time.expression' = '#{date.past ''15'',''SECONDS''}',
    'fields.order_status.expression' = '#{regexify ''(RECEIVED|PREPARING|DELIVERING|DELIVERED|CANCELED){1}''}'
);
To create the table, you need to click on the Execute button under the SQL Editor.
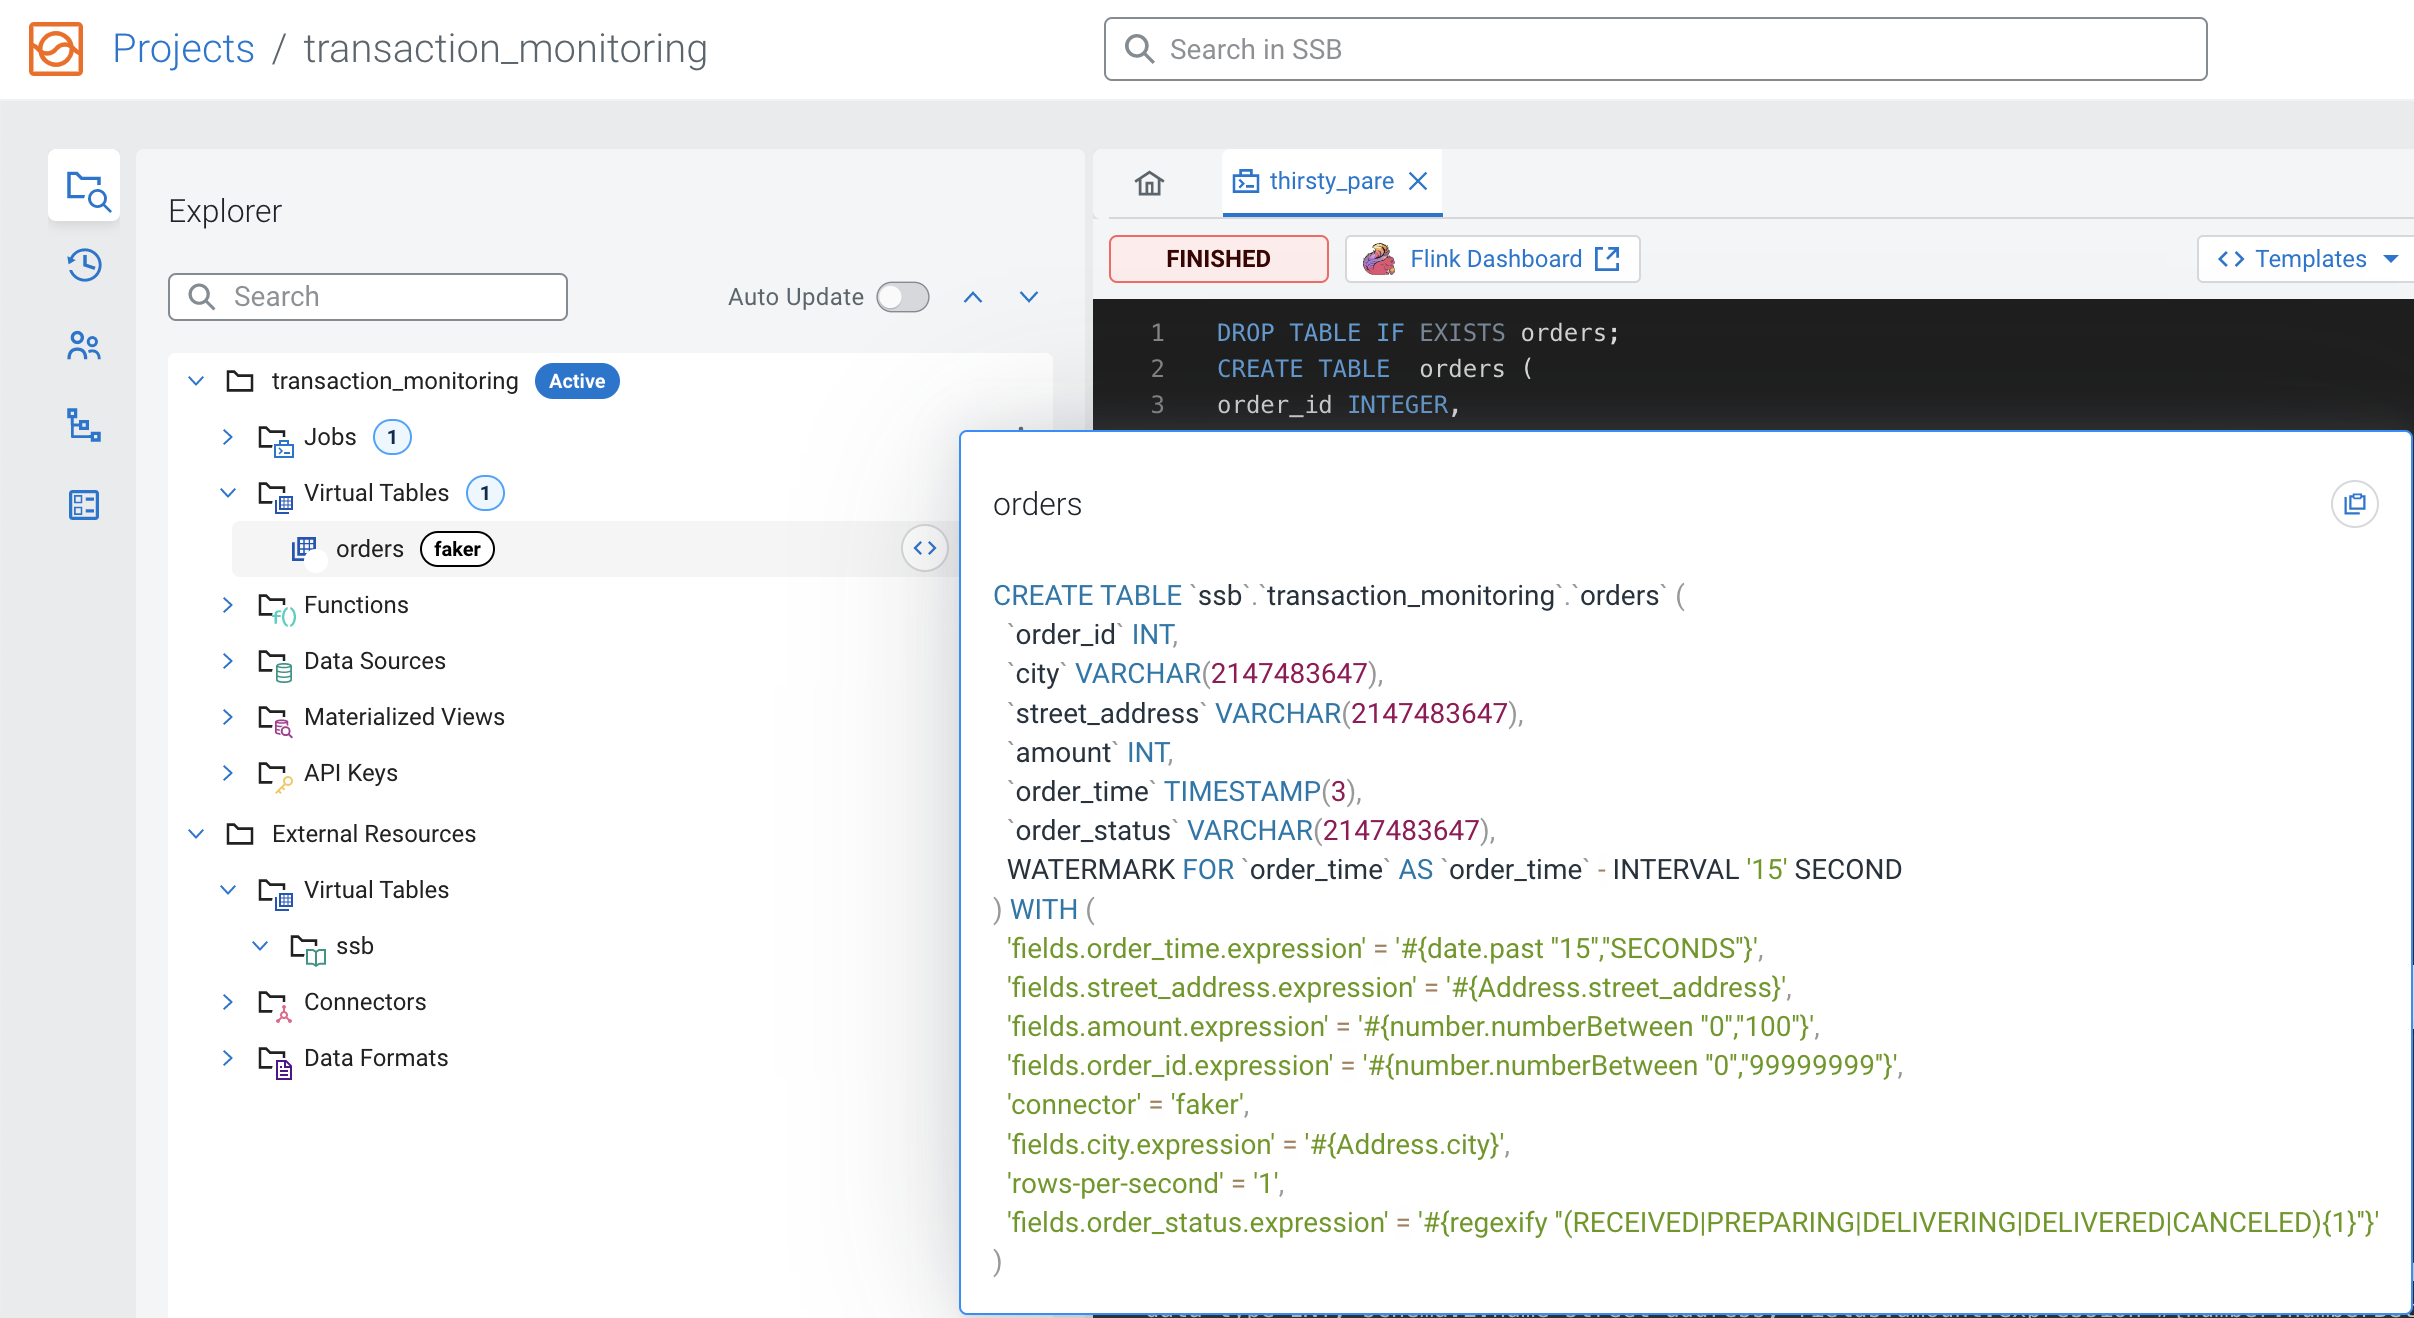
CREATE TABLE statement, there are two ways to view the
created table:- You can view the table under Virtual Tables of the project by
clicking the arrow to expand the table properties:
- In the SQL Editor window, you can replace the earlier statement
by
DESCRIBE orders;, and click Execute again: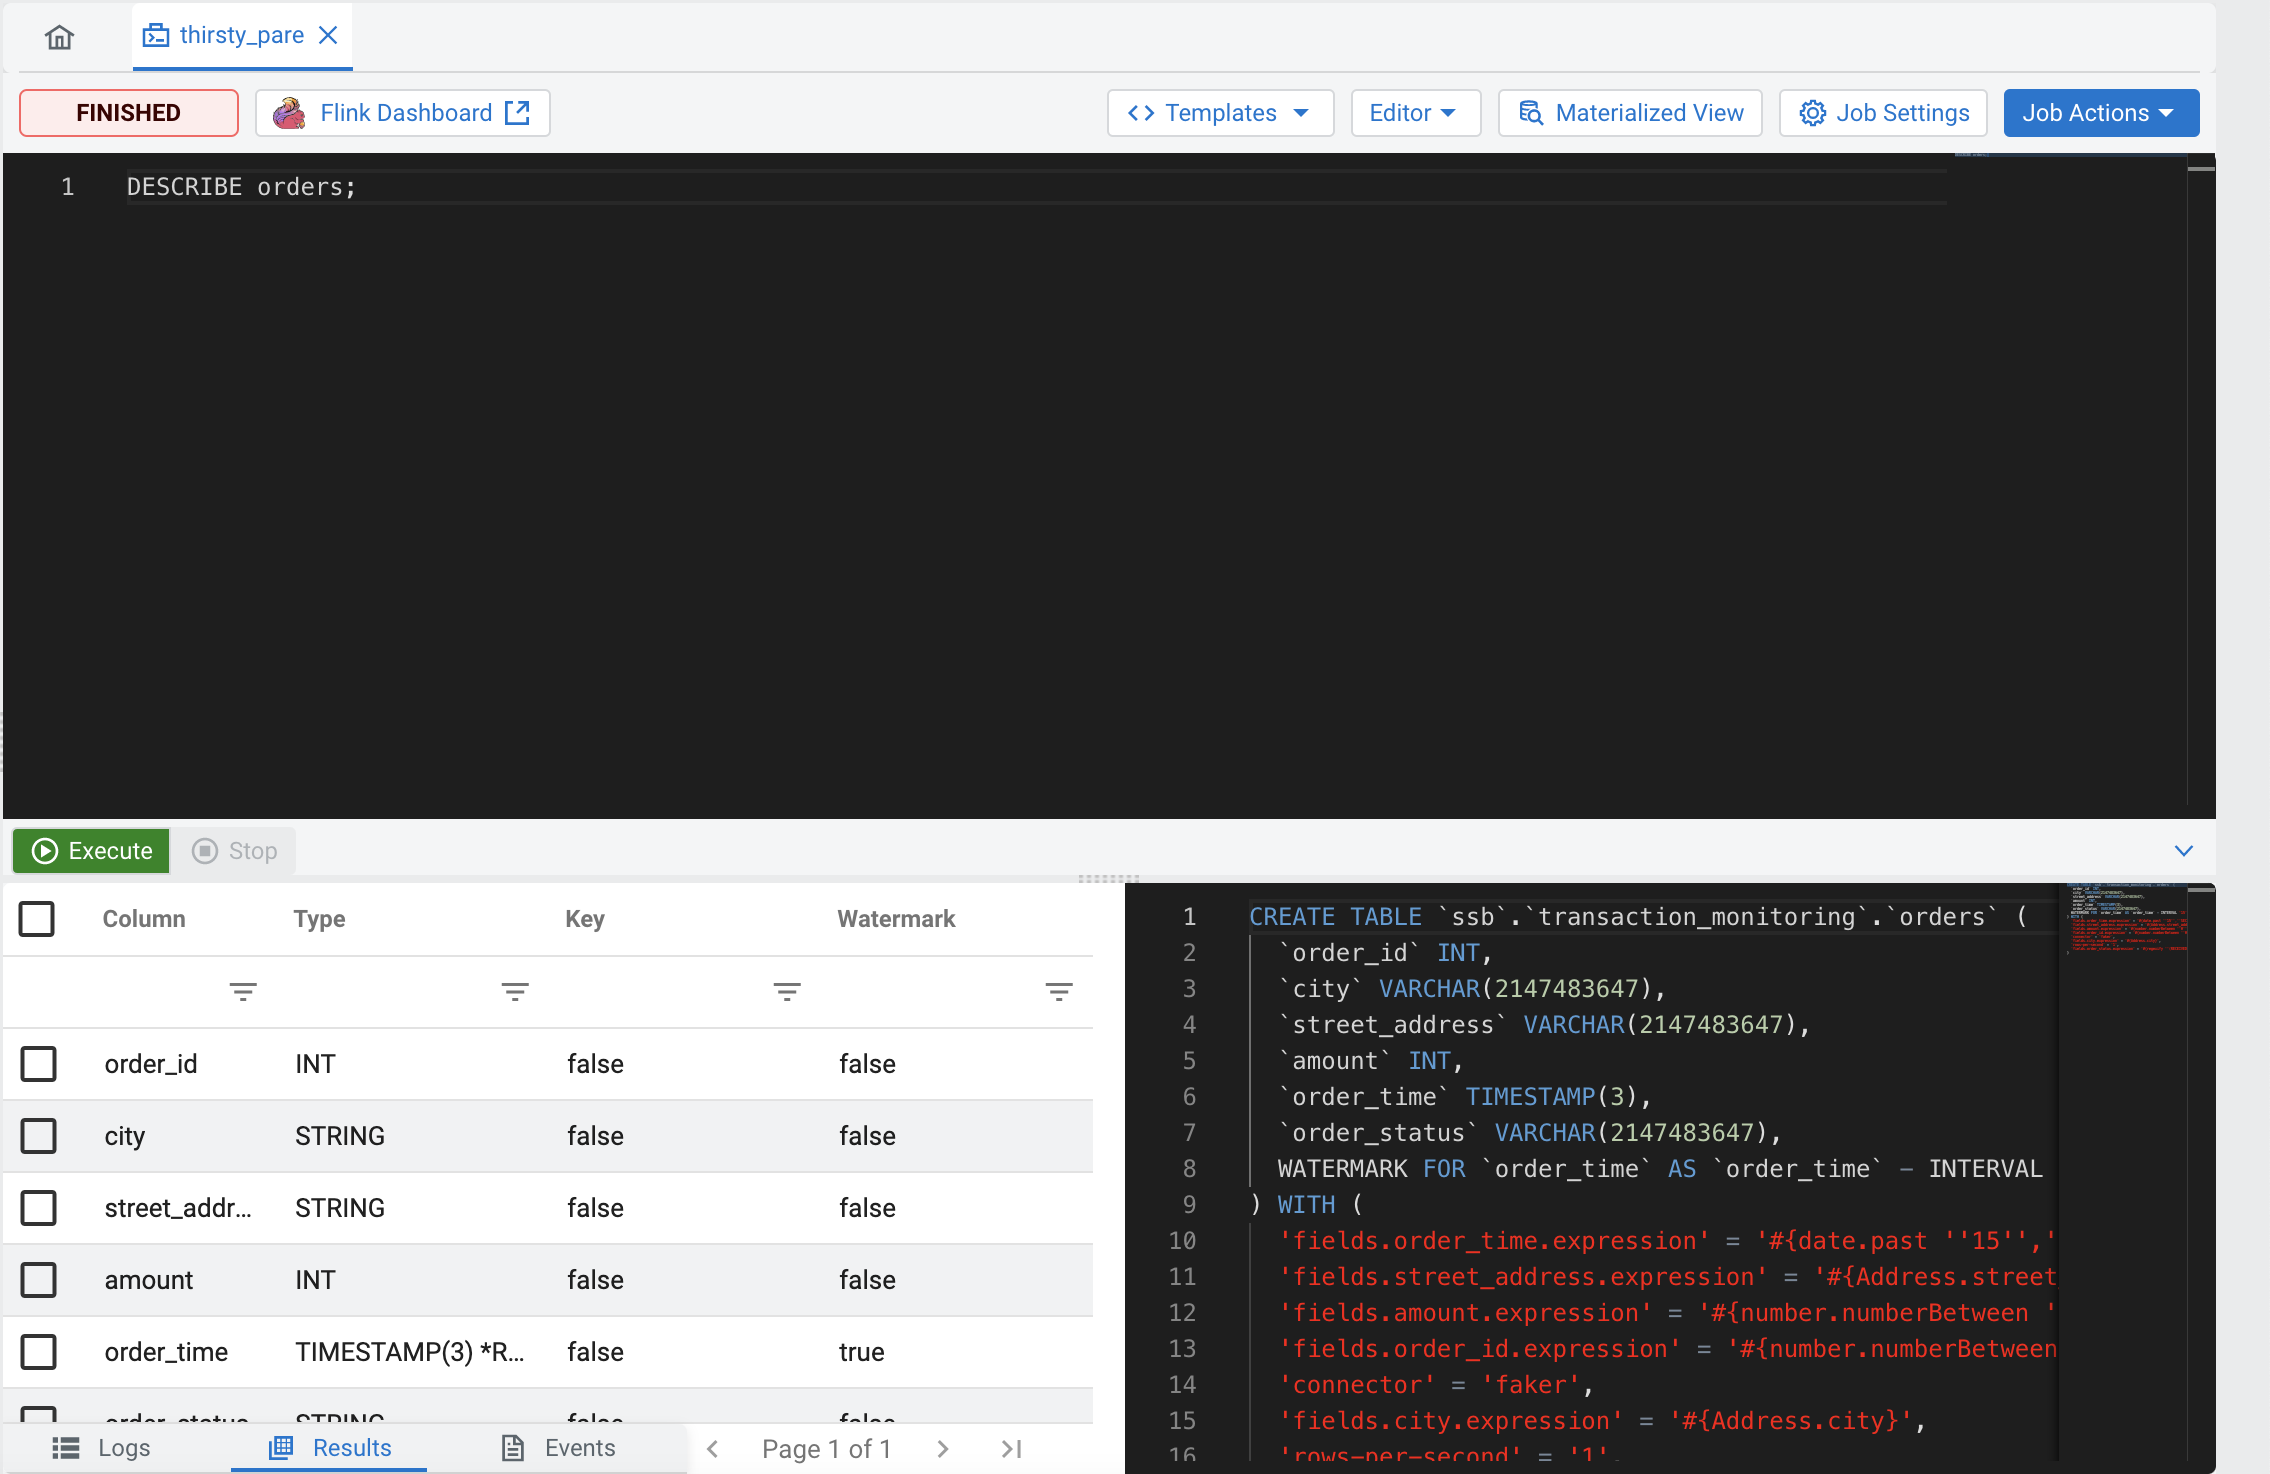
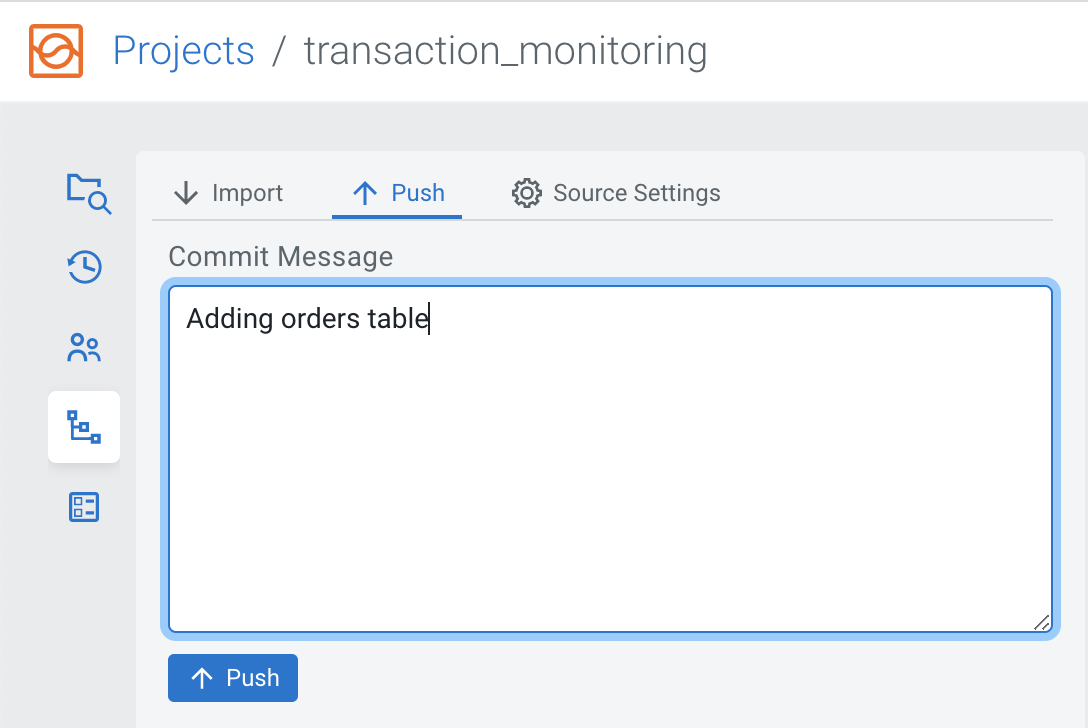
Optional: Synchronizing your changes to Git
Now that you have created a job and a table, you can push your changes to your Git repository using the Source Control view and selecting the Push tab. Provide a commit message that describes the changes, and click Push to synchronize your changes to Git.
If someone else would work on this project in their local SSB Community Edition instance or Cloudera SQL Stream Builder on a CDP cluster, they can use the Import button to pull the changes and have the latest version of the project in their SSB.
3. Running a SELECT query
After creating a table, learn how to run a SELECT query that outputs a sample of the resulting data in Streaming SQL Console.
You have created your table using the Faker template that currently generates data. As a next
step, you can run a SELECT query and output the results at the SQL
Editor under the Results tab.
SELECT * FROM orders;To execute the query, you need to click on the Execute button under the SQL Editor.
After a short amount of time, the samples of the result continuously show up under the Results tab.
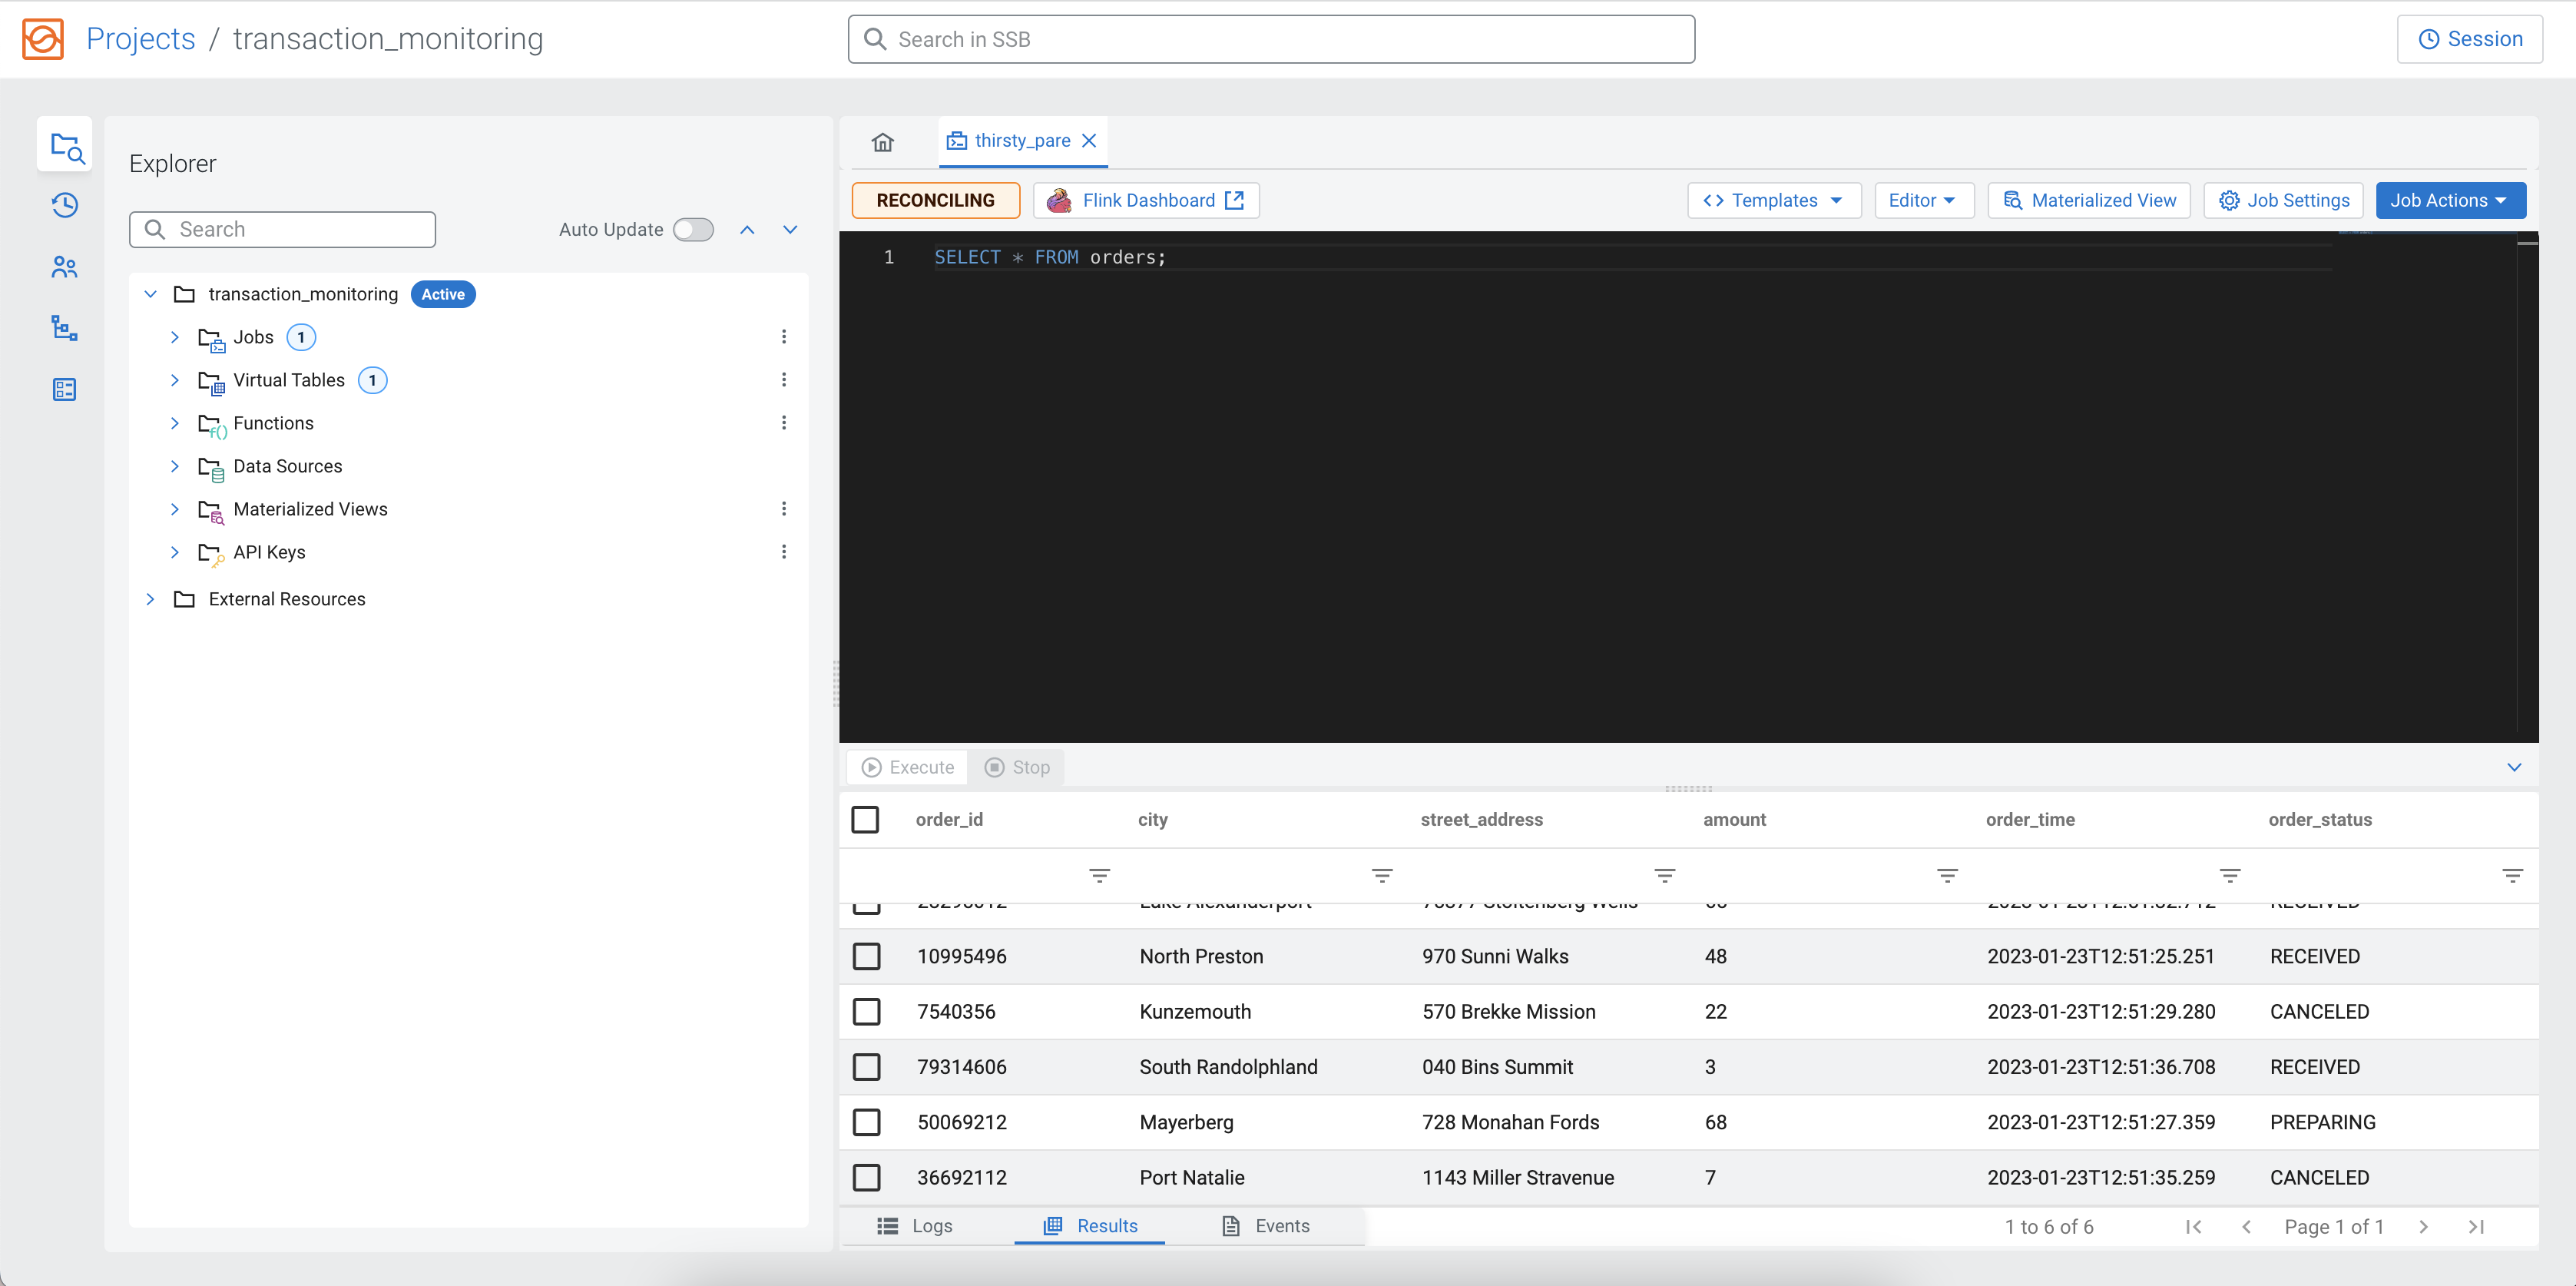
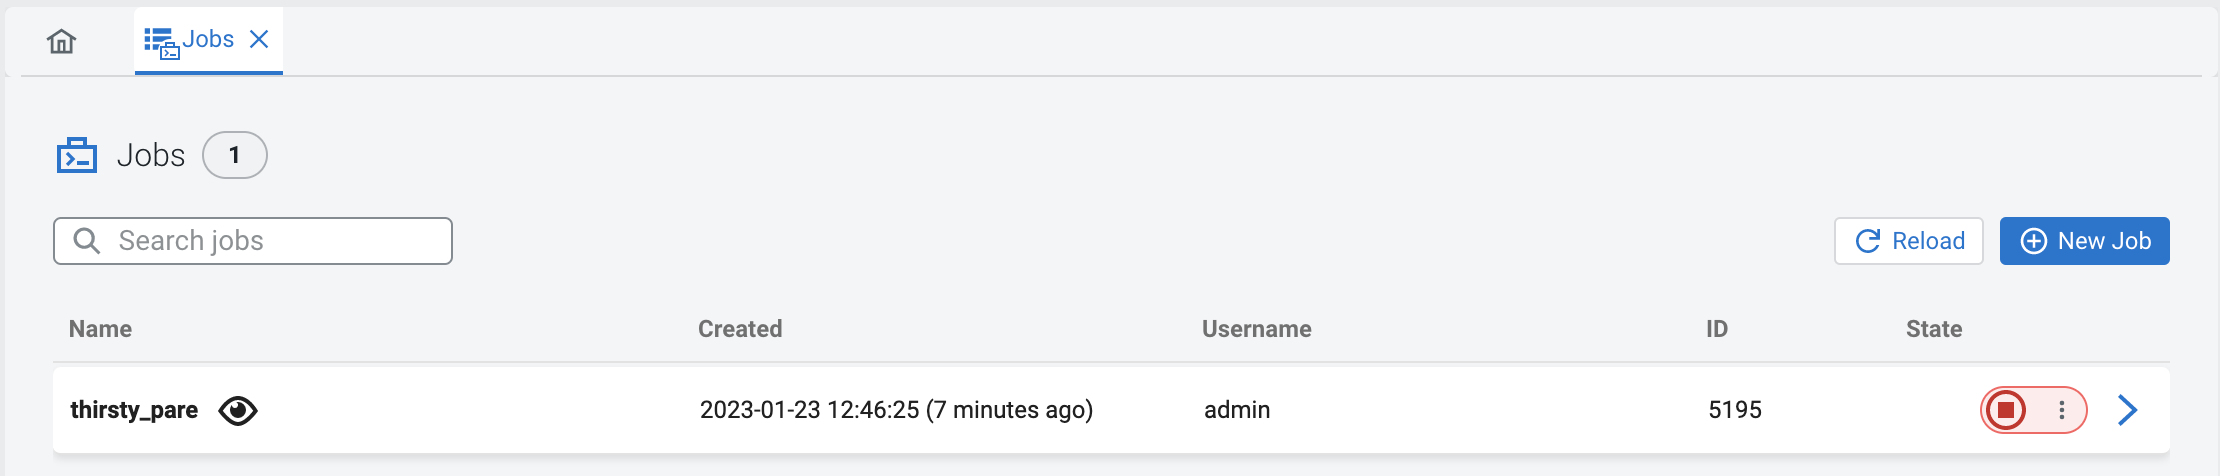
When you execute a query, a Flink job is created in the background. You can see more details about the created Flink job by clicking on the Flink Dashboard button for the running job. You can also reload the SQL job into the SQL Editor to edit the job, or stop the job from the Jobs tab that lists all of the running and finished jobs in a project.
4. Creating and querying a view
Now that you know the basics of creating a table and querying data from a table, learn how to create a more complex query using views.
In the following example, you will use the columns from the created Faker table. In this derived computation that can be saved as a view, the orders are aggregated in half minute intervals based on their status.
Copy and paste the following CREATE VIEW statement to the SQL
Editor:
DROP VIEW IF EXISTS summaries;
CREATE VIEW summaries AS
SELECT window_start, window_end, order_status, COUNT(*) as order_count, SUM(amount) as total_amount
FROM TABLE(TUMBLE(TABLE orders, DESCRIPTOR(order_time), INTERVAL '20' SECONDS))
GROUP BY window_start, window_end, order_status;
If your previous query is still running, click on the Stop button under the SQL Editor to stop the job. Afterwards, to create the view, you need to click on the Execute button under the SQL Editor.
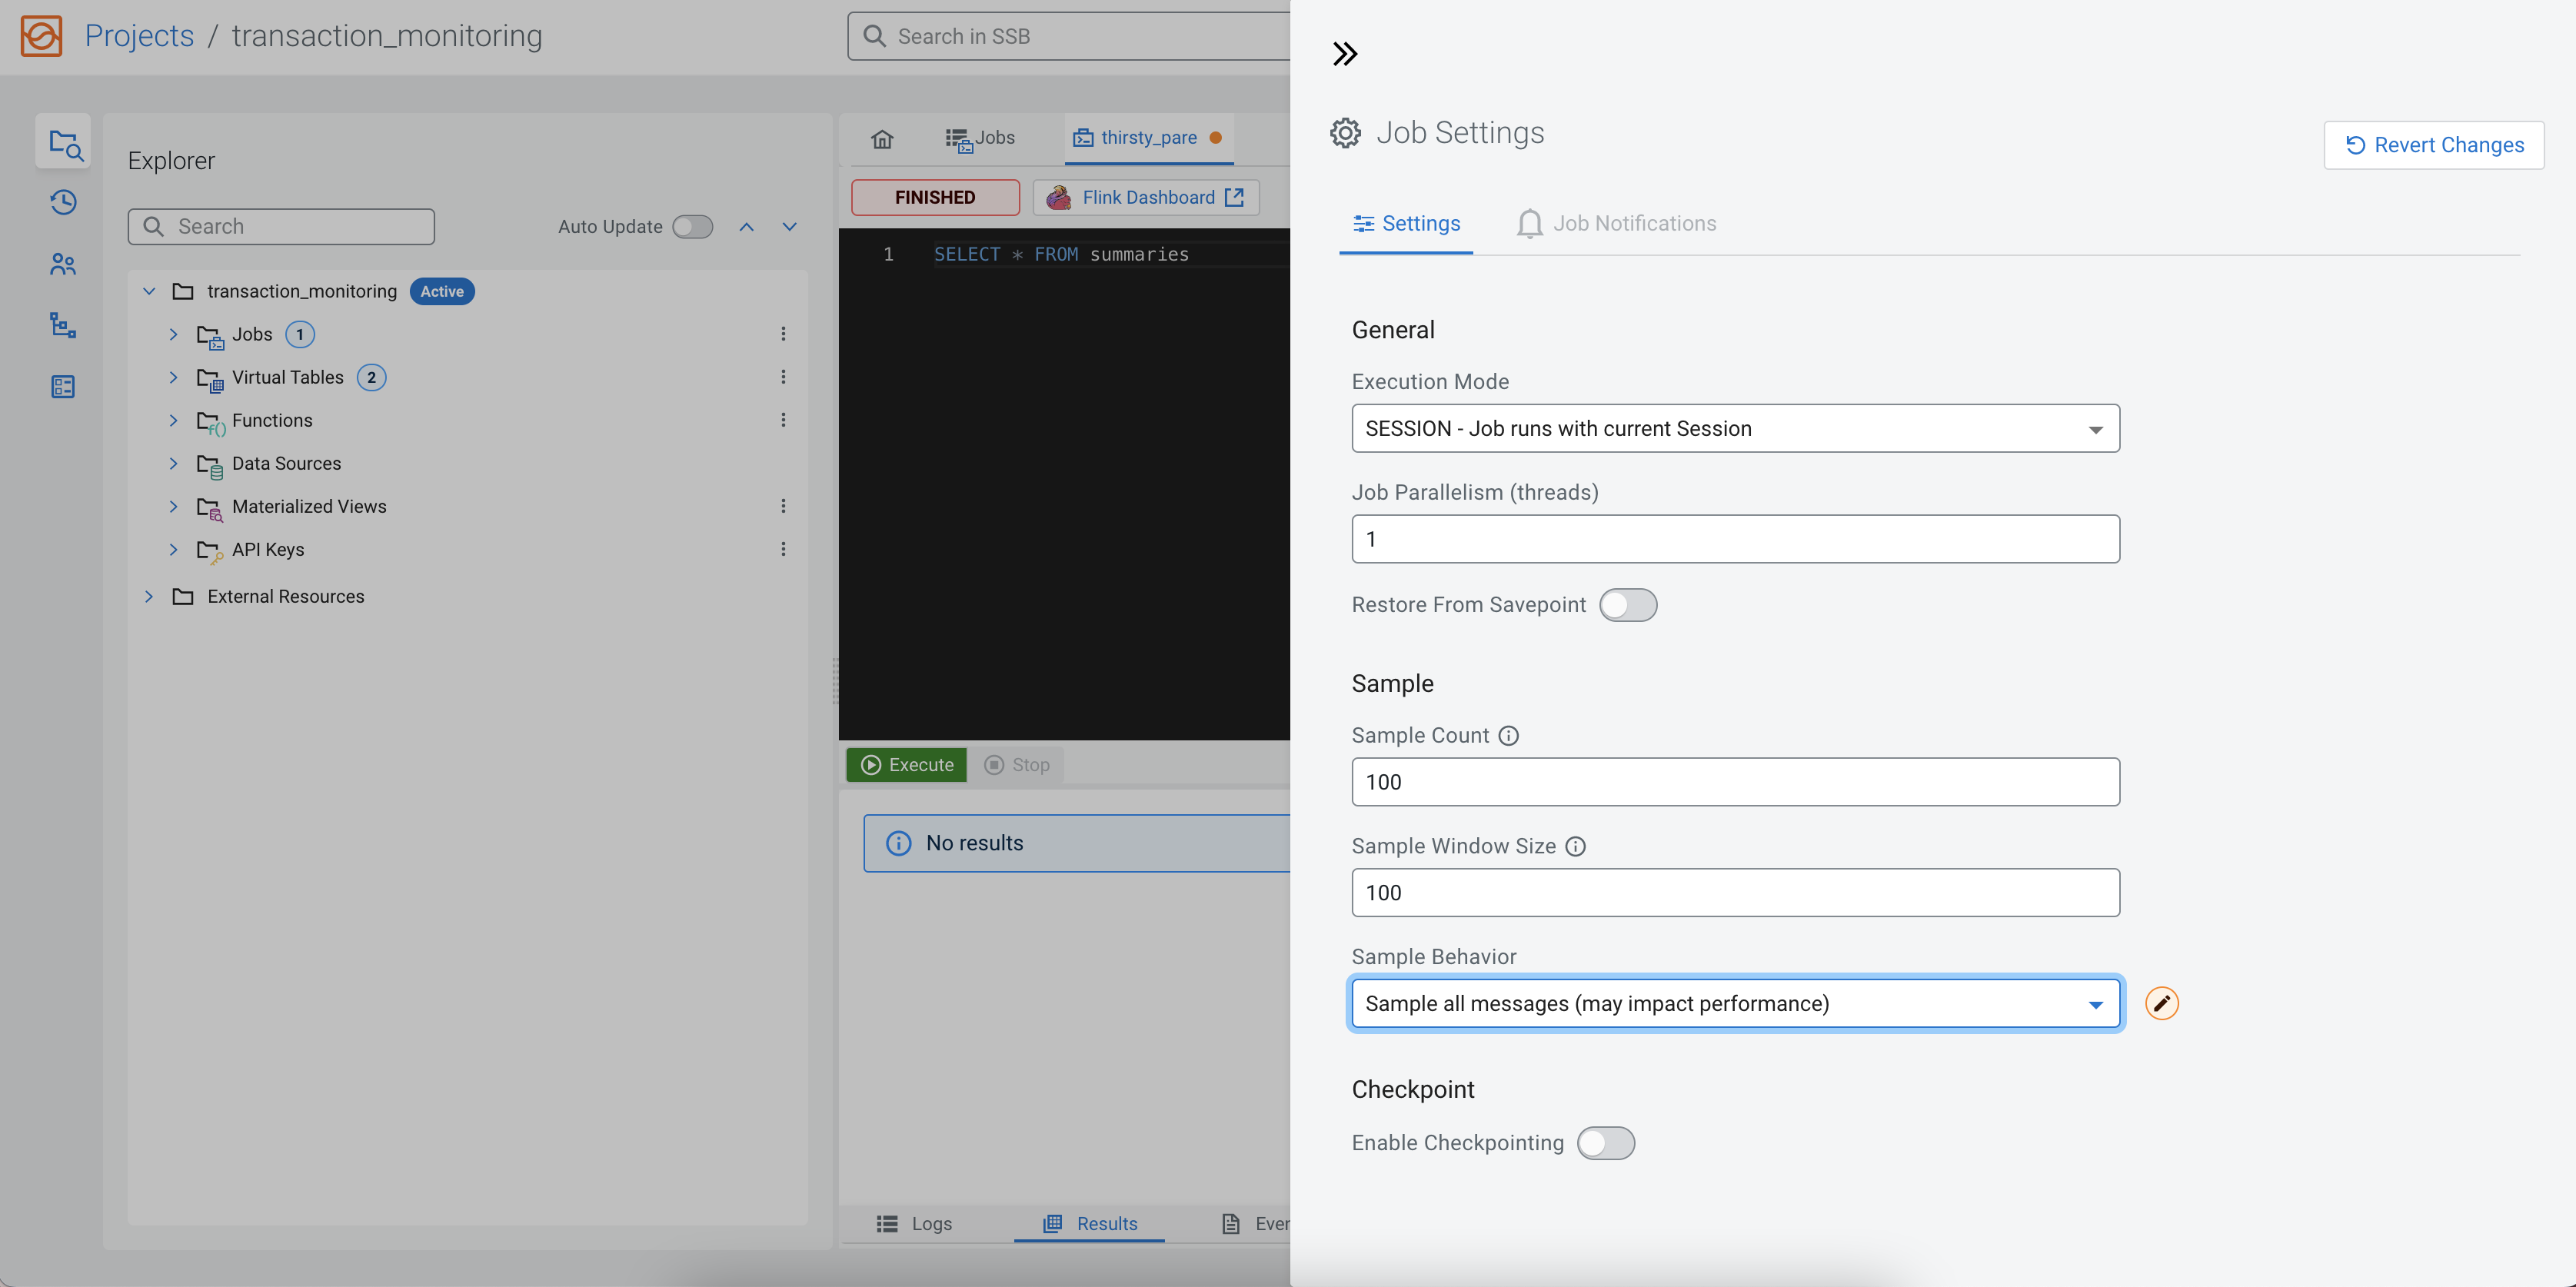
When you execute a query, not all the records produced by the query are shown in the
Results window. By default, 1 record is sampled every
second to be displayed. Before selecting data from this view, you can change the
Sample Behavior to Sample all messages. You need to
click on the Job Settings button to open the settings that can be updated
for a job. This way the Results window will contain all messages, up to
the specified count.
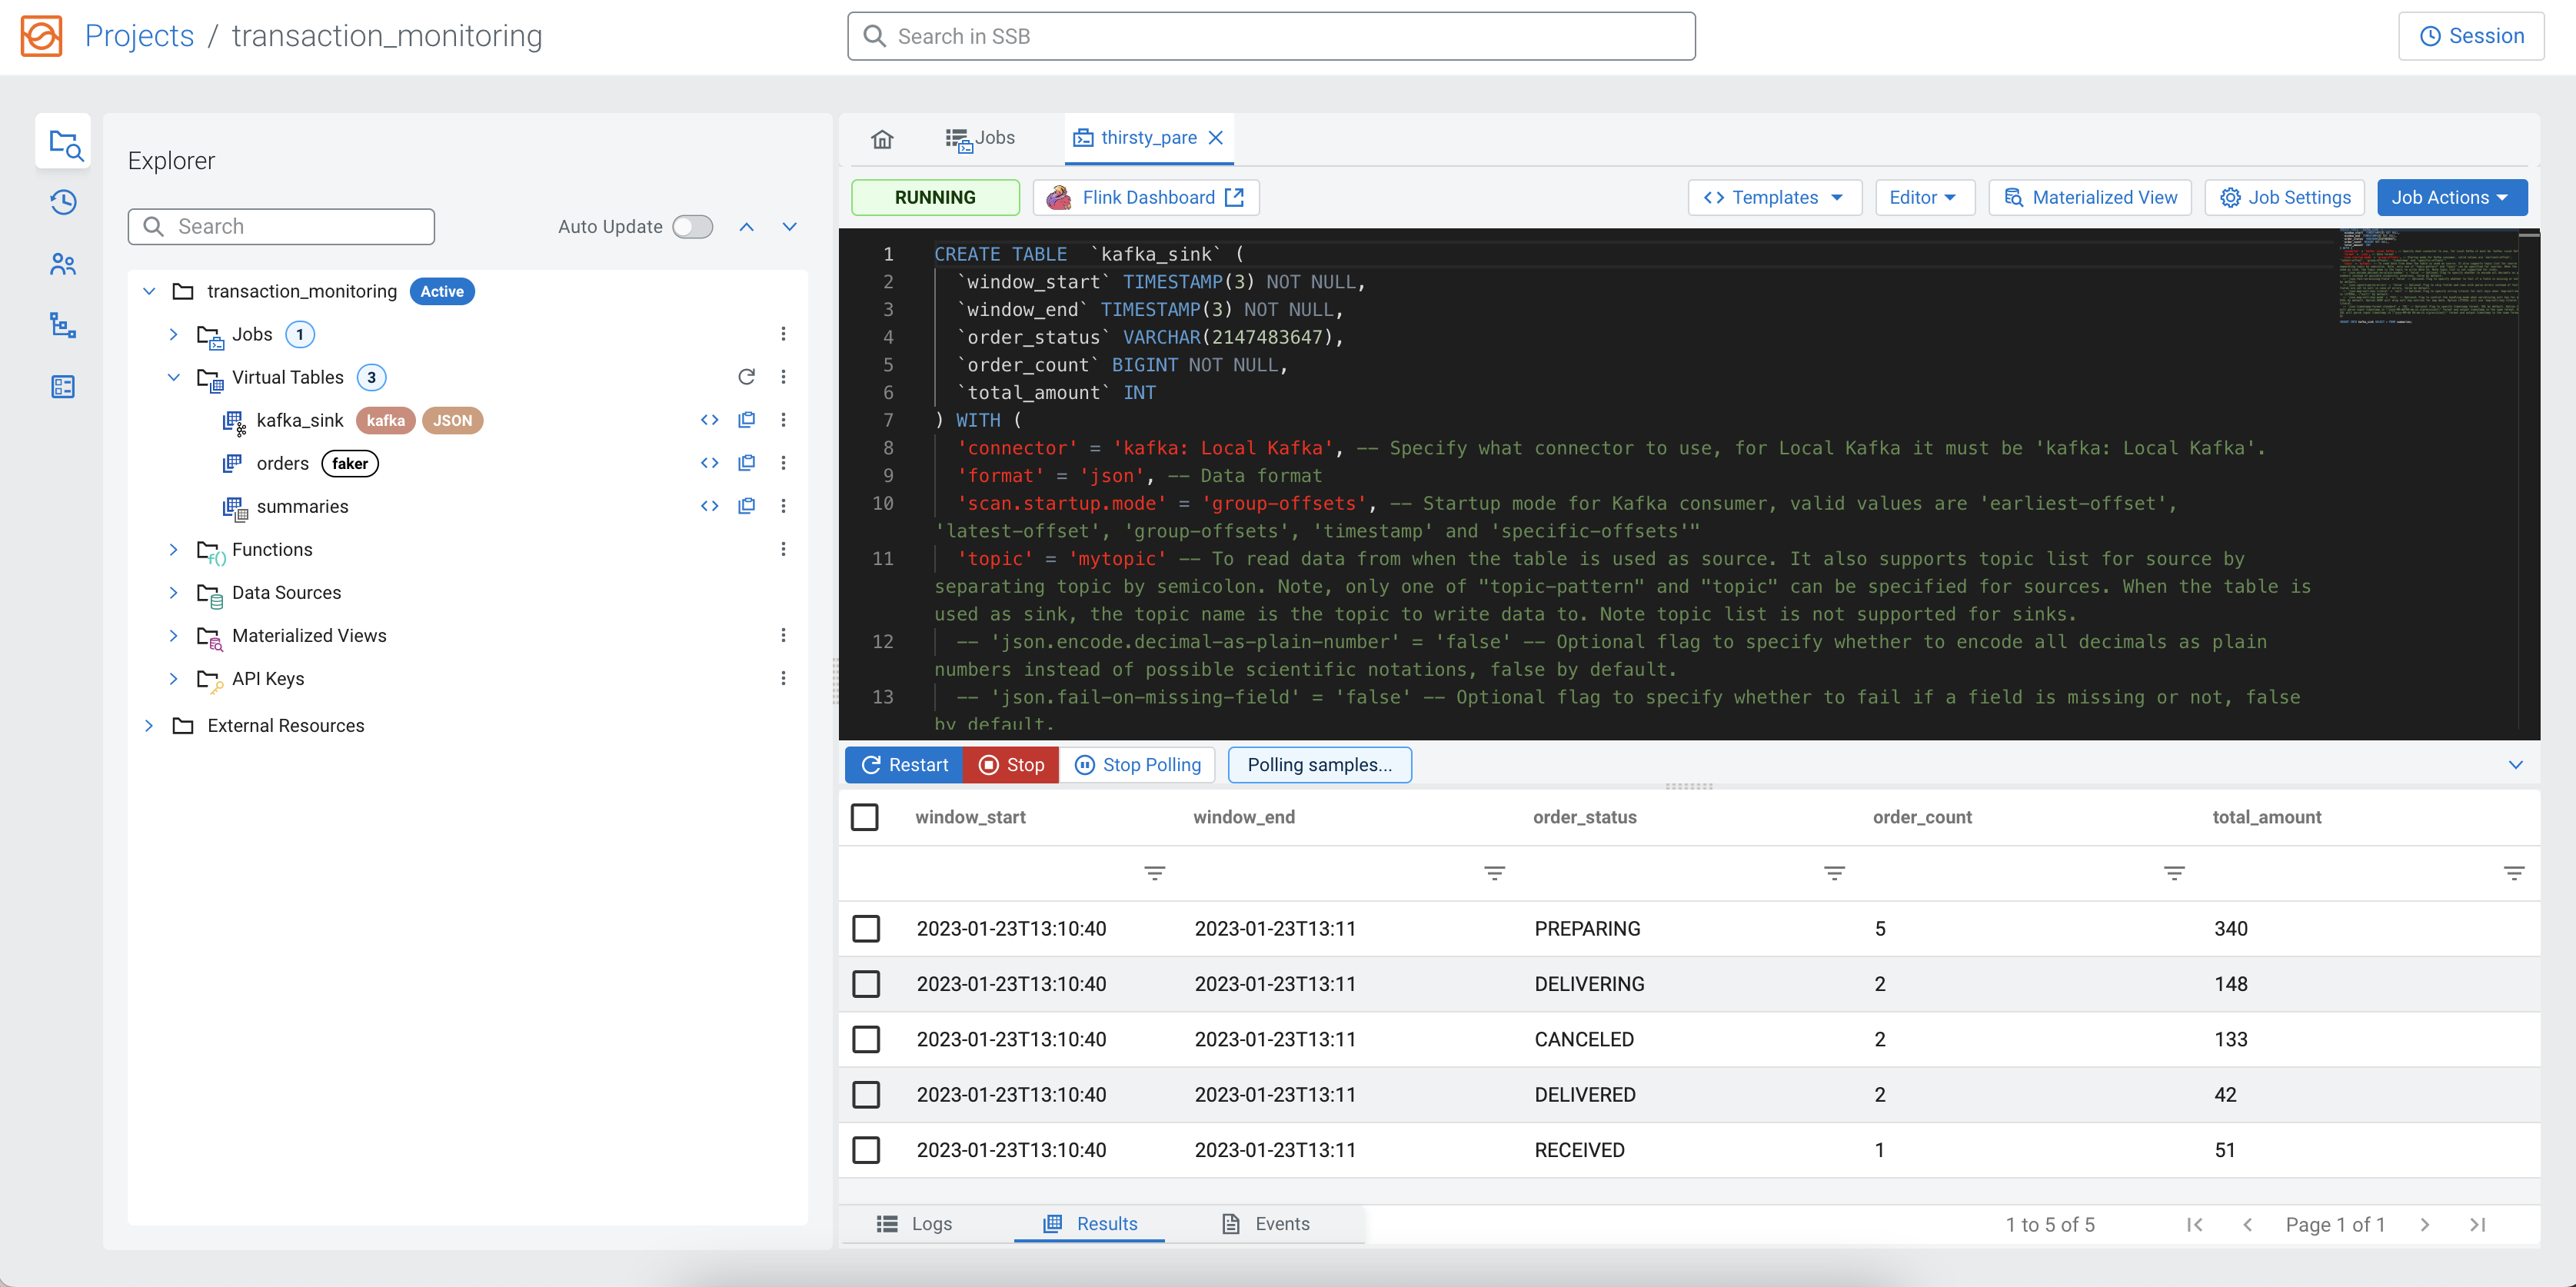
SELECT * FROM summariesTo execute the query, you need to click on the Execute button under the SQL Editor.
After a short amount of time, the samples of the aggregated result continuously show up under the Results tab. As it is an aggregated view, the results can appear slower after another.

5. Outputting results of SQL query
As you already know how to query tables and views, the next step is to write the queried results into a sink or create a Materialized View.
Adding a sink using a Local Kafka template
So far you have sampled the results to the Results tab of Streaming SQL Console, so the next step is to learn how to create a sink using one of the predefined templates to output the results of the executed SQL queries.
Previously, you created the summaries view, executed the SELECT *
FROM summaries query, and examined its results on the Streaming SQL Console.
Now, the next step is to stream the aggregated records to an external system, such as Kafka. The Community Edition comes with a preconfigured Kafka container that can be selected from the predefined templates.
The created view has a complex schema. It would be tedious to describe it, and manually create a Kafka table with a matching schema. Luckily, SQL Stream Builder can do this task automatically.
As you can add more statements in one SQL window, you can create the Kafka table and add a SELECT query at the same time.
summaries table with the
schema of the kafka_sink that will be created at the next
step:SELECT * FROM summaries;As the kafka_sink does not exist yet, you need to import the
CREATE TABLE statement to the SQL window by selecting . SSB automatically inserts the appropriate CREATE TABLE
statement with the schema retrieved from the summaries table. Before
executing the statement, you must fill out the topic in the connector option. This means you
need to replace '...' in the template with 'mytopic' as it
is shown in the following example:
Click on the Execute button to run the script, both statements will be executed.
SELECT query after the CREATE TABLE statement:
INSERT INTO kafka_sink SELECT * FROM summaries;Optional: Creating an Environment configuration for your project
- Properties of tables in DDL, for example topic names, connector types and so on
- Kafka data source and catalog properties, for example brokers, schema registry url and so on
CREATE TABLE statement as my_topic, you would use a
placeholder based on the key and value provided in the environment file as shown below. When
the project is synchronized to Git, and imported to a production environment, the topic name
will be substituted with the applicable Kafka topic name, if an Environment is also
configured on that Cloudera SQL Stream Builder instance. You can also export and import Environments as JSON files,
which make the management of environments easier for users.To create an Environment configuration, select the Environments view and click New Environment.
Provide a name to the Environment, and add a key with dedicated value, and click on the plus button.

Click on the Save button, and you are redirected to the Environments view. Click on Activate next to the Environment you would like to use to the currently working on project.
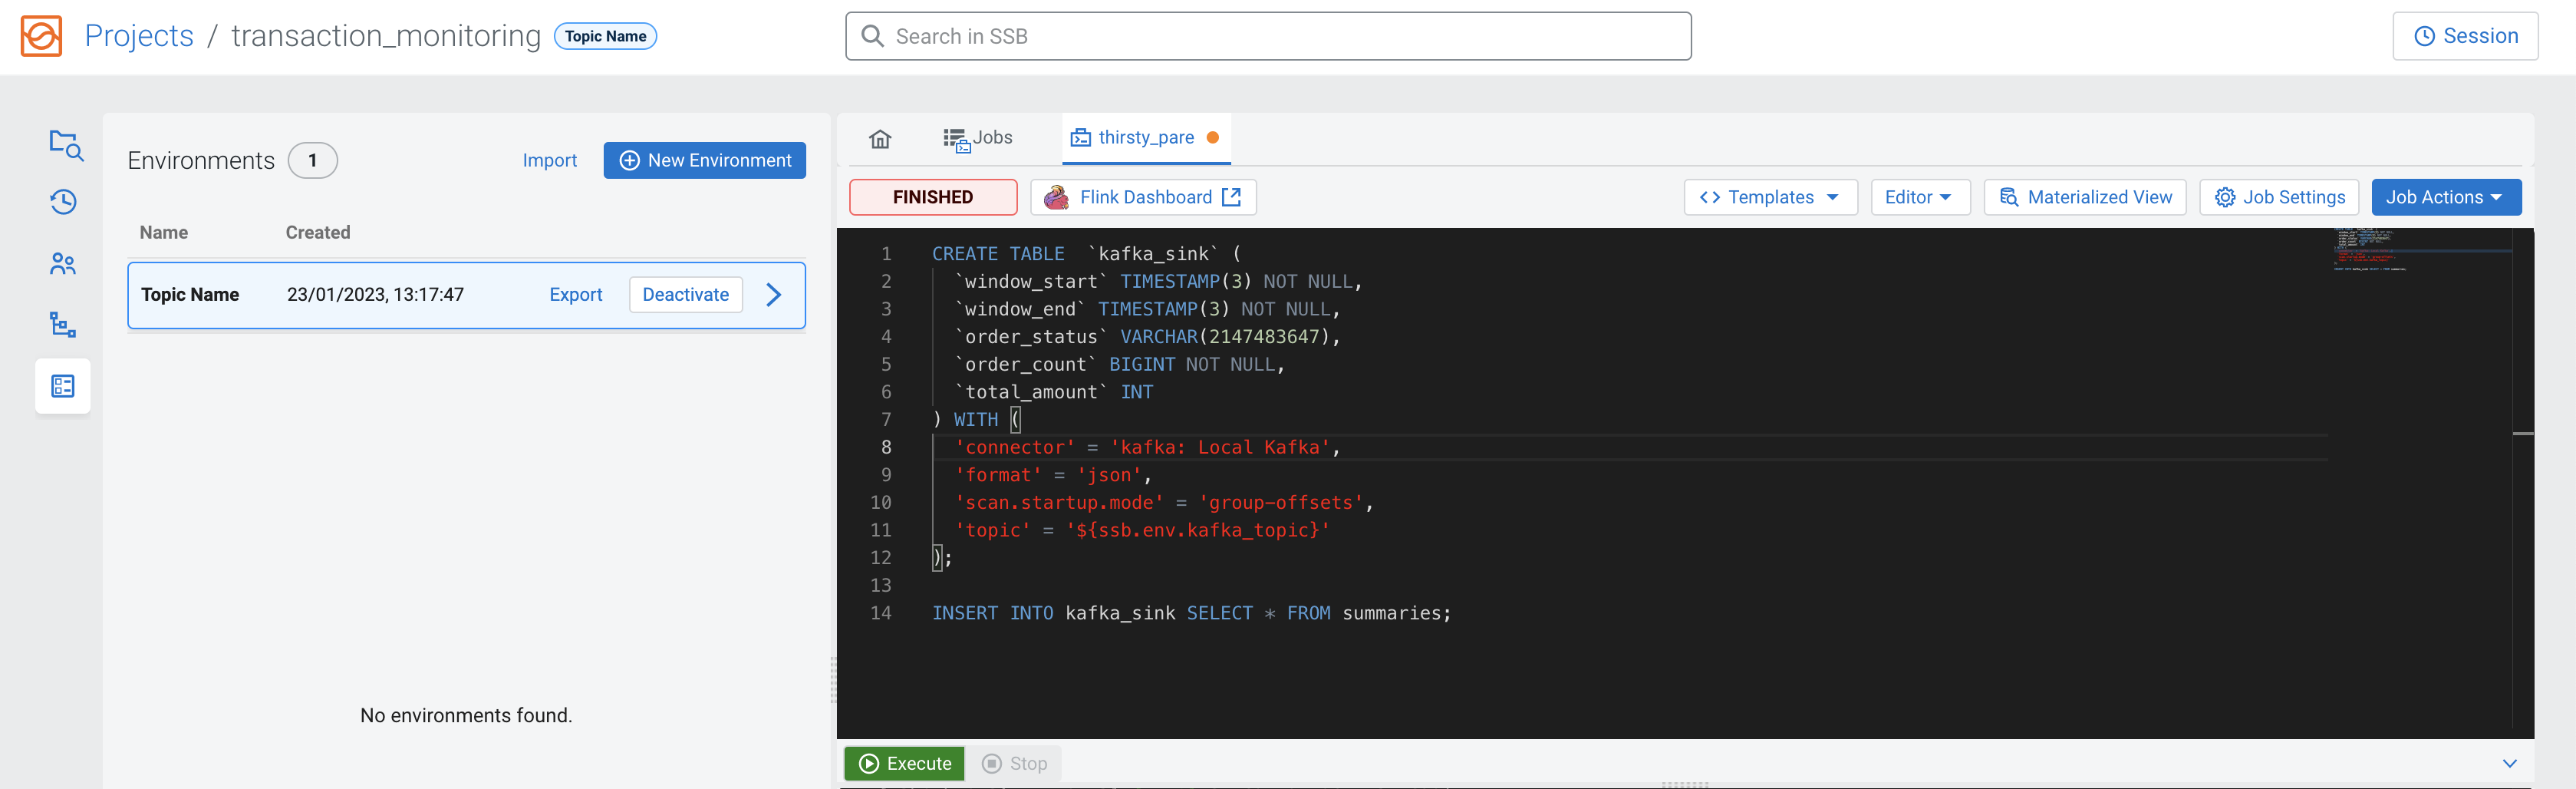
ssb.env.) in the CREATE TABLE statement as shown in the
following
example:CREATE TABLE `kafka_sink` (
`window_start` TIMESTAMP(3) NOT NULL,
`window_end` TIMESTAMP(3) NOT NULL,
`order_status` VARCHAR(2147483647),
`order_count` BIGINT NOT NULL,
`total_amount` INT
) WITH (
'connector' = 'kafka: Local Kafka',
'format' = 'json',
'scan.startup.mode' = 'group-offsets',
'topic' = '${ssb.env.kafka_topic}'
);Adding a sink using a Schema Registry catalog
You can use Schema Registry as a catalog to read data or output results to a Kafka topic based on a defined schema in Schema Registry.
Cloudera SQL Stream Builder in the Cloudera Streaming Community Edition comes with a preconfigured Schema
Registry catalog, which is available by default in the ssb_default project.
This means that if you are working in the ssb_default project, you do not
have to register the local Schema Registry service running in the Community Edition as it is
already set up.
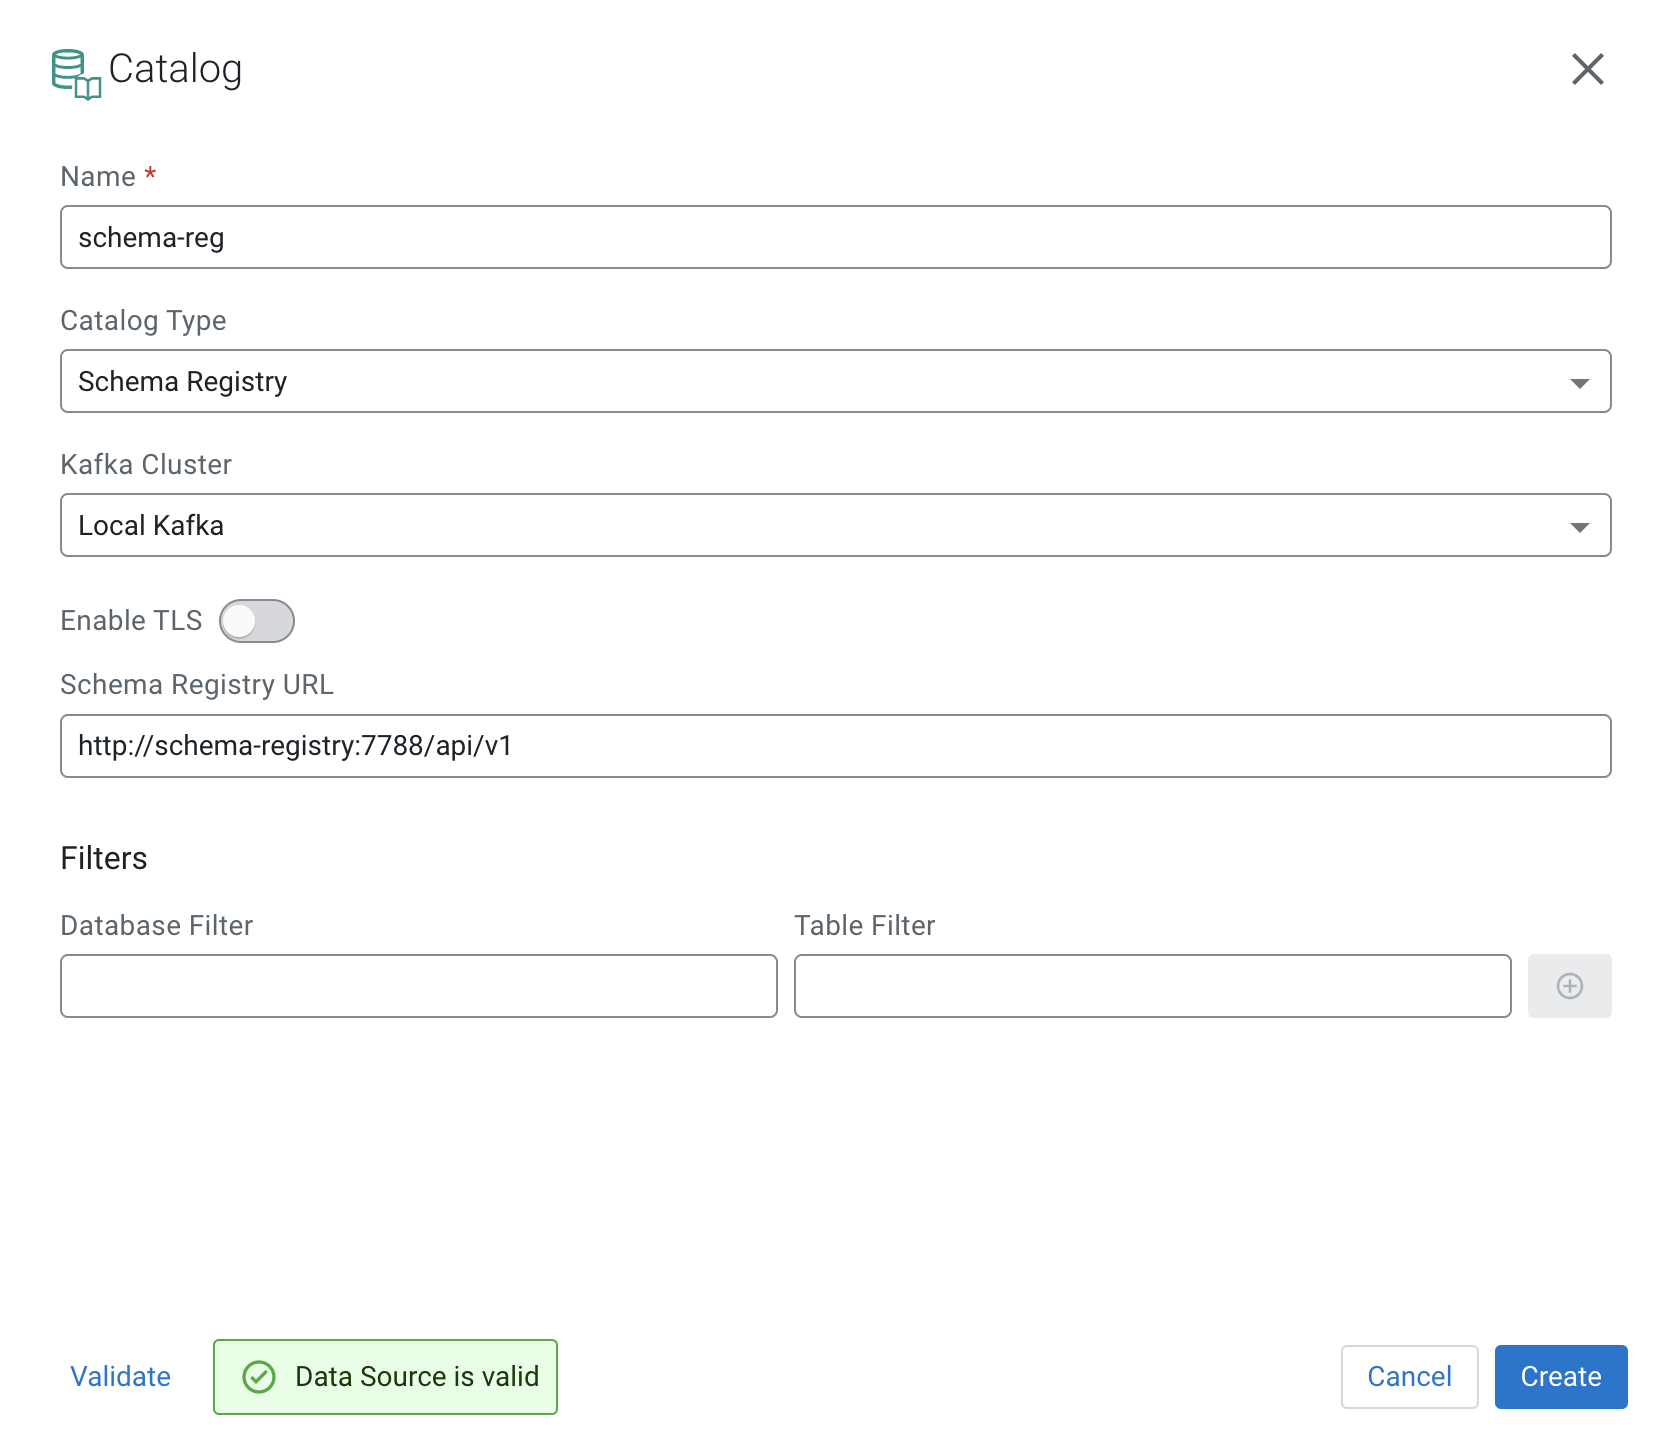
| Setting | Value |
|---|---|
| Name | schema-reg |
| Catalog Type | Schema Registry |
| Kafka Cluster | Local Kafka |
| Schema Registry URL | http://schema-registry:7788/api/v1 |
After adding Schema Registry as a catalog, you need to create a schema and a topic that will be used as the output sink.
http://localhost:7788
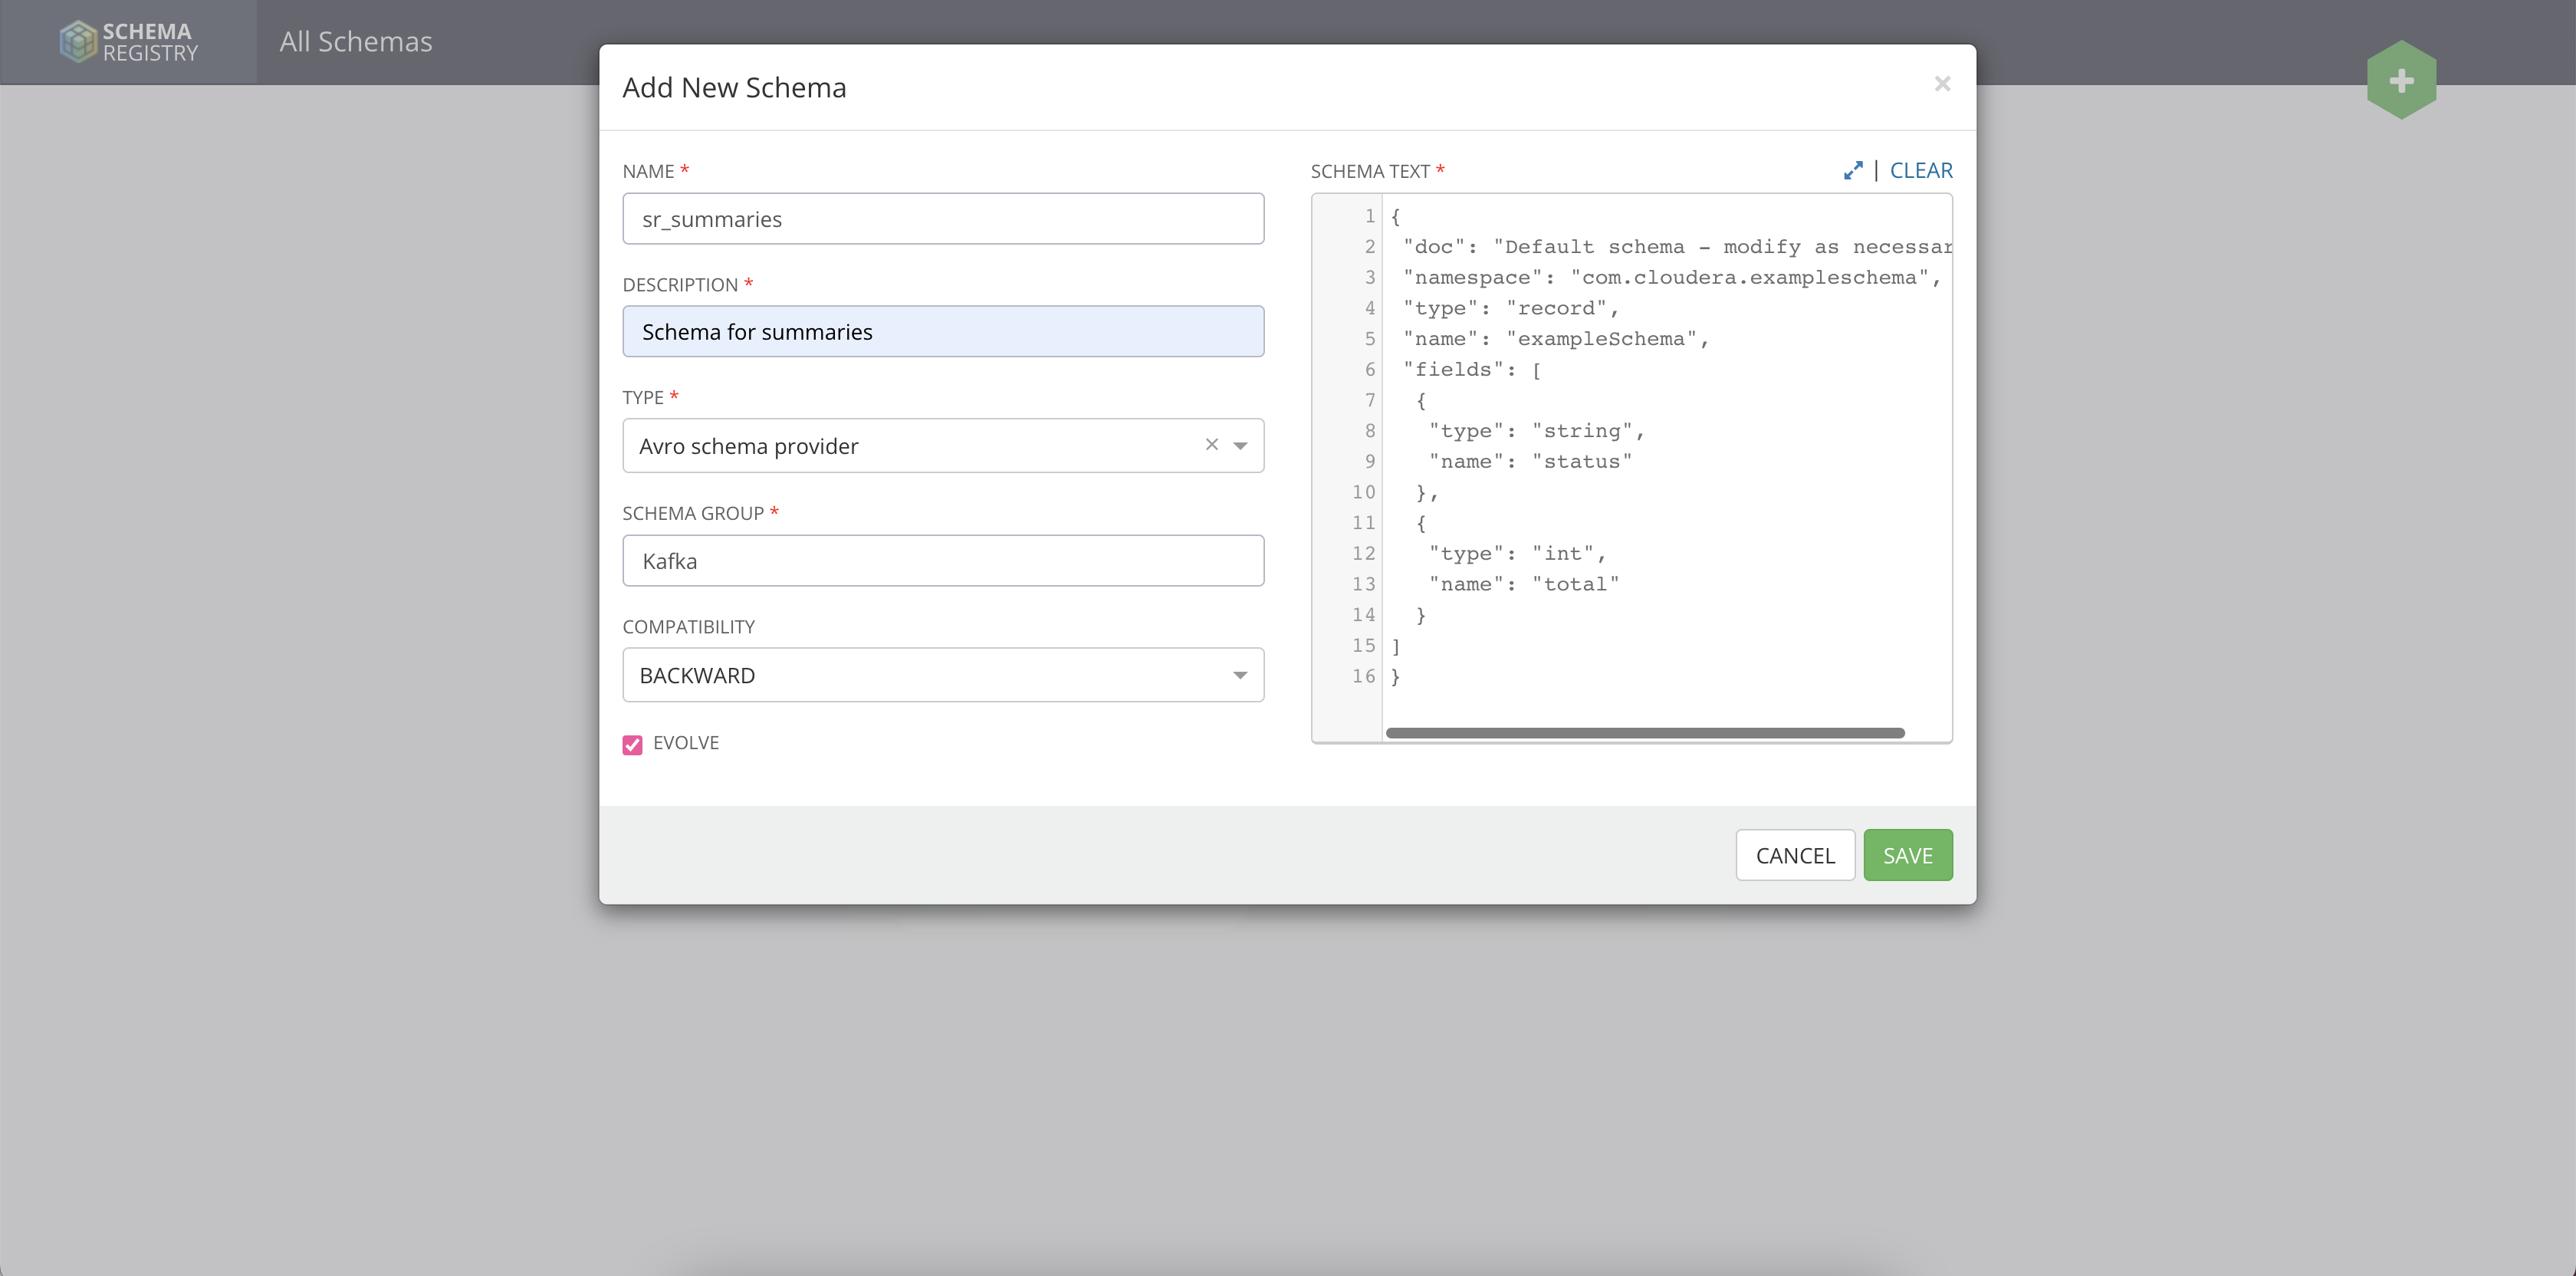
from your browser. Click on the Add New Schema button, and provide the
schema and the necessary information to the window:| Setting | Value |
|---|---|
| NAME | sr_summaries |
| DESCRIPTION | Provide a description based on your requirements. |
| TYPE | Avro schema provider |
| SCHEMA GROUP | Kafka |
| COMPATIBILITY | BACKWARD |
The following illustration also details how you need to fill out the Add New Schema settings.
{
 "doc": "Default schema - modify as necessary",
 "namespace": "com.cloudera.exampleschema",
 "type": "record",
 "name": "exampleSchema",
 "fields": [
  {
   "type": "string",
   "name": "status"
  },
  {
   "type": "int",
   "name": "total"
  }
]
}http://localhost:9991 from your browser. Select Topics
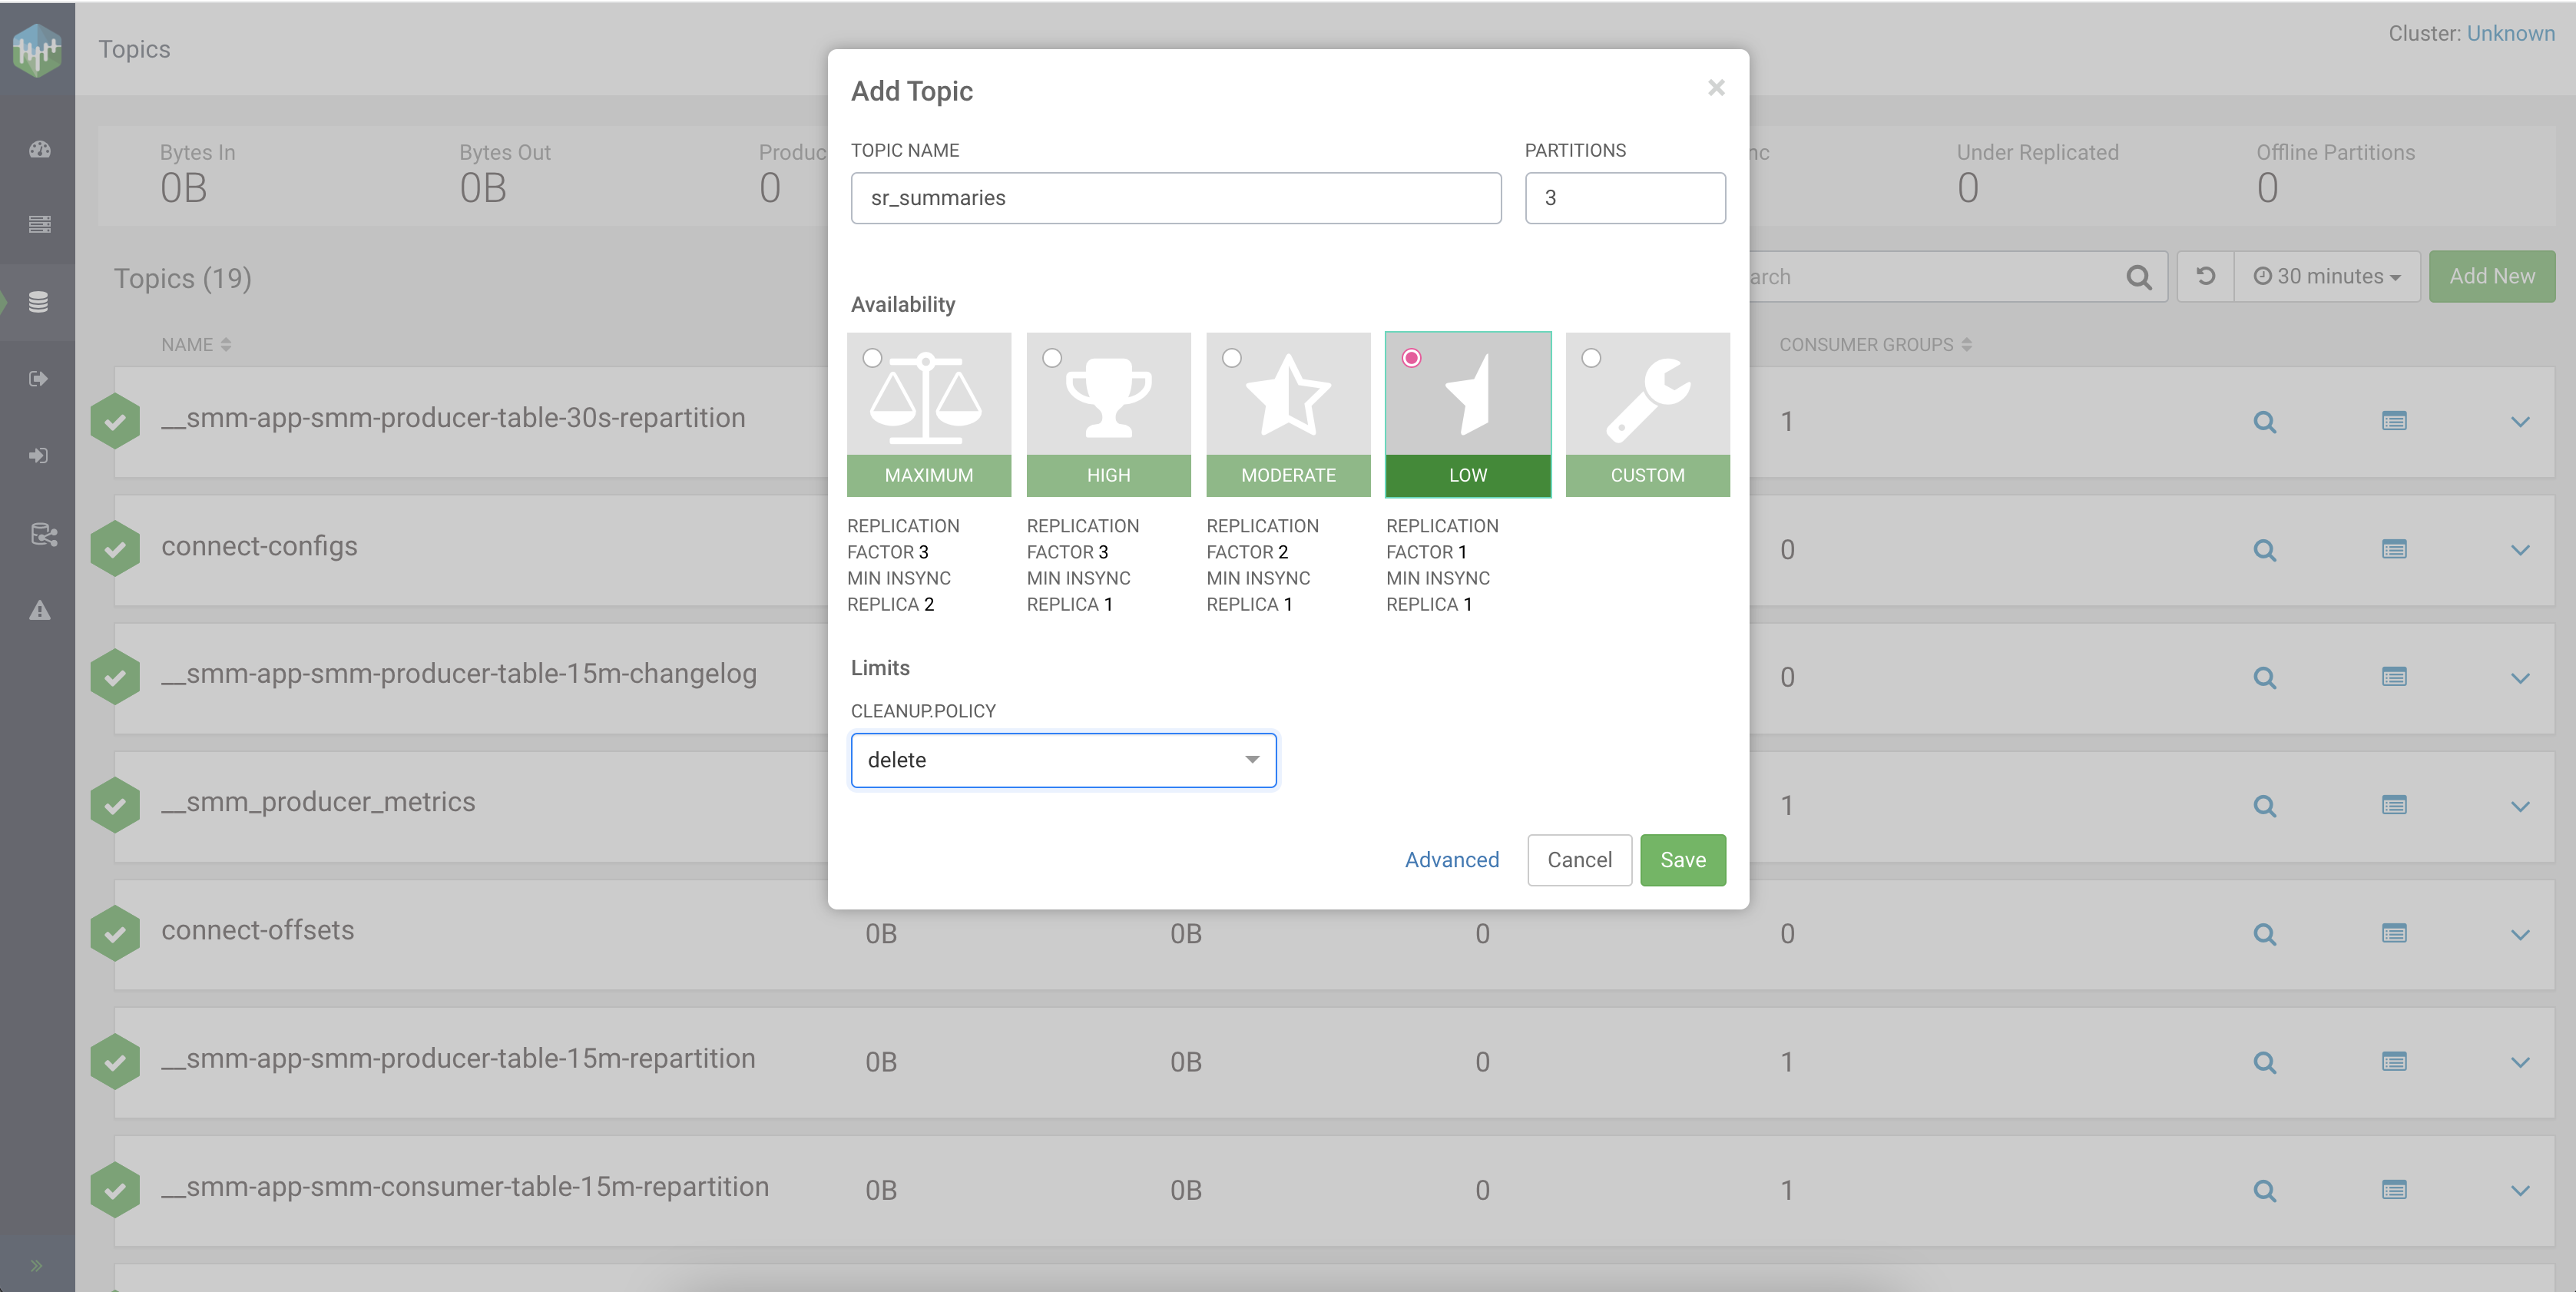
from the main menu, and click on the Add New button. Fill out the
fields, and click Save to create the topic:| Setting | Value |
|---|---|
| TOPIC NAME | sr_summaries |
| PARTITIONS | 3 |
| Availability | LOW |
| CLEANUP POLICY | delete |
The following illustration also details how you need to fill out the Add Topic settings.
http://localhost:18121 or
refresh the browser window, and the table will appear under External Resources >
Virtual Tables. When you describe the created table, you can see the added schema and also that it is
automatically connected to the local Kafka and Kafka topic.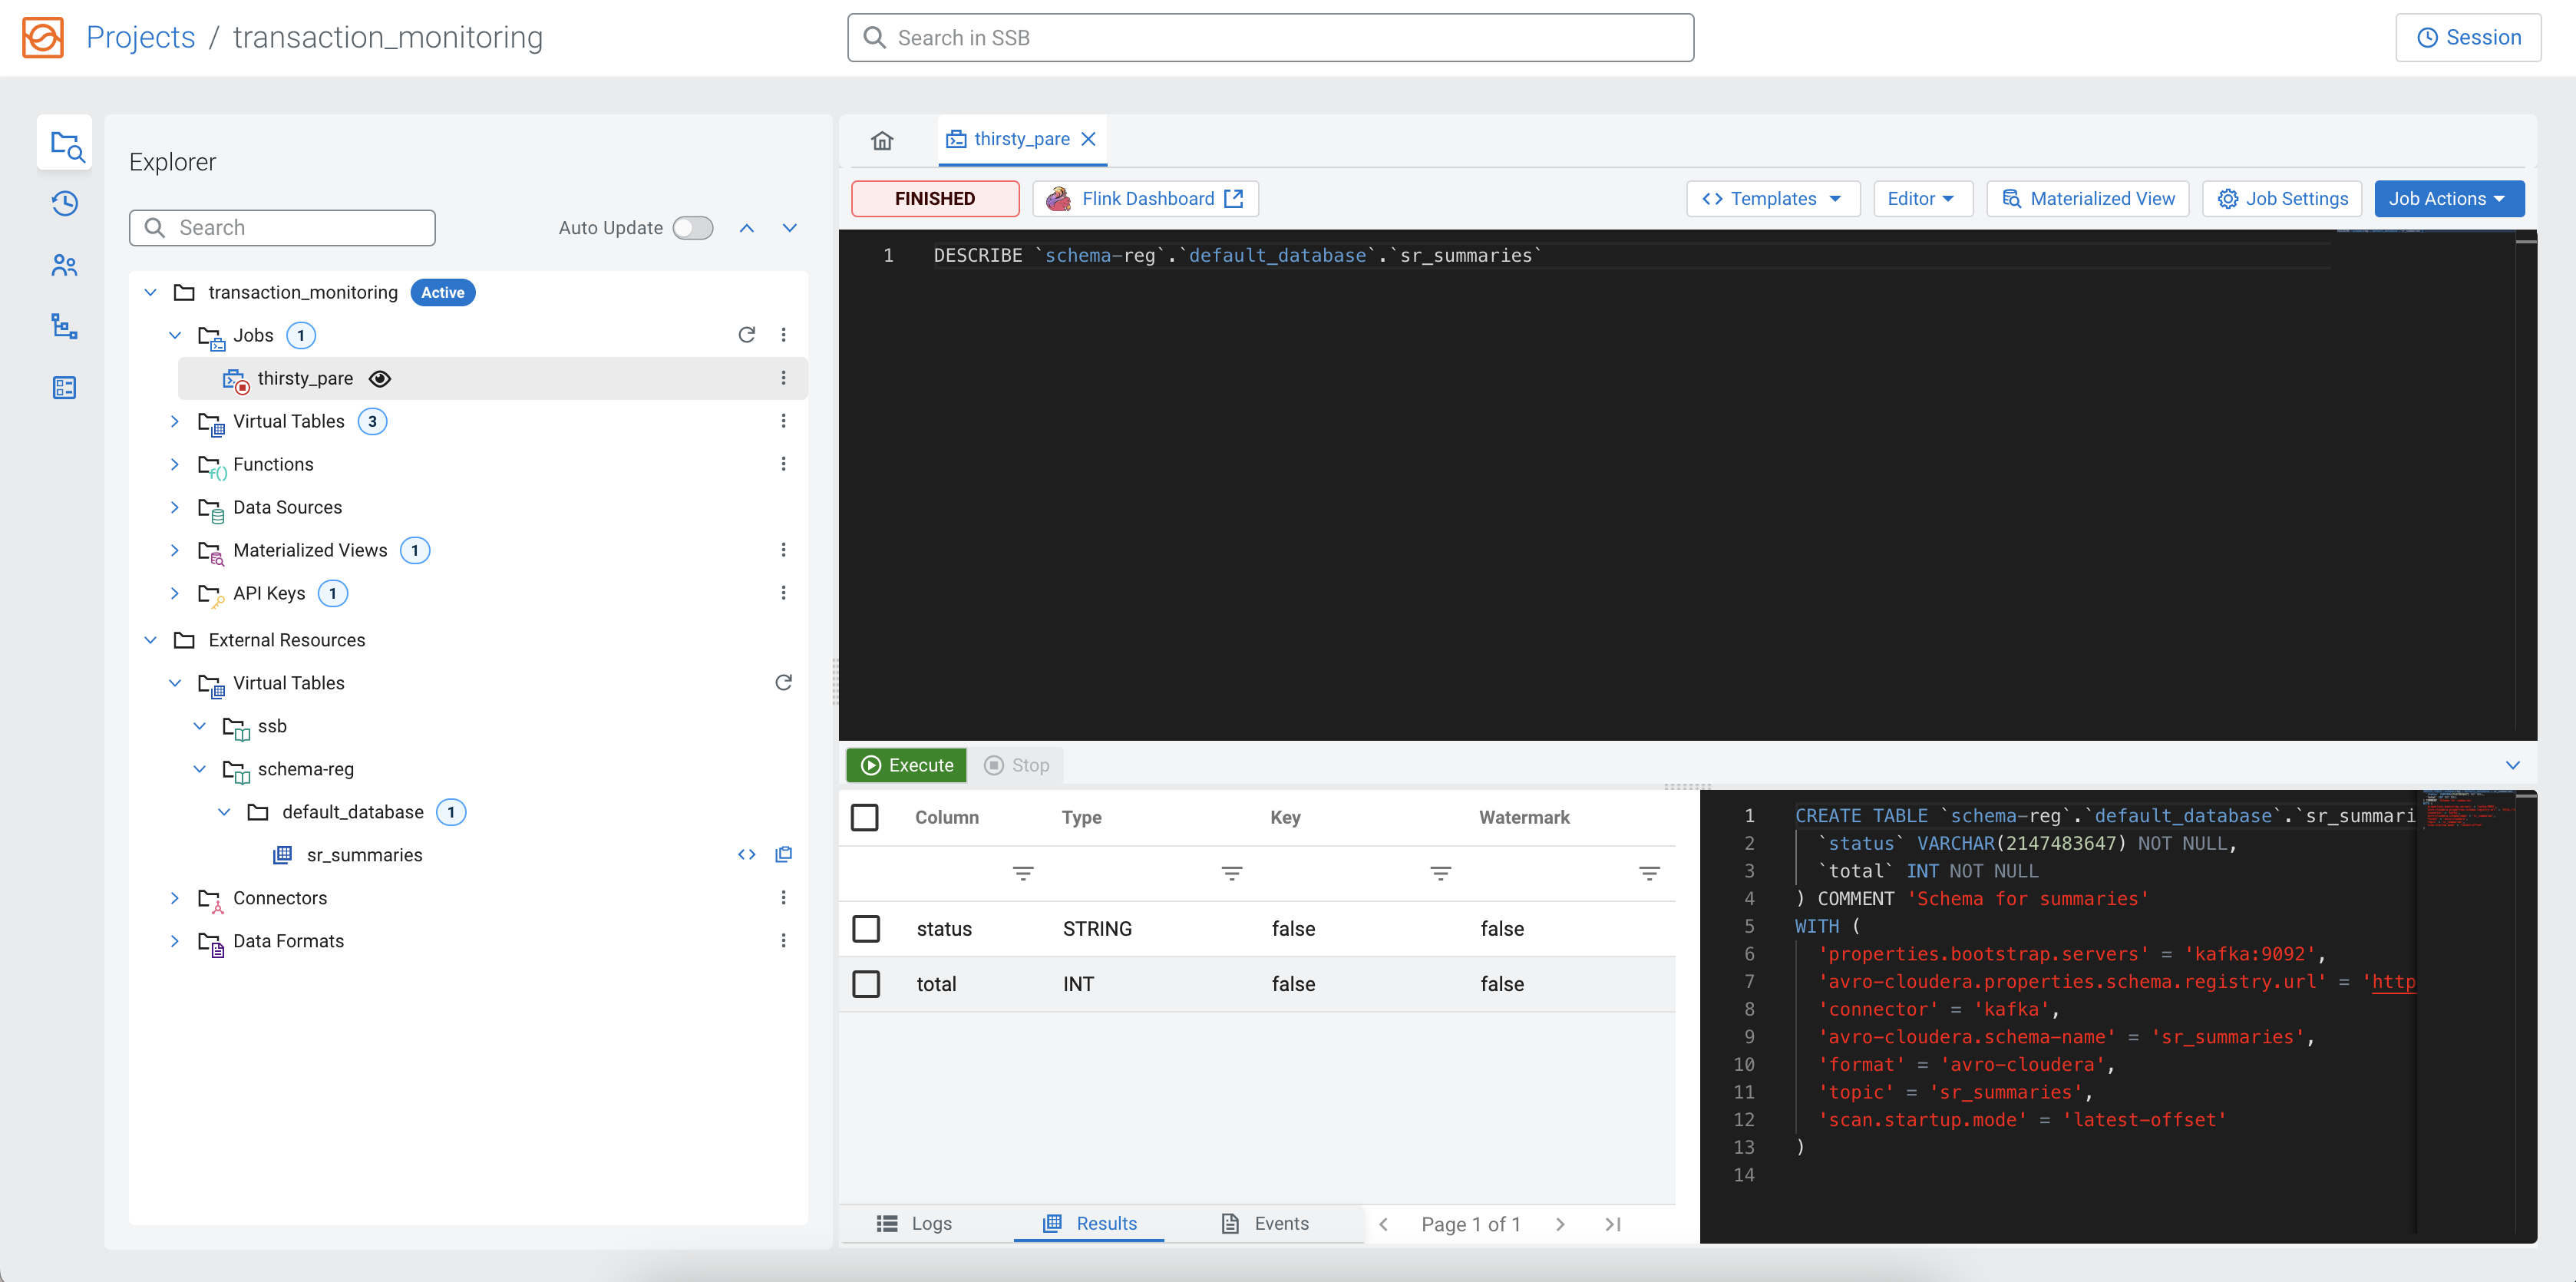
SELECT query where
the order_status and total_amount are inserted into the
sr_summaries
table.INSERT INTO `schema-reg`.`default_database`.`sr_summaries`
SELECT order_status, total_amount FROM summaries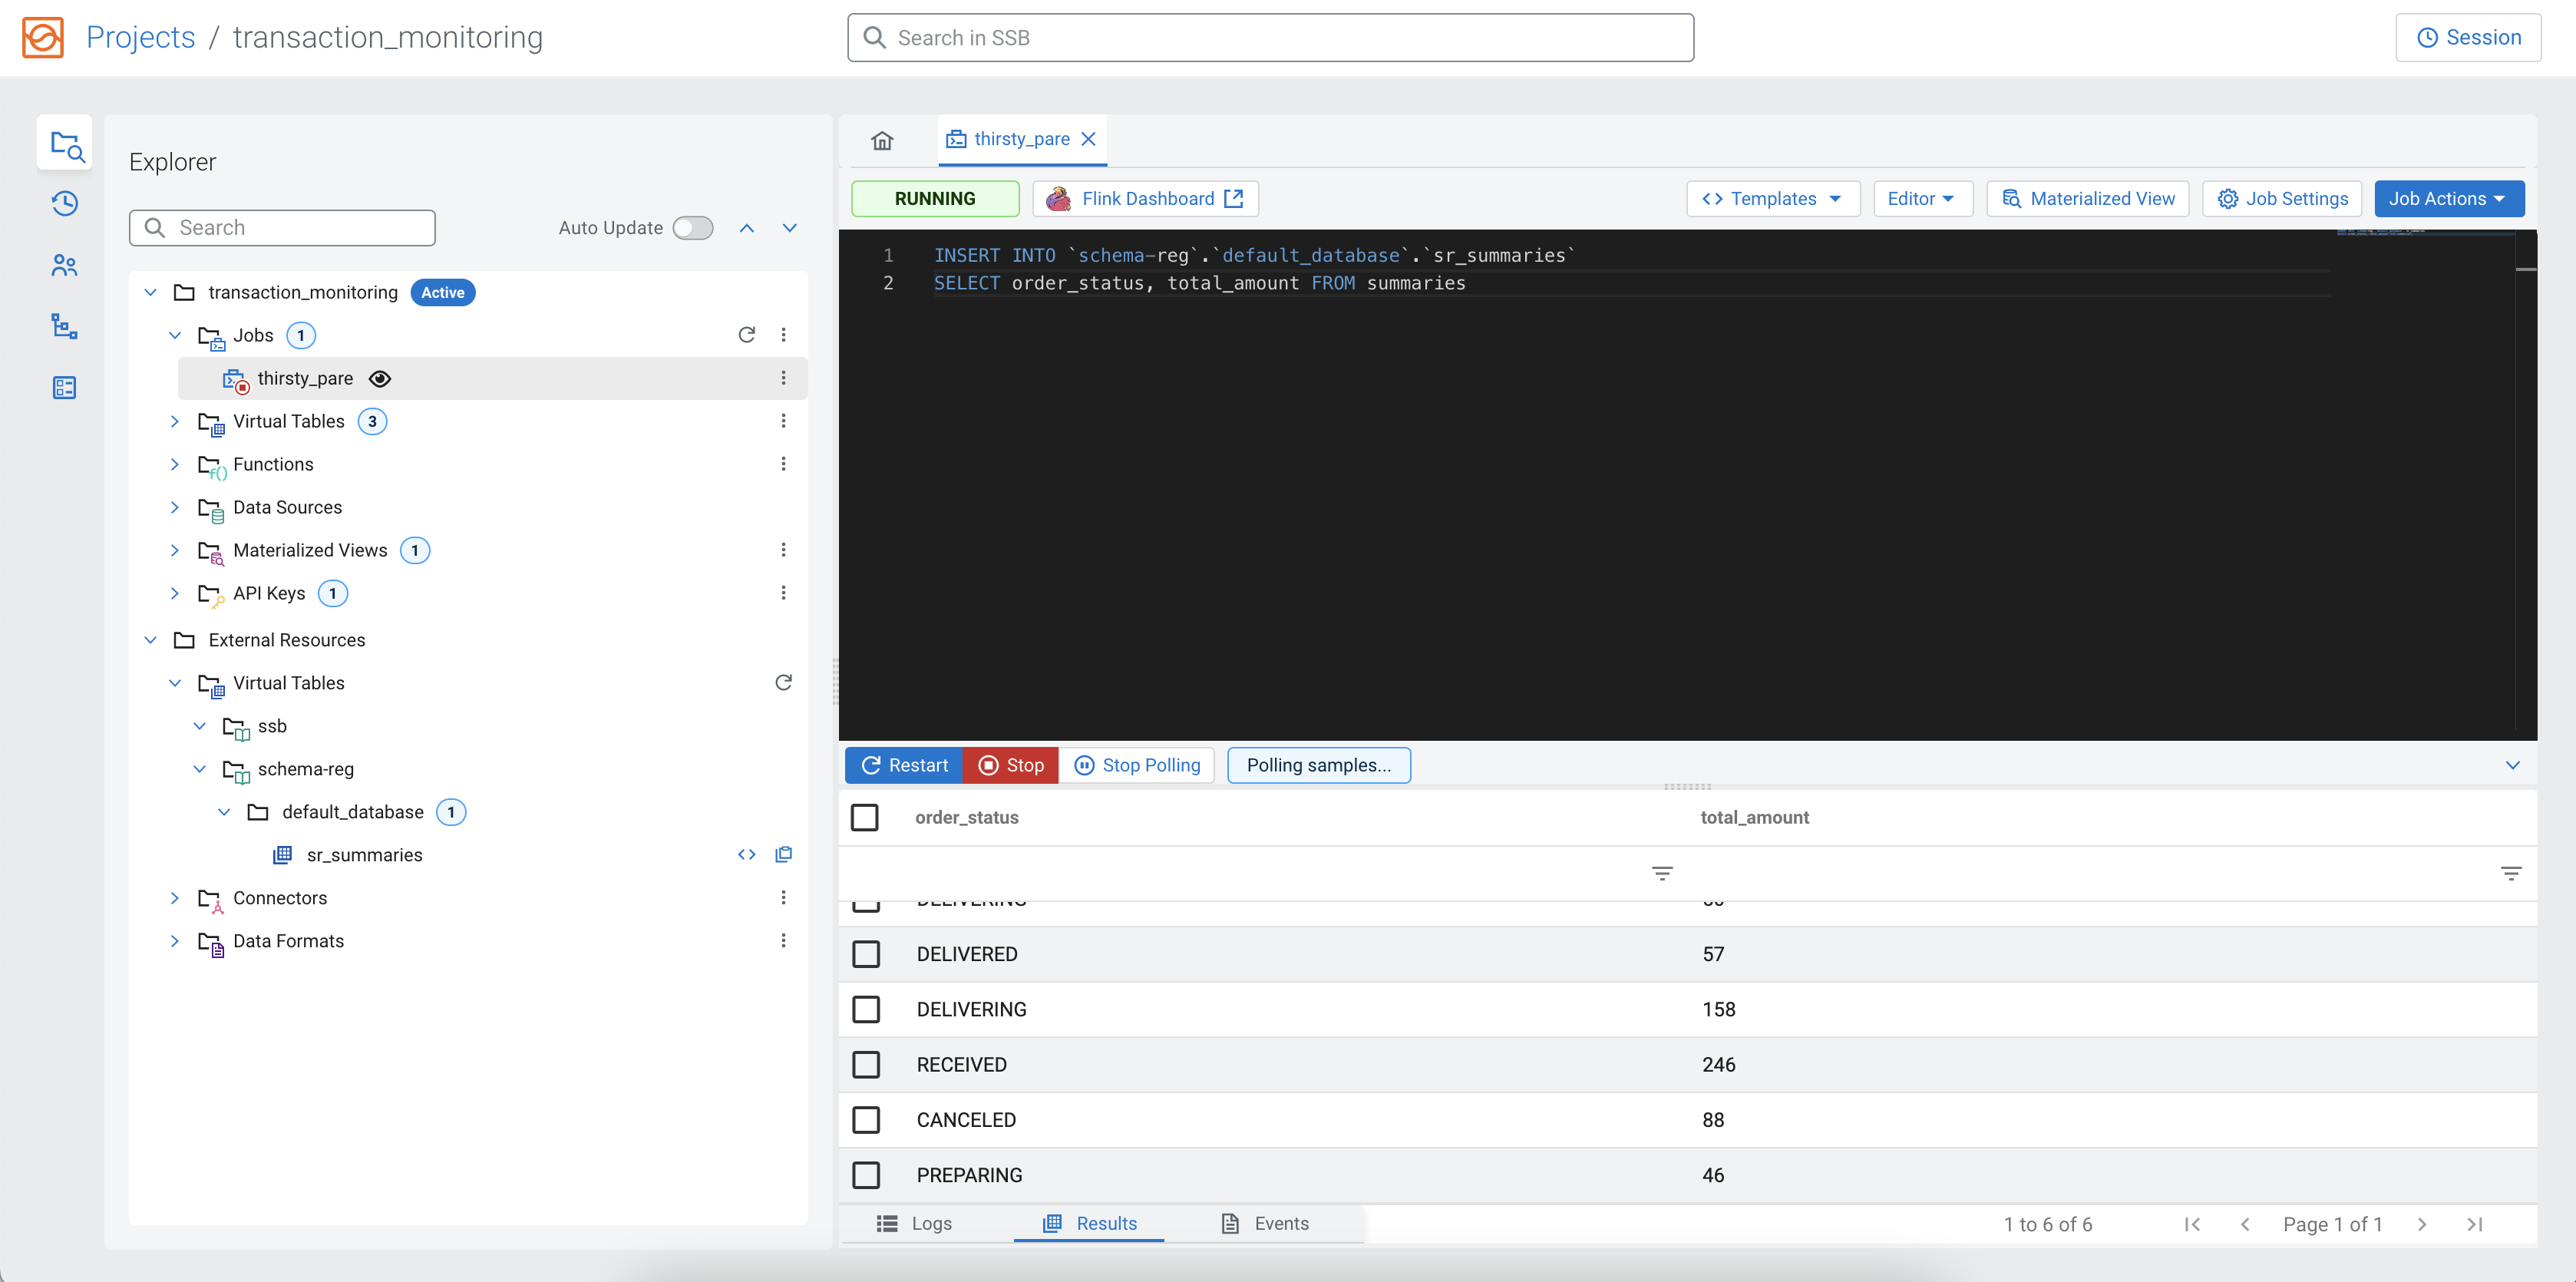
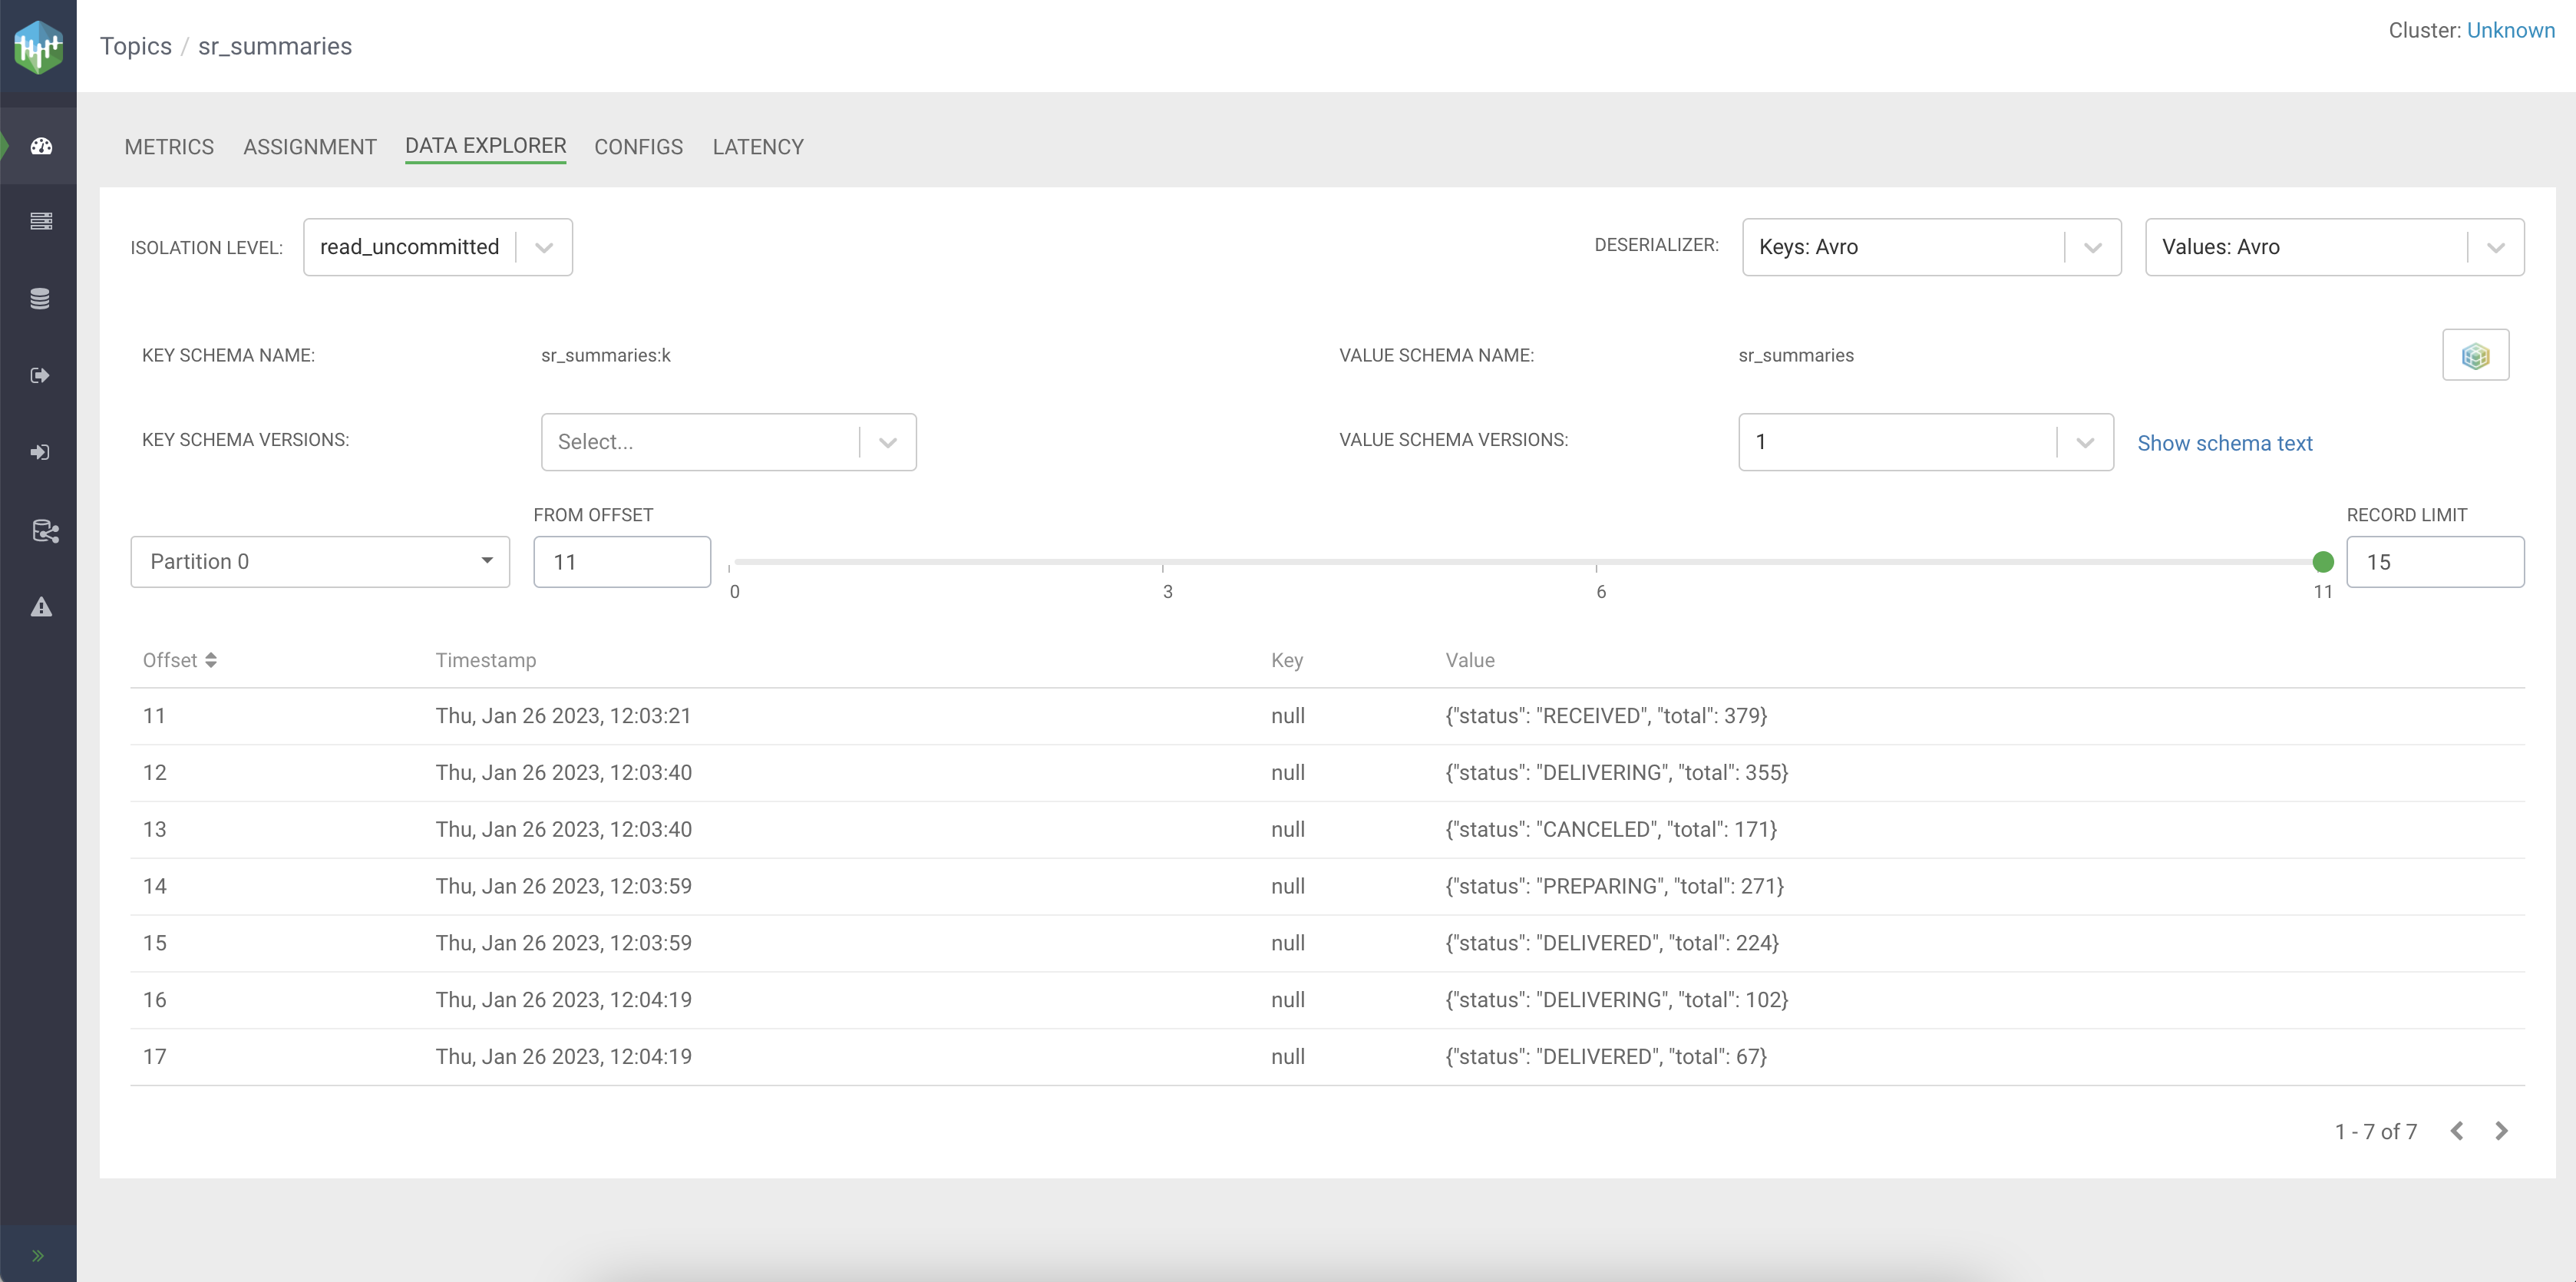
When you navigate to the Streams Messaging Manager user interface, search for the sr_summaries
topic, and click on the Data Explorer view to see the received
messages. Set the Values deserializer type to Avro for
the messages to be shown correctly. Streams Messaging Manager will automatically fetch the schema from Schema
Registry to deserialize the messages.
Adding a Materialized View
One of the features of Cloudera SQL Stream Builder is creating Materialized Views. Materialized Views let you create a persistent snapshot of the stream that can be queried through a REST endpoint. This can then be queried by external applications and tools. Now that you know how to query simple and aggregated data, learn how to create Materialized Views.
In the following example, you will create a Materialized View that shows the latest order count and total amount for each order status. The key will be the status, and the other fields will be updated with the value from the latest 20 second interval.
SELECT query. Add the following SQL query to
the SQL Editor to run the
query:SELECT * FROM summaries
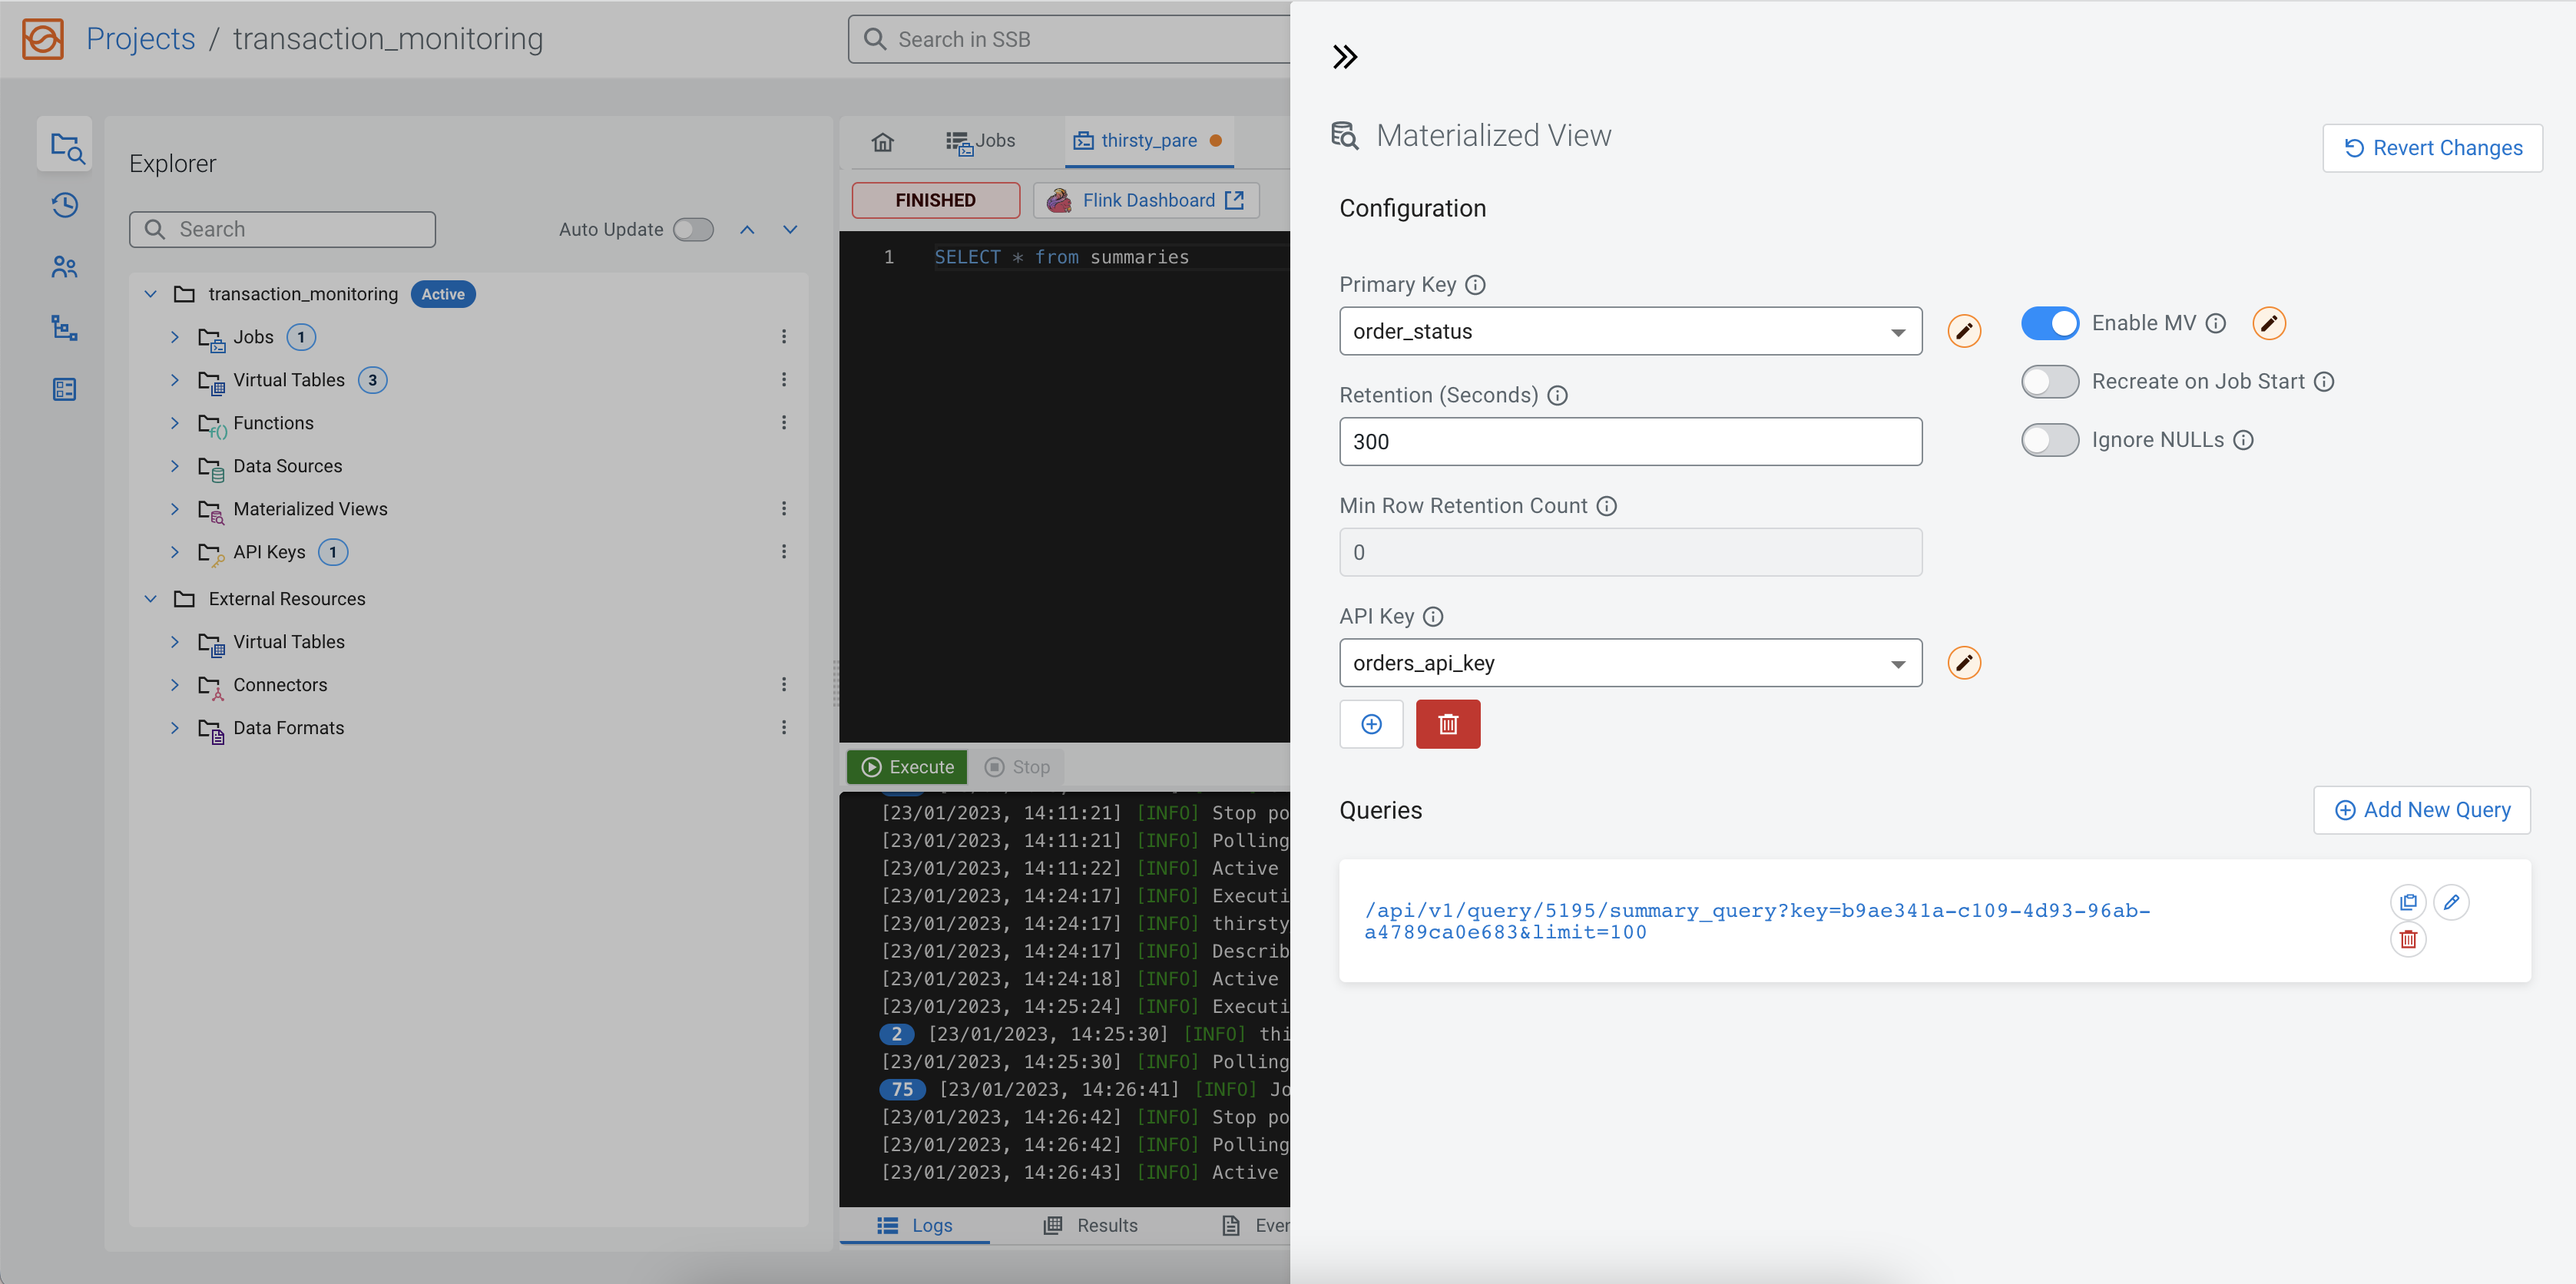
You also must add an API key to the configuration that will be a part of the generated URL.
Click on the Add API Key button, and provide any type of name to the API
key. For example orders_api_key, and click Save. After
the API key is created, select it as the API Key of the current Materialized View.

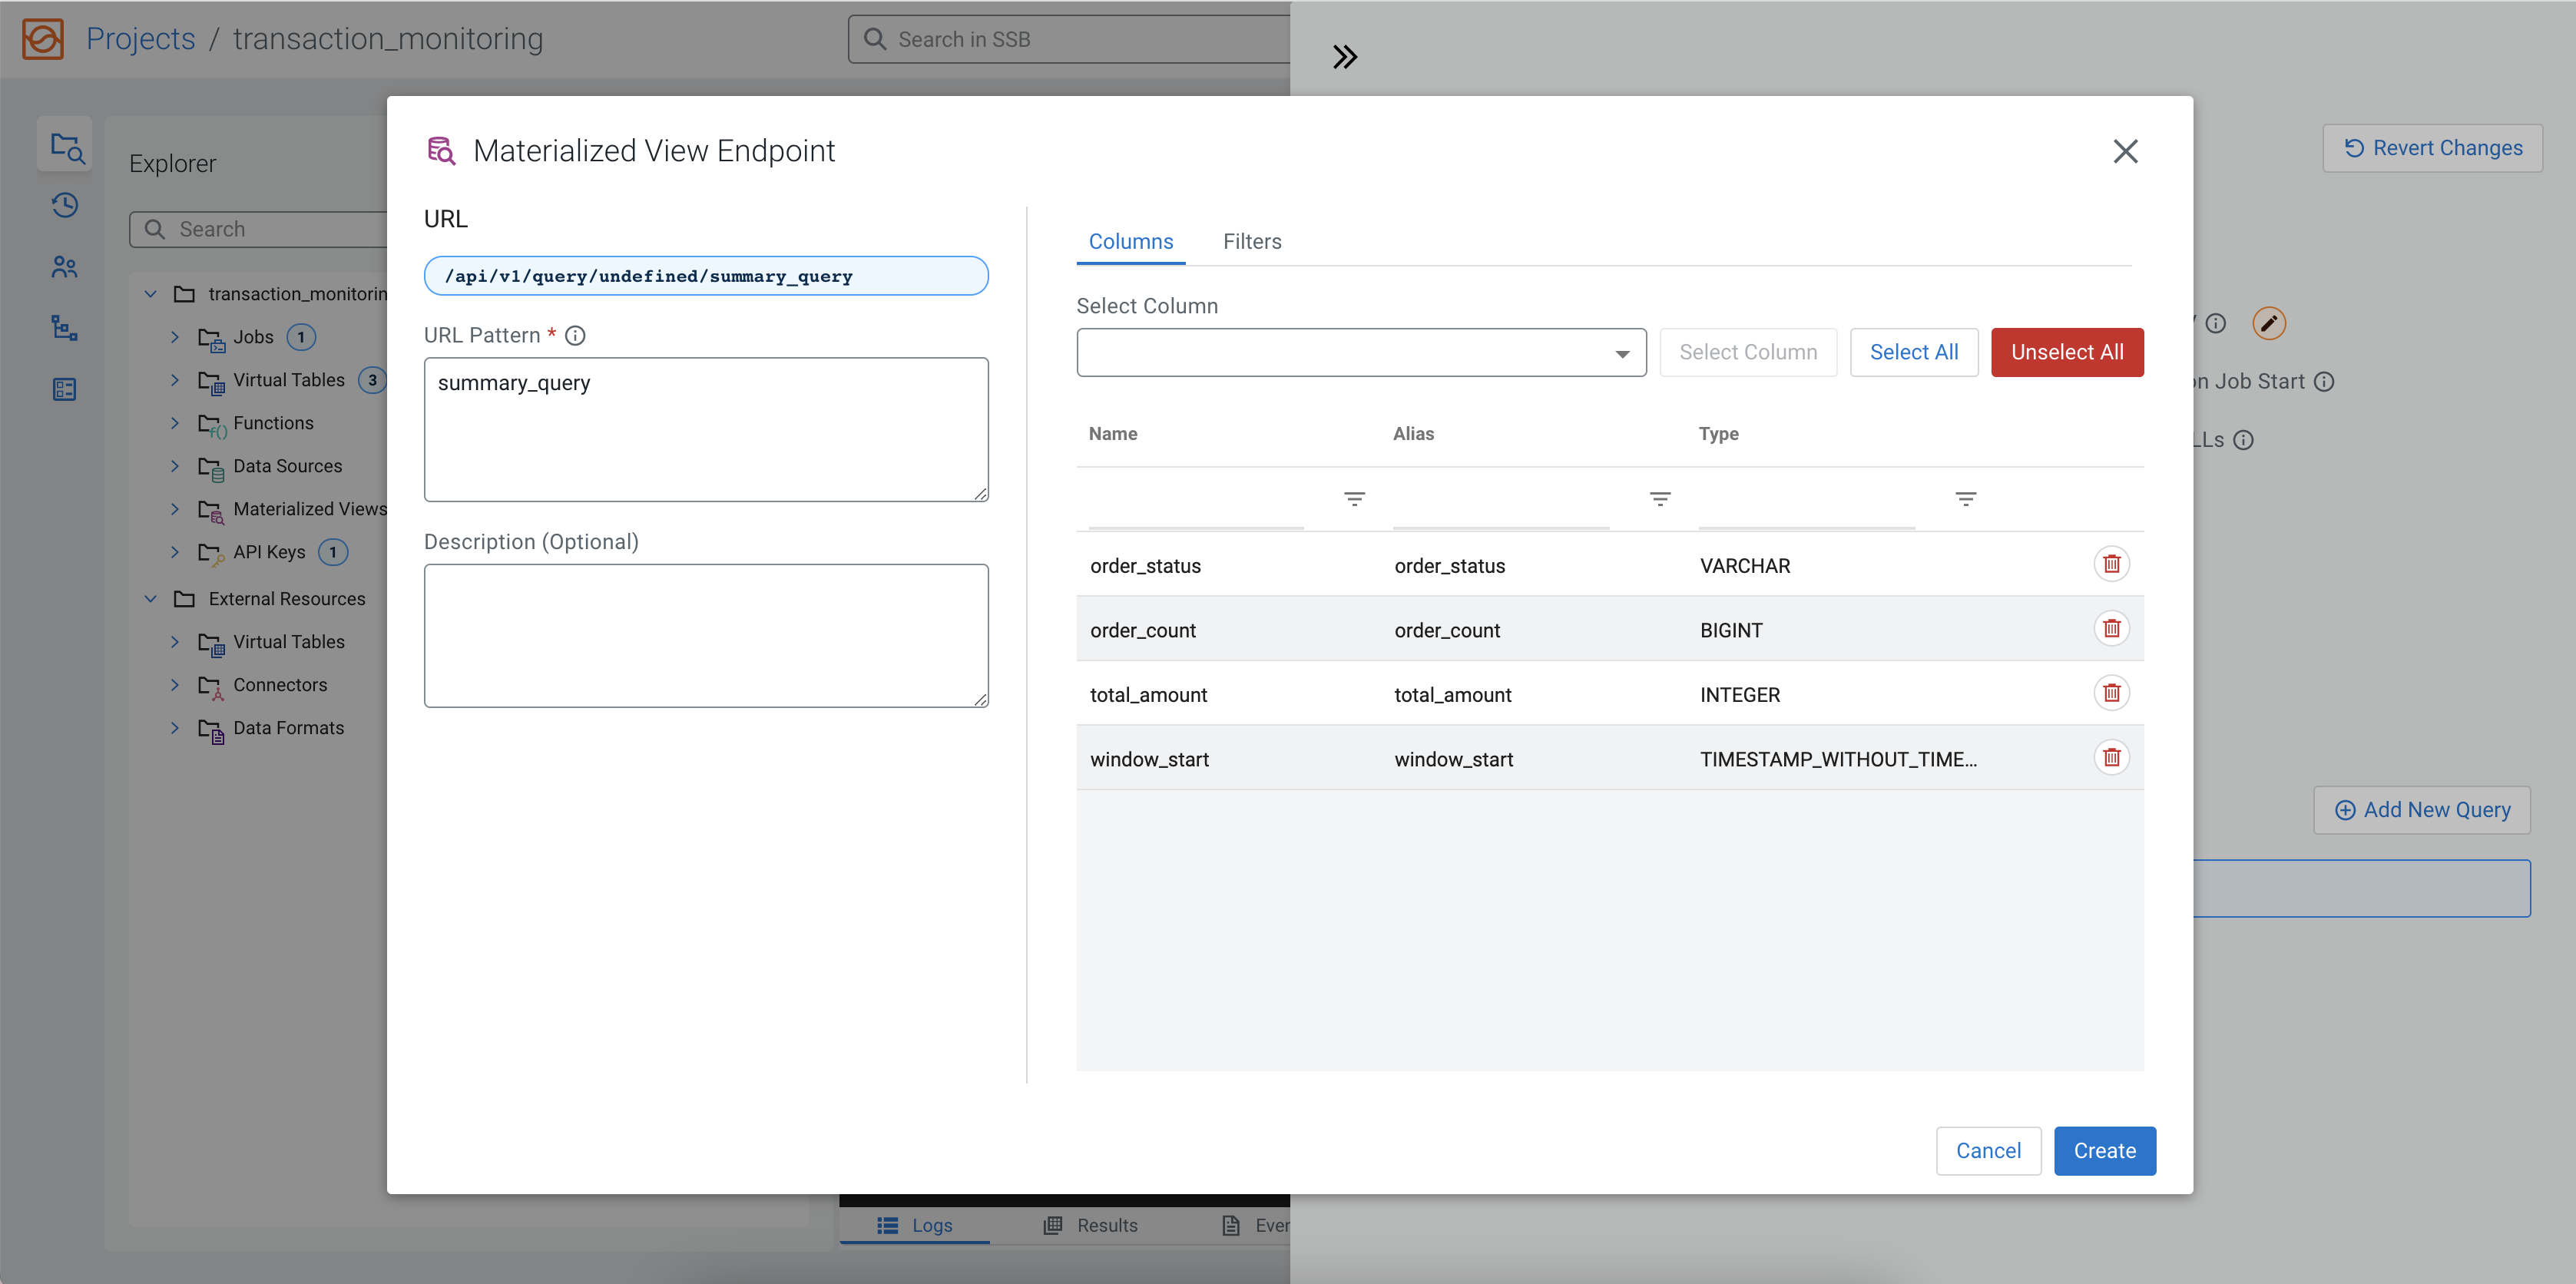
After configuring the Materialized View, you can add a query by clicking on the Add
New Query button. On the Query Configuration page, specify the
URL Pattern and select the fields that you want to include in the
Materialized View. You can also add filters to further narrow down the result. In the following
example, summary_query is the URL Pattern, order_status,
order_count, total_amount and window_start
columns are selected as fields. You can add these fields by clicking Select
All, and removing window_end with the red
bin icon under Actions. You also have the option to select the
fields from the drop-down menu under Query Builder, and add the fields
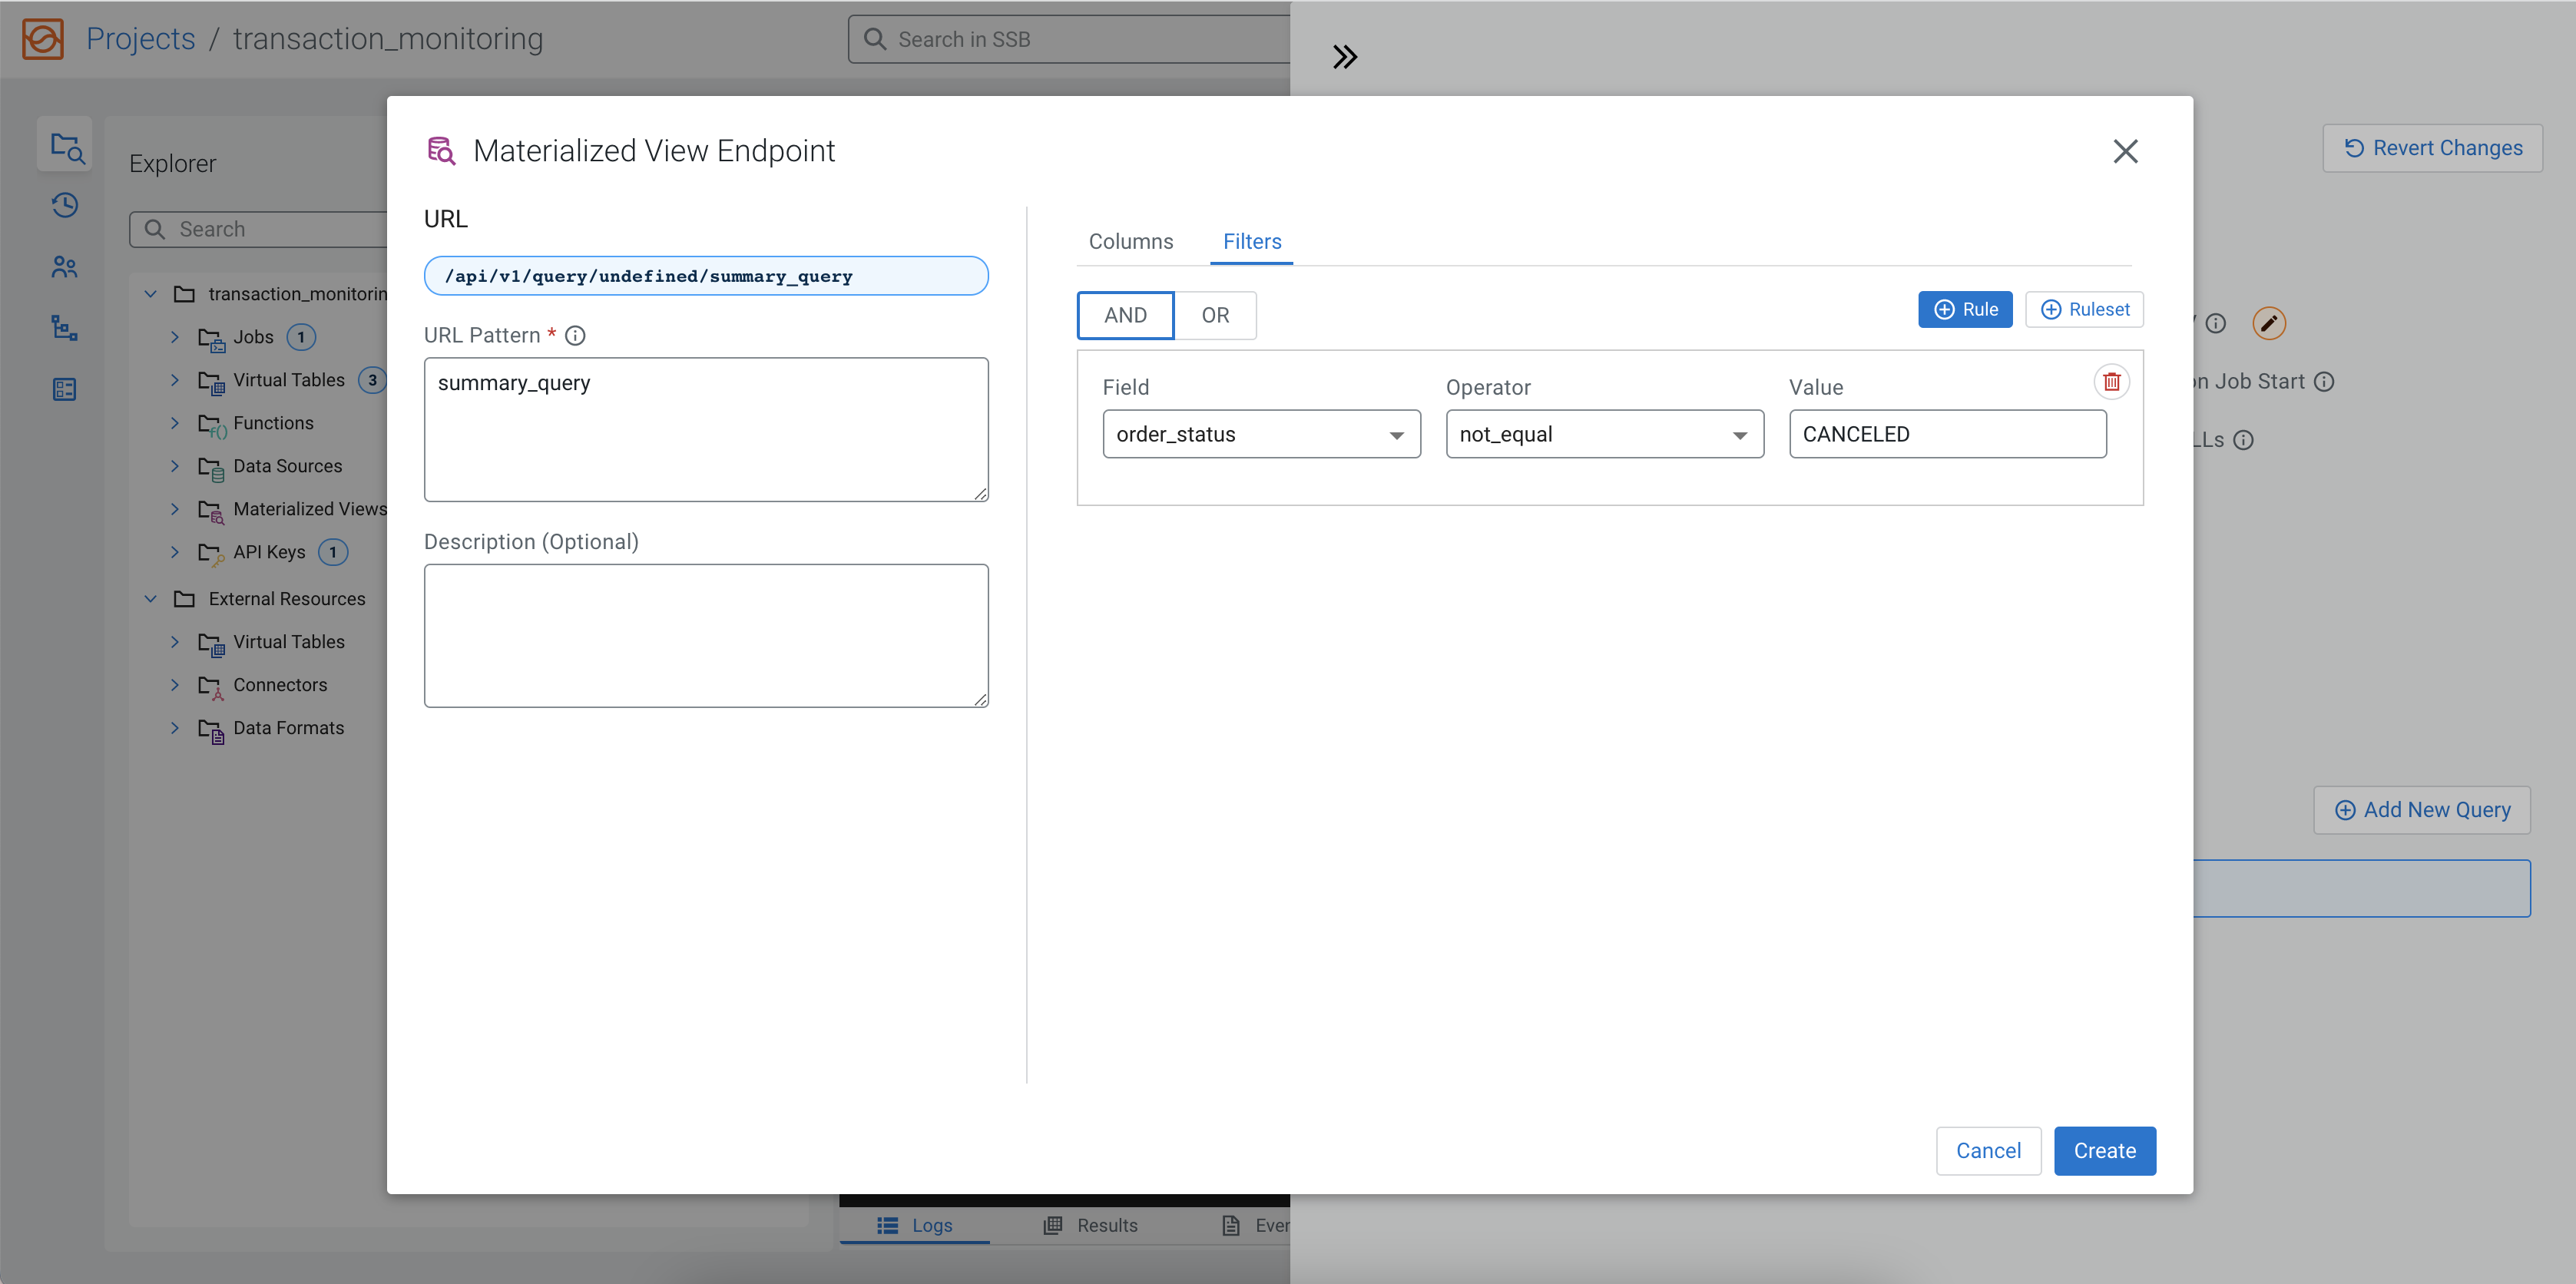
individually. A filter is also added to exclude the orders with a CANCELED
status.
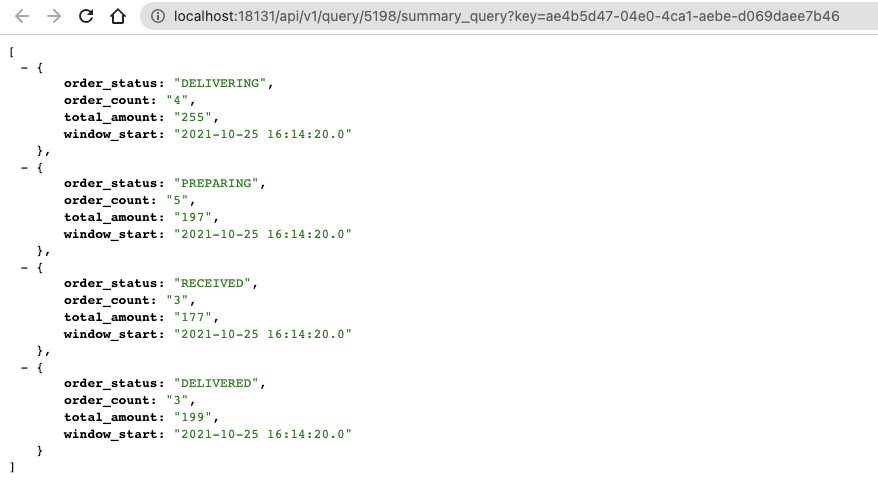
Click on the Create button to add the query to the Materialized View. The URL will appear under the Materialized View Queries.
When you click on the URL, you are redirected to the http://localhost:18131
address. You will receive an error message that no data is generated, because the
SELECT query is not executed yet. Go back to the SQL
Editor using the arrows on the Materialized View window, and
click on the Execute button to start the SQL job. After a couple of
seconds, the endpoint becomes active and the results show up on the localhost address.
Next step
You have completed the Getting Started guide of Streaming Analytics. As you already know the basic steps to use Cloudera SQL Stream Builder, feel free to experiment more and get more familiar with the features by trying out the PostgreSQL CDC and Filesystem connectors, or learning how to monitor your SQL jobs.