Adding Cloudera Data Warehouse cluster access to external S3 buckets in a different AWS account

You might need to know how to add read/write access to S3 buckets under AWS accounts that are different from the account for the Cloudera Data Warehouse (CDW) service cluster.

To add CDW service cluster access to a bucket you add to S3 under a different AWS account, you must configure the bucket in the different account to access the CDW cluster account. Then, you can configure the CDW service account to access the bucket you added. You perform both of these tasks in the AWS Management Console.

Required role: DWAdmin

To configure access to external S3 buckets for your CDW cluster, you must edit the AWS instance profile. Before you edit the instance profile, get the cluster ID from the Environments tile in the CDW service UI:

You use this cluster ID in Step 5 below.

  1. In the AWS Console, navigate to AWS Management Console > S3, locate the bucket in the other AWS account you added, and then click the bucket name.
  2. In the bucket details page, click the Permissions tab, and then click the Bucket Policy sub-tab.
  3. In the Bucket Policy sub-tab page, in the Bucket policy editor, add the CDW cluster Id and what permissions you want the CDW service account to have for this bucket:

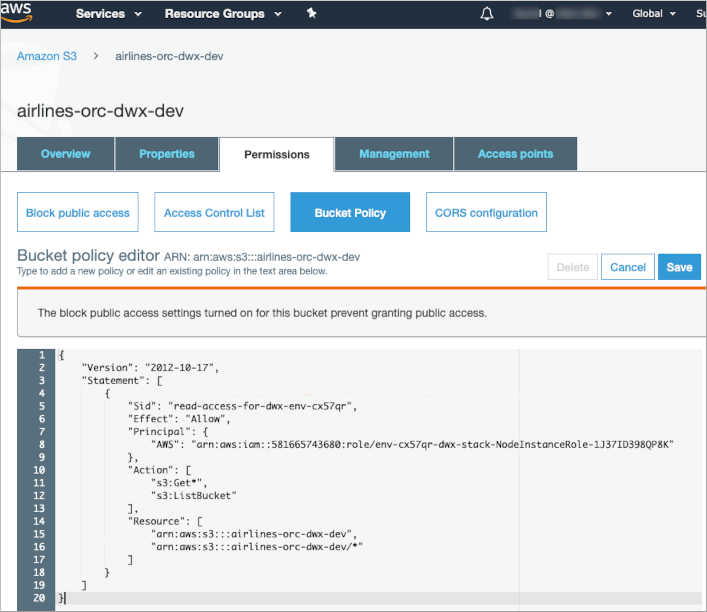
    This example policy includes the following specifications:

    • A.

      This section includes the Sid, which is an optional identifier indicating what the policy does. The Effect specifies that this policy is allowing the Principal to do what is listed below in the Action section. The Principal is where you specify the ARN of the instance role for your CDW cluster account.

    • B. The Action section specifies what actions the Principal can perform.
    • C. The Resource section specifies the S3 bucket you addad and want your CDW cluster to be able to access.

    For details about bucket policies, see Managing Access to Amazon S3 Buckets Using Bucket Policies in the AWS documentation.
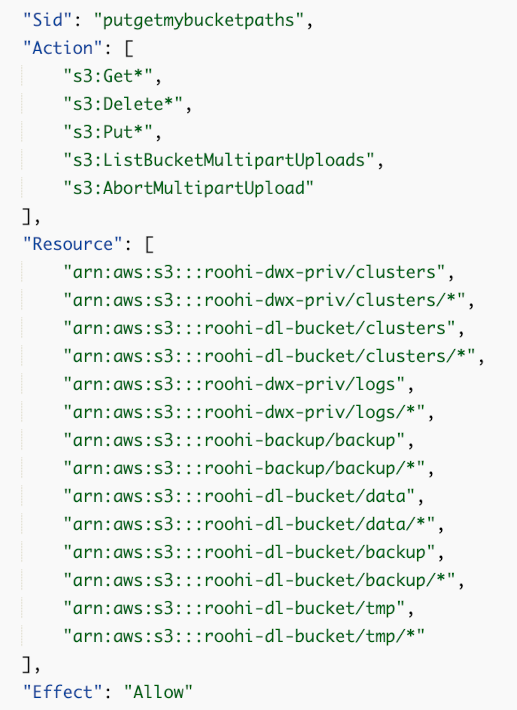
  4. Click Save.
  5. Still in the AWS Console, navigate to AWS Management Console > CloudFormation and locate the corresponding stack using the cluster ID you obtained from the CDW Environments tile in the "Before you begin" section above. Click on the CloudFormation stack name. This stack name is based on the form: <cluster-ID>-dwx-stack. For example, if the cluster ID is env-6cwwgg, the CloudFormation stack name for this cluster is env-6cwwgg-dwx-stack.
  6. In the CloudFormation stack details page, click the Resources tab, locate the NodeInstanceRole in the Logical ID column, and then click the adjacent hyperlink in the Physical ID column:

    This launches the Identity and Access Management (IAM) console.

  7. In the IAM console, locate the s3-read-write-own-buckets policy. Click Show…More if you do not see it.
  8. Expand the row for the s3-read-write-own-buckets policy by clicking the triangle icon to the left of the policy, and then click Edit Policy:
  9. In the Edit s3-read-write-own-buckets editor page, click the JSON tab and append ARN information about the additional external bucket in the "Resource" section of the JSON file. For example, if you want to add access to the dwx-env-cx57qr bucket, you append it at the end of the "Resource" section as shown in the following example:
    "Resource":[
                "arn:aws:s3:::cdw-sales-hj9s-dwx-managed",
                "arn:aws:s3:::cdw-sales-hj9s-dwx-managed/*",
                "arn:aws:s3:::cdw-sales-hj9s-dwx-external",
                "arn:aws:s3:::cdw-sales-hj9s-dwx-external/*",
               "arn:aws:s3:::dwx-env-cx57qr",
                "arn:aws:s3:::dwx-env-cx57q/*"
         ],
  10. Click Review policy in the lower right corner of the page, and then click Save changes. You can access the new bucket from your CDW service cluster now. For example, you can create external Hive tables that point to the newly added bucket.