You can either choose from pre-defined templates or create your own. The pre-defined
Code Generation and Text-to-SQL templates offer curated prompts, seeds (explained below), and
examples to generate datasets. Alternatively, the Custom template lets you define every aspect
from scratch, enabling the creation of synthetic datasets tailored specifically to your enterprise
use cases.
-
In the Cloudera
console, click the Cloudera AI
tile.
The Cloudera AI Workbenches page displays.
-
Click on the name of the workbench.
The workbenches Home page displays.
-
Click AI Studios.
-
Launch the Synthetic Data
Studio..
-
Under AI Studios, click Synthetic Data Studio, and then click Get
Started.
-
Under Create Datasets, click Getting Started. The Synthetic Dataset
Studio page is displayed.
-
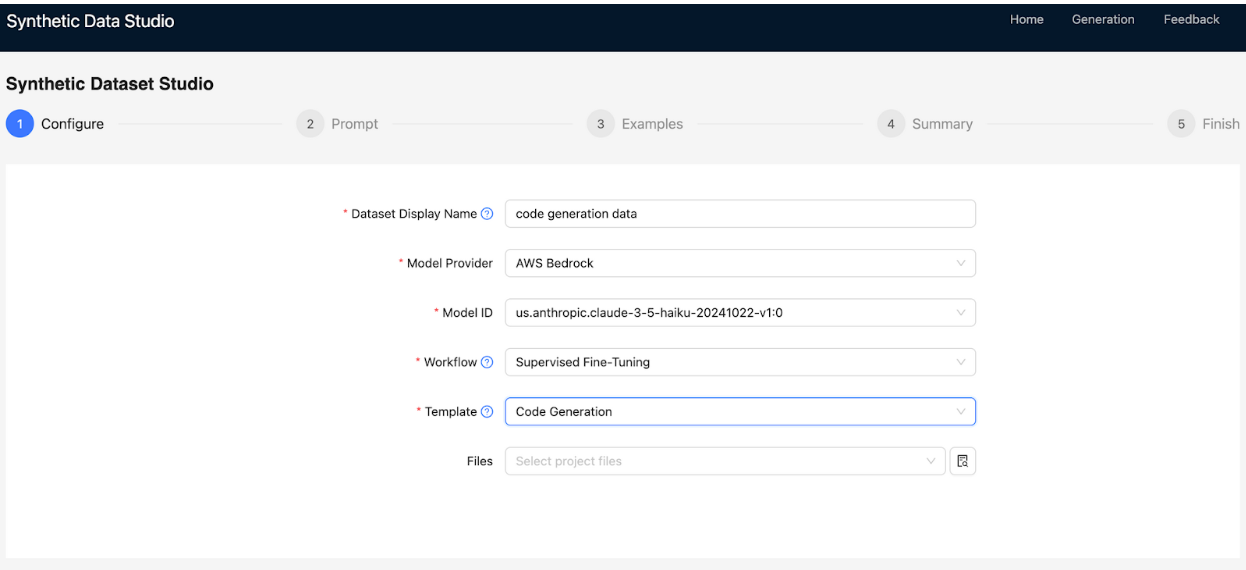
In the Configure tab, specify the following:
- In Dataset Display Name, provide a name for your dataset.
- In Model Provider, select AWS Bedrock or Cloudera AI Inference as the
model provider.
If Cloudera AI Inference is selected, specify the Model ID
and Cloudera AI Inference Endpoint. You can obtain the Model ID from the Model
Endpoint Details page, and you can select a target model such as, LLaMA, Mistral, and
so on. If Model endpoints are in the same cluster where the application is hosted, a JWT
token is sufficient. Otherwise, a CDP token must be specified in the environment
variables.
- In Workflow, choose the tuning type:
- Supervised Fine-Tuning: Generate prompt-completion pairs with or without
additional documents. For example, PDFs, DOCs, TXTs, and so on.
- Custom Data Generation: Use a user-uploaded JSON array to generate responses.
This workflow allows you to provide your inputs and instructions and generate tailored
outputs for the corresponding inputs.
For
Custom Data Generation, define the
following to generate the final pair of responses:
- Input Key: Specify the Key or Column name within the uploaded
JSOM whose values will be used for generation.
- Output Key: Define the key name in the final output. If left
empty, it defaults to Prompt.
- Output Value: Define the name of the generated series values
corresponding to the input key. If left empty, it defaults to
Completion.
- In Files, select input files from your project file system for the chosen
workflow.
-
In the Prompt tab, specify the following:
- In Prompt, create a custom prompt manually, select from predefined templates, or
allow the LLM to generate a prompt based on your use case description.
- In Seeds Instructions, provide seed instructions to guide the LLM in diversifying
the dataset. Seeds act as prompts that influence the style, domain, or subject matter of the
output.
Examples for
Code Generation
- Algorithms for Operation Research
- Web Development with Flask
- PyTorch for Reinforcement Learning
Example Seeds for language translation:
- Poems
- Greetings in Formal Communication
- Haikus
- In Entries Per Seed, specify the number of entries to generate for each seed
defined in Seeds Instructions.
- Under Parameters, adjust the model parameters for Temperature, Top K,
and Top P.
- Temperature: Low temperature improves accuracy, while high temperature enhances
diversity.
- Top K: Increases the search space and response options for the LLM but may impact
response speed.
- Top P: Controls diversity and randomness in the generated tokens. Higher values
increase diversity and randomness, while lower values reduce both.
-
In the Examples tab, view the details of example prompts.
- Under Actions, click
 to modify an example prompt or response.
- Under Actions, click
 to remove the example prompt.
- Click Add Example to create new example prompts.
-
In the Summary tab, review your settings. Click Generate to generate the
dataset, or click Previous to return to earlier tabs and make changes.
-
In the Finish tab, view the status of the dataset creation process. The generated
Prompts and Completions will be displayed. The output will be saved in the
Project File System within the Cloudera environment.