Snowflake Tool Permissions Prerequisites
Learn how to configure Snowflake permissions to enable seamless integration with Cloudera Octopai.
Permissions overview
General guidelines
-
Create the Snowflake user while signed in with an ACCOUNTADMIN role.
-
Assign required roles and a DEFAULT_WAREHOUSE to ensure efficient query processing.
-
Grant USAGE on all schemas in the target databases to simplify access management.
Database and warehouse roles
Database roles
-
USAGE: Lists the database and allows metadata queries. -
CREATE SCHEMA: Creates schemas within the database. -
CREATE TABLE: Creates tables within the database. -
SELECT: Queries data from tables. -
INSERT: Inserts data into tables. -
UPDATE: Updates table data. -
DELETE: Deletes table data. -
REFERENCES: Creates foreign-key relationships.
Warehouse roles
-
USAGE: Runs queries on the warehouse. -
MONITOR: Reviews warehouse usage and performance. -
OPERATE: Starts, stops, and resizes the warehouse. -
OWNERSHIP: Grants full control over the warehouse.
Set up Snowflake permissions
Follow these steps to provision a dedicated Cloudera Octopai user and assign the necessary Snowflake roles and privileges.
1. Create a dedicated user
Run the following SQL to create a Snowflake user for Cloudera Octopai metadata extraction:
CREATE USER [***USERNAME***]
  PASSWORD = '[***PASSWORD***]'
  DEFAULT_WAREHOUSE = '[***WAREHOUSE NAME***]'
  MUST_CHANGE_PASSWORD = false;
Result: the user appears in Snowflake.

2. Create a dedicated role
Create a role to encapsulate Cloudera Octopai permissions:
CREATE ROLE [***ROLE NAME***];Result: the role is registered in Snowflake.

3. Assign the role to the user
Grant the role and set it as the default:
GRANT ROLE [***ROLE NAME***] TO USER [***USERNAME***];ALTER USER [***USERNAME***] SET DEFAULT_ROLE = [***ROLE NAME***];4. Grant warehouse usage
Allow the role to run workloads on the chosen warehouse:
GRANT USAGE ON WAREHOUSE [***WAREHOUSE NAME***] TO ROLE [***ROLE NAME***];Verify warehouse grants when needed:
SHOW GRANTS ON WAREHOUSE [***WAREHOUSE NAME***];
5. Grant imported privileges on the Snowflake database
Provide access to the shared SNOWFLAKE database:
GRANT IMPORTED PRIVILEGES ON DATABASE SNOWFLAKE TO ROLE [***ROLE NAME***];6. Grant object-specific permissions
For metadata extraction, Cloudera Octopai primarily reads object
metadata from SNOWFLAKE.ACCOUNT_USAGE views after you grant
IMPORTED PRIVILEGES ON DATABASE SNOWFLAKE in step 5. Ensure the service
role can see the required objects in Account Usage for the databases and schemas in
scope.
When definitions are missing or additional object details are needed, Cloudera Octopai may also run supplemental commands such as
Get_DDL('[***OBJECT TYPE***]', '[***OBJECT NAME***]'), SHOW STREAMS, SHOW
TASKS, SHOW MATERIALIZED VIEWS, SHOW
WAREHOUSES, and LIST @stage. Ensure that the service role has
sufficient database- and schema-level visibility and privileges for those commands to
succeed.
Grant the following permissions when supplemental access is required for your environment:
Functions
GRANT USAGE ON FUNCTION [***DATABASE NAME***].[***SCHEMA NAME***].[***FUNCTION NAME***]([***DATA TYPE 1***],[***DATA TYPE 2***], [***ADDITIONAL DATA TYPES***]) TO ROLE [***ROLE NAME***];Procedures
GRANT USAGE ON PROCEDURE [***DATABASE NAME***].[***SCHEMA NAME***].[***PROCEDURE NAME***]([***DATA TYPE 1***],[***DATA TYPE 2***], [***ADDITIONAL DATA TYPES***]) TO ROLE [***ROLE NAME***];Pipes
GRANT USAGE ON DATABASE [***DATABASE NAME***] TO ROLE [***ROLE NAME***];
GRANT USAGE ON SCHEMA [***DATABASE NAME***].[***SCHEMA NAME***] TO ROLE [***ROLE NAME***];
Dynamic tables
GRANT USAGE ON DATABASE [***DATABASE NAME***] TO ROLE [***ROLE NAME***];
GRANT USAGE ON SCHEMA [***DATABASE NAME***].[***SCHEMA NAME***] TO ROLE [***ROLE NAME***];
GRANT SELECT ON ALL DYNAMIC TABLES IN SCHEMA [***SCHEMA NAME***] TO ROLE [***ROLE NAME***];
Optional: enable access to future dynamic tables.
GRANT SELECT ON FUTURE DYNAMIC TABLES IN SCHEMA [***SCHEMA NAME***] TO ROLE [***ROLE NAME***];Troubleshooting checks
Use these queries to validate role assignments and investigate issues:
-
Check database-level grants:
SHOW GRANTS TO ROLE [***ROLE NAME***] ON DATABASE [***DATABASE NAME***];-
Review default warehouse and role settings:
SHOW USERS LIKE '%[***USERNAME***]%';SHOW ROLES LIKE '%[***ROLE NAME***]%';-
Confirm warehouse grants:
SHOW GRANTS ON WAREHOUSE [***WAREHOUSE NAME***];-
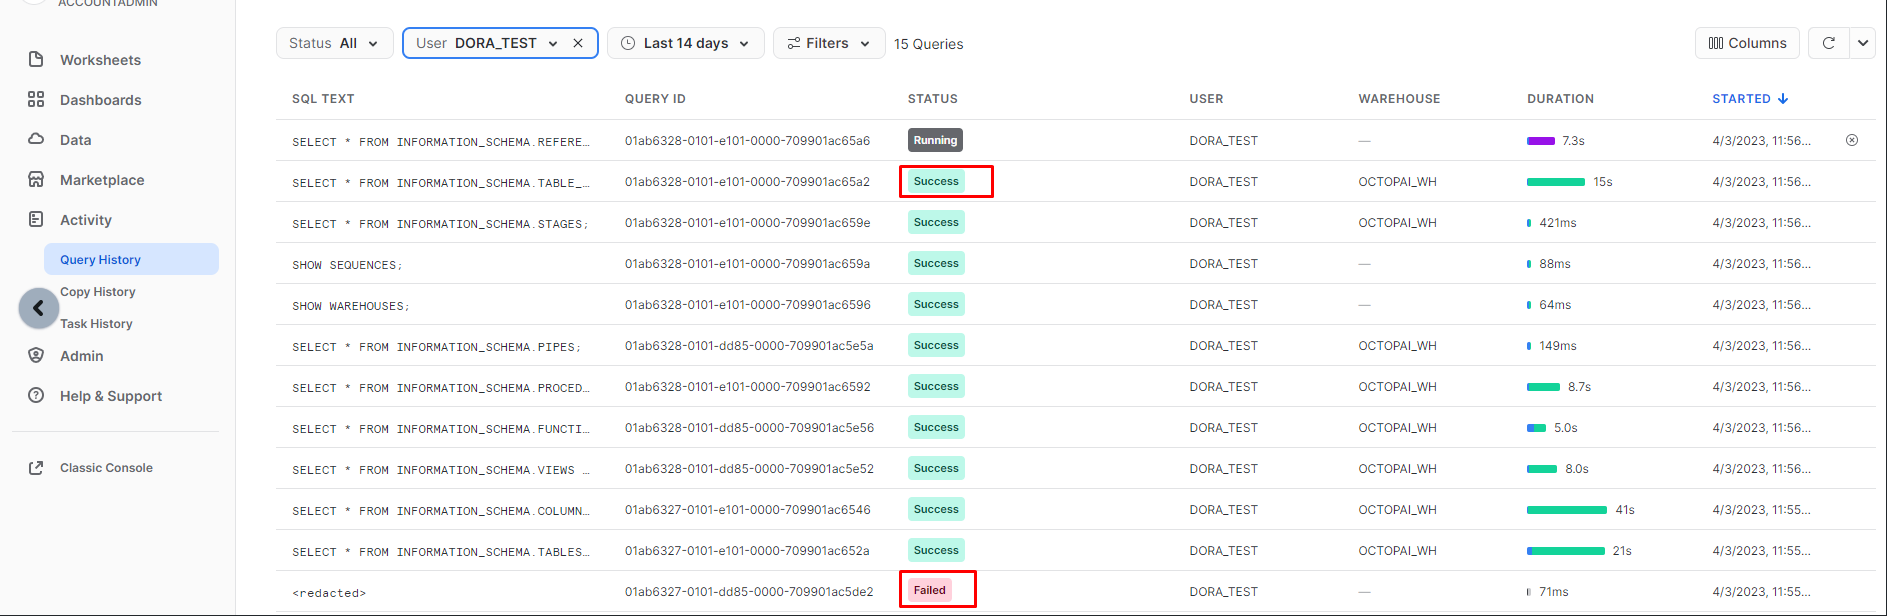
Inspect query history logs through the Snowflake UI.
Revoke warehouse permissions
Use revoke statements when access must be removed:
REVOKE [***PRIVILEGE***] ON WAREHOUSE [***WAREHOUSE NAME***] FROM ROLE [***ROLE NAME***];Example:
REVOKE MONITOR, OPERATE, USAGE ON WAREHOUSE my_warehouse FROM ROLE my_role;Set up the Snowflake metadata source
Configure metadata sources through the Cloudera Octopai Client.
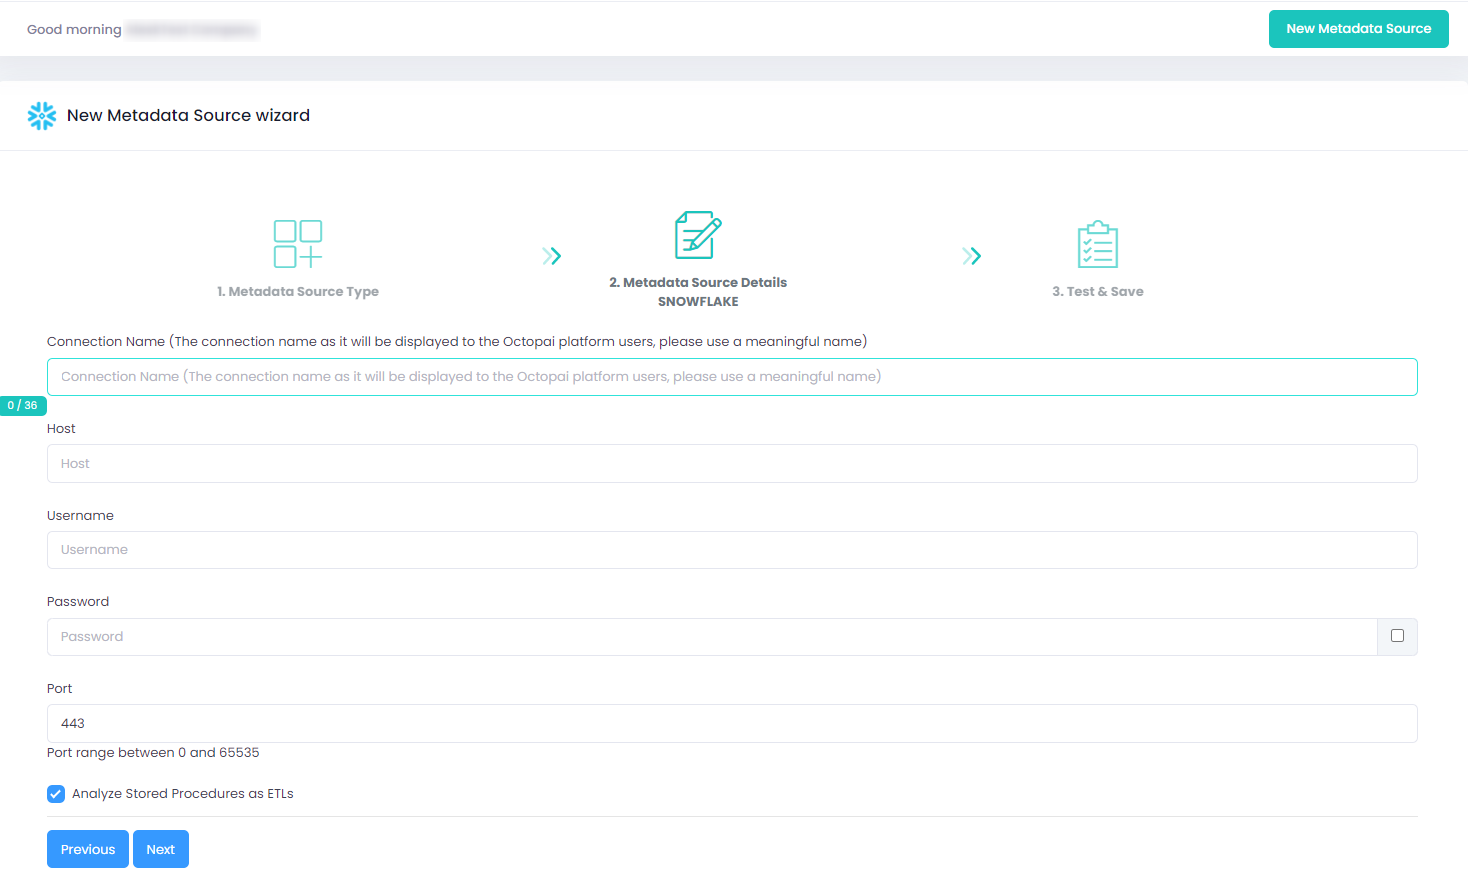
In the metadata source wizard, select an authentication method:
-
User-password — enter the Snowflake user name and password for the service account.
-
Key-pair — authenticate with an encrypted private key and optional passphrase. See Key-pair configuration options.
-
Okta SSO — authenticate using your Okta account URL as the Snowflake
authenticatorparameter. See Setting up Okta SSO metadata source.
Enter the remaining connection settings for your selection, then run the connection test.
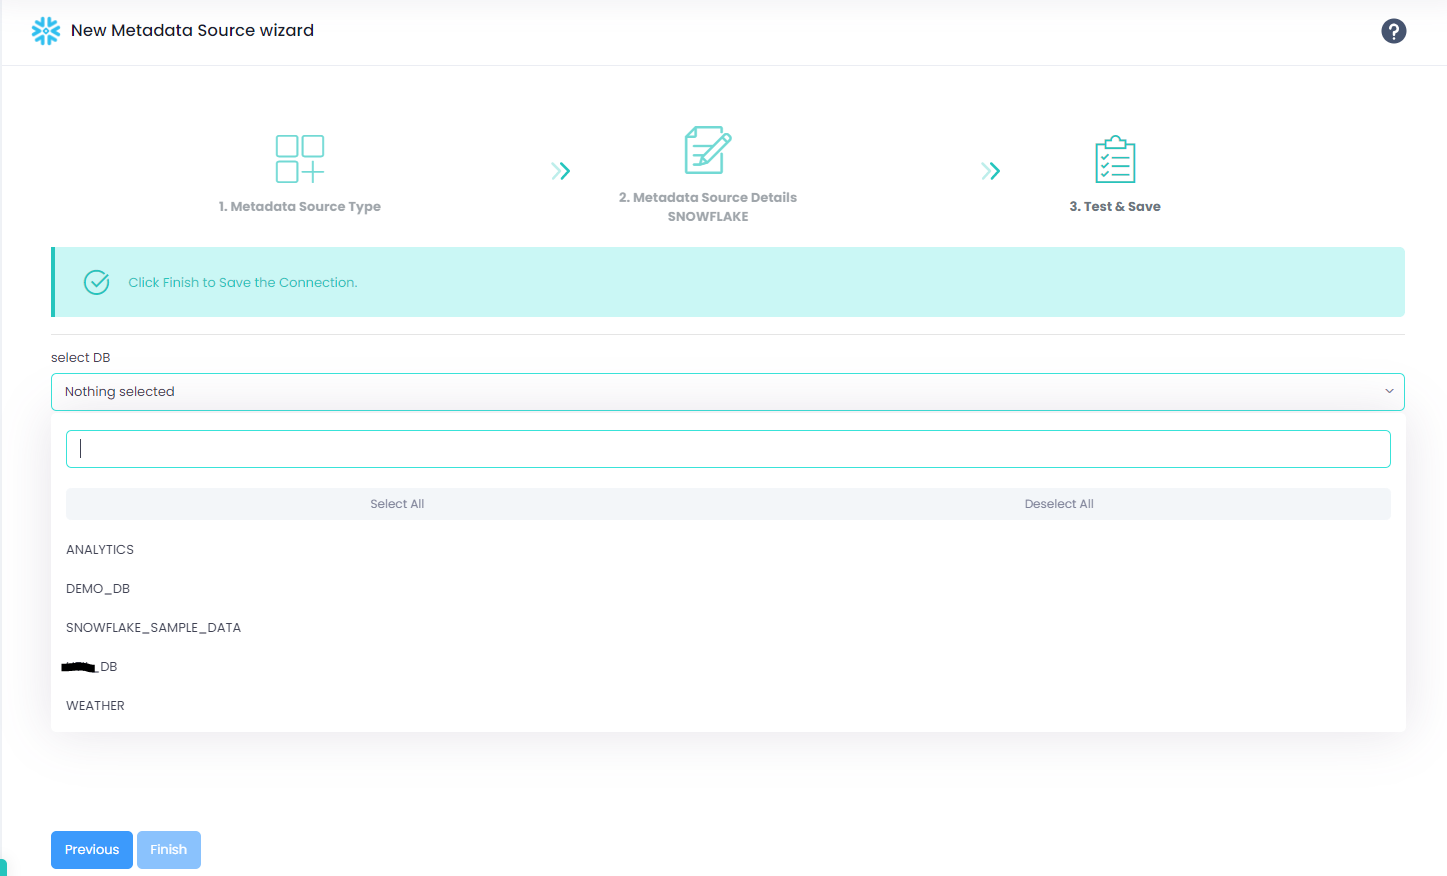
After the connection test succeeds, select the databases to scan. The list is populated from
the SNOWFLAKE.ACCOUNT_USAGE.DATABASES view. The service role must have
IMPORTED PRIVILEGES ON DATABASE SNOWFLAKE. See step 5.
Snowflake connector authentication options
Cloudera Octopai supports multiple authentication methods when connecting to Snowflake for metadata extraction:
-
User-password — enter the Snowflake user name and password in the metadata source wizard.
-
Key-pair — authenticate with an encrypted private key and optional passphrase instead of a Snowflake password.
-
Okta SSO — authenticate through Okta
SAML 2.0federated sign-on using your Okta account URL as the Snowflakeauthenticatorparameter.
Cloudera recommends key-pair or Okta authentication as Snowflake deprecates password-based programmatic access. See Why migrate from passwords.
Why migrate from passwords
Snowflake is retiring single-factor password authentication for many accounts:
-
November 2025: password-only sign-ins are blocked for service and human users. See Snowflake announcement and community update.
-
March 2026: programmatic access for password-based legacy service accounts is fully disabled. Refer to Snowflake MFA rollout documentation.
Key-pair authentication
Cloudera Octopai supports key-pair authentication as a secure alternative to user name and password sign-in.
Key-pair configuration options
You can configure key-pair authentication in two ways:
-
Paste the encrypted private key and passphrase directly into the Cloudera Octopai Agent configuration.
Figure 7. Pasting an encrypted private key 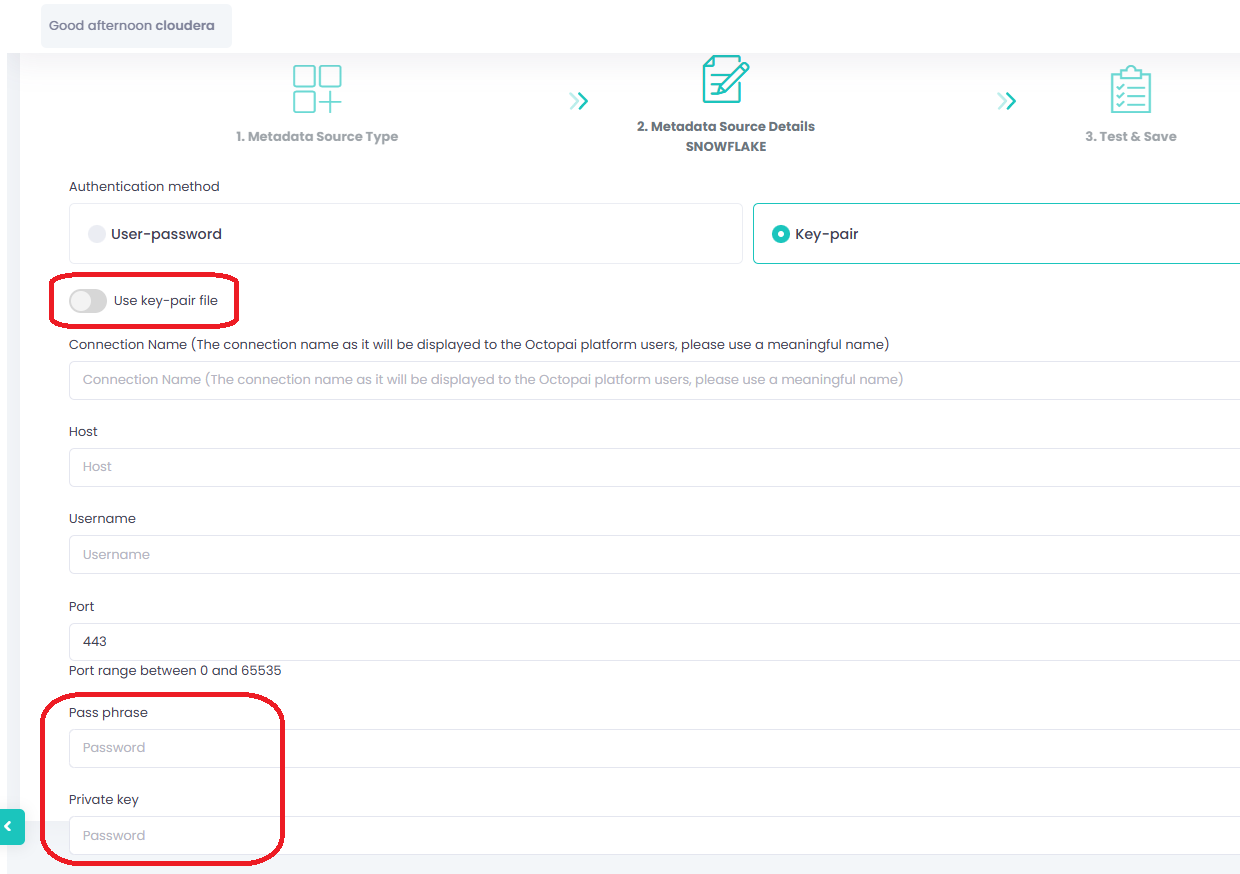
-
Enable Use key-pair file and provide the file path to the private key file and an optional passphrase.
Figure 8. Referencing a private key file 
Both methods ensure secure authentication during metadata extraction.
Recommended actions
-
Configure key-pair authentication in Cloudera Octopai using one of the available methods.
-
Ensure the Snowflake service account is marked as a
SERVICEuser (notLEGACY_SERVICE). -
Plan your migration before Snowflake disables password-based programmatic access for your account, to avoid service disruptions.
Review the full setup steps in the Snowflake Key Pair Authentication Guide.
Okta authentication
Cloudera Octopai supports Okta as an identity provider (IdP)
for Snowflake through SAML 2.0 federated authentication. When Okta is
configured, the connection uses your Okta account URL as the Snowflake authenticator
parameter. Select Okta SSO in the metadata source wizard to use this
method.
Okta authentication requirements
Before you configure the Snowflake connector for Okta authentication, ensure the following:
-
An Okta organization with
SAML 2.0federated sign-on configured for your Snowflake account. -
Snowflake federated authentication enabled through a
SAML2security integration. You must have the ACCOUNTADMIN role to create or update this integration. -
A dedicated Snowflake user for Cloudera Octopai metadata extraction, with the roles and warehouse access in Set up Snowflake permissions.
-
The Snowflake user assigned to the Snowflake SAML application in Okta.
-
For programmatic connections such as metadata extraction,
native SSOthrough Okta. You must set theauthenticatorlogin parameter to your Okta account URL (for example,https://[***OKTA SUBDOMAIN***].okta.com).native SSOdoes not use a web browser and is supported only when Okta is theIdP.
Okta authentication setup overview
Configure Okta and Snowflake federated authentication before you add the metadata source in Cloudera Octopai:
-
In Okta, configure the Snowflake SAML application and assign the service account user.
-
In Snowflake, create or update the
SAML2security integration that trusts Okta as theIdP. -
Create the Snowflake service user without a Snowflake-managed password so that federated sign-on is required.
-
Grant the user the Snowflake roles and privileges required for metadata extraction, as described in Set up Snowflake permissions.
-
In Cloudera Octopai, configure the Snowflake metadata source with Okta SSO as described in Setting up Okta SSO metadata source.
Review the full setup steps in How to Configure SAML 2.0 for Snowflake and Using federated authentication: Native SSO — Okta only.
Setting up Okta SSO metadata source
Configure the metadata source on the Cloudera Octopai Client. In Metadata Source Details, select Okta SSO, and enter the following:
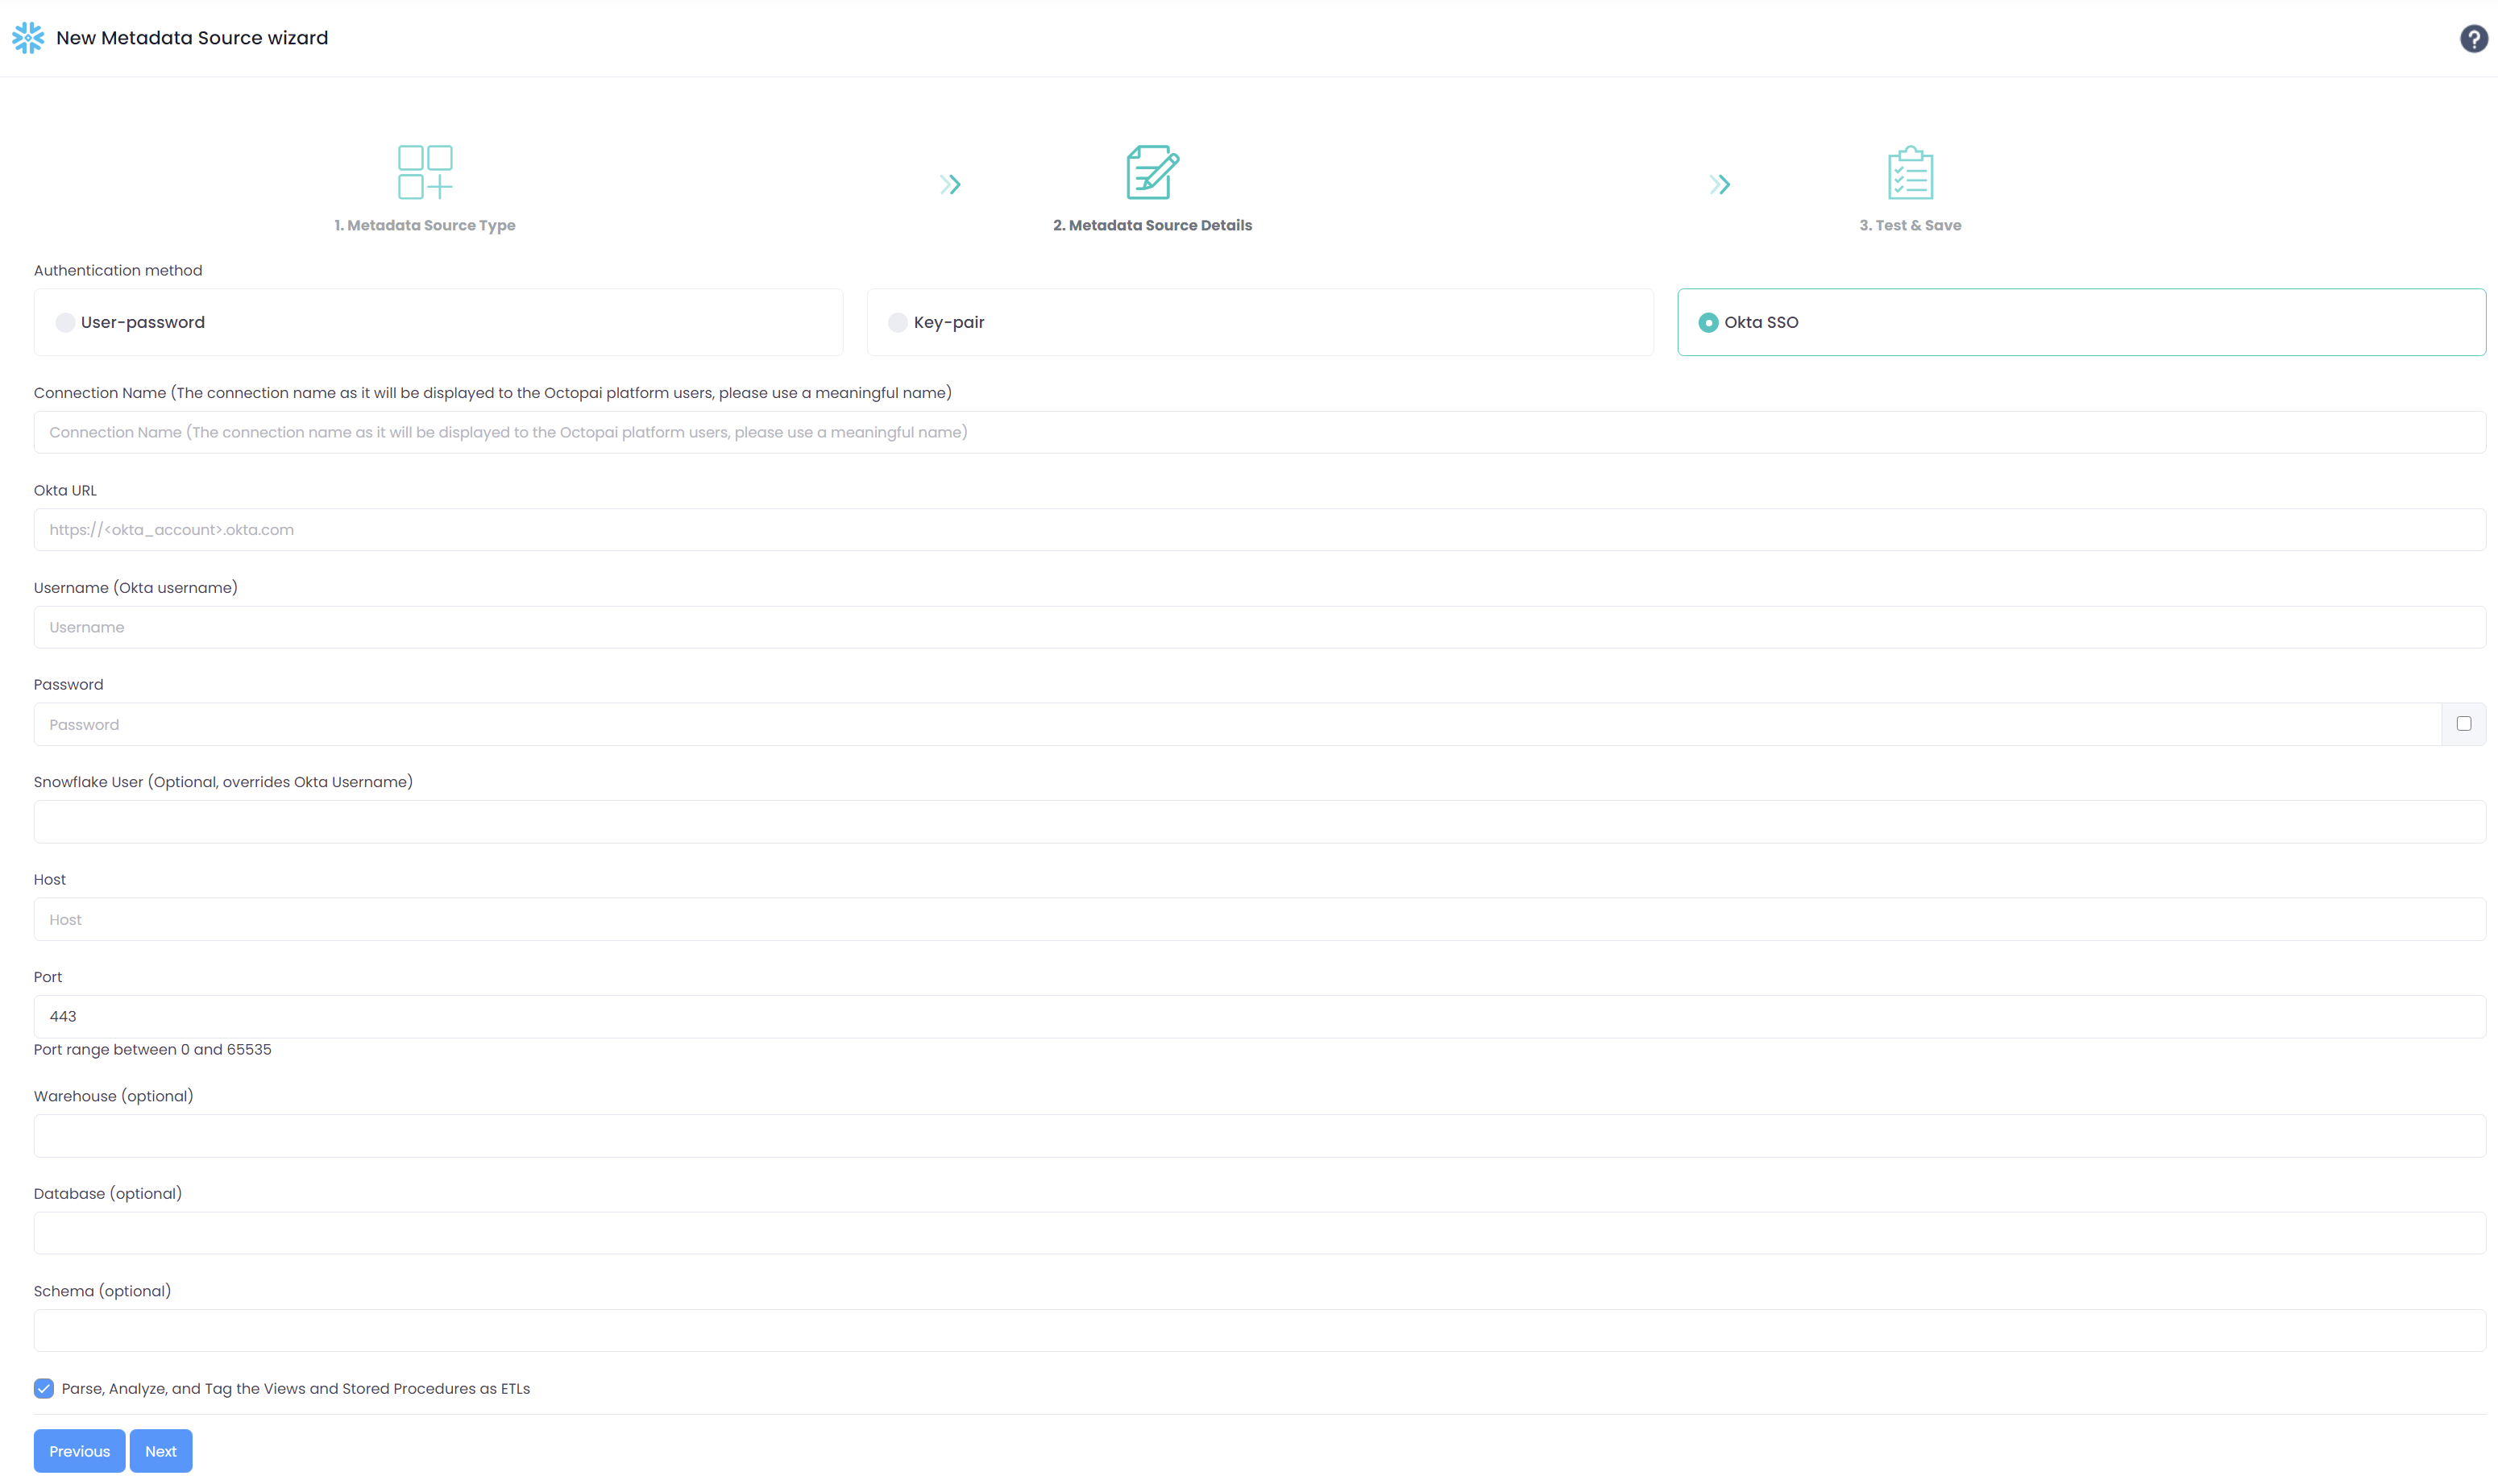
- Connection Name: Enter a meaningful name. The name is displayed to Cloudera Octopai platform users.
-
Okta URL: Enter your Okta account URL, for example
https://[***OKTA SUBDOMAIN***].okta.com. -
Username (Okta username): Enter the Okta user name for the service account.
-
Password: Enter the Okta password for the service account.
-
Snowflake User (Optional; overrides Okta Username): Enter the Snowflake user name when it differs from the Okta user name.
-
Host: Enter the full Snowflake URL, including
https://(for example,https://[***ACCOUNT***].[***REGION***].snowflakecomputing.com). -
Port: Enter the Snowflake port (default
443). -
Warehouse (optional): Enter the Snowflake warehouse name.
-
Database (optional): Enter the Snowflake database name.
-
Schema (optional): Enter the Snowflake schema name.
-
Parse, Analyze, and Tag the Views and Stored Procedures as ETLs: optional. Select this option when you want Cloudera Octopai to treat views and stored procedures as ETL objects during analysis.
Verify the extracted metadata files
Troubleshoot extraction issues
If extraction fails:
-
Confirm Snowflake permissions.
-
Send logs (including connector number and name) to Cloudera Support. Logs reside at C:\Program Files (x86)\Octopai\Service\log.
Figure 10. Example log files 
Access the Cloudera Octopai target folder
-
On the server hosting the Cloudera Octopai Client, open the TGT folder (default: C:\Program Files (x86)\Octopai\Service\TGT).
-
Locate the ZIP file named after the connector and open it.
Figure 11. Connector ZIP contents 
-
Review the inner files for completeness and quality.