Configure Atlas Authorization using Ranger

Use the Ranger Admin UI to add or update policies to control Atlas access.

You can use Ranger policies to control user-access to Atlas metadata and to actions that users can perform in Atlas. The following policies are defined by default:

  • rangertagsync: the TagSync service users has read access to entity metadata, specifically to entity classifications to be used in Ranger tag-based policies.
  • beacon: the Data Plane service user has full access to entity metadata, classification and relationship creation, and the ability to import and export metadata from Atlas. These privileges allow integration between the Data Catalog (Data Steward Studio) and Atlas.
  • admin: the initial Cloudera Manager superuser has full access to all Atlas actions, including full access to entity metadata, classification and relationship creation, the ability to import and export metadata from Atlas, and the ability to save searches.
  • public: all users are granted access to read Atlas entity metadata and relationships (such as lineage).
  • {USER}: any user who successfully logs in to Atlas can save searches so they are available in subsequent Atlas sessions.
The following video summarizes the steps in Ranger.

To change Ranger policies for Atlas, your user needs privileges in Ranger to change Resource Based Policies.

  1. Open the Ranger service that is running in the same cluster as Atlas.
    One way to do this is to open the Ranger Admin Web UI from Cloudera Manager.

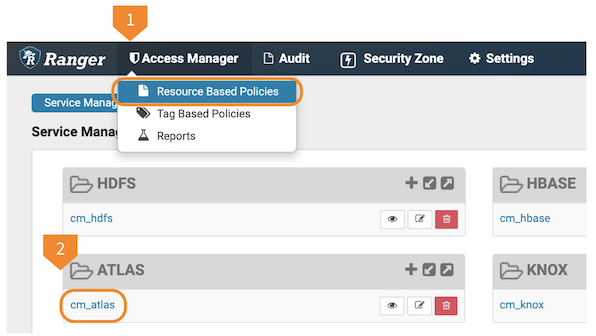
  2. Open Access Manager > Resource Based Policies and select Atlas policies (cm_atlas).


  3. On the List of Policies page, click Add New Policy.
  4. Use the Create Policy page to specify the Atlas authorization policy.
    Policy Type Access. There are no other policy types available for an Atlas service.
    Policy Name 255 character name that appears in the list of policies. Roles, users, and groups also show up in the list, so it helps if your name includes the operations or metadata that the policy controls.
    Policy Label Metadata you can include in the policy definition to help organize the policies for a given service. The same label can be added to any number of policies for the service. There is no limit to the number of characters in a label, but only 28 characters display in the policy list.
    type-category selection The metadata or operation type ("resources" in Ranger terms) that the policy applies to, including:
    • type-category
    • entity-type
    • atlas-service
    • relationship-type

    After selecting the resource type, add the type category in the category list. To apply the policy to all categories for the selected type, use *. For details, see Configuring Atlas Authorization.

    This selection can be set to "include" the selected resources or "exclude" the selected resources. An include policy for type-category and category entity would apply only to entities. An exclude policy for the same type-category and entity would apply to all metadata types other than entity.

    Type Name Further refinement within the metadata or operation category specified in the type-category selection. You can limit the policy to metadata that matches the name or names you specify here. For example, if you chose type-category and the category entity, you could use the Type Name to apply the policy to entities with names that start with "fy2020*". This field supports ? and * wildcards for single and multiple character replacement.
    Description Information that you add to help you remember the value of this policy.
    Audit Logging Enables Ranger's audit logging for this policy. There are other options in Ranger's configuration that can conflict with this option, but generally if you turn off this setting, Ranger will enforce the policy but will not audit success or failed actions against the policy.
    Allow Conditions Choose the roles, users, and/or groups and the permissions they can access for the resources defined in the policy. If you need to include parts of overlapping groups, add an exclude condition in addition to the allow condition.
    Deny Conditions Choose the roles, users, and/or groups and the permissions they cannot access for the resources defined in the policy.
  5. Click Add.
You should be able to validate the policy almost immediately after saving a valid policy.