

Create a data lake
After meeting the prerequisites and registering the external resources in Cloudbreak, create a data lake by using the create cluster wizard.
The instructions below only list data-lake specific steps. For information on other cluster options refer to the documentation for creating clusters on your cloud platform.
Steps
- In Cloudbreak web UI, navigate to Clusters, click on Create Cluster.
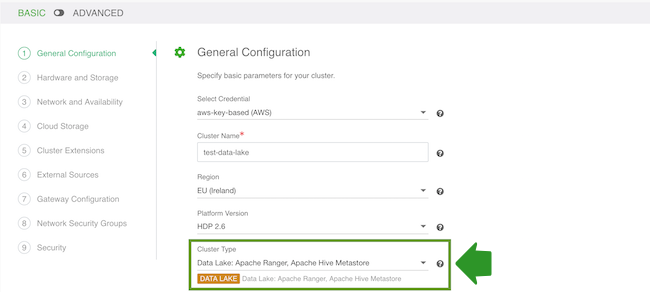
- On the General Configuration page:
- Under Cluster Name, provide a name for your data lake.
- Under Cluster Type, choose one of the two available "Data Lake" blueprints: either "Data Lake: Apache Ranger, Apache Atlas, Apache Hive Metastore" or "Data Lake: Apache Ranger, Apache Hive Metastore HA".
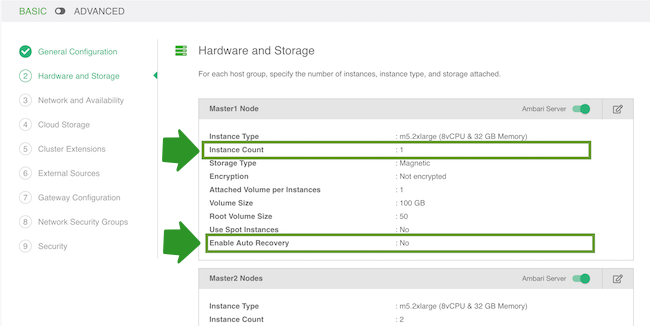
- (Only if using the HA blueprint) On the Hardware and Storage page you can select
the following for each host group:
- Under Instance Count, you can optionally specify how many nodes should be included in each host group. By default, Cloudbreak creates the minimum viable number of nodes. We recommend placing an odd node number of nodes in each host group. A total of 3 or 5 instances is recommended.
- You can optionally select to Enable Auto Recovery. Enabling this option will allow Cloudbreak to automatically recover any failed nodes. Without checking this option, you will have to manually trigger recovery of the failed nodes.
- (Only if using the HA blueprint) On the Network and Availability page, enter:
- Custom Domain: Enter some domain name that Cloudbreak can use locally. For example “mydatalake.local”. This domain name is for local use and does not require DNS services.
- Custom Hostname: Enter some name convention to use for the host names. For example “prod”.
prod0.<cluster-name>.mydatalake.local,prod1.<cluster-name>.mydatalake.local, and so on.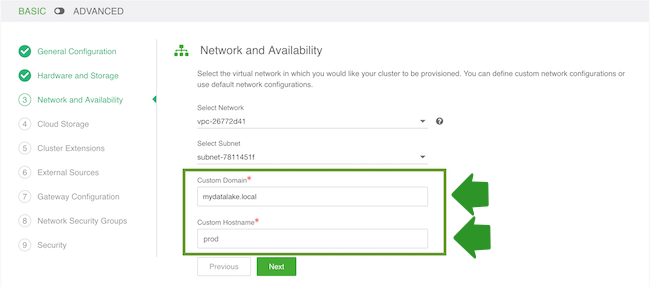
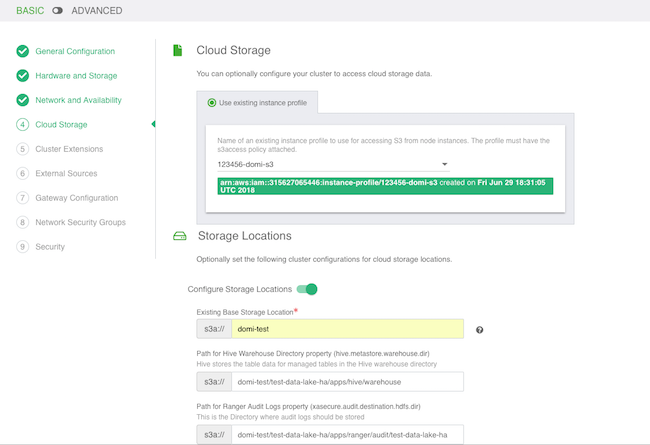
- On the Cloud Storage page:
- Under Cloud Storage, configure access to cloud storage via the method available for your cloud provider.
- Under Storage Locations, provide an existing location within your cloud storage account that can be used for Ranger audit log. if using HDP 2.6, this will also be used for Hive metastore directory and Hive warehouse directory. If using the HA blueprint, this location will also be used for HBase Root Directory.
 Note
NoteThe storage location must exist prior to data lake provisioning. If the storage location does not exist then Ranger is installed properly, but it may not work.
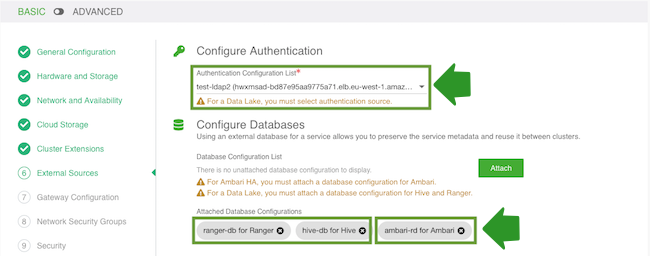
- On the External Sources page, select the previously registered Ranger database,
Hive database and LDAP.
If using the HA blueprint, also select the previously registered Ambari database:
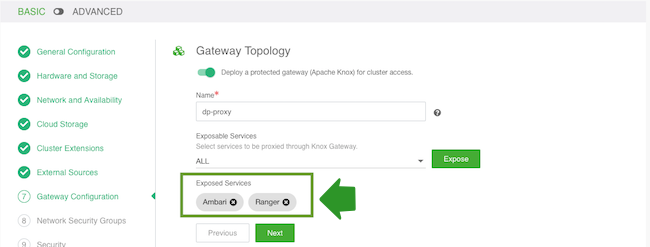
- On the Gateway Configuration page, the gateway is enabled by default with Ambari
exposed through the gateway. You should also enable Ranger by selecting the Ranger
service and clicking Expose.
- On the Network Security Groups page, you do not need to change anything. If you would like to restrict the open ports, refer to Default cluster security groups.
- On the Security page:
- Under Password, provide a strong password for your cluster. For example “SomeRandomChars123!” is a strong password. A strong password is required for the default Ranger admin, which - among other cluster components like Ambari - will use this password.
- Select an SSH key.
- Click Create Cluster to initiate data lake creation.
As an outcome of this step, you should have a running data lake. Once the data lake is running, you can create workload clusters attached to it.