Updating Ambari, HDP, and HDF on long-running clusters
Long-running clusters require maintenance updates such as Ambari and stack updates. Cloudbreak supports performing these maintenance updates.
In general, updating a cluster involves (1) upgrading Ambari and/or HDP/HDF on existing nodes and, if needed, (2) switching to a new default image that will be used for any nodes added in the future via cluster scaling. Ambari and/or HDP/HDF upgrade can be performed when your cluster has been put in maintenance mode.
The general steps are:
- Enabling maintenance mode for the cluster that you are planning to update.
- Upgrading Ambari and/or HDP/HDF.
- Updating Ambari and/or HDP/HDF repo information.
- Changing cluster's default image, if needed.
- Validating the repository configuration.
- Disabling maintenance mode.
Step 1: Enable maintenance mode
Prior to updating your cluster, you must enable maintenance mode for that cluster. This can be done from the Cloudbreak CLI by using the following steps:
- On your computer, export the name of the cluster that you are attempting to upgrade. For
example (replace
test-clusterin the example with the actual cluster name):export clustername=test-cluster Note
NoteThis is optional, but if you don’t perform this step, you should replace
${clustername}in all commands listed here with your actual cluster name. - Enable maintenance mode for the cluster that you would like to update. You can do this by using
the following CLI command:
cb cluster maintenance-mode enable --name "${clustername}" - To verify that maintenance mode is enabled, do one of the following:
- Run the
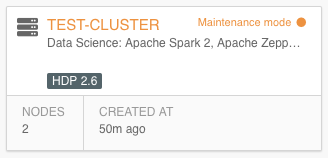
cb cluster listcommand and confirm that the cluster status is "MAINTENANCE_MODE_ENABLED":cb cluster list [ { "Name": "test-cluster", "Description": "", "CloudPlatform": "OPENSTACK", "StackStatus": "AVAILABLE", "ClusterStatus": "MAINTENANCE_MODE_ENABLED" } ] - Verify in the web UI that the cluster tile looks similar to the following:

Once your cluster is in maintenance mode, only Sync, Terminate, and Change image actions are available. Other actions cannot be performed: Cloudbreak will return an error if you try to use them. Once your cluster is in maintenance mode, you can proceed to upgrading Ambari and HDP/HDF.
- Run the
Step 2: Upgrade Ambari and HDP/HDF
Once your cluster is in maintenance mode, you can upgrade Ambari and/or stack. If updating both Ambari and stack, update Ambari prior to updating HDP/HDF.
- Upgrade Ambari. If your cluster is in HA mode, make sure to update the Ambari server on each of the gateway nodes. For instructions, refer to Ambari upgrade documentation for the Ambari version that you would like to upgrade to.
- Upgrade HDP or HDF. For instructions, refer to HDP or HDF upgrade documentation for the HDP or HDF version that would like to upgrade to.
Step 3: Update Ambari repo information
After the upgrade is complete, update Ambari repo information in Cloudbreak by using the following steps. If you only upgraded the stack without upgrading Ambari, skip this step.
The commands below use jq. To install jq, refer to https://stedolan.github.io/jq/download/.
- (Optional) Check the current repository information by using cb cluster
describe:
cb cluster describe --name "${clustername}" | jq ".cluster.ambariRepoDetailsJson" - Use the cb cluster maintenance-mode generate-template-json command to generate
a JSON
template:
cb cluster maintenance-mode generate-template-json ambari - Create a new JSON file, paste the generated template, and provide correct repository information by replacing the ____ with actual values of the updated Ambari or HDP/HDF repository.
- Configure repository metadata by passing the JSON file created in the previous
steps:
cb cluster maintenance-mode ambari --name "${clustername}" --cli-input-json ~/Users/myuser/ambari.jsonReplace
~/Users/myuser/ambari.jsonwith the actual name and location of your JSON file. - (Optional) Verify that the update was successful by using cb cluster
describe:
cb cluster describe --name "${clustername}" | jq ".cluster.ambariRepoDetailsJson"
Step 4: Update HDP/HDF repo information
After the upgrade is complete, update stack repo information in Cloudbreak by using the following steps. If you only upgraded Ambari without upgrading the stack, skip this step.
The commands below use jq. To install jq, refer to https://stedolan.github.io/jq/download/.
- (Optional) Check the current repository information by using cb cluster
describe:
cb cluster describe --name "${clustername}" | jq ".cluster.ambariStackDetails" - Use the cb cluster maintenance-mode generate-template-json command to generate
a JSON template:
For HDP:
cb cluster maintenance-mode generate-template-json hdpFor HDF:
cb cluster maintenance-mode generate-template-json hdf - Create a new JSON file, paste the generated template, and provide correct repository information by replacing the ____ with actual values of the updated Ambari or HDP/HDF repository.
- Configure repository metadata by passing the JSON file created in the previous
steps:
For HDP:
cb cluster maintenance-mode hdp --name "${clustername}" --cli-input-json ~/Users/myuser/stack.jsonFor HDF:
cb cluster maintenance-mode hdf --name "${clustername}" --cli-input-json ~/Users/myuser/stack.jsonReplace
~/Users/myuser/stack.jsonwith the actual name and location of your JSON file. - (Optional) Verify that the update was successful by using cb cluster
describe:
cb cluster describe --name "${clustername}" | jq ".cluster.ambariStackDetails"
Step 5: Change cluster's default image
If using prewarmed images, the updated Ambari and/or stack version will be different from the original versions included in the prewarmed image, making it necessary to change prewarmed images. In this case, you should either update to a compatible prewarmed image (if one exist) or update to a base image. If you are using base images, skip this step.
Updating your cluster to use the new default image for newly added cluster nodes can be done by using the web UI or CLI.
(Option 1: web UI) To update cluster’s default image by using the web UI:
- Navigate to the cluster details.
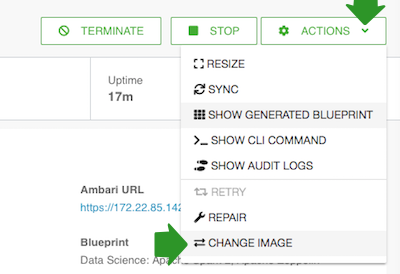
- Sync the cluster (Actions > Sync) to ensure that Cloudbreak has the latest image and package information.
- From the Actions menu select Change image.

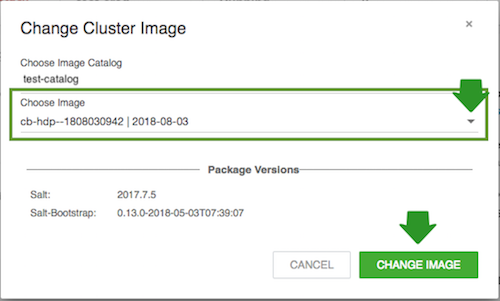
- Under Choose Image Catalog, choose the image catalog where the image that you
would like to use is included.
 Note
NoteIf this window does not show any images, try

- Under Choose Image, select the image that you would like to use as the new default image. Click on Choose image.
This will set the new image as default for all newly added nodes.
 | Note |
|---|---|
This will not update currently running cluster nodes. Only the nodes added after the default image update will use the new default image. Existing cluster nodes, must be updated separately. |
(Option 2: CLI) To update cluster’s default image by using the CLI:
- Sync the cluster:
cb cluster sync --name "${clustername}" - List the available images you can upgrade your cluster to:
cb imagecatalog images cluster-upgrade --cluster "${clustername}" - Update your cluster’s default image:
cb cluster change-image --name "${clustername}" --imageid <image-id>
Step 6: Validate repository configuration
Perform these steps to validate that the repository configurations are correct.
- Sync the cluster (if not already done in the previous step):
cb cluster sync --name "${clustername}" - Run the following command to trigger validation:
cb cluster maintenance-mode validate --name ${clustername} - check the cluster’s Event History in the web UI to ensure that the validation finished
successfully. Upon successful validation, you will see the following messages:If you see any warnings, you should resolve them prior to disabling maintenance mode.
Validation finished successfully.
The validation of the repo and image settings has begun
Step 7: Disable maintenance mode
cb cluster maintenance-mode disable --name "${clustername}" Once you exit maintenance mode, all cluster operations will be available as usual.

