Launch Cloudbreak from the quickstart template on Azure
Launch Cloudbreak from an Azure Resource Manager (ARM) template by using the following steps. This is the quickstart deployment option.
 | Note |
|---|---|
As of December 31, 2021, Cloudbreak reached end of
support. For more information, see Support lifecycle policy. Cloudera recommends that
you migrate your workloads to CDP Public Cloud. |
Steps
- Log in to your Azure Portal.
- Click here to get started with Cloudbreak installation using the Azure Resource Manager template:
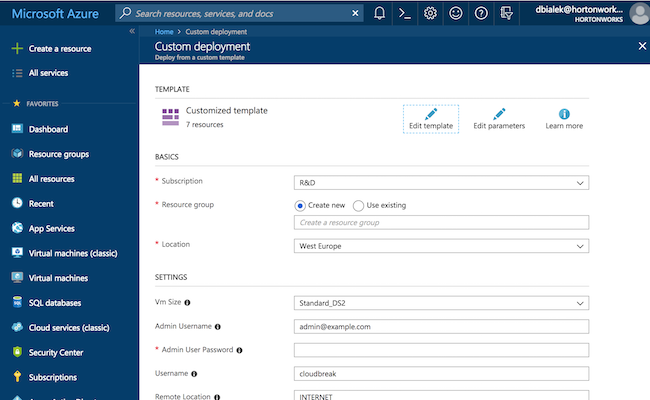
- The template for installing Cloudbreak will appear. On the
Basics page, provide the following basic parameters:

BASICS
Parameter Description Subscription Select which existing subscription you want to use. Resource group Select an existing resource group or create a new one by selecting Create new and entering a name for your new resource group. Cloudbreak resources will later be accessible in that chosen resource group. Location Select an Azure region in which you want to deploy Cloudbreak. SETTINGSParameter Description Vm Size Select virtual machine instance type to use for the Cloudbreak instance. The minimum instance type suitable for Cloudbreak is Standard_DS3. The minimum requirements are 16GB RAM, 40GB disk, 4 cores. Admin Username Create an admin login that you will use to log in to the Cloudbreak web UI. Must be a valid email address. By default, admin@example.com is used but you should change it to your email address. Admin User Password Password for the admin login. Must be at least 8 characters containing letters, numbers, and symbols. Username Enter an admin username for the virtual machine. You will use it to SSH to the VM. By default, “cloudbreak” is used. Remote Location Enter a valid CIDR IP or use one of the default tags. Default value is Internetwhich allows access from all IP addresses. Examples:- 10.0.0.0/24 will allow access from 10.0.0.0 through 10.0.0.255
- ‘Internet’ will allow access from all. This is not a secure option but you can use it if you are just getting started and are not planning to have the instance on for a longer period.
- (Advanced) ‘VirtualNetwork’ will allow access from the address space of the Virtual Network.
- (Advanced) ‘AzureLoadBalancer’ will allow access from the address space of the load balancer.
For more information, refer to the Plan virtual networks in Azure documentation.
Ssh Key Paste your SSH public key. You can use pbcopyto quickly copy it. For example:pbcopy < /Users/homedir/.ssh/id_rsa.pubVnet New Or Existing By default, Cloudbreak is launched in a new VNet called cbdeployerVnetand a new subnet calledcbdeployerSubnet; if needed, you can customize the settings for the new VNet using available VNet and Subnet parameters.Vnet Name Provide the name for a new Vnet. Default is cbdeployerVnet. Vnet Subnet Name Provide a name for a new subnet. Default is cbdeployerSubnet. Vnet Address Prefix Provide a CIDR for the virtual network. Default is 10.0.0.0/16. Vnet Subnet Address Prefix Provide a CIDR for the subnet. Default is 10.0.0.0/24. Vnet RG Name The name of the resource group in which the Vnet is located. If creating a new Vnet, enter the same resource group name as provided in the "Resource group" field in the BASICS section. - Review terms of use and check “I agree to the terms and conditions stated above”.
- Click Purchase.
- Your deployment should be initiated.


