Create CredentialRole
In order to use role-based authentication, you must create the CredentialRole on AWS.
Use the following “CbPolicy” policy definition:
{
    "Version": "2012-10-17",
    "Statement": [
        {
            "Effect": "Allow",
            "Action": [
                "cloudformation:CreateStack",
                "cloudformation:DeleteStack",
                "cloudformation:DescribeStackEvents",
                "cloudformation:DescribeStackResource",
                "cloudformation:DescribeStackResources",
                "cloudformation:DescribeStacks"
            ],
            "Resource": [
                "*"
            ]
        },
        {
            "Effect": "Allow",
            "Action": [
                "ec2:AllocateAddress",
                "ec2:AssociateAddress",
                "ec2:AssociateRouteTable",
                "ec2:AuthorizeSecurityGroupIngress",
                "ec2:DescribeRegions",
                "ec2:DescribeAvailabilityZones",
                "ec2:CreateRoute",
                "ec2:CreateRouteTable",
                "ec2:CreateSecurityGroup",
                "ec2:CreateSubnet",
                "ec2:CreateTags",
                "ec2:CreateVpc",
                "ec2:ModifyVpcAttribute",
                "ec2:DeleteSubnet",
                "ec2:CreateInternetGateway",
                "ec2:CreateKeyPair",
                "ec2:DeleteKeyPair",
                "ec2:DisassociateAddress",
                "ec2:DisassociateRouteTable",
                "ec2:ModifySubnetAttribute",
                "ec2:ReleaseAddress",
                "ec2:DescribeAddresses",
                "ec2:DescribeImages",
                "ec2:DescribeInstanceStatus",
                "ec2:DescribeInstances",
                "ec2:DescribeInternetGateways",
                "ec2:DescribeKeyPairs",
                "ec2:DescribeRouteTables",
                "ec2:DescribeSecurityGroups",
                "ec2:DescribeSubnets",
                "ec2:DescribeVpcs",
                "ec2:DescribeSpotInstanceRequests",
                "ec2:DescribeVpcAttribute",
                "ec2:ImportKeyPair",
                "ec2:AttachInternetGateway",
                "ec2:DeleteVpc",
                "ec2:DeleteSecurityGroup",
                "ec2:DeleteRouteTable",
                "ec2:DeleteInternetGateway",
                "ec2:DeleteRouteTable",
                "ec2:DeleteRoute",
                "ec2:DetachInternetGateway",
                "ec2:RunInstances",
                "ec2:StartInstances",
                "ec2:StopInstances",
                "ec2:TerminateInstances",
                "ec2:CopyImage",
                "ec2:CreateSnapshot",
                "ec2:DeleteSnapshot",
                "ec2:DescribeSnapshots",
                "ec2:CreateVolume",
                "ec2:DeleteVolume",
                "ec2:DescribeVolumes",
                "ec2:DeregisterImage"
            ],
            "Resource": [
                "*"
            ]
        },
        {
            "Effect": "Allow",
            "Action": [
                "iam:ListRolePolicies",
                "iam:GetRolePolicy",
                "iam:ListAttachedRolePolicies",
                "iam:ListInstanceProfiles",
                "iam:PutRolePolicy",
                "iam:PassRole",
                "iam:GetRole"
            ],
            "Resource": [
                "*"
            ]
        },
        {
            "Effect": "Allow",
            "Action": [
                "autoscaling:CreateAutoScalingGroup",
                "autoscaling:CreateLaunchConfiguration",
                "autoscaling:DeleteAutoScalingGroup",
                "autoscaling:DeleteLaunchConfiguration",
                "autoscaling:DescribeAutoScalingGroups",
                "autoscaling:DescribeLaunchConfigurations",
                "autoscaling:DescribeScalingActivities",
                "autoscaling:DetachInstances",
                "autoscaling:ResumeProcesses",
                "autoscaling:SuspendProcesses",
                "autoscaling:UpdateAutoScalingGroup"
            ],
            "Resource": [
                "*"
            ]
        },
        {
            "Effect": "Allow",
            "Action": [
                "kms:ListKeys",
                "kms:ListKeyPolicies",
                "kms:ListAliases"
            ],
            "Resource": "*"
        }
    ]
}
Steps
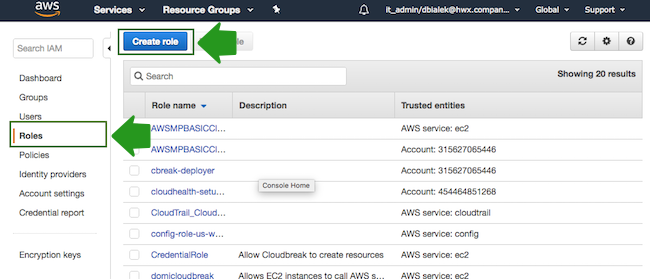
- Navigate to the IAM console > Roles and click Create Role:
- In the “Create Role” wizard, select Another AWS account role type. Next, provide
the following:
- In the Account ID field, enter your AWS account ID.
- Under Options, check Require external ID.
- In the External ID, enter “provision-ambari”.
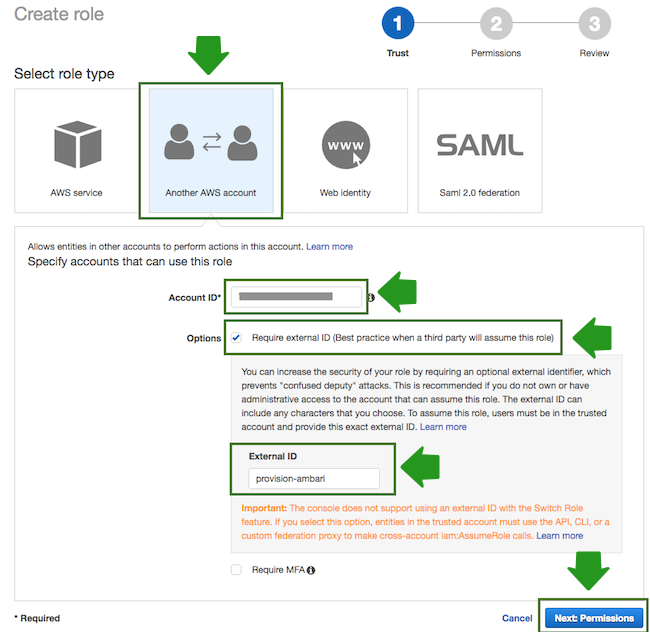
- When done, click Next: Permissions to navigate to the next page in the wizard.
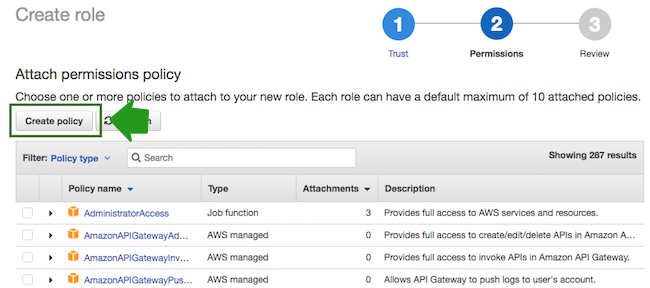
- Click Create policy and the create policy wizard will open in a new browser tab:
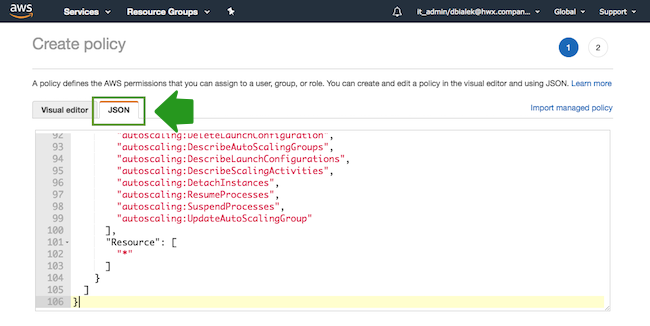
- Select the JSON view, and copy and paste the policy definition. You can either copy
it from the section preceding these steps or download and copy it from here:
- When done, navigate to Review policy.
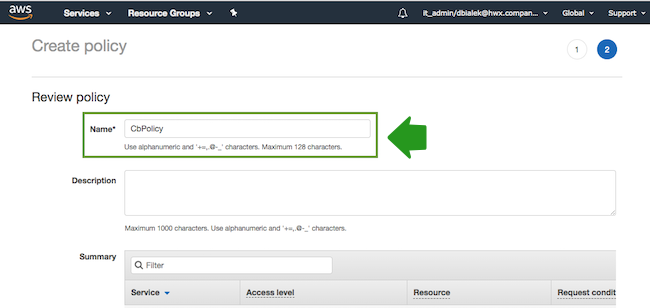
- On the Review policy page, in the Name field, enter a name for your
policy, such as "CbPolicy":
- When done, click Create Policy.
- Return to the previous browser tab where you started creating a new role (since the create policy wizard was opened in a new browser tab).
- Click Refresh. Next, find the “CbPolicy” that you just created and select it by
checking the box:
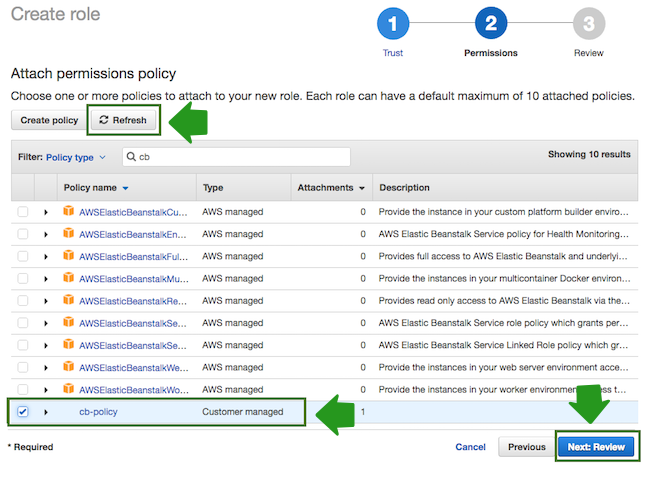
- When done, click Next: Review.
- In the Roles name field, enter role name, for example “CredentialRole”.
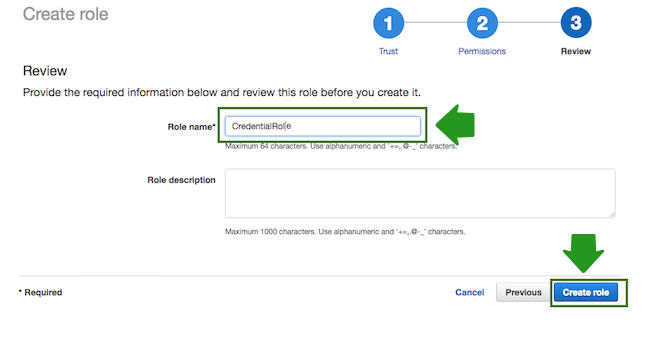
- When done, click Create role to finish the role creation process.
Once you are done, you can proceed to launch Cloudbreak.

