Building a Data Flow
Also available as:
PDF

Scheduling Tab

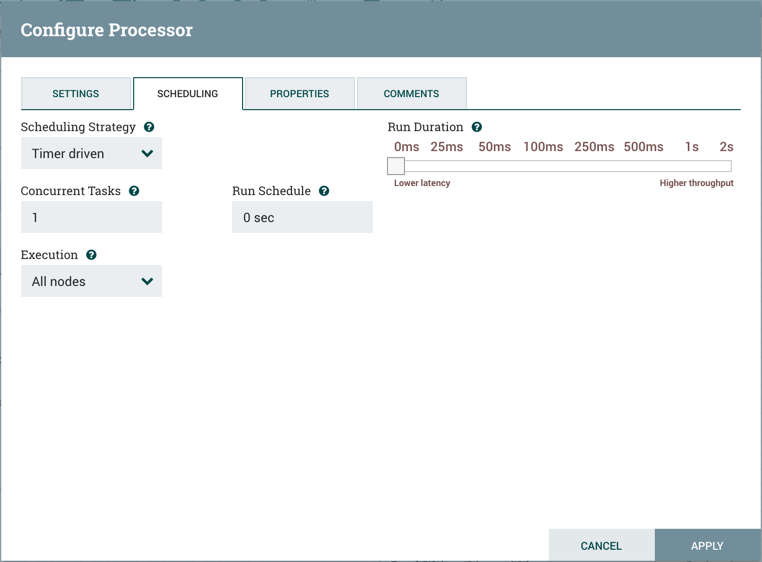
The second tab in the Processor Configuration dialog is the Scheduling Tab:

Scheduling Strategy

The first configuration option is the Scheduling Strategy. There are three possible options for scheduling components:

Timer driven: This is the default mode. The Processor will be scheduled to run on a regular interval. The interval at which the Processor is run is defined by the 'Run Schedule' option (see below).

Event driven: When this mode is selected, the Processor will be triggered to run by an event, and that event occurs when FlowFiles enter Connections feeding this Processor. This mode is currently considered experimental and is not supported by all Processors. When this mode is selected, the 'Run Schedule' option is not configurable, as the Processor is not triggered to run periodically but as the result of an event. Additionally, this is the only mode for which the 'Concurrent Tasks' option can be set to 0. In this case, the number of threads is limited only by the size of the Event-Driven Thread Pool that the administrator has configured.

CRON driven: When using the CRON driven scheduling mode, the Processor is scheduled to run periodically, similar to the Timer driven scheduling mode. However, the CRON driven mode provides significantly more flexibility at the expense of increasing the complexity of the configuration. The CRON driven scheduling value is a string of six required fields and one optional field, each separated by a space. These fields are:

Field Valid values

Seconds

0-59

Minutes

0-59

Hours

0-23

Day of Month

1-31

Month

1-12 or JAN-DEC

Day of Week

1-7 or SUN-SAT

Year (optional)

empty, 1970-2099

You typically specify values one of the following ways:

  • Number: Specify one or more valid value. You can enter more than one value using a comma-separated list.

  • Range: Specify a range using the <number>-<number> syntax.

  • Increment: Specify an increment using <start value>/<increment> syntax. For example, in the Minutes field, 0/15 indicates the minutes 0, 15, 30, and 45.

You should also be aware of several valid special characters:

  • *  - Indicates that all values are valid for that field.

  • ?  - Indicates that no specific value is specified. This special character is valid in the Days of Month and Days of Week field.

  • L  - You can append L to one of the Day of Week values, to specify the last occurrence of this day in the month. For example, 1L indicates the last Sunday of the month.

For example:

  • The string 0 0 13 * * ? indicates that you want to schedule the processor to run at 1:00 PM every day.

  • The string 0 20 14 ? * MON-FRI indicates that you want to schedule the processor to run at 2:20 PM every Monday through Friday.

  • The string 0 15 10 ? * 6L 2011-2017 indicates that you want to schedule the processor to run at 10:15 AM, on the last Friday of every month, between 2011 and 2017.

For additional information and examples, see the http://www.quartz-scheduler.org/documentation/quartz-2.x/tutorials/crontrigger.html in the Quartz documentation.

Concurrent Tasks

Next, the Scheduling tab provides a configuration option named 'Concurrent Tasks'. This controls how many threads the Processor will use. Said a different way, this controls how many FlowFiles should be processed by this Processor at the same time. Increasing this value will typically allow the Processor to handle more data in the same amount of time. However, it does this by using system resources that then are not usable by other Processors. This essentially provides a relative weighting of Processors - it controls how much of the system's resources should be allocated to this Processor instead of other Processors. This field is available for most Processors. There are, however, some types of Processors that can only be scheduled with a single Concurrent task.

Run Schedule

The 'Run Schedule' dictates how often the Processor should be scheduled to run. The valid values for this field depend on the selected Scheduling Strategy (see above). If using the Event driven Scheduling Strategy, this field is not available. When using the Timer driven Scheduling Strategy, this value is a time duration specified by a number followed by a time unit. For example, 1 second or 5 mins. The default value of 0 sec means that the Processor should run as often as possible as long as it has data to process. This is true for any time duration of 0, regardless of the time unit (i.e., 0 sec, 0 mins, 0 days). For an explanation of values that are applicable for the CRON driven Scheduling Strategy, see the description of the CRON driven Scheduling Strategy itself.

Execution

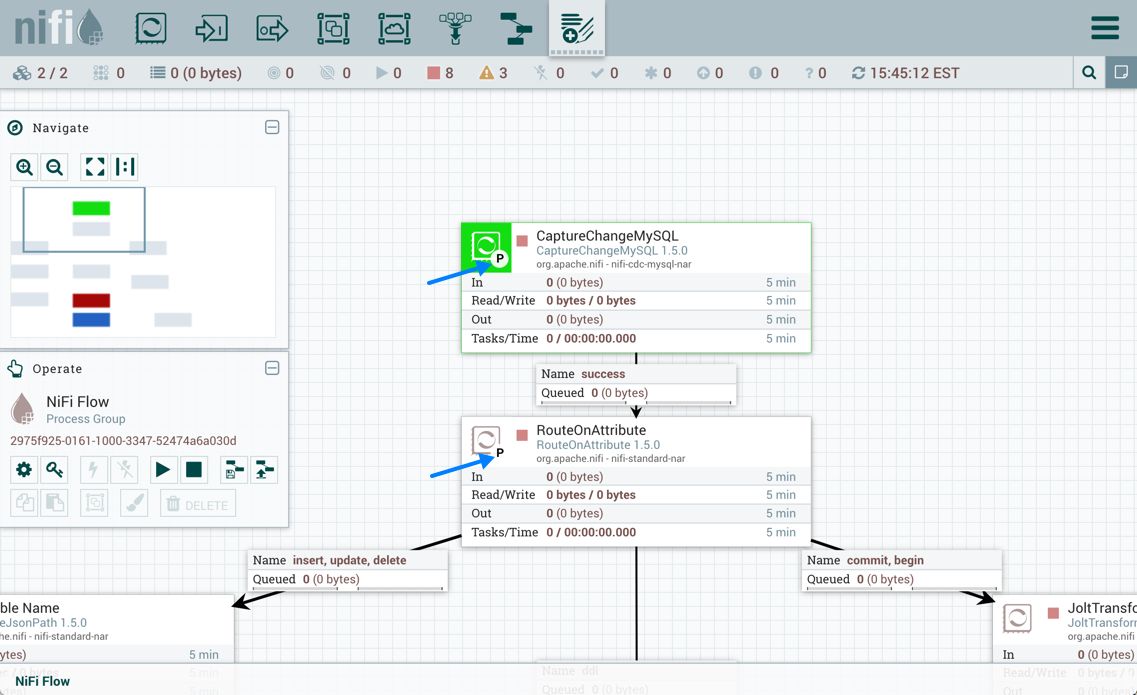
The Execution setting is used to determine on which node(s) the Processor will be scheduled to execute. Selecting 'All Nodes' will result in this Processor being scheduled on every node in the cluster. Selecting 'Primary Node' will result in this Processor being scheduled on the Primary Node only. Processors that have been configured for 'Primary Node' execution are identified by a "P" next to the processor icon:

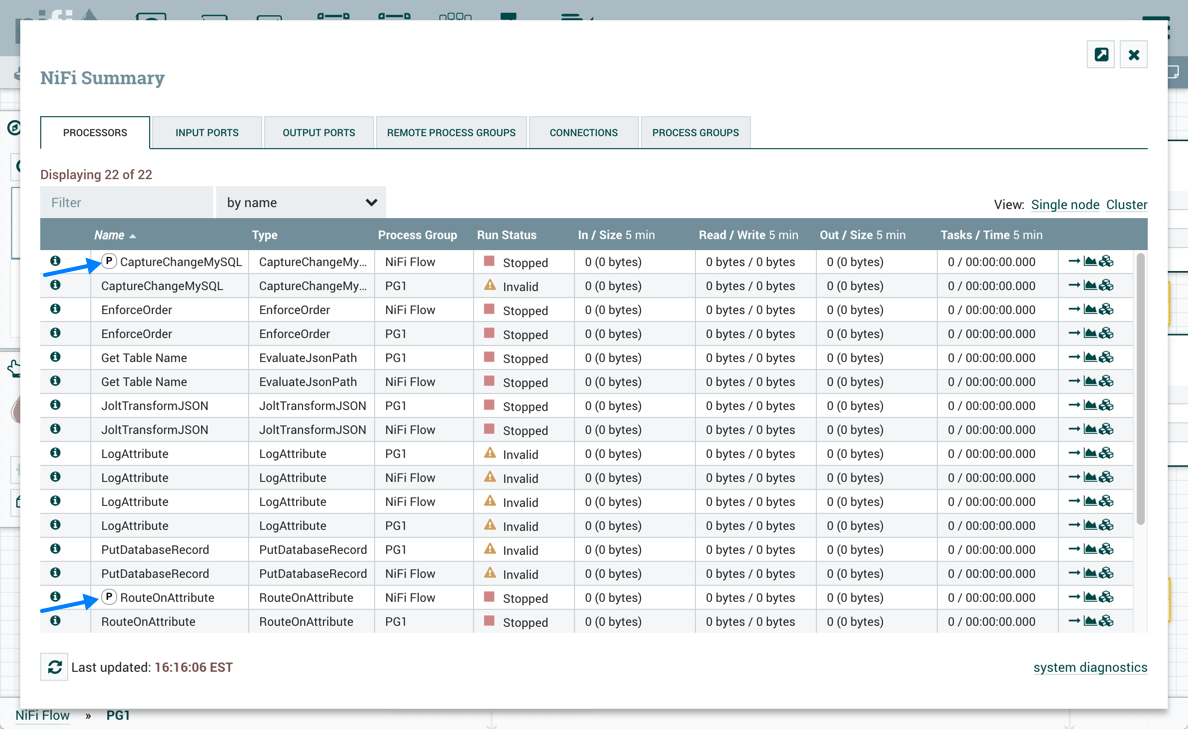
To quickly identify 'Primary Node' processors, the "P" icon is also shown in the Processors tab on the Summary page:

Run Duration

The right-hand side of the Scheduling tab contains a slider for choosing the 'Run Duration'. This controls how long the Processor should be scheduled to run each time that it is triggered. On the left-hand side of the slider, it is marked 'Lower latency' while the right-hand side is marked 'Higher throughput'. When a Processor finishes running, it must update the repository in order to transfer the FlowFiles to the next Connection. Updating the repository is expensive, so the more work that can be done at once before updating the repository, the more work the Processor can handle (Higher throughput). However, this means that the next Processor cannot start processing those FlowFiles until the previous Process updates this repository. As a result, the latency will be longer (the time required to process the FlowFile from beginning to end will be longer). As a result, the slider provides a spectrum from which the DFM can choose to favor Lower Latency or Higher Throughput.