
Using the Atlas Web UI to Search Metadata
Using the Atlas web UI is an efficient way to interact with HDP metadata services. Use Ambari to deploy your cluster, choose Atlas as one of your services, and the Atlas web UI is automatically installed. See the Automated Install with Ambari guide.
Try the Atlas web UI by installing sample metadata with the quick_start.py Python script. This script installs metadata in your repository so you can
test the search capabilities of the Atlas web UI:
To install sample metadata in your Atlas repository:
At a command prompt, log in to the host on your cluster where Atlas is installed.
Run the following command as the Atlas user:
su atlas -c '/usr/hdp/current/atlas-server/bin/quick_start.py'
After you have installed the sample metadata, you can explore the Atlas web UI.
To search metadata with the Atlas web UI:
From the Ambari dashboard, click Services > Atlas. On the Summary tab, make sure that the Atlas Metadata Server is started.
Click Quick Links > Atlas Dashboard to launch the Atlas web UI.
Type a tag name in the search well and press enter:
The search returns all metadata types that are associated with the tag. Click the identifier link to view details about the metadata object:
You can view four types of information for each metadata object by clicking each tab: Details, Schema, Output, and Input.
The Details tab shows information about the object, such as when it was created, the owner, when it was last accessed, and so on:
Click the Schema tab to view the metadata object schema:
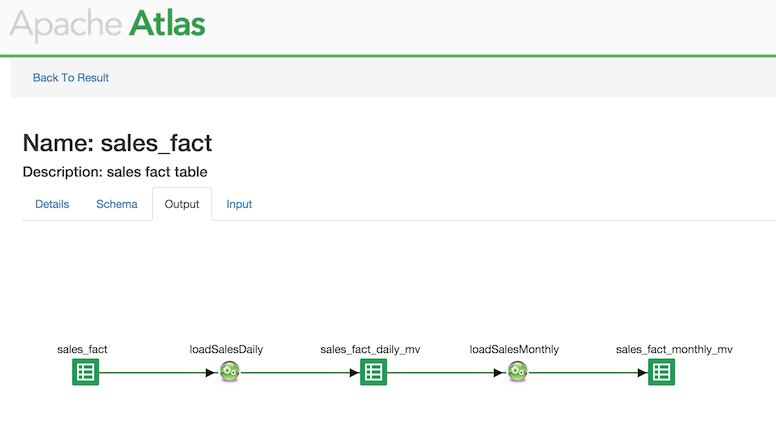
Click the Output or the Input tabs to view lineage of the metadata:
In the above image, the lineage, or where the data comes from and where it goes when it is output is shown.