
Chapter 4. Connectivity and Admission Control
Creating and maintaining an environment for performant data analytics applications using a Hive EDW requires orchestrating several software components that reside on your cluster and using compatible client tools. The main pieces that concern the application developer and IT or DevOps staff are the following:
HiveServer2: A service that connects your client application to the Hive EDW.
YARN: A system resource for queuing data queries.
Cost-Based Optimizer: An enhanced queuing mechanism of Hive.
Apache Tez: An application framework for running high-performance batch and interactive data applications.
For interactive and sub-second queries: Hive LLAP daemons. The daemons manage resources across all YARN nodes, rather than relying on separate Tez sessions on each node of the cluster.
HiveServer2, YARN, and Tez are components that work together to “intelligently” queue incoming queries on your Hive data set to minimize latency of returned results.
HiveServer2 is one of several architectural components for admission control. Admission control is designed to minimize query response time while enabling high concurrency. It operates by scaling the Hive processing of concurrent queries to the available system resources while removing the traditional launch time associated with MapReduce or Tez applications by maintaining long-living sessions. Admission control is akin to “connection pooling” in RDBMS databases.
To optimize Hive performance, configuration parameter settings that affect admission control must be optimized in line with your needs and system resources.
This chapter focuses on what you need to know about the components listed above to ensure clients connect to the Hive data warehouse and receive query results with high performance. To achieve optimal results, you also need to tune the data warehouse infrastructure so that it can handle concurrent queries in the way that comes closest to meeting your priorities.
HiveServer2
HiveServer2 is a server interface that enables remote clients to execute queries against Hive and retrieve the results using a JDBC or ODBC connection. For a client, you can use one of various BI tools (for example, Microstrategy, Tableau, and BusinessObjects) or another type of application that can access Hive over a JDBC or ODBC connection. In addition, you can also use a command-line tool, such as Beeline, that uses JDBC to connect to Hive.
![[Important]](../common/images/admon/important.png) | Important |
|---|---|
Do not use the Hive command-line interface (CLI). Instead, use the Beeline command-line shell or another JDBC CLI. |
An embedded metastore, which is different from the MetastoreDB, also runs in HiveServer2. This metastore performs the following tasks:
Get statistics and schema from the MetastoreDB
Compile queries
Generate query execution plans
Submit query execution plans
Return query results to the client
Sizing HiveServer2 Heap Memory
The following are general recommendations for sizing heap memory of a HiveServer2 instance:
1 to 20 concurrent executing queries: Set to 6 GB heap size.
21 to 40 concurrent executing queries: Set to 12 GB heap size.
More than 40 concurrent executing queries: Create a new HiveServer2 instance. See Multiple HiveServer2 Instances for Different Workloads for how to add a HiveServer2 instance.
HiveServer2 Interactive UI
| Important |
|---|---|
The HiveServer2 Interactive UI functions only with clusters that have LLAP enabled. |
The HiveServer2 Interactive UI monitors and displays heap, system, and cache metrics of each Hive LLAP node.
![[Tip]](../common/images/admon/tip.png) | Tip |
|---|---|
The HiveServer2 Interactive UI enables you to view executing queries in real time, a recent history of queries, and access running LLAP daemons. The Tez View provides diagnostics for debugging queries that executed or attempted to execute in the past. |
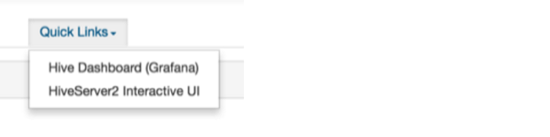
From the Quick Links menu of Ambari, shown in the following figure, you can open the HiveServer2 Interactive UI.
Multiple HiveServer2 Instances for Different Workloads
Multiple HiveServer2 instances can be used for:
Load-balancing and high availability using ZooKeeper
Running multiple applications with different settings
Because HiveServer2 uses its own settings file, using one for ETL operations and another for interactive queries is a common practice. All HiveServer2 instances can share the same MetastoreDB.
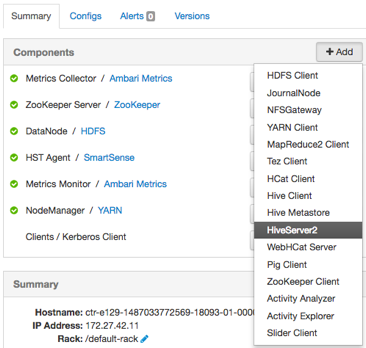
Adding a HiveServer2 Instance to Your Cluster
In Ambari, select the Hosts window

Click the name of the host node where you want to create the HiveServer2 instance.
On the Summary tab, click the Add button and select .
Security
HiveServer2 performs standard SQL security checks when a query is submitted, including connection authentication. After the connection authentication check, the server runs authorization checks to make sure that the user who submits the query has permission to access the databases, tables, columns, views, and other resources required by the query. Hortonworks recommends that you use SQLStdAuth or Ranger to implement security. Storage-based access controls, which is suitable for ETL workloads only, is also available.
Workload Management with YARN Capacity Scheduler Queues
YARN allocates Hadoop cluster resources among users and groups with Capacity Scheduler queues. The Hive queries that are submitted from your data analytics applications compose just one set of the competing resource demands from different Hortonworks Data Platform (HDP) components.
You can configure the Capacity Scheduler queues to scale Hive batch and LLAP workloads as needed for your environment. However, the queue configuration in YARN for batch processing is different from the YARN configuration for Hive LLAP.
Queues for Batch Processing
Capacity Scheduler queues can be used to allocate cluster resources among users and groups. These settings can be accessed from Ambari > YARN > Configs > Scheduler or in conf/capacity-scheduler.xml.
The following configuration example demonstrates how to set up Capacity Scheduler queues. This example separates short- and long-running queries into two separate queues:
hive1--This queue is used for short-duration queries and is assigned 50% of cluster resources.
hive2--This queue is used for longer-duration queries and is assigned 50% of cluster resources.
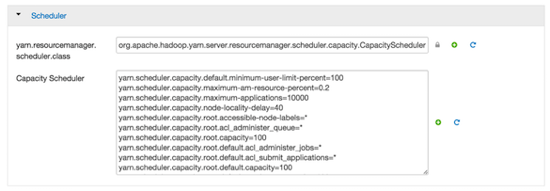
The following capacity-scheduler.xml settings are used to implement this configuration:
yarn.scheduler.capacity.root.queues=hive1,hive2
yarn.scheduler.capacity.root.hive1.capacity=50
yarn.scheduler.capacity.root.hive2.capacity=50
Configure usage limits for these queues and their users with the following settings:
yarn.scheduler.capacity.root.hive1.maximum-capacity=50
yarn.scheduler.capacity.root.hive2.maximum-capacity=50
yarn.scheduler.capacity.root.hive1.user-limit=1
yarn.scheduler.capacity.root.hive2.user-limit=1
Setting maximum-capacity to 50 restricts queue users to 50% of the queue capacity with a hard limit. If the maximum-capacity is set to more than 50%, the queue can use more than its capacity when there are other idle resources in the cluster. However, any user can use only the configured queue capacity. The default value of "1" for user-limit means that any single user in the queue can at a maximum occupy 1X the queue's configured capacity. These settings prevent users in one queue from monopolizing resources across all queues in a cluster.
This example is a basic introduction to queues. For more detailed information on allocating cluster resources using Capacity Scheduler queues, see the "Capacity Scheduler" section of the YARN Resource Management Guide.
Setup Using the Ambari Capacity Scheduler View
If you are using Ambari 2.1 or later, queues can be set up using the Ambari Capacity Scheduler View as shown in the following image:
In Ambari, navigate to the administration page.
Click Views > CAPACITY-SCHEDULER > <your_view_name>, and then click Go to instance at the top of your view page.
In your view instance page, select the queue you want to use or create a queue. See the Ambari Views Guide.
To create the scenario that is shown in the following screen capture, select the root queue and add hive1 and hive2 at that level.

Queues in Hive LLAP Sites
If you accept the default queue of the Hive LLAP Service in Ambari, then no manual configuration of the YARN Capacity Scheduler is required. But if you prefer to create and customize the workload queue for interactive queries, then you need to complete the following task before enabling and configuring Hive LLAP in Ambari.
| Important |
|---|---|
If you are an advanced Hive user and want to launch Hive LLAP with a customized queue, complete the following task before enabling Hive LLAP. Do not complete the following task if plan to use the default queue that can be deployed automatically by starting the Hive LLAP Service in Ambari. |
Setup of YARN for a Non-Default LLAP Queue
Create and configure a queue with the YARN Capacity Scheduler.
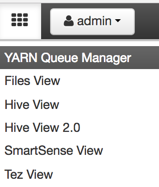
Open the Queue Manager View of Ambari:
Select the queue that should be used by Hive LLAP.
In the Resources pane, set the Priority field with a number that is larger than the priority value of the other queues. The default value of the Priority field after a queue is created is zero.