Chapter 3. Installing Kafka
Although you can install Kafka on a cluster not managed by Ambari (see Installing and Configuring Apache Kafka in the Non-Ambari Cluster Installation Guide), this chapter describes how to install Kafka on an Ambari-managed cluster.
Prerequisites
Before installing Kafka, ZooKeeper must be installed and running on your cluster.
Note that the following underlying file systems are supported for use with Kafka:
EXT4: supported and recommended
EXT3: supported
![[Caution]](../common/images/admon/caution.png) | Caution |
|---|---|
Encrypted file systems such as SafenetFS are not supported for Kafka. Index file corruption can occur. |
Installing Kafka Using Ambari
Before you install Kafka using Ambari, refer to Adding a Service in the Ambari Operations Guide for background information about how to install Hortonworks Data Platform (HDP) components using Ambari.
To install Kafka using Ambari, complete the following steps.
Click the Ambari "Services" tab.
In the Ambari "Actions" menu, select "Add Service." This starts the Add Service wizard, displaying the Choose Services page. Some of the services are enabled by default.
Scroll through the alphabetic list of components on the Choose Services page, and select "Kafka".

Click "Next" to continue.
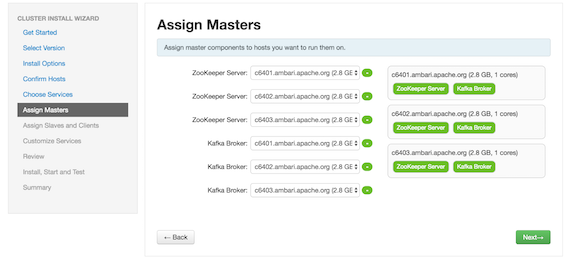
On the Assign Masters page, review the node assignments for Kafka nodes.
The following screen shows node assignment for a single-node Kafka cluster:

If you want Kafka to run with high availability, you must assign more than one node for Kafka brokers, resulting in Kafka brokers running on multiple nodes.
Click the "+" symbol to add more broker nodes to the cluster:

The following screen shows node assignment for a multi-node Kafka cluster:

Click "Next" to continue.
On the Assign Slaves and Clients page, choose the nodes that you want to run ZooKeeper clients:

Click "Next" to continue.
Ambari displays the Customize Services page, which lists a series of services:

For your initial configuration you should use the default values set by Ambari. If Ambari prompts you with the message "Some configurations need your attention before you can proceed," review the list of properties and provide the required information.
For information about optional settings that are useful in production environments, see Configuring Apache Kafka for a Production Environment.
Click "Next" to continue.
When the wizard displays the Review page, ensure that all HDP components correspond to HDP 2.5 or later:

Click "Deploy" to begin installation.
Ambari displays the Install, Start and Test page. Monitor the status bar and messages for progress updates:

When the wizard presents a summary of results, click "Complete" to finish installing Kafka:

After Kafka is deployed and running, validate the installation. You can use the command-line interface to create a Kafka topic, send test messages, and consume the messages. For more information, see Validate Kafka in the Non-Ambari Cluster Installation Guide.

