Chapter 2. Installing and Configuring Apache Atlas Using Ambari
Apache Atlas Prerequisites
Apache Atlas requires the following components:
Ambari Infra (which includes an internal HDP Solr Cloud instance) or an externally managed Solr Cloud instance.
HBase (used as the Atlas Metastore).
Kafka (provides a durable messaging bus).
Install Atlas
To install Atlas using Ambari:
Start the Installation
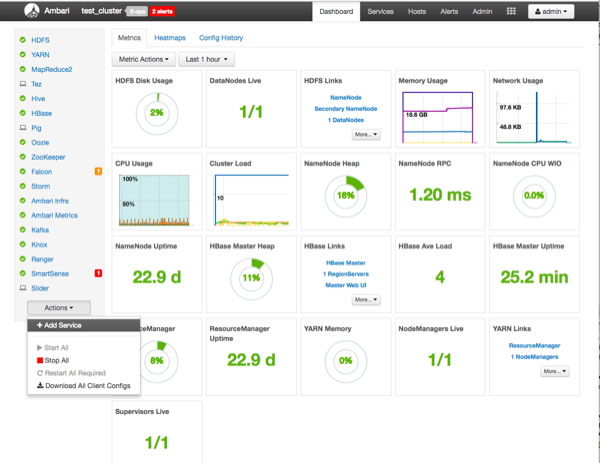
On the Ambari Dashboard, click Actions, then select Add Service.
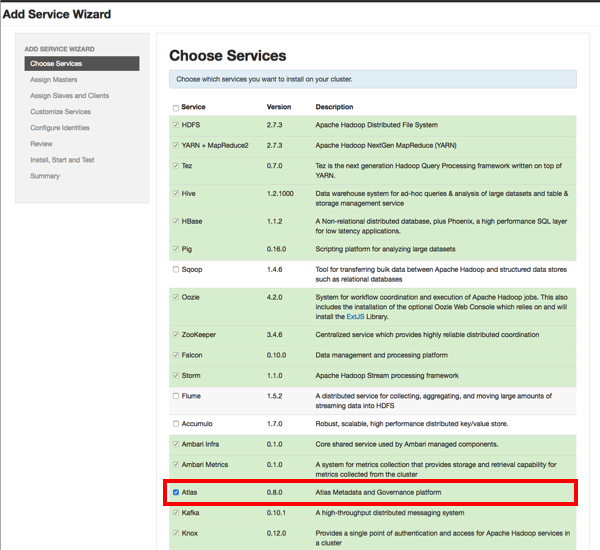
On the Choose Services page, select Atlas, then click Next.
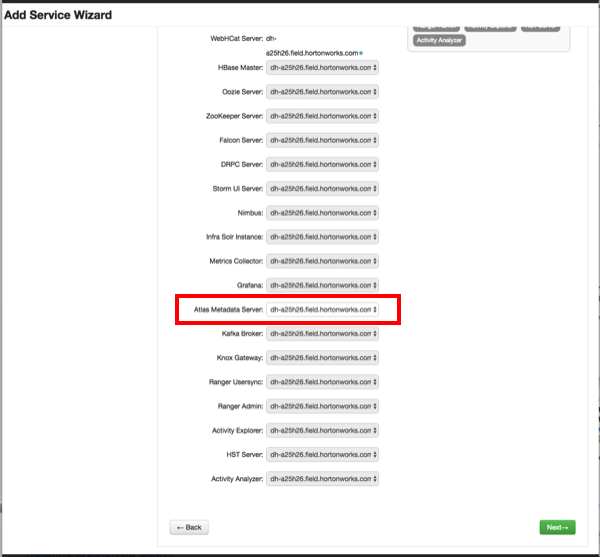
The Assign Master page appears. Specify a host for the Atlas Metadata Server, then click Next.
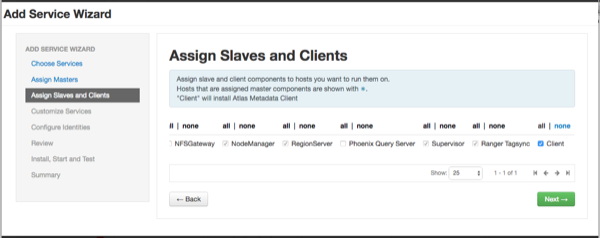
The Assign Slaves and Clients page appears with Client (the Atlas Metadata Client) selected. Click Next to continue.
The Customize Services page appears. These settings are described in the next section.
Customize Services
The next step in the installation process is to specify Atlas settings on the Customize Services page.
Authentication Settings
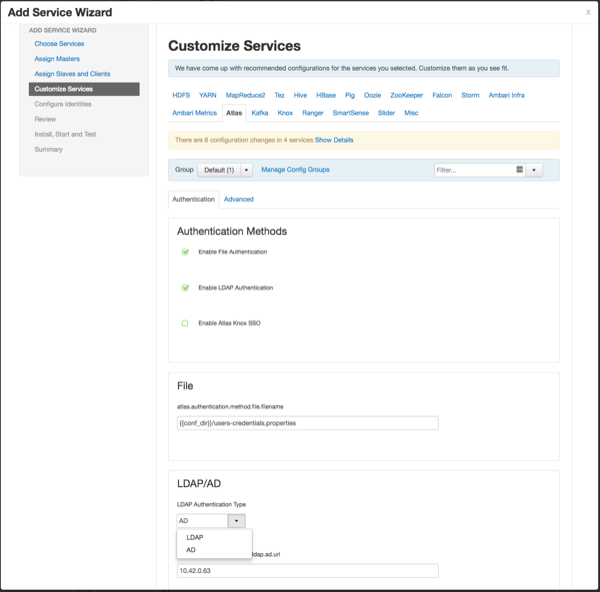
You can set the Authentication Type to File, LDAP, or AD.
File-based Authentication
When file-based authentication is selected, the
atlas.authentication.method.file.filename property is
automtically set to {{conf_dir}}/users-credentials.properties.
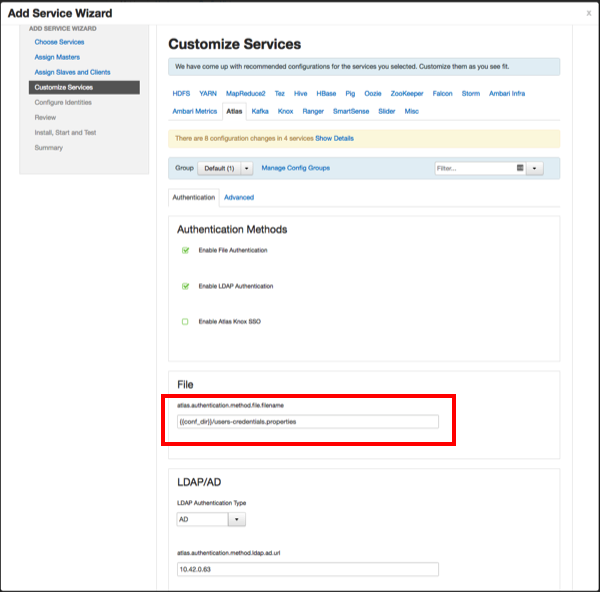
The users-credentials.properties file should have the
following format:
username=group::sha256password
admin=ADMIN::e7cf3ef4f17c3999a94f2c6f612e8a888e5b1026878e4e19398b23bd38ec221a
The user group can be ADMIN, DATA_STEWARD, or
DATA_SCIENTIST.
The password is encoded with the sha256 encoding method and
can be generated using the UNIX tool:
echo -n "Password" | sha256sum
e7cf3ef4f17c3999a94f2c6f612e8a888e5b1026878e4e19398b23bd38ec221a -
LDAP Authentication
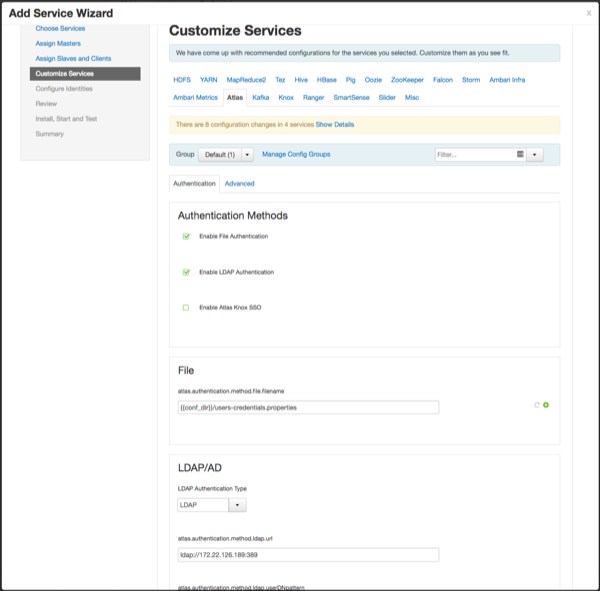
To enable LDAP authentication, select LDAP, then set the following configuration properties.
Table 2.1. Apache Atlas LDAP Configuration Settings
| Property | Sample Values |
|---|---|
| atlas.authentication.method.ldap.url | ldap://127.0.0.1:389 |
| atlas.authentication.method.ldap.userDNpattern | uid={0],ou=users,dc=example,dc=com |
| atlas.authentication.method.ldap.groupSearchBase | dc=example,dc=com |
| atlas.authentication.method.ldap.groupSearchFilter | (member=cn={0},ou=users,dc=example,dc=com |
| atlas.authentication.method.ldap.groupRoleAttribute | cn |
| atlas.authentication.method.ldap.base.dn | dc=example,dc=com |
| atlas.authentication.method.ldap.bind.dn | cn=Manager,dc=example,dc=com |
| atlas.authentication.method.ldap.bind.password | PassW0rd |
| atlas.authentication.method.ldap.referral | ignore |
| atlas.authentication.method.ldap.user.searchfilter | (uid={0}) |
| atlas.authentication.method.ldap.default.role | ROLE_USER |
AD Authentication
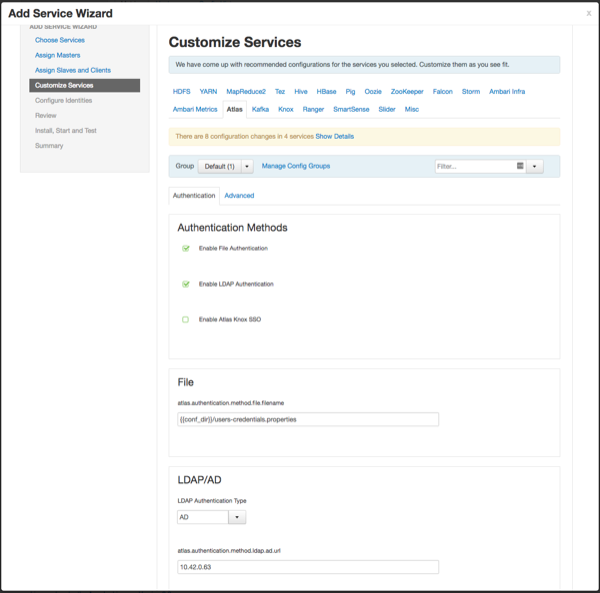
To enable AD authentication, select AD, then set the following configuration properties.
Table 2.2. Apache Atlas AD Configuration Settings
| Property | Sample Values |
|---|---|
| atlas.authentication.method.ldap.ad.url | ldap://127.0.0.1:389 |
| Domain Name (Only for AD) | example.com |
| atlas.authentication.method.ldap.ad.base.dn | DC=example,DC=com |
| atlas.authentication.method.ldap.ad.bind.dn | CN=Administrator,CN=Users,DC=example,DC=com |
| atlas.authentication.method.ldap.ad.bind.password | PassW0rd |
| atlas.authentication.method.ldap.ad.referral | ignore |
| atlas.authentication.method.ldap.ad.user.searchfilter | (sAMAccountName={0}) |
| atlas.authentication.method.ldap.ad.default.role | ROLE_USER |
Authorization Settings
Two authorization methods are available for Atlas: Simple and Ranger.
Simple Authorization
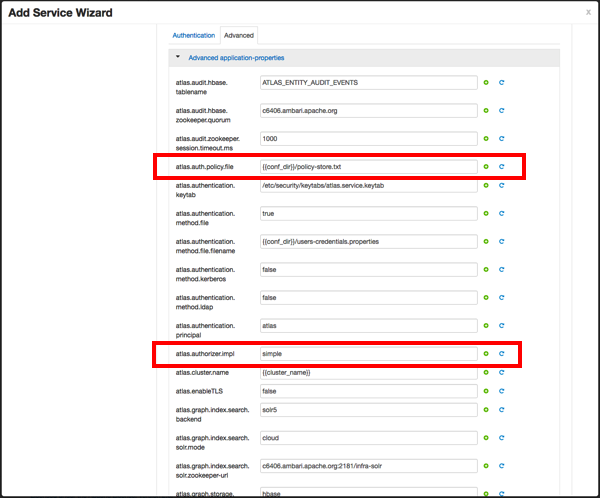
The default setting is Simple, and the following properties are automatically set under Advanced application-properties on the Advanced tab.
Table 2.3. Apache Atlas Simple Authorization
| Property | Value |
|---|---|
| atlas.authorizer.impl | simple |
| atlas.auth.policy.file | {{conf_dir}}/policy-store.txt |
The policy-store.txt file has the following format:
Policy_Name;;User_Name:Operations_Allowed;;Group_Name:Operations_Allowed;;Resource_Type:Resource_Name
For example:
adminPolicy;;admin:rwud;;ROLE_ADMIN:rwud;;type:*,entity:*,operation:*,taxonomy:*,term:*
userReadPolicy;;readUser1:r,readUser2:r;;DATA_SCIENTIST:r;;type:*,entity:*,operation:*,taxonomy:*,term:*
userWritePolicy;;writeUser1:rwu,writeUser2:rwu;;BUSINESS_GROUP:rwu,DATA_STEWARD:rwud;;type:*,entity:*,operation:*,taxonomy:*,term:*
In this example readUser1, readUser2,
writeUser1 and writeUser2 are the user IDs,
each with its corresponding access rights. The User_Name,
Group_Name and Operations_Allowed are
comma-separated lists.
Authorizer Resource Types:
Operation
Type
Entity
Taxonomy
Term
Unknown
Operations_Allowed are r = read,
w = write, u = update, d =
delete
Ranger Authorization
Ranger Authorization is activated by enabling the Ranger Atlas plug-in in Ambari.
Dependent Configurations
After you customize Atlas services and click Next, the Dependent Configurations page displayes recommended settings for dependent configurations. Clear the checkbox next to a property to retain the current value. Click OK to set the selected recommended property values.
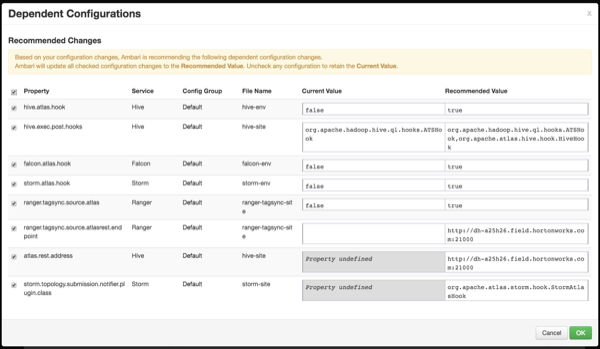
If Ambari detects other configuration issues, they will be displayed on a Configurations pop-up. Click Cancel to go back and change these settings, or click Proceed Anyway to continue the installation without changing the configurations.

Configure Identities
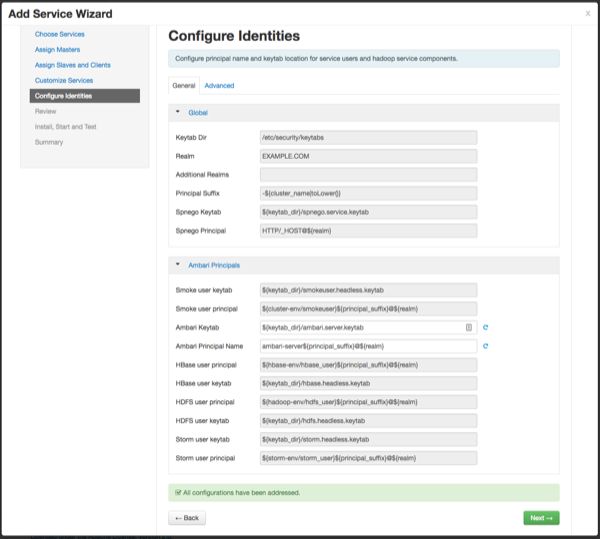
If Kerberos is enabled, the Configure Identities page appears. Click Next to continue with the installation.
Complete the Atlas Installation
On the Review page, carefully review all of your settings and configurations. If everything looks good, click Deploy to install Atlas on the Ambari server.
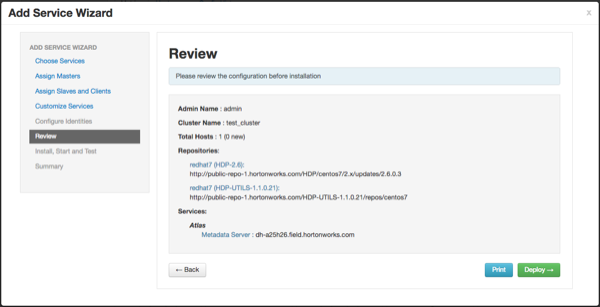
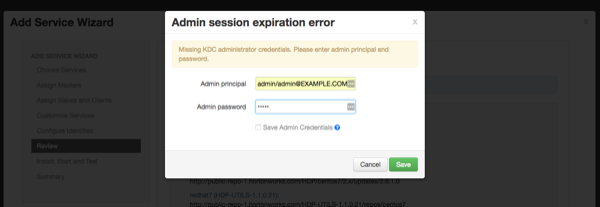
If Kerberos is enabled, you are prompted to enter your KDC administrator credentials. Type in your KDC Admin principal and password, then click Save.
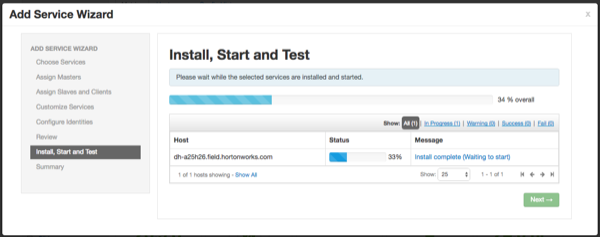
When you click Deploy, Atlas is installed on the specified host on your Ambari server. A progress bar displays the installation progress.
When the installation is complete, a Summary page displays the installation details. Click Complete to finish the installation.
![[Note]](../common/images/admon/note.png)
Note The Atlas user name and password are set to
admin/adminby default.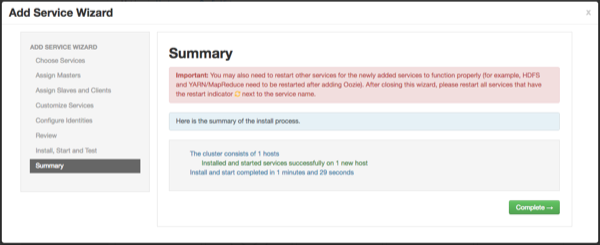
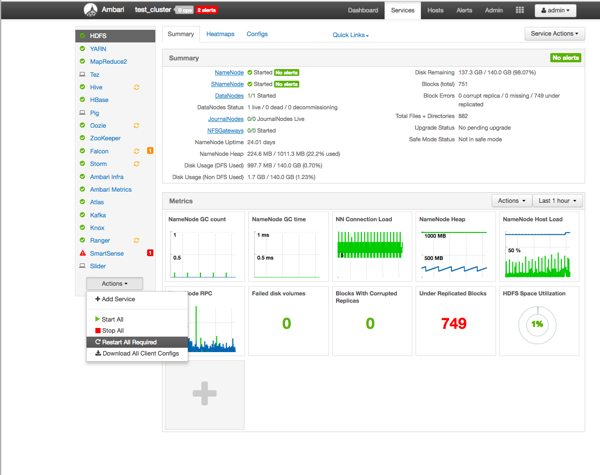
Select Actions > Restart All Required to restart all cluster components that require a restart.
Enable the Ranger Plugin
The Ranger Atlas plugin enables you to establish and enforce global security policies based on data classifications. For more information, see enabling the Ranger Atlas plugin in Ambari.
Configure Atlas Tagsync in Ranger
![[Note]](../common/images/admon/note.png) | Note |
|---|---|
Before configuring Atlas Tagsync in Ranger, you must enable Ranger Authorization in Atlas by enabling the Ranger Atlas plug-in in Ambari. |
For information about configuring Atlas Tagsync in Ranger, see Configure Ranger Tagsync.
Configure Atlas High Availability
For information about configuring High Availability (HA) for Apache Atlas, see Apache Atlas High Availability.
Configure Atlas Security
Additional Requirements for Atlas with Ranger and Kerberos
Currently additional configuration steps are required for Atlas with Ranger and in Kerberized environments.
Additional Requirements for Atlas with Ranger
When Atlas is used with Ranger, perform the following additional configuration steps:
![[Important]](../common/images/admon/important.png) | Important |
|---|---|
These steps are not required for Ambari-2.4.x and higher versions. For Ambari-2.4.x and higher, these steps will be performed automatically when Atlas is restarted. |
Create the following HBase policy:
table: atlas_titan, ATLAS_ENTITY_AUDIT_EVENTS
user: atlas
permission: Read, Write, Create, Admin
Create following Kafka policies:
topic=ATLAS_HOOK
permission=publish, create; group=public
permission=consume, create; user=atlas (for non-kerberized environments, set group=public)
topic=ATLAS_ENTITIES
permission=publish, create; user=atlas (for non-kerberized environments, set group=public)
permission=consume, create; group=public
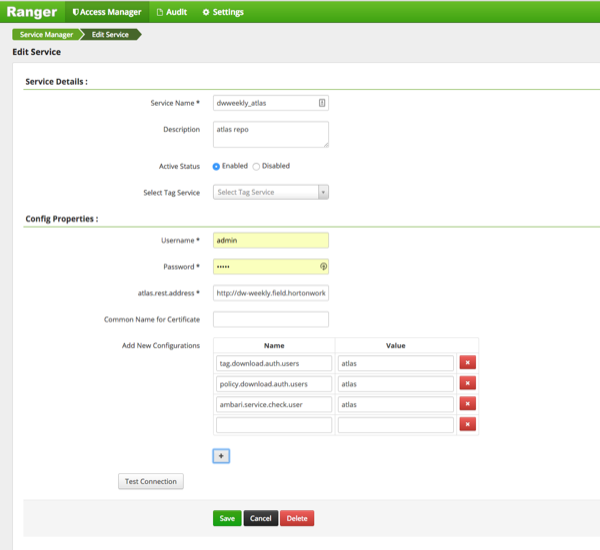
You should also ensure that an Atlas service is created in Ranger, and that the Atlas service includes the following configuration properties:
Table 2.4. Ranger Atlas Service Kerberos Properties
| Property | Value |
|---|---|
| tag.download.auth.users | atlas |
| policy.download.auth.users | atlas |
| ambari.service.check.user | atlas |
![[Note]](../common/images/admon/note.png) | Note |
|---|---|
If the Ranger Atlas service is not created after enabling the plugin and
restarting Atlas, that indicates that either there is already a policy JSON
on the Atlas host (in the
|
Additional Requirements for Atlas with Kerberos without Ranger
When Atlas is used in a Kerberized environment without Ranger, perform the following additional configuration steps:
Start the HBase shell with the user identity of the HBase admin user ('hbase')
Execute the following command in HBase shell, to enable Atlas to create necessary HBase tables:
grant 'atlas', 'RWXCA'
Start (or restart) Atlas, so that Atlas would create above HBase tables
Execute the following commands in HBase shell, to enable Atlas to access necessary HBase tables:
grant 'atlas', 'RWXCA', 'atlas_titan'
grant 'atlas', 'RWXCA', 'ATLAS_ENTITY_AUDIT_EVENTS'
Kafka – To grant permissions to a Kafka topic, run the following commands as the Kafka user:
/usr/hdp/current/kafka-broker/bin/kafka-acls.sh --topic ATLAS_HOOK --allow-principals * --operations All --authorizer-properties "zookeeper.connect=hostname:2181"
/usr/hdp/current/kafka-broker/bin/kafka-acls.sh --topic ATLAS_ENTITIES --allow-principals * --operations All --authorizer-properties "zookeeper.connect=hostname:2181"
Enable Atlas HTTPS
For information about enabling HTTPS for Apache Atlas, see Enable SSL for Apache Atlas.
Hive CLI Security
If you have Oozie, Storm, or Sqoop Atlas hooks enabled, the Hive CLI can be used with these components. You should be aware that the Hive CLI may not be secure without taking additional measures.
Configure the Knox Proxy for Atlas
You can avoid exposing Atlas hosts and ports by using Apache Knox as a proxy. Use the following steps to configure the Knox proxy for Atlas.
On the Ambari Dashboard, select Knox > Configs > Advanced Topology, then add the following services:
<service>
  <role>ATLAS-API</role>
  <url><atlas-server-host>:21000</url>
</service>

<service>
  <role>ATLAS</role>
  <url><atlas-server-host>:21000</url>
</service>
Click Save to save the new configuration, then click Restart > Restart All Affected to restart Knox.
With the Knox proxy enabled, use the following URL format to access the Atlas Dashboard:
https://<knox-gateway-host>:<knox-gateway-port>/<gateway-path>/<topology>/atlas/index.html
For example:
https://<knox-gateway-host>:8443/gateway/ui/atlas/index.html
Use the following format to access the Atlas REST API:
https://<knox-gateway-host>:<knox-gateway-port>/<gateway-path>/<topology>/atlas/
For example:
curl -i -k -L -u admin:admin -X GET \ 'https://<knox-gateway-host>:8443/gateway/{topology}/atlas/api/atlas/v2/types/typedefs?type=classification&_=1495442879421'![[Note]](../common/images/admon/note.png)
Note Apache Atlas HA (High Availability) is not supported with the Atlas Knox proxy.
Knox SSO is supported with the Atlas Knox proxy, but is not required.
Install Sample Atlas Metadata
You can use the quick_start.py Python script to install sample
metadata to view in the Atlas web UI. Use the following steps to install the sample
metadata:
Log in to the Atlas host server using a command prompt.
Run the following command as the Atlas user:
su atlas -c '/usr/hdp/current/atlas-server/bin/quick_start.py'
![[Note]](../common/images/admon/note.png)
Note In an SSL-enabled environment, run this command as:
su atlas -c '/usr/hdp/current/atlas-server/bin/quick_start.py https://<fqdn_atlas_host>:21443'
When prompted, type in the Atlas user name and password. When the script finishes running, the following confirmation message appears:
Example data added to Apache Atlas Server!!!
If Kerberos is enabled,
kinitis required to execute thequick_start.pyscript.
After you have installed the sample metadata, you can explore the Atlas web UI.
![[Note]](../common/images/admon/note.png) | Note |
|---|---|
If you are using the HDP Sandbox, you do not need to run the Python script to populate Atlas with sample metadata. |
Update the Atlas Ambari Configuration
When you update the Atlas configuration settings in Ambari, Ambari marks the services that require restart, and you can select Actions > Restart All Required to restart all services that require a restart.
![[Important]](../common/images/admon/important.png) | Important |
|---|---|
Apache Oozie requires a restart after an Atlas configuration update, but may not be included in the services marked as requiring restart in Ambari. Select Oozie > Service Actions > Restart All to restart Oozie along with the other services. |


