Dedicating Cloudera Embedded Container Service nodes for specific workloads
Dedicate Cloudera Embedded Container Service nodes using host-specific taints in Cloudera Manager to prevent outside pods from running on hardware reserved for specialized workloads.
Dedicating Cloudera Embedded Container Service nodes when creating a new cluster
- Verify the ECS installation requirements.
- Add the new hosts to Cloudera Manager.
- In the Cloudera Manager UI, select .
- Use the search box to locate the
node_taintconfiguration property and select Add Host Overrides. - Under the
node_taintproperty on the Cloudera Embedded Container Service Host Configuration page, select one of the following options:- Select Dedicated GPU Node to allocate the node for Cloudera AI when the host uses an NVIDIA GPU. Once selected, this host is reserved for workloads that require GPU resources.
- Select Dedicated NVMe Node to allocate the node for the Cloudera Data Warehouse service when the host uses NVMe for caching. Once selected, this host is reserved only for the workloads that require NVMe resources and can be used to schedule executors under the Use dedicated executor nodes feature. For more information, see Scheduling executor pods on dedicated worker nodes.
- Select Dedicated CDE Node to allocate the nodes for Cloudera Data Engineering services (available only for Cloudera Embedded Container Service 1.5.5 SP2 or higher versions). Once selected, the host is reserved exclusively for the Cloudera Data Engineering services and workloads.
- Select Dedicated CAI Infra to allocate nodes for the Cloudera AI infrastructure services (available only for Cloudera Embedded Container Service 1.5.5 SP2 or higher versions). Once selected, the host is reserved exclusively for the Cloudera Embedded Container Service infrastructure services.
- Select None if you do not want to make any selection. This is the default value.
When either of these options is selected, no other workload pods are allowed to run on the dedicated node.
Figure 1. Workload restriction options for host overrides 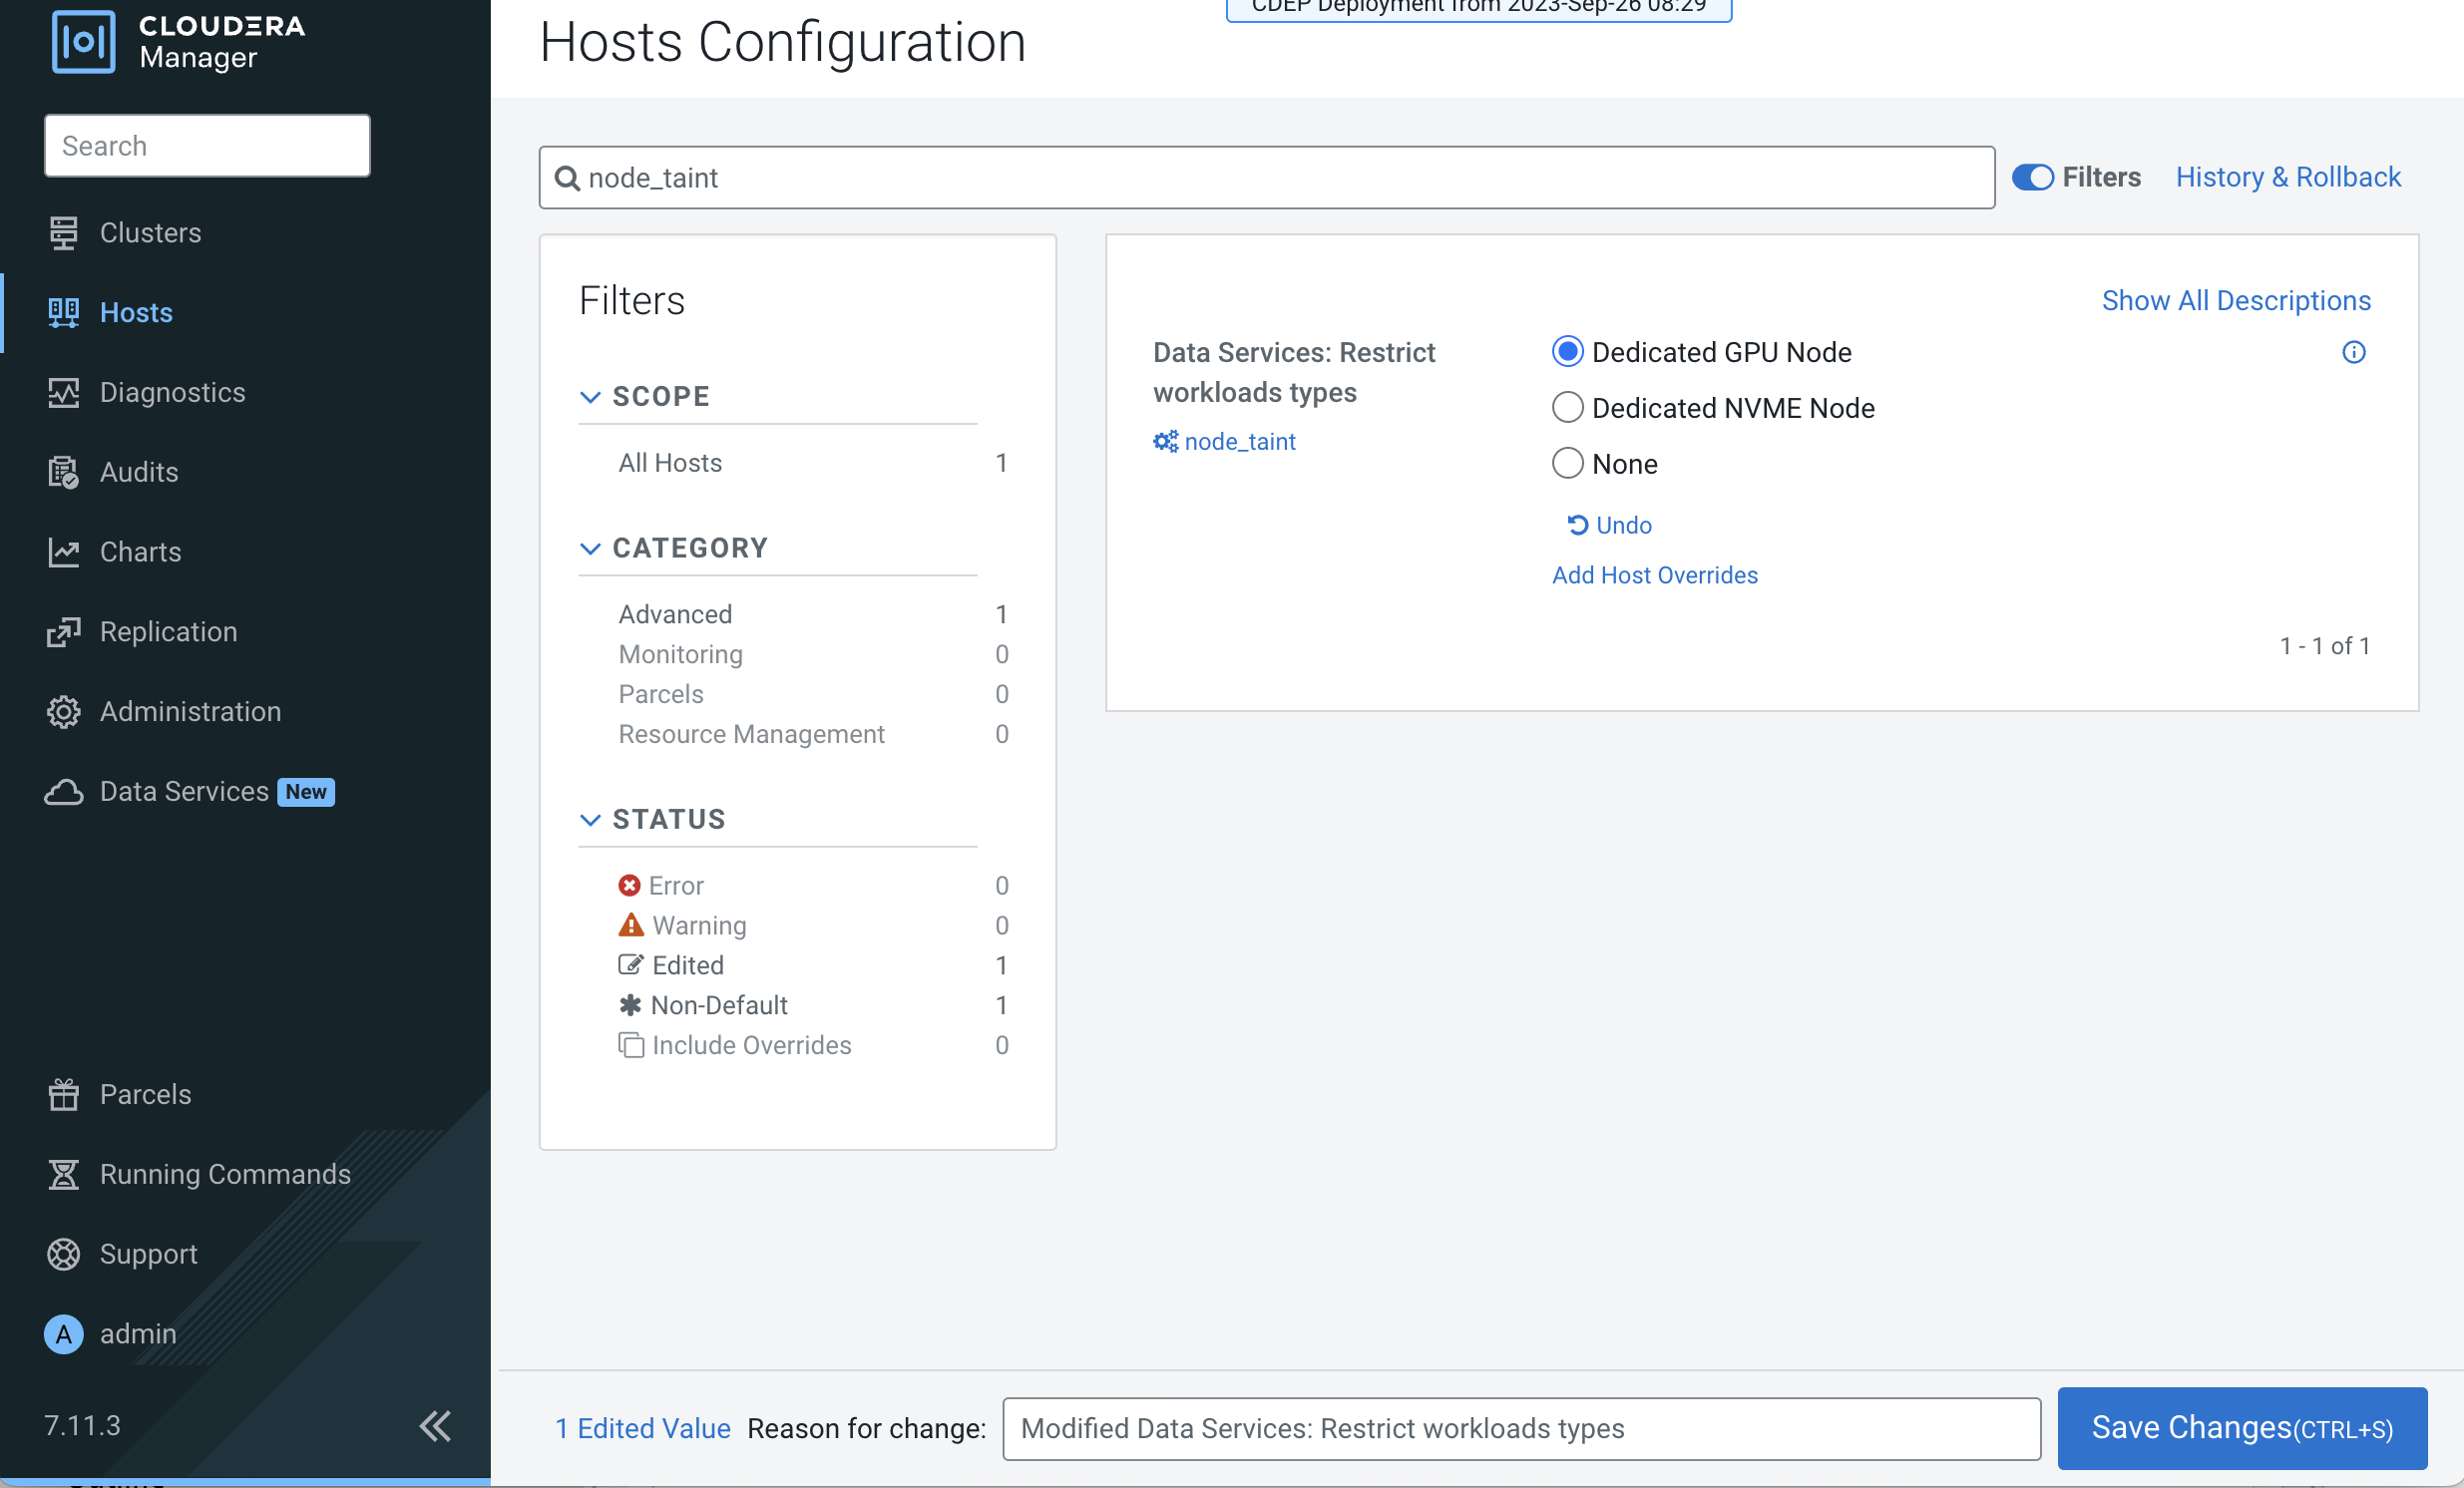
- Click Save Changes.
- Map the respective profiles.
- Label the Dedicated NVMe Node for Cloudera Data Warehouse
workloads.
kubectl label node <node name> cdw.cloudera.com/dedicated-executor-host=<any value> - Label the Dedicated CDE
Node.
kubectl label node <node name> cloudera.com/node-role=cde - Label the Dedicated CAI
Infra.
kubectl label node <node name> cloudera.com/node-role=cai-infra
Table 1. Cluster node profile reference Profile Taint Labels Dedicated GPU Node nvidia.com/gpu=true:NoSchedulecloudera.com/node-role=gpu Dedicated NVMe Node ssd/nvme=true:NoSchedulecloudera.com/node-role=nvme,cdw.cloudera.com/dedicated-executor-host=trueDedicated CDE Node dedicated-to=cde:NoSchedulecloudera.com/node-role=cde Dedicated CAI Infra cai.cloudera.com/infra=true:NoSchedulecml-infra-node=true,cloudera.com/node-role=cai-infraNone Removes the taint Removes the label - Label the Dedicated NVMe Node for Cloudera Data Warehouse
workloads.
- Verify the respective
mappings.
kubectl get node <name> --show-labels - Based on the Cloudera Data Services on premises version that you are using, repeat the previous steps to add the other Cloudera Embedded Container Service hosts to Cloudera Manager and assign workload types.
- Perform the ECS installation procedure. The Specify Hosts page in the installation wizard displays the hosts you added to Cloudera Manager.
- Select the hosts, click Continue, and proceed through the rest of the installation wizard.
- After the installation is complete, the applicable workloads run on the specified dedicated nodes.
Dedicating Cloudera Embedded Container Service nodes in an existing cluster
- Start the Cloudera Manager Admin Console.
- On the home page, select the ECS Cluster.
- Click Hosts and go to the ECS host to be tainted.
- Go to the Configuration tab, then use the
Search box to locate the
node_taintconfiguration property. -
Under the
node_taintproperty on the Cloudera Embedded Container Service Host Configuration page, select a workflow restriction option.- Select Dedicated GPU Node to allocate the node for Cloudera AI when the host uses an NVIDIA GPU. Once selected, this host is reserved for workloads that require GPU resources.
- Select Dedicated NVMe Node to allocate the node for the Cloudera Data Warehouse service when the host uses NVMe for caching. Once selected, this host is reserved only for the workloads that require NVMe resources.
- Select Dedicated CDE Node to allocate the nodes for Cloudera Data Engineering services (available only for Cloudera Embedded Container Service 1.5.5 SP2 or higher versions). Once selected, the host is reserved exclusively for the Cloudera Data Engineering services and workloads.
- Select Dedicated CAI Infra to allocate nodes for zhe Cloudera AI infrastructure services (available only for Cloudera Embedded Container Service 1.5.5 SP2 or higher versions). Once selected, the host is reserved exclusively for the Cloudera Embedded Container Service infrastructure services.
- Select None if you do not want to make any selection. This is the default value.
Figure 2. Workflow restriction options in the Configuration tab 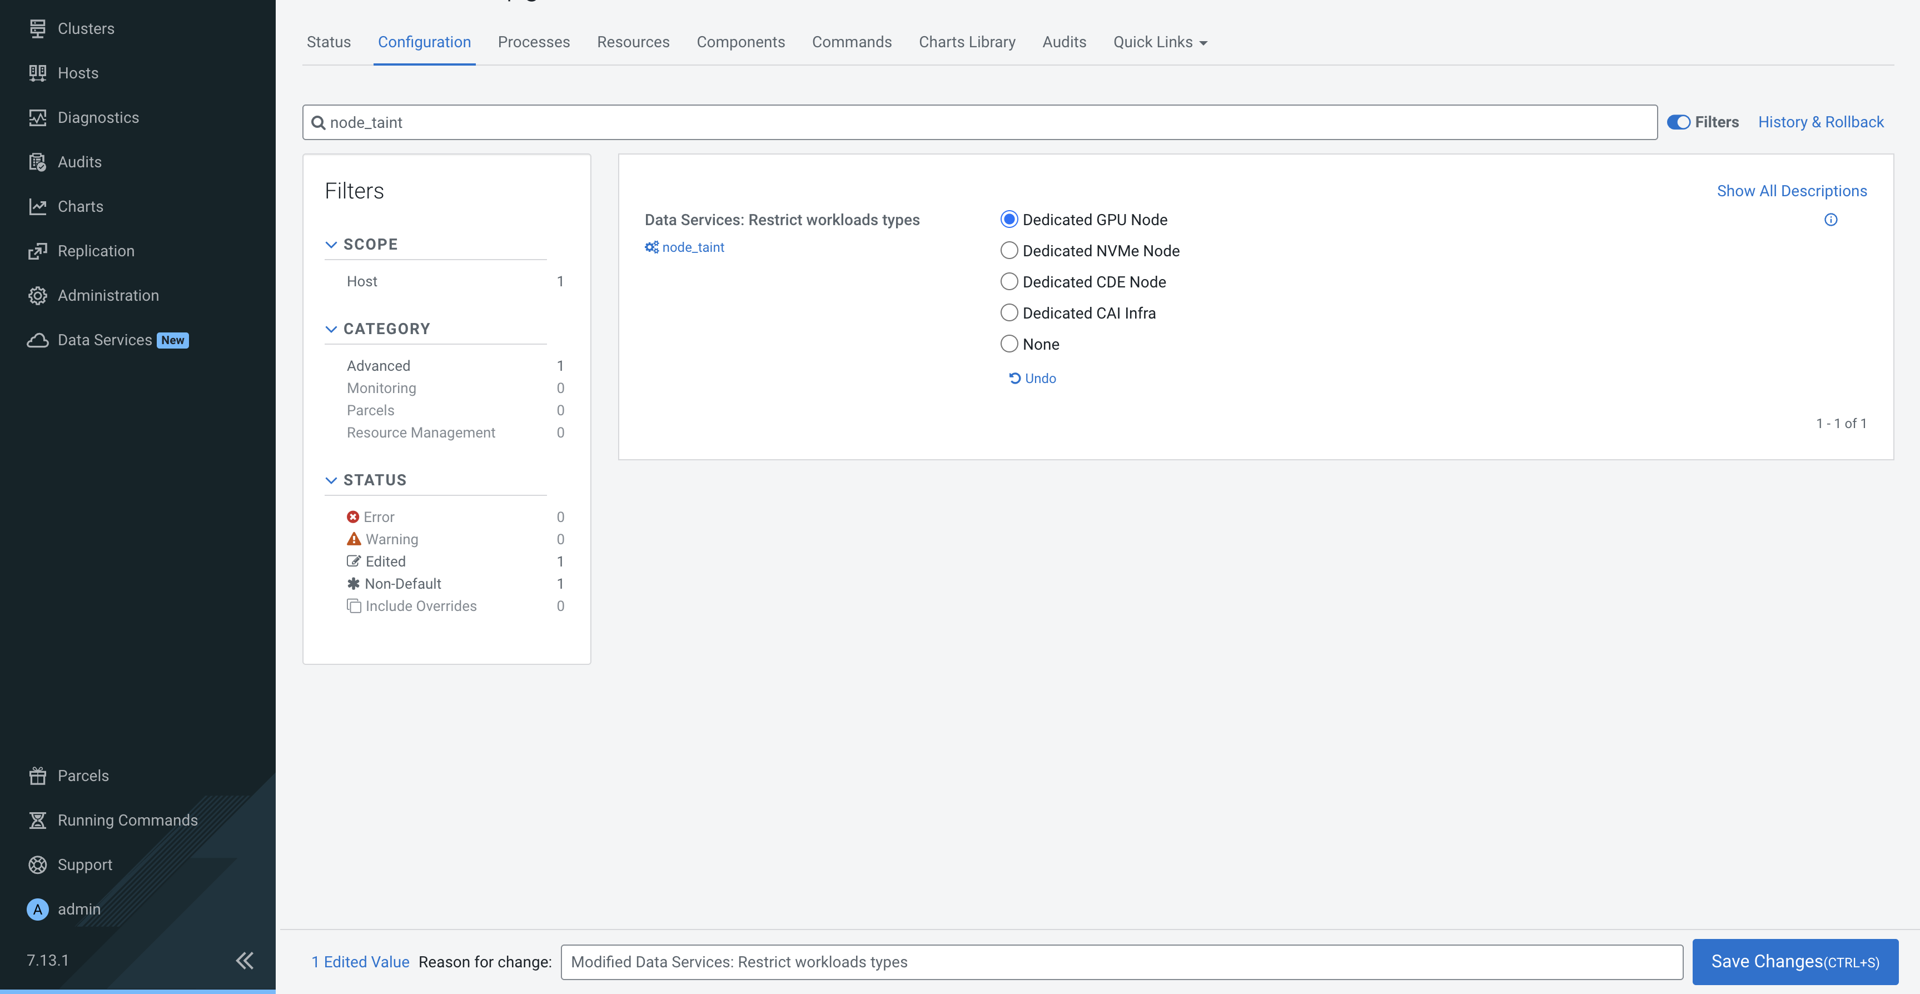
- Click Save Changes.
- Map the respective profiles.
- Label the Dedicated NVMe Node for Cloudera Data Warehouse
workloads.
kubectl label node <node name> cdw.cloudera.com/dedicated-executor-host=<any value> - Label the Dedicated CDE
Node.
kubectl label node <node name> cloudera.com/node-role=cde - Label the Dedicated CAI
Infra.
kubectl label node <node name> cloudera.com/node-role=cai-infra
- Label the Dedicated NVMe Node for Cloudera Data Warehouse
workloads.
- Based on the Cloudera Data Services on premises version that you are using, repeat the previous steps to assign workload types to the other Cloudera Embedded Container Service hosts.
- On the ECS Cluster landing page, click .
- After the cluster refresh completes, click .
