Sentry Policy File Configuration
 Important
Sentry enables role-based, fine-grained authorization for HiveServer2 and Cloudera Impala. It provides classic database-style authorization for Hive and Impala. Follow the instructions below to install and configure Sentry manually under the current CDH release.
Prerequisites
Sentry depends on an underlying authentication framework to reliably identify the requesting user. It requires:
- CDH 5
- HiveServer2 with strong authentication (Kerberos or LDAP)
- A secure Hadoop cluster
This is to prevent a user bypassing the authorization and gaining direct access to the underlying data.
- The Hive warehouse directory (/user/hive/warehouse or any
path you specify as hive.metastore.warehouse.dir in your hive-site.xml) must be
owned by the Hive user and group.
- Permissions on the warehouse directory must be
set as follows (see following Note for caveats):
- 771 on the directory itself (for example, /user/hive/warehouse)
- 771 on all subdirectories (for example, /user/hive/warehouse/mysubdir)
- All files and subdirectories should be owned by hive:hive
For example:$ sudo -u hdfs hdfs dfs -chmod -R 771 /user/hive/warehouse $ sudo -u hdfs hdfs dfs -chown -R hive:hive /user/hive/warehouse
 Note
Note: - If you set hive.warehouse.subdir.inherit.perms to true in hive-site.xml, the permissions on the subdirectories will be set when you set permissions on the warehouse directory itself.
- If a user has access to any object in the warehouse, that user will be able to execute use default. This ensures that use default commands issued by legacy applications work when Sentry is enabled. Note that you can protect objects in the default database (or any other database) by means of a policy file.
Important: These instructions override the recommendations in the Hive section of the CDH 5 Installation Guide.
- Permissions on the warehouse directory must be
set as follows (see following Note for caveats):
- HiveServer2 impersonation must be turned off.
- The Hive user must be able to submit MapReduce jobs. You can ensure
that this is true by setting the minimum user ID for job submission to 0.
Edit the taskcontroller.cfg file and set min.user.id=0. To enable the Hive user to submit YARN jobs, add the user hive to the allowed.system.users configuration property. Edit the container-executor.cfg file and add hive to the allowed.system.users property. For example,
allowed.system.users=nobody,impala,hive
Important: - You must restart the cluster and HiveServer2 after changing this value, whether you use Cloudera Manager or not.
- These instructions override the instructions under Configuring MRv1 Security
- These instructions override the instructions under Configuring YARN Security
Roles and Privileges
Sentry uses a role-based privilege model. A role is a collection of rules for accessing a given Hive object. The objects supported in the current release are server, database, table, and URI. Access to each object is governed by privileges: Select, Insert, or All.
Noteserver=server1->db=sales->table=customer->action=Select
sales_reporting =
\server=server1->db=sales->table=customer->action=Select,
\server=server1->db=sales->table=items>action=Select,
\server=server1->db=reports->table=sales_insights>action=Insert
Privilege Model
With CDH 5.1, the privilege model has undergone changes to accomodate the new grant/revoke syntax that is used with the Sentry service. These changes are common to both the new database-backed Sentry service, as well as the previous policy file approach.
- Allows any user to execute show function, desc function, and show locks.
- Allows the user to see only those tables and databases for which this user has privileges.
- Requires a user to have the necessary privileges on the URI to execute HiveQL operations that take in a location. Examples of such operations include LOAD, IMPORT, and EXPORT.
ImportantFor more information, see Appendix: Authorization Privilege Model for Hive and Impala.
Users and Groups
- A user is an entity that is permitted by the authentication subsystem to access the Hive service. This entity can be a Kerberos principal, an LDAP userid, or an artifact of some other pluggable authentication system supported by HiveServer2.
- A group connects the authentication system with the authorization system. It is a collection of one or more users who have been granted one or more authorization roles. Sentry allows a set of roles to be configured for a group.
- A configured group provider determines a user’s affiliation with a group. The current release supports HDFS-backed groups and locally configured groups.
analyst = sales_reporting, data_export, audit_reportHere the group analyst is granted the roles sales_reporting, data_export, and audit_report. The members of this group can run the HiveQL statements that are allowed by these roles. If this is an HDFS-backed group, then all the users belonging to the HDFS group analyst can run such queries.
User to Group Mapping
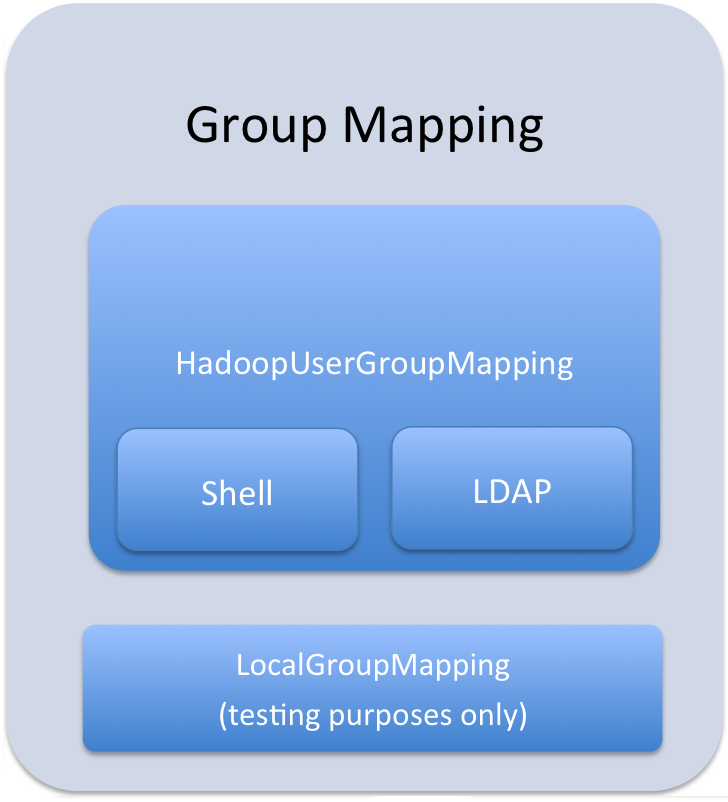
You can configure Sentry to use either Hadoop groups or groups defined in the policy file. By default, Sentry looks up groups locally, but it can be configured to look up Hadoop groups using LDAP (for Active Directory). Local groups will be looked up on the host Sentry runs on. For Hive, this will be the host running HiveServer2.
Group mappings in Sentry can be summarized as in the figure below:
 Important
Configuring Hadoop Groups
<property>
<name>hive.sentry.provider</name>
<value>org.apache.sentry.provider.file.HadoopGroupResourceAuthorizationProvider</value>
</property>
Configuring Local Groups
- Define local groups in a [users] section of the
Policy file. For
example:
[users]
user1 = group1, group2, group3
user2 = group2, group3
- In sentry-site.xml, set hive.sentry.provider as
follows:
<property>
<name>hive.sentry.provider</name>
<value>org.apache.sentry.provider.file.LocalGroupResourceAuthorizationProvider</value>
</property>
Setup and Configuration
Sentry stores the configuration as well as privilege policies in files. The sentry-site.xml file contains configuration options such as group association provider, privilege policy file location, and so on. The Policy file contains the privileges and groups. It has a .ini file format and can be stored on a local file system or HDFS.
Sentry is plugged into Hive as session hooks which you configure in hive-site.xml. The sentry package must be installed; it contains the required JAR files. You must also configure properties in the Sentry Configuration File.
Installing and Upgrading Sentry
ImportantIf you have not already done so, install Cloudera's yum, zypper/YaST or apt repository before using the following commands. For instructions, see CDH 5 Installation.
Upgrading Sentry from CDH 4 to CDH 5
To upgrade Sentry from CDH 4 to CDH 5, you must uninstall the old version and install the new version. If you have already performed the steps to uninstall CDH 4 and all components, as described under Upgrading from CDH 4 to CDH 5, you can skip Step 1 below and proceed with installing the new CDH 5 version of Sentry.
- Remove the CDH 4 Version of
Sentry
Remove Sentry as follows, depending on your operating system:
OS Command RHEL $ sudo yum remove sentry
SLES $ sudo zypper remove sentry
Ubuntu or Debian $ sudo apt-get remove sentry
- Install the New Version of Sentry
Follow instructions in the next section to install the CDH 5 version of Sentry.
Important: Configuration files- If you install a newer version of a package that is already on the system, configuration files that you have modified will remain intact.
- If you uninstall a package, the package manager renames any configuration files you have modified from <file> to <file>.rpmsave. If you then re-install the package (probably to install a new version) the package manager creates a new <file> with applicable defaults. You are responsible for applying any changes captured in the original configuration file to the new configuration file. In the case of Ubuntu and Debian upgrades, you will be prompted if you have made changes to a file for which there is a new version; for details, see Automatic handling of configuration files by dpkg.
The upgrade is now complete.
Installing Sentry
Install Sentry as follows, depending on your operating system:| OS | Command |
|---|---|
| RHEL |
$ sudo yum install sentry |
| SLES |
$ sudo zypper install sentry |
| Ubuntu or Debian |
$ sudo apt-get update; $ sudo apt-get install sentry |
Policy file
The sections that follow contain notes on creating and maintaining the policy file, and using URIs to load external data and JARs.
 Warning
Storing the Policy File
Considerations for storing the policy file(s) in HDFS include:
- Replication count - Because the file is read for each query in Hive and read once every five minutes by all Impala daemons, you should increase this value; since it is a small file, setting the replication count equal to the number of slave nodes in the cluster is reasonable.
- Updating the file - Updates to the file are reflected immediately, so you should write them to a temporary copy of the file first, and then replace the existing file with the temporary one after all the updates are complete. This avoids race conditions caused by reads on an incomplete file.
Defining Roles
role1 = privilege1
role1 = privilege2
Role names are scoped to a specific file. For example, if you give role1 the ALL privilege on db1 in the global policy file and give role1 ALL on db2 in the per-db db2 policy file, the user will be given both privileges.
URIs
Any command which references a URI such as CREATE TABLE EXTERNAL, LOAD, IMPORT, EXPORT, and more, in addition to CREATE TEMPORARY FUNCTION requires the URI privilege. This is an important security control because without this users could simply create an external table over an existing table they do not have access to and bypass Sentry.
URIs must start with either hdfs:// or file://. If a URI starts with anything else, it will cause an exception and the policy file will be invalid.
data_read = server=server1->uri=file:///path/to/dir,\
server=server1->uri=hdfs://namenode:port/path/to/dir
Important-Dsentry.allow.uri.db.policyfile=true
ImportantLoading Data
- Load data from a
local/NFS
directory:
server=server1->uri=file:///path/to/nfs/local/to/nfs
- Load data from
HDFS (MapReduce, Pig, and so
on):
server=server1->uri=hdfs://ha-nn-uri/data/landing-skid
In addition to the privilege in Sentry, the hive or impala user will require the appropriate file permissions to access the data being loaded. Groups can be used for this purpose. For example, create a group hive-users, and add the hive and impala users along with the users who will be loading data, to this group.
$ groupadd hive-users
$ usermod -G someuser,hive-users someuser
$ usermod -G hive,hive-users hive
External Tables
External tables require the ALL@database privilege in addition to the URI privilege. When data is being inserted through the EXTERNAL TABLE statement, or is referenced from an HDFS location outside the normal Hive database directories, the user needs appropriate permissions on the URIs corresponding to those HDFS locations. This means that the URI location must either be owned by the hive:hive user OR the hive/impala users must be members of the group that owns the directory.
[roles]
someuser_home_dir_role = server=server1->uri=hdfs://ha-nn-uri/user/someuser
You should now be able to create an external table:
CREATE EXTERNAL TABLE ...
LOCATION 'hdfs://ha-nn-uri/user/someuser/mytable';
JARs and User-Defined Functions (UDFs)
Note- On the Beeline client machine, in /etc/hive/conf/hive-site.xml, set the hive.aux.jars.path
property to a comma-separated list of the fully-qualified paths to
the JAR file and any dependent
libraries.
hive.aux.jars.path=file:/opt/local/hive/lib/my.jar
- Copy the JAR file (and its dependent libraries) to the host running HiveServer2/Impala.
- On the HiveServer2/Impala host, open /etc/default/hive-server2 and set the AUX_CLASSPATH variable
to a comma-separated list of the fully-qualified paths to the JAR
file and any dependent
libraries.
AUX_CLASSPATH=/opt/local/hive/lib/my.jar
- To access the UDF, you must have URI privilege
to the jar where the UDF resides. This privilege prevents users from
creating functions such as the reflect function which is disallowed
because it allows users to execute arbitrary Java
code.
udf_r = server=server1->uri=file:///opt/local/hive/lib
- Restart HiveServer2.You should now be able to use the UDF:
CREATE TEMPORARY FUNCTION my_udf AS 'MyUDF';
Sample Configuration
This section provides a sample configuration.
Policy Files
The following is an example of a policy file with a per-DB policy file. In this example, the first policy file, sentry-provider.ini would exist in HDFS; hdfs://ha-nn-uri/etc/sentry/sentry-provider.ini might be an appropriate location. The per-DB policy file is for the customer's database. It is located at hdfs://ha-nn-uri/etc/sentry/customers.ini.
[databases]
# Defines the location of the per DB policy file for the customers DB/schema
customers = hdfs://ha-nn-uri/etc/sentry/customers.ini

[groups]
# Assigns each Hadoop group to its set of roles
manager = analyst_role, junior_analyst_role
analyst = analyst_role
jranalyst = junior_analyst_role
customers_admin = customers_admin_role
admin = admin_role

[roles]
# The uris below define a define a landing skid which
# the user can use to import or export data from the system.
# Since the server runs as the user "hive" files in that directory
# must either have the group hive and read/write set or
# be world read/write.
analyst_role = server=server1->db=analyst1, \
    server=server1->db=jranalyst1->table=*->action=select
    server=server1->uri=hdfs://ha-nn-uri/landing/analyst1
junior_analyst_role = server=server1->db=jranalyst1, \
    server=server1->uri=hdfs://ha-nn-uri/landing/jranalyst1

# Implies everything on server1 -> customers. Privileges for
# customers can be defined in the global policy file even though
# customers has its only policy file. Note that the Privileges from
# both the global policy file and the per-DB policy file
# are merged. There is no overriding.
customers_admin_role = server=server1->db=customers

# Implies everything on server1.
admin_role = server=server1
[groups]
manager = customers_insert_role, customers_select_role
analyst = customers_select_role

[roles]
customers_insert_role = server=server1->db=customers->table=*->action=insert
customers_select_role = server=server1->db=customers->table=*->action=select
Important[roles] analyst_role = server=server1->db=default->table=col_test_view->action=select
Sentry Configuration File
The following is an example of a sentry-site.xml file.
ImportantIf you are using Cloudera Manager 4.7 (or later), Cloudera Manager will create and deploy sentry-site.xml for you. See Sentry for Hive Authorization for more details on configuring Sentry with Cloudera Manager.
sentry-site.xml
<configuration>
  <property>
    <name>hive.sentry.provider</name>
    <value>org.apache.sentry.provider.file.HadoopGroupResourceAuthorizationProvider</value>
  </property>

  <property>
    <name>hive.sentry.provider.resource</name>
    <value>/path/to/authz-provider.ini</value>
    <!--
       If the hdfs-site.xml points to HDFS, the path will be in HDFS;
       alternatively you could specify a full path, e.g.:
       hdfs://namenode:port/path/to/authz-provider.ini
       file:///path/to/authz-provider.ini
    -->
  </property>

  <property>
    <name>sentry.hive.server</name>
    <value>server1</value>
  </property>
</configuration>
Enabling Sentry in HiveServer2
<property>
<name>hive.server2.session.hook</name>
<value>org.apache.sentry.binding.hive.HiveAuthzBindingSessionHook</value>
</property>

<property>
<name>hive.sentry.conf.url</name>
<value></value>
<description>sentry-site.xml file location</description>
</property>
Securing the Hive Metastore
It's important that the Hive metastore be secured. Do this by turning on Hive metastore security, using the instructions in the CDH 5 Security Guide:
- Secure the Hive metastore; see Hive MetaStoreServer Security Configuration.
- In addition, allow access to the metastore only from the HiveServer2 server (see "Securing the Hive Metastore" under HiveServer2 Security Configuration) and then disable local access to the HiveServer2 server.
Accessing Sentry-Secured Data Outside Hive/Impala
NoteHowever, there are scenarios where fully vetted and reviewed jobs will also need to access the data stored in the Hive warehouse. A typical scenario would be a secured MapReduce transformation job that is executed automatically as an application user. In such cases it's important to know that the user executing this job will also have full access to the data in the Hive warehouse.
Scenario One: Authorizing Jobs
Problem
A reviewed, vetted, and automated job requires access to the Hive warehouse and cannot use Hive/Impala to access the data.
Solution
Create a group which contains hive, impala, and the user executing the automated job.
For example, if the etl user is executing the automated job, you can create a group called hive-users which contains the hive, impala, and etl users.
$ groupadd hive-users
$ usermod -G hive,impala,hive-users hive
$ usermod -G hive,impala,hive-users impala
$ usermod -G etl,hive-users etl
Once you have added users to the hive-users group, change directory permissions in the HDFS:
$ hadoop fs -chgrp -R hive:hive-users /user/hive/warehouse
$ hadoop fs -chmod -R 770 /user/hive/warehouse
Scenario Two: Authorizing Group Access to Databases
Problem
One group of users, grp1 should have full access to the database, db1, outside of Sentry. The database, db1 should not be accessible to any other groups, outside of Sentry. Sentry should be used for all other authorization needs.
Solution
$ usermod -G hive,impala,grp1 hive
$ usermod -G hive,impala,grp1 impala
Then change group ownerships of all directories and files in db1 to grp1, and modify directory permissions in the HDFS. This example is only applicable to local groups on a single host.
$ hadoop fs -chgrp -R hive:grp1 /user/hive/warehouse/db1.db
$ hadoop fs -chmod -R 770 /user/hive/warehouse/db1.db
Debugging Failed Sentry Authorization Requests
- In Cloudera Manager, add log4j.logger.org.apache.sentry=DEBUG to the logging settings for your service through the corresponding Logging Safety Valve field for the Impala, Hive Server 2, or Solr Server services.
- On systems not managed by Cloudera Manager, add log4j.logger.org.apache.sentry=DEBUG to the log4j.properties file on each host in the cluster, in the appropriate configuration directory for each service.
FilePermission server..., RequestPermission server...., result [true|false]which indicate each evaluation Sentry makes. The FilePermission is from the policy file, while RequestPermission is the privilege required for the query. A RequestPermission will iterate over all appropriate FilePermission settings until a match is found. If no matching privilege is found, Sentry returns false indicating
Appendix: Authorization Privilege Model for Hive and Impala
Privileges can be granted on different objects in the Hive warehouse. Any privilege that can be granted is associated with a level in the object hierarchy. If a privilege is granted on a container object in the hierarchy, the base object automatically inherits it. For instance, if a user has ALL privileges on the database scope, then (s)he has ALL privileges on all of the base objects contained within that scope.
Object Hierarchy in Hive
Server
     Database
         Table
             Partition
             Columns
         View
         Index
     Function/Routine
     Lock
| Privilege | Object |
|---|---|
| INSERT | DB, TABLE |
| SELECT | DB, TABLE |
| ALL | SERVER, TABLE, DB, URI |
| Base Object | Granular privileges on object | Container object that contains the base object | Privileges on container object that implies privileges on the base object |
|---|---|---|---|
| DATABASE | ALL | SERVER | ALL |
| TABLE | INSERT | DATABASE | ALL |
| TABLE | SELECT | DATABASE | ALL |
| VIEW | SELECT | DATABASE | ALL |
| Operation | Scope | Privileges | URI | Others |
|---|---|---|---|---|
| CREATE DATABASE | SERVER | ALL | ||
| DROP DATABASE | DATABASE | ALL | ||
| CREATE TABLE | DATABASE | ALL | ||
| DROP TABLE | TABLE | ALL | ||
| CREATE VIEW | DATABASE; SELECT on TABLE | ALL | SELECT on TABLE | |
| DROP VIEW | VIEW/TABLE | ALL | ||
| CREATE INDEX | TABLE | ALL | ||
| DROP INDEX | TABLE | ALL | ||
| ALTER TABLE .. ADD COLUMNS | TABLE | ALL | ||
| ALTER TABLE .. REPLACE COLUMNS | TABLE | ALL | ||
| ALTER TABLE .. CHANGE column | TABLE | ALL | ||
| ALTER TABLE .. RENAME | TABLE | ALL | ||
| ALTER TABLE .. SET TBLPROPERTIES | TABLE | ALL | ||
| ALTER TABLE .. SET FILEFORMAT | TABLE | ALL | ||
| ALTER TABLE .. SET LOCATION | TABLE | ALL | URI | |
| ALTER TABLE .. ADD PARTITION | TABLE | ALL | ||
| ALTER TABLE .. ADD PARTITION location | TABLE | ALL | URI | |
| ALTER TABLE .. DROP PARTITION | TABLE | ALL | ||
| ALTER TABLE .. PARTITION SET FILEFORMAT | TABLE | ALL | ||
| SHOW TBLPROPERTIES | TABLE | SELECT/INSERT | ||
| SHOW CREATE TABLE | TABLE | SELECT/INSERT | ||
| SHOW PARTITIONs | TABLE | SELECT/INSERT | ||
| DESCRIBE TABLE | TABLE | SELECT/INSERT | ||
| DESCRIBE TABLE .. PARTITION | TABLE | SELECT/INSERT | ||
| LOAD DATA | TABLE | INSERT | URI | |
| SELECT | TABLE | SELECT | ||
| INSERT OVERWRITE TABLE | TABLE | INSERT | ||
| CREATE TABLE .. AS SELECT | DATABASE; SELECT on TABLE | ALL | SELECT on TABLE | |
| USE <dbName> | Any | |||
| ALTER TABLE .. SET SERDEPROPERTIES | TABLE | ALL | ||
| ALTER TABLE .. PARTITION SET SERDEPROPERTIES | TABLE | ALL | ||
| Hive-Only Operations | ||||
| INSERT OVERWRITE DIRECTORY | TABLE | INSERT | URI | |
| Analyze TABLE | TABLE | SELECT + INSERT | ||
| IMPORT TABLE | DATABASE | ALL | URI | |
| EXPORT TABLE | TABLE | SELECT | URI | |
| ALTER TABLE TOUCH | TABLE | ALL | ||
| ALTER TABLE TOUCH PARTITION | TABLE | ALL | ||
| ALTER TABLE .. CLUSTERED BY SORTED BY | TABLE | ALL | ||
| ALTER TABLE .. ENABLE/DISABLE | TABLE | ALL | ||
| ALTER TABLE .. PARTITION ENABLE/DISABLE | TABLE | ALL | ||
| ALTER TABLE .. PARTITION.. RENAME TO PARTITION | TABLE | ALL | ||
| ALTER DATABASE | DATABASE | ALL | ||
| DESCRIBE DATABASE | DATABASE | SELECT/INSERT | ||
| SHOW COLUMNS | TABLE | SELECT/INSERT | ||
| SHOW INDEXES | TABLE | SELECT/INSERT | ||
| GRANT PRIVILEGE | Allowed only for Sentry admin users | |||
| REVOKE PRIVILEGE | Allowed only for Sentry admin users | |||
| SHOW GRANTS | Allowed only for Sentry admin users | |||
| ADD JAR | Not Allowed | |||
| ADD FILE | Not Allowed | |||
| DFS | Not Allowed | |||
| Impala-Only Operations | ||||
| EXPLAIN | TABLE | SELECT | ||
| INVALIDATE METADATA | SERVER | ALL | ||
| INVALIDATE METADATA <table name> | TABLE | SELECT/INSERT | ||
| REFRESH <table name> | TABLE | SELECT/INSERT | ||
| CREATE FUNCTION | SERVER | ALL | ||
| DROP FUNCTION | SERVER | ALL | ||
| COMPUTE STATS | TABLE | ALL | ||
| << Enabling HDFS Extended ACLs | Sentry Service Configuration >> | |