Creating and Modifying Clusters with the Cloudera Director web UI
Before initially launching a CDH cluster, you can use the Cloudera Director web UI to add, delete, or modify the default roles and instance groups. You can also add, remove, or repair instances in an existing cluster.
Configuring Instance Groups During Cluster Creation
- For HDFS - NameNode, SecondaryNameNode, Balancer
- For YARN - ResourceManager, JobHistory Server
- For HDFS - DataNode
- For YARN - NodeManager
For an introduction to master, worker, and gateway roles, see the Cloudera Manager 5 Overview .
Although the default instance groups are automatically configured with roles of a given type (masters, workers, or gateway), you can add any kind of role to any instance group.
When you create a cluster with Cloudera Director, a default set of instance groups and roles, based on the CDH services you include, is displayed in the Instance Groups section of the Add Cluster page:
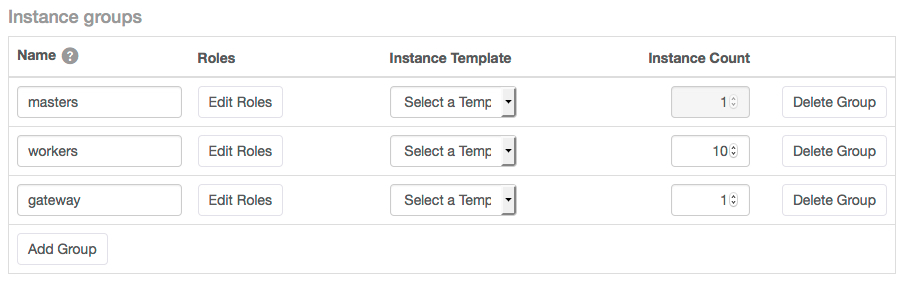
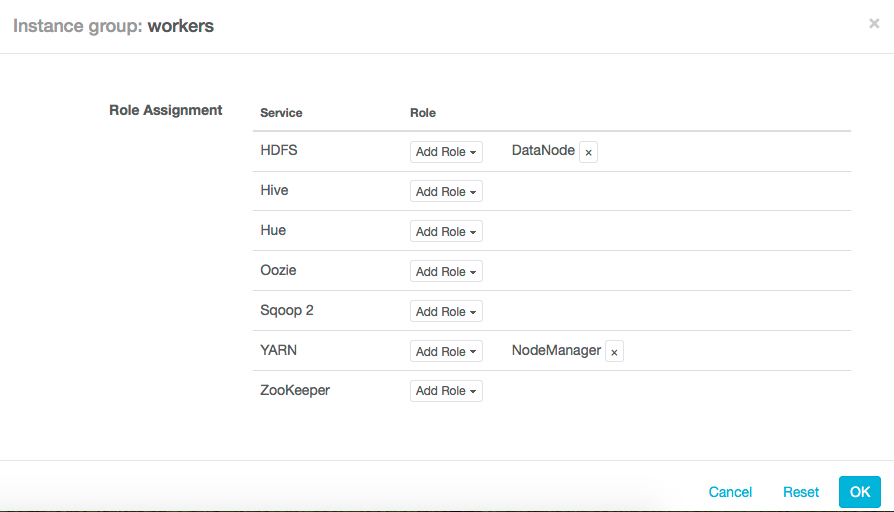
By clicking Edit Roles, you can see the roles included in each instance group. These roles will be installed on each instance running that instance group. In this example, by clicking Edit Roles for the workers instance group above, you can see that each of the 10 instances that will be installed for the workers instance group will include two roles, an HDFS DataNode and a YARN NodeManager:
- Change the number of instances for an instance group by clicking the up or down arrows.
- Delete an instance group by clicking Delete Group at the right end of the row for that instance group.
- Add roles to an existing instance group by clicking Edit Roles and then Add Role. Available roles for the services in the cluster are displayed. Click a role to add it to the instance group.
- Add another instance group to the cluster by clicking Add Group, entering a name for the instance group and assigning roles to it, selecting an instance template, and clicking the up or down arrows to choose the number of instances to install.
Modifying the Number of Instances in an Existing Cluster
Cloudera Director can grow or shrink the size of an existing cluster by adding or removing instances.
Adding Instances to a Cluster
- Log in to Cloudera Director at http://director-server-hostname:7189. Cloudera Director opens on the All Environments page, which displays the current environments, deployments, and clusters. Click the cluster you want to modify.
- Click Modify Cluster to the right of the cluster name. The Modify Cluster page displays the gateway, masters, and workers instance groups and any additional instance groups that have been added to the cluster, with the current number of instances in each instance group.
- You can add instances to an existing instance group or create a new instance group and add roles to it.
- To add instances to an existing instance group, click Edit to the right of the instance group and click the up or down arrows in the Add Instances section to increase the number of workers and gateways to the desired size. Each new instance will contain the same roles as the existing instances of that group.
- To create a new instance group, click Add Group, enter a name for the instance group, assign roles to it, select an instance template, and click the up or down arrows to choose the desired number of instances of that group to add.
Removing Instances from a Cluster
- Log in to Cloudera Director at http://director-server-hostname:7189.
Cloudera Director opens on the All Environments page, which displays the current environments, deployments, and clusters. Click the cluster you want to modify.
- Click Modify Cluster to the right of the cluster name. The Modify Cluster page displays the gateway, masters, and workers instance groups and any additional instance groups that have been added to the cluster, with the current number of instances in each instance group.
- You can remove an entire instance group, including all of its instances, or remove individual instances from an instance group:
- To remove an entire instance group, click Delete Group at the right end of the row for that instance group.
- To remove individual instances from an instance group, click Edit near the right end of the row for the instance group. Click the checkbox for each instance you want to remove, and click the Delete button. The instances you select display an action status of To be deleted.
- Click OK to continue, Reset to unselect the selected instances and make a new selection, or Cancel to stop without making any changes.
- Click Continue to confirm and delete the selected instances.
Rebalancing the Cluster After Adding or Removing Instances
After you add or remove instances from a cluster, HDFS data is likely to be distributed unevenly across DataNodes. Cloudera Director does not rebalance HDFS when you add instances or remove them from the cluster. If you need to rebalance the cluster, you must do so manually as described in HDFS Balancers in the Cloudera Manager documentation.
The need for rebalancing depends on the amount of data in HDFS and the number of instances added or removed during the cluster. Rebalancing is required only when there is a large movement of data. Cloudera recommends rebalancing the cluster through Cloudera Manager if you increase or reduce the number of DataNodes by 30% or more.
Repairing Worker and Gateway Instances in a Cluster
- Log in to Cloudera Director at http://director-server-hostname:7189
Cloudera Director opens on the All Environments page, which displays the current environments, deployments, and clusters. Click the cluster you want to modify.
- Click Modify Cluster to the right of the cluster name. The Modify Cluster page displays the gateway, masters, and workers instance groups and any additional instance groups that have been added to the cluster, with the current number of instances in each instance group.
- Click Edit next to the instance count for workers or gateways to repair, and select the instances to repair.
- Click the Repair button above the list of instances. The instances you selected display an action status of To be repaired.
- Click OK to continue, Reset to unselect the selected instances and make a new selection, or Cancel to stop without making any changes.
- Click Continue to confirm and repair the selected instances.