Setting Up Dynamic DNS on Azure
This topic describes how to set up Dynamic DNS (DDNS) on Microsoft Azure.
Overview
Running Hadoop—specifically CDH, in this case—requires forward and reverse DNS for internal IP addresses, which is not currently supported in Microsoft Azure. You must use your own DNS server to run CDH on Azure. For more information on using your own DNS server on Azure, see Name resolution using your own DNS server in the Azure documentation. Following is basic example for setting up a DDNS server to provide forward and reverse hostname resolution.
- Setting up basic DDNS using BIND.
- Creating required configuration and zone files.
- Creating update scripts that automatically update BIND when IP addresses are assigned or changed (for example, when stopping and starting hosts).
The DNS Server and the Cloudera Director Host
Creating a DNS Server and Cloudera Director Host
This example shows how to set up the DNS server and Cloudera Director to run on the same host.
Creating a Virtual Machine for the DNS Server
- In Azure, select or create the resource group you will use for your cluster.
- Select the + button to add a resource within that resource group.
- Search for the VM image CDH cloudera-centos and create it, following the instructions in Setting Up a Virtual Machine for Cloudera Director Server.
Make sure port 53 is accessible on the VM used for the DNS server.
Selecting DNS Defaults
Select an internal host fully qualified domain name (FQDN) suffix. This is the suffix for all internal hostname resolution within Cloudera clusters. (You also specify a FQDN suffix when
you set up clusters with Cloudera Director.)

The FQDN suffix you specify depends on your environment. Examples include cdh-cluster.internal, cluster.company-name.local, and internal.company-name.com.
Setting Up BIND on the Host
Information from Azure
- Hostname: director
- Virtual Network Address Space: 10.3.0.0/16
- Private IP: 10.3.0.4
Installing BIND
Perform the following changes as root. Run after sudo -i, or start all commands with sudo.
# install bind
yum -y install bind bind-utils

# make the directories that bind will use
mkdir /etc/named/zones
# make the files that bind will use
touch /etc/named/named.conf.local
touch /etc/named/zones/db.internal
touch /etc/named/zones/db.reverse
Updating or Creating the Files
The contents of each of the four files and the changes required are included below. See the comments inline for changes you need to make. You must perform the following changes as root. Run after sudo -i, or start all commands with sudo.
/etc/named.conf
//
// Provided by Red Hat bind package to configure the ISC BIND named(8) DNS
// server as a caching only nameserver (as a localhost DNS resolver only).
//
// See /usr/share/doc/bind*/sample/ for example named configuration files.
//


acl trusted {
    // replace `10.3.0.0/16` with your subnet
    10.3.0.0/16;
};

options {
    // replace `10.3.0.4` with the internal IP of the BIND host
    listen-on port 53 { 127.0.0.1; 10.3.0.4; };
    listen-on-v6 port 53 { ::1; };
    directory "/var/named";
    dump-file "/var/named/data/cache_dump.db";
    statistics-file "/var/named/data/named_stats.txt";
    memstatistics-file "/var/named/data/named_mem_stats.txt";
    allow-query { localhost; trusted; };
    recursion yes;
    forwarders { 168.63.129.16; }; // used for all regions
    dnssec-enable yes;
    dnssec-validation yes;
    dnssec-lookaside auto;

    /* Path to ISC DLV key */
    bindkeys-file "/etc/named.iscdlv.key";

    managed-keys-directory "/var/named/dynamic";
};


logging {
    channel default_debug {
        file "data/named.run";
        severity dynamic;
    };
};


zone "." IN {
    type hint;
    file "named.ca";
};

include "/etc/named.rfc1912.zones";
include "/etc/named.root.key";
include "/etc/named/named.conf.local";
/etc/named/named.conf.local
// replace the zone name (`cdh-cluster.internal`) with with the internal host FQDN suffix
// you want to use for your cluster network. (This option is exposed in Director.)
zone "cdh-cluster.internal" IN {
    type master;
    file "/etc/named/zones/db.internal";
    // replace with your subnet
    allow-update { 10.3.0.0/16; };
};

// replace the zone name (`0.3.10.in-addr.arpa`) with the network component of your subnet, reversed
// (example: with a subnet definition of 10.3.0.0/24, the reversed subnet component would be 0.3.10)
zone "0.3.10.in-addr.arpa" IN {
    type master;
    file "/etc/named/zones/db.reverse";
    // replace with your subnet
    allow-update { 10.3.0.0/16; };
 };
/etc/named/zones/db.internal
$ORIGIN .
$TTL 600  ; 10 minutes
; replace `cdh-cluster.internal` with the zone name defined in /etc/named/named.conf.local)
; replace `director.cdh-cluster.internal` with the internal fqdn of the primary name server; note the trailing period (`.`)
; replace `hostmaster.cdh-cluster.internal` with the hostmaster email address, represented with only periods (.), by convention this is `hostmaster.<your fqdn suffix>`; note the trailing period (.)
cdh-cluster.internal  IN SOA  director.cdh-cluster.internal. hostmaster.cdh-cluster.internal. (
        10         ; serial
        600        ; refresh (10 minutes)
        60         ; retry (1 minute)
        604800     ; expire (1 week)
        600        ; minimum (10 minutes)
        )
        ; replace `director.cdh-cluster.internal` with the internal fqdn of the primary name server; note the trailing period (.)
        NS  director.cdh-cluster.internal.

; replace `cdh-cluster.internal` with the zone name defined in /etc/named/named.conf.local; note the trailing period (.)
$ORIGIN cdh-cluster.internal.
; replace `director` with the hostname of your DNS host, this should be the prefix of the internal fqdn of the primary name server
; replace `10.5.0.4` with the internal IP of the primary name server
director    A  10.5.0.4
/etc/named/zones/db.reverse
$ORIGIN .
$TTL 600  ; 10 minutes
; replace `0.5.10.in-addr.arpa` with the the network component of your subnet, reversed (the zone name defined in /etc/named/named.conf.local)
; replace `director.cdh-cluster.internal` with the internal fqdn of the primary name server; note the trailing period (.)
; replace `hostmaster.cdh-cluster.internal` with the hostmaster email address, represented with only periods (.), by convention this is `hostmaster.<your fqdn suffix>`; note the trailing period (.)
0.5.10.in-addr.arpa  IN SOA  director.cdh-cluster.internal. hostmaster.cdh-cluster.internal. (
        10     ; serial
        600    ; refresh (10 minutes)
        60     ; retry (1 minute)
        604800   ; expire (1 week)
        600    ; minimum (10 minutes)
        )
      ; replace `director.cdh-cluster.internal` with the internal fqdn of your primary name server; note the trailing period (.)
      NS  director.cdh-cluster.internal.

; replace `0.5.10.in-addr.arpa` with the the network component of your subnet, reversed (the zone name defined in /etc/named/named.conf.local)
$ORIGIN 0.5.10.in-addr.arpa.
; replace `4` with the host number of the private IP of your DNS host
; replace `director.cdh-cluster.internal` with the internal fqdn of your primary name server
4      PTR  director.cdh-cluster.internal.
Checking BIND Configuration
# named-checkconf /etc/named.confCorrect any errors. (Blank output means no errors exist.)
Starting BIND
- Change the ownership of /etc/named* to named:named (named requires read/write
privileges):
# chown -R named:named /etc/named*
- Start BIND:
# service named start
- Set BIND to start on startup:
# chkconfig named on
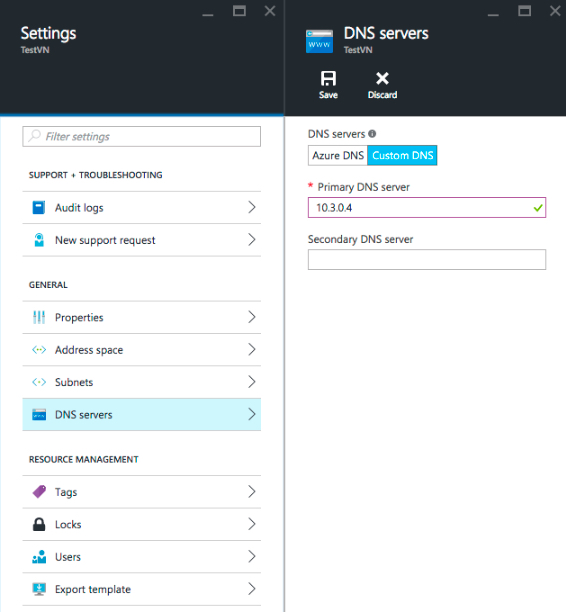
Swapping DNS from Azure to BIND
- In the left pane, click Resource groups.
- Select the resource group your DNS server is in.
- Click on the virtual network your cluster is using.
- Click settings.
- Click DNS servers.
- Set DNS servers to Custom DNS.
- Set Primary DNS server to the private IP address of your Cloudera Director host (10.3.0.4 in this example).
- Wait for the DNS setting update to complete in the Azure portal, then restart the network service on the VM.
VMs created after the DNS setting is updated in the Azure portal automatically pick up the new DNS server address.
- Restart the network service to pull down the nameserver changes entered in the Azure portal:
service network restart
cat /etc/resolv.confIf the change has not yet propagated, wait two minutes and restart the network service again. You may have to do this multiple times.
RHEL 6 and CentOS 6: Add dhclient-exit-hooks
This script creates a new dhclient-exit-hooks file in /etc/dhcp/ and sets the file to be executable. Run the script as root:
#!/bin/sh
# cat a here-doc represenation of the hooks to the appropriate file
cat > /etc/dhcp/dhclient-exit-hooks <<"EOF"
#!/bin/bash
printf "\ndhclient-exit-hooks running...\n\treason:%s\n\tinterface:%s\n" "${reason:?}" "${interface:?}"
# only execute on the primary nic
if [ "$interface" != "eth0" ]
then
    exit 0;
fi
# when we have a new IP, perform nsupdate
if [ "$reason" = BOUND ] || [ "$reason" = RENEW ] ||
   [ "$reason" = REBIND ] || [ "$reason" = REBOOT ]
then
    printf "\tnew_ip_address:%s\n" "${new_ip_address:?}"
    host=$(hostname | cut -d'.' -f1)
    domain=$(hostname | cut -d'.' -f2- -s)
    domain=${domain:='cdh-cluster.internal'} # If no hostname is provided, use cdh-cluster.internal
    IFS='.' read -ra ipparts <<< "$new_ip_address"
    ptrrec="${ipparts[3]}.${ipparts[2]}.${ipparts[1]}.${ipparts[0]}.in-addr.arpa"
    nsupdatecmds=$(mktemp -t nsupdate.XXXXXXXXXX)
    resolvconfupdate=$(mktemp -t resolvconfupdate.XXXXXXXXXX)
    echo updating resolv.conf
    grep -iv "search" /etc/resolv.conf > "$resolvconfupdate"
    echo "search $domain" >> "$resolvconfupdate"
    cat "$resolvconfupdate" > /etc/resolv.conf
    echo "Attempting to register $host.$domain and $ptrrec"
    {
        echo "update delete $host.$domain a"
        echo "update add $host.$domain 600 a $new_ip_address"
        echo "send"
        echo "update delete $ptrrec ptr"
        echo "update add $ptrrec 600 ptr $host.$domain"
        echo "send"
    } > "$nsupdatecmds"
    nsupdate "$nsupdatecmds"
fi
#done
exit 0;
EOF
chmod 755 /etc/dhcp/dhclient-exit-hooks
service network restart
RHEL 7 and CentOS 7: Add NetworkManager Dispatcher Scripts
#!/bin/sh
# RHEL 7.2 uses NetworkManager. Add a script to be automatically invoked when interface comes up.
cat > /etc/NetworkManager/dispatcher.d/12-register-dns <<"EOF"
#!/bin/bash
# NetworkManager Dispatch script
# Deployed by Cloudera Director Bootstrap
#
# Expected arguments:
#    $1 - interface
#    $2 - action
#
# See for info: http://linux.die.net/man/8/networkmanager

# Register A and PTR records when interface comes up
# only execute on the primary nic
if [ "$1" != "eth0" || "$2" != "up" ]
then
    exit 0;
fi

# when we have a new IP, perform nsupdate
new_ip_address="$DHCP4_IP_ADDRESS"

host=$(hostname -s)
domain=$(hostname | cut -d'.' -f2- -s)
domain=${domain:='cdh-cluster.internal'} # REPLACE-ME If no hostname is provided, use cdh-cluster.internal
IFS='.' read -ra ipparts <<< "$new_ip_address"
ptrrec="$(printf %s "$new_ip_address." | tac -s.)in-addr.arpa"
nsupdatecmds=$(mktemp -t nsupdate.XXXXXXXXXX)
resolvconfupdate=$(mktemp -t resolvconfupdate.XXXXXXXXXX)
echo updating resolv.conf
grep -iv "search" /etc/resolv.conf > "$resolvconfupdate"
echo "search $domain" >> "$resolvconfupdate"
cat "$resolvconfupdate" > /etc/resolv.conf
echo "Attempting to register $host.$domain and $ptrrec"
{
    echo "update delete $host.$domain a"
    echo "update add $host.$domain 600 a $new_ip_address"
    echo "send"
    echo "update delete $ptrrec ptr"
    echo "update add $ptrrec 600 ptr $host.$domain"
    echo "send"
} > "$nsupdatecmds"
nsupdate "$nsupdatecmds"
exit 0;
EOF
chmod 755 /etc/NetworkManager/dispatcher.d/12-register-dns
service network restart
Checking DNS
Azure has hooks to automatically overwrite /etc/resolv.conf with Azure-specific values. However, depending on OS, the contents of /etc/dhcp/dhclient-exit-hooks or /etc/NetworkManager/dispatcher.d/12-register-dns are executed after the Azure hooks, and so can overwrite /etc/resolv.conf with custom values.
; generated by /sbin/dhclient-script
nameserver 10.3.0.4
search cdh-cluster.internal
You can now resolve internal FQDNs and perform forward and reverse DNS queries without errors:
# hostname -f
director.cdh-cluster.internal

# hostname -i
10.3.0.4

# host `hostname -i`
4.0.3.10.in-addr.arpa domain name pointer director.cdh-cluster.internal

# host `hostname -f`
director.cdh-cluster.internal has address 10.3.0.4
Note that the values 10.3.0.4, 4.0.3.10, and cdh-cluster.internal are specific to this example and will be different for your implementation.
# hostname -f
hostname: Unknown host

# hostname -i
hostname: Unknown host

# host `hostname -i`
Host 4.0.3.10.in-addr.arpa. not found: 3(NXDOMAIN)