Using Sqoop to Import Data from MySQL to Cloudera Data Warehouse
by Alan Choi
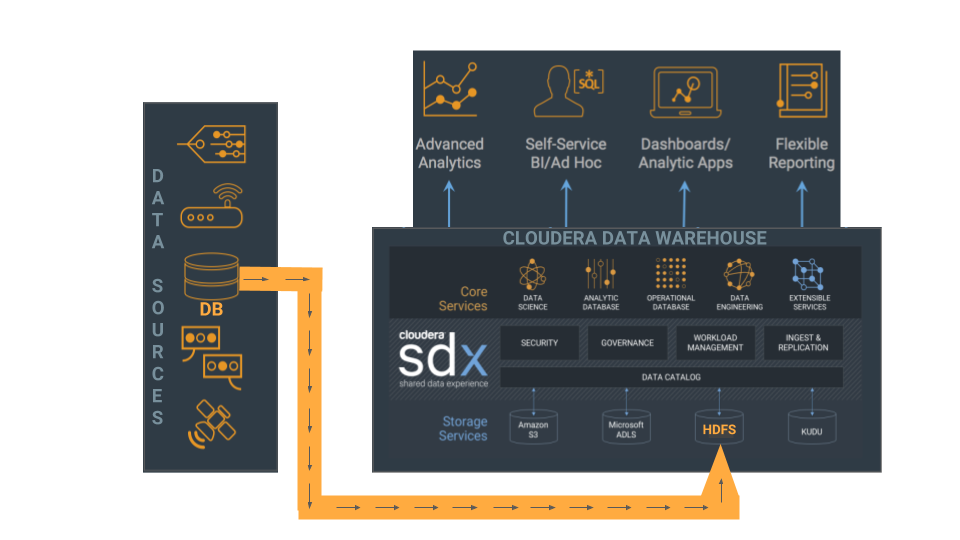
The powerful combination of flexibility and cost-savings that Cloudera Data Warehouse offers make compelling reasons to consider how you can transform and optimize your current traditional data warehouse by moving select workloads to your CDH cluster. This article shows you how you can start the transformation to a modern data warehouse by moving some initial data over to Impala on your CDH cluster:
Prerequisites
To use the following data import scenario, you need the following:
- A moderate-sized CDH cluster that is managed by Cloudera Manager, which configures everything properly so you don't need to worry about Hadoop configurations.
- Your cluster setup should include a gateway host where you can connect to launch jobs on the cluster. This gateway host must have all the command-line tools installed on it, such as impala-shell and sqoop.
-
Ensure that you have adequate permissions to perform the following operations on your remote CDH cluster and that the following software is installed there:
-
Use secure shell to log in to a remote host in your CDH cluster where a Sqoop client is installed:
ssh <user_name>@<remote_host>.comIf you don't know the name of the host where the Sqoop client is installed, ask your cluster administrator.
-
After you’ve logged in to the remote host, check to make sure you have permissions to run the Sqoop client by using the following command in your terminal window:
sqoop versionHere’s the output I see when I run this command:
Warning: /opt/cloudera/parcels/CDH-5.15.2-1.cdh5.15.2.p0.43/bin/../lib/sqoop/../accumulo does not exist! Accumulo imports will fail.
Please set $ACCUMULO_HOME to the root of your Accumulo installation.
18/09/13 17:21:48 INFO sqoop.Sqoop: Running Sqoop version: 1.4.6-cdh5.15.2-SNAPSHOT
Sqoop 1.4.6-cdh5.15.2-SNAPSHOT
git commit id
Compiled by jenkins on Thu Sep  6 02:30:31 PDT 2018
The output you get back might be different, depending on the version of the Sqoop 1 client you are running.
-
Since we are reading from a MySQL database, make sure that the appropriate MySQL JDBC driver is installed on your cluster:
-
First, check whether a JDBC driver jar location is specified for the HADOOP_CLASSPATH environment variable or if the directory, $SQOOP_HOME/lib, contains a MySQL JDBC driver JAR:
-
To check whether a driver jar location is specified for HADOOP_CLASSPATH, run the following printenv command in your terminal window on the remote host:
printenv “HADOOP_CLASSPATH”If there is a value set for this environment variable, look in the directory path that is specified to determine if it contains a JDBC driver JAR file.
-
To check whether the $SQOOP_HOME/lib directory contains a MySQL JDBC driver JAR file, run the following command in your terminal window:
ls $SQOOP_HOME/libThis command should list out the contents of that directory so you can quickly check whether it contains a MySQL JDBC driver JAR file.
-
-
If no MySQL JDBC driver is installed, download the correct driver from here to the home directory for the user you are logged in to the cluster with and export it to the HADOOP_CLASSPATH environment variable with the following command:
export
HADOOP_CLASSPATH=$HADOOP_CLASSPATH:/home/<your_name>/<jdbc_filename.jar>;
The Sqoop documentation says that you should add the JAR file to the $SQOOP_HOME/lib directory, but specifying it in the HADOOP_CLASSPATH environment variable works better in CDH. If you have problems, ask your cluster administrator to install the driver on the gateway host for you.
-
If you don’t have permissions to perform these operations, ask your cluster administrator to give you the appropriate permissions. If that is not possible, install the Sqoop 1 client on a local host that can connect to your CDH cluster.
-
Steps to Import Data from a Tiny MySQL Table into Impala
As an example, we’ll be using Sqoop to import data from a tiny table that resides in a remote MySQL database to an Impala database on the CDH cluster.
-
Use secure shell to log in to the remote gateway host where a Sqoop client is installed:
ssh <user_name>@<remote_host>.comIf you don’t know the name of the gateway host where the Sqoop client is installed, ask your cluster administrator.
-
To import the MySQL database table, identify the connection URL to the database and its corresponding username and password. You can get this information from the DBA who manages the MySQL database where the tiny table resides. In the following example, the connection URL and corresponding username and password are:
Connection URL with port: my_cluster-1.gce.acme.com:3306
Username / Password: user1 / ep71*_a!
When you have this log-in information, log in to the MySQL database with the following syntax on a host that has the mysql client:
mysql -h my_cluster-1.gce.acme.com -P 3306 -u user1 -pWhere the -h specifies the host, -P specifies the port, -u specifies the username, and -p specifies that you want to be prompted for a password.
-
The table we are importing to CDH is tiny_table. Let’s take a look at it:
SELECT * FROM tiny_table; +---------+---------+ | column1 | column2 | +---------+---------+ | 1 | one | | 2 | two | | 3 | three | | 4 | four | | 5 | five | +---------+---------+ 5 rows in set (0.00 sec) -
If you are working on a secure cluster, run the kinit command now to obtain your Kerberos credentials:
kinit <username>@<kerberos_realm>After you enter this command, you are prompted for your password. Type your password in the terminal window and your Kerberos credentials (ticket-granting ticket) are cached so you can authenticate seamlessly.
-
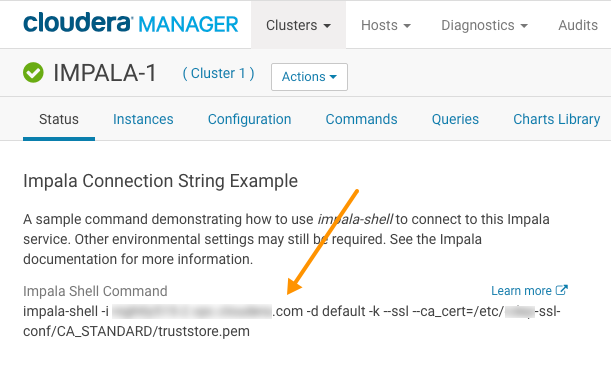
Now is a good time to create your Impala database on the CDH cluster, which is where you will import tiny_table from your MySQL database. First log in to the Impala shell on the CDH remote host:
impala-shell -i <impala host>If you are working on a secure cluster or have problems logging in to the Impala shell, you can get the appropriate connection string to log into it in Cloudera Manager:
-
In the Cloudera Manager Admin Console Home page, click Impala in the list of services.
-
On the Impala service page, make sure the Status tab is selected.
-
An Impala Connection String Example is listed at the top of the page:
-
-
After you have logged in to the Impala shell, you can create the database called import_test, but first run a SHOW DATABASES command to make sure that there isn’t already an Impala database named import_test:
SHOW DATABASES;
Query: show databases
   +---------+-----------------------+
   | name    | comment               |
   +---------+-----------------------+
   | default | Default Hive database |
   +---------+-----------------------+
   Fetched 1 row(s) in 0.02s
CREATE DATABASE import_test;
Notice that because Impala also uses the Hive Metastore, the Hive default database is listed when you run the SHOW DATABASES command in the Impala shell.
If you don’t have permissions to create a database in the Impala shell, request permissions from the cluster administrator.
-
Now we are almost ready to kick off the import of data, but before we do, we need to make sure that the target directory that Sqoop creates on HDFS during the import does not already exist. When I import the data, I will specify to Sqoop to use /user/<myname>/tiny_table so we need to make sure that directory does not already exist. Run the following HDFS command:
hdfs dfs -rm -r /user/<myname>/tiny_tableIf the tiny_table directory exists on HDFS, running this command removes it.
-
There are still a couple of more decisions to make. First what will be the name of the destination table. Since I’m using direct export, I want to keep the old name “tiny_table.” I also want Sqoop to create the table for me. If it used the Parquet format, that would be ideal, but due to SQOOP-2943, it’s better to use the text format for now. Here are the main Sqoop command-line options that I’ll use:
--create-hive-table
--hive-import
--hive-table tiny_table
Since I’ll be doing a full export, I want to overwrite any existing data and will need to use the following option, too:
--hive-overwrite -
If somehow the tiny_table already exists in the Impala import_test database, the --create-hive-table Sqoop command will fail, so drop import_test.tiny_table before you run the Sqoop command:
impala-shell -i <impala_host> DROP TABLE import_test.tiny_table; -
Because the import_test.tiny_table table is so small and it doesn’t have a primary key, for simplicity’s sake, I won’t run the Sqoop command with a high degree of parallelism, so I will specify a parallelism of 1 with the -m option. For larger tables, we’ll use more parallelism, but for now, here is the full Sqoop command we use:
sqoop import --connect jdbc:mysql://my_cluster-1.gce.acme.com:3306/user1 --driver
            com.mysql.cj.jdbc.Driver --username user1 -P -e ‘select * from tiny_table
            where $CONDITIONS’ --target-dir
            /user/<myname>/tiny_table -z --create-hive-table
              --hive-database import_test --hive-import --hive-table tiny_table --hive-overwrite -m 1
Where:
Command-line Option Description sqoop import Imports an individual table from a traditional database to HDFS or Hive. --connect <connect_string> Specifies the JDBC connect string to your source database. --driver <JDBC_driver_class> Manually specifies the JDBC driver class to use. --username <user_name> Specifies the user to connect to the database. -P Instructs Sqoop to prompt for the password in the console. -e '<SQL_statement>' Instructs Sqoop to import the results of the specified statement. --target-dir <directory_path> Specifies the HDFS destination directory. -z Enables compression. --create-hive-table If this option is used, the job fails if the target Hive table already exists. --hive-database Specifies the database name where you want to import the table. --hive-import Imports a table into Hive. If no delimiters are set, it uses Hive default delimiters. ----hive-table <table_name> Specifies the table name when importing into Hive. --hive-overwrite Overwrites any data in the table specified by --hive-table. -m Specifies the number of map tasks to import in parallel. -
It should finish in less than a minute. Log back into the Impala shell, run the INVALIDATE METADATA command so Impala reloads the metadata for the specified table, and then list the table and select all of its data to see if your import was successful:
impala-shell -i <impala_host>
USE import_test;
INVALIDATE METADATA tiny_table;
SHOW TABLES;
DESCRIBE tiny_table;
SELECT * FROM tiny_table;
The table is really too small to use statistics sampling, but once you import a bigger table, we’ll use sampling with the COMPUTE STATS statement to save you time when querying the table.
Steps to Import Data from a Bigger MySQL Table into Impala
The basic import steps described for tiny tables applies to importing bigger tables into Impala. The difference occurs when you construct your sqoop import command. For large tables, you want it to run fast, so setting parallelism to 1, which specifies one map task during the import won’t work well. Instead, using the default parallelism setting, which is 4 map tasks to import in parallel, is a good place to start. So you don’t need to specify a value for the -m option unless you want to increase the number of parallel map tasks.
Another difference is that bigger tables usually have a primary key, which become good candidates where you can split the data without skewing it. The tiny_table we imported earlier doesn’t have a primary key. Also note that the -e option for the sqoop import command, which instructs Sqoop to import the data returned for the specified SQL statement doesn’t work if you split data on a string column. If string columns are used to split the data with the -e option, it generates incompatible SQL. So if you decide to split data on the primary key for your bigger table, make sure the primary key is on a column of a numeric data type, such as int, which works best with the -e option because it generates compatible SQL.
In the following example, the primary key column is CD_ID and it is an int column and the table we are importing data from is bigger_table. So, when you are ready to import data from a bigger table, here is what the sqoop import command looks like:
sqoop import --connect jdbc:mysql://my_cluster-1.gce.acme.com:3306/user1 --driver
        com.mysql.cj.jdbc.Driver --username user1 -P -e ‘select * from bigger_table
        where $CONDITIONS’ --split-by CD_ID --target-dir /user/impala/bigger_table
        -z --create-hive-table --hive-database import_test --hive-import --hive-table
        bigger_table --hive-overwrite
Where the new option not defined earlier in this article is:
| Command-line Option | Description |
|---|---|
| --split-by <column_name> | Specifies the column where you want to split the data. It is highly recommended that you use the primary key and that it be of a numeric type, such as int. |
After you have imported the data, use Step 11 from the tiny_table section to check that the data was imported properly. But before you query the table, you should run COMPUTE STATS on it because this is a larger amount of data and running a quick statistics sampling on it should make the results of your query return faster.
For example, the full command sequence you’d run is:
impala-shell -i <impala_host>
USE import_test;
INVALIDATE METADATA bigger_table;
SHOW TABLES;
COMPUTE STATS bigger_table;
DESCRIBE tiny_table;
SELECT * FROM bigger_table;
Now, you have imported your data from a traditional MySQL database into Impala so it is available to Cloudera Data Warehouse.
About the Author

Alan Choi is a software engineer at Cloudera working on the Impala project. Before joining Cloudera, he worked at Greenplum on the Greenplum-Hadoop integration. Prior to that, Alan worked extensively on PL/SQL and SQL at Oracle where he co-authored the Oracle white paper, "Integrating Hadoop Data with Oracle Parallel Processing," which was published in January 2010.