Cloudera AI on premises 1.5.4 SP1
Review the features, fixes, and known issues in the Cloudera AI 1.5.4 Service Pack 1 release.
What's new in 1.5.4 SP1
Cloudera on premises 1.5.4 SP1 includes the following features for Cloudera AI.
- Exploratory Data Science and Visualization
-
The Exploratory Data Science and Visualization feature automatically discovers the data sources available for you, from within the standard Cloudera AI user interface. Exploratory Data Science and Visualization enables the Data Scientist to connect to data sources within a project, to explore data, its basic shape and characteristics, to create data sets to be used, to visualize data for understanding its nature, and to create dashboards for sharing purposes.
Fixed issues in 1.5.4 SP1
This section lists issues fixed in this release for Cloudera AI on premises.
- DSE-39287: Job configuration update error on parameter type being invalid
-
The update on the job setting's workflow is fixed in on premises environments without GPUs configured.
- DSE-38404: Model Monitoring AMP task failing due to a restart of the model metrics pod
-
The container in the Model Metrics pod restarted due to insufficient memory, causing a 502 Bad Gateway error on
cdsw.read_metrics(**ipt). The memory limit for the container was set to 100 MB, which has now been increased to 1Gi. - DSE-39287: Job configuration update error:
The job accelerator label ID is not of a valid type - Previously, you could encounter the error,
The job accelerator label ID is not of
            a valid type
when attempting to update a job through the UI. This issue has been resolved and now you can update job settings directly from the UI without any issues.
Known issues in 1.5.4 SP1
You might run into some known issues while using Cloudera AI on premises.
- Required workarounds with Cloudera Data Visualization with Hive and Impala
-
Cloudera Data Visualization on premises for Hive and Impala Virtual Warehouses
For starting Cloudera Data Visualization on premises for Hive and Impala Virtual Warehouses, switch to LDAP Authentication mode and add your username and password in the Edit Data Connection page:- Select the required connection in the left navigation and click Edit
Connection.
Figure 1. Selecting the required connection for editing 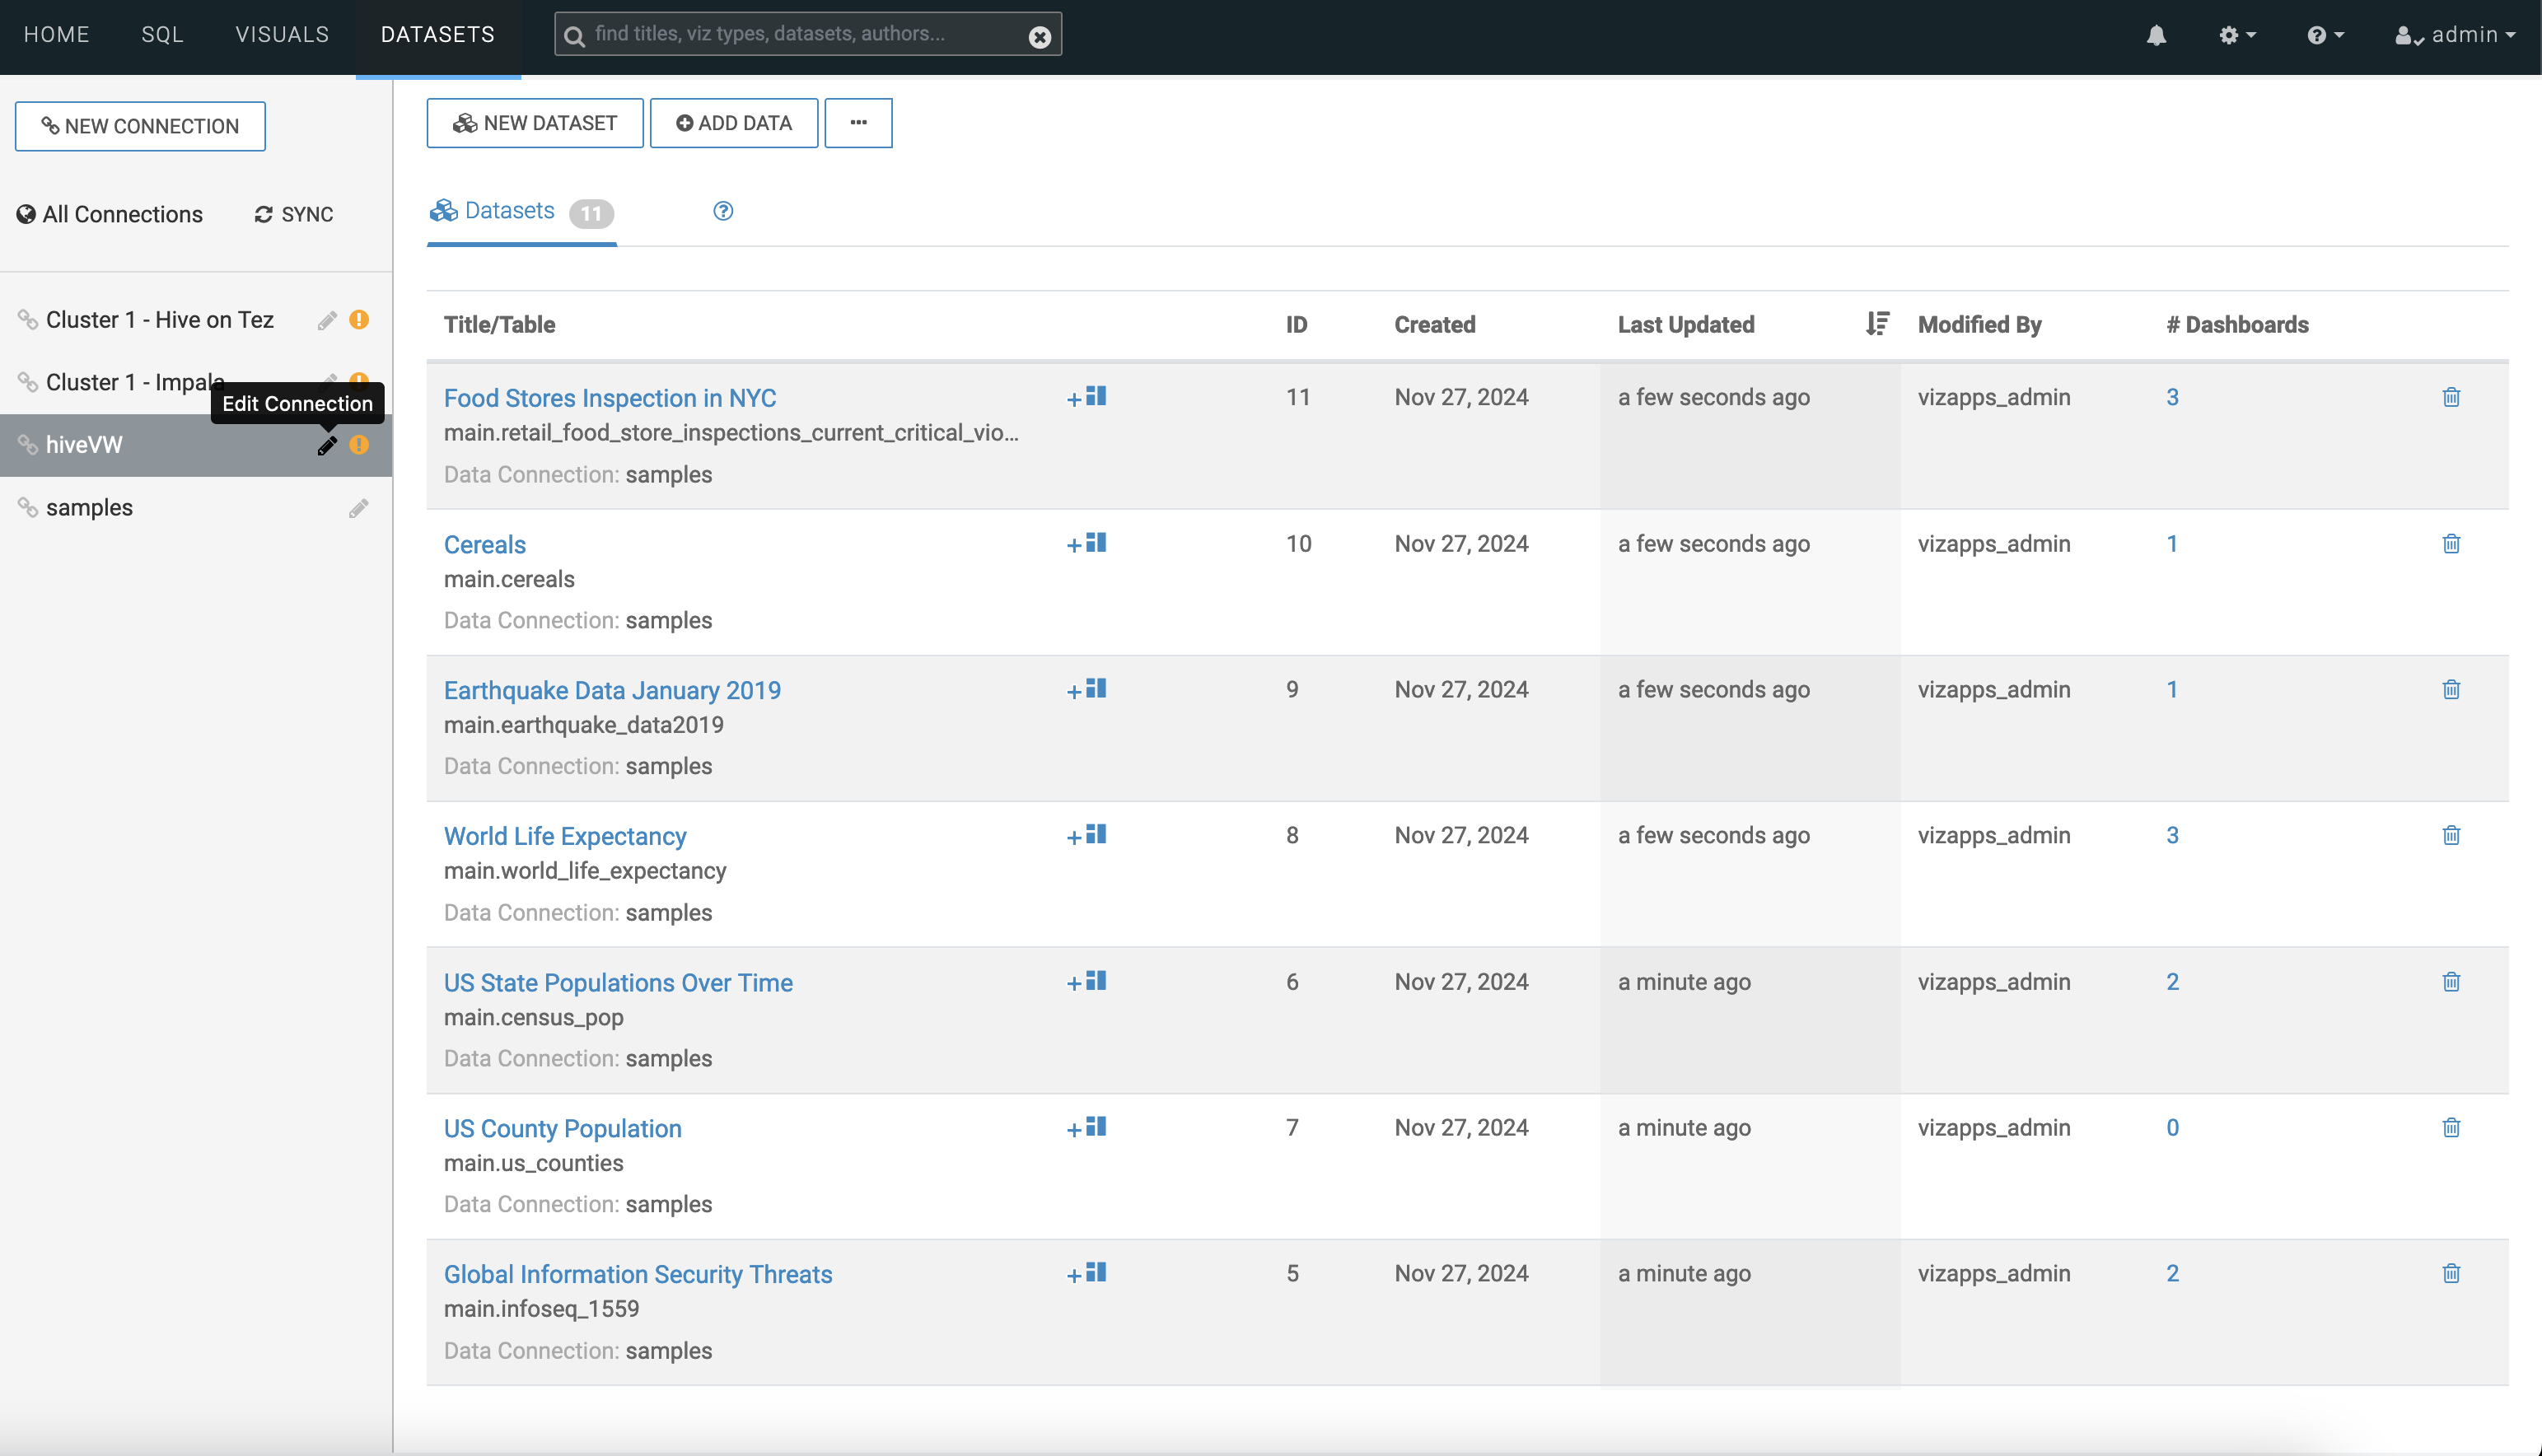
- Provide your username and password.
Figure 2. Provide username and password 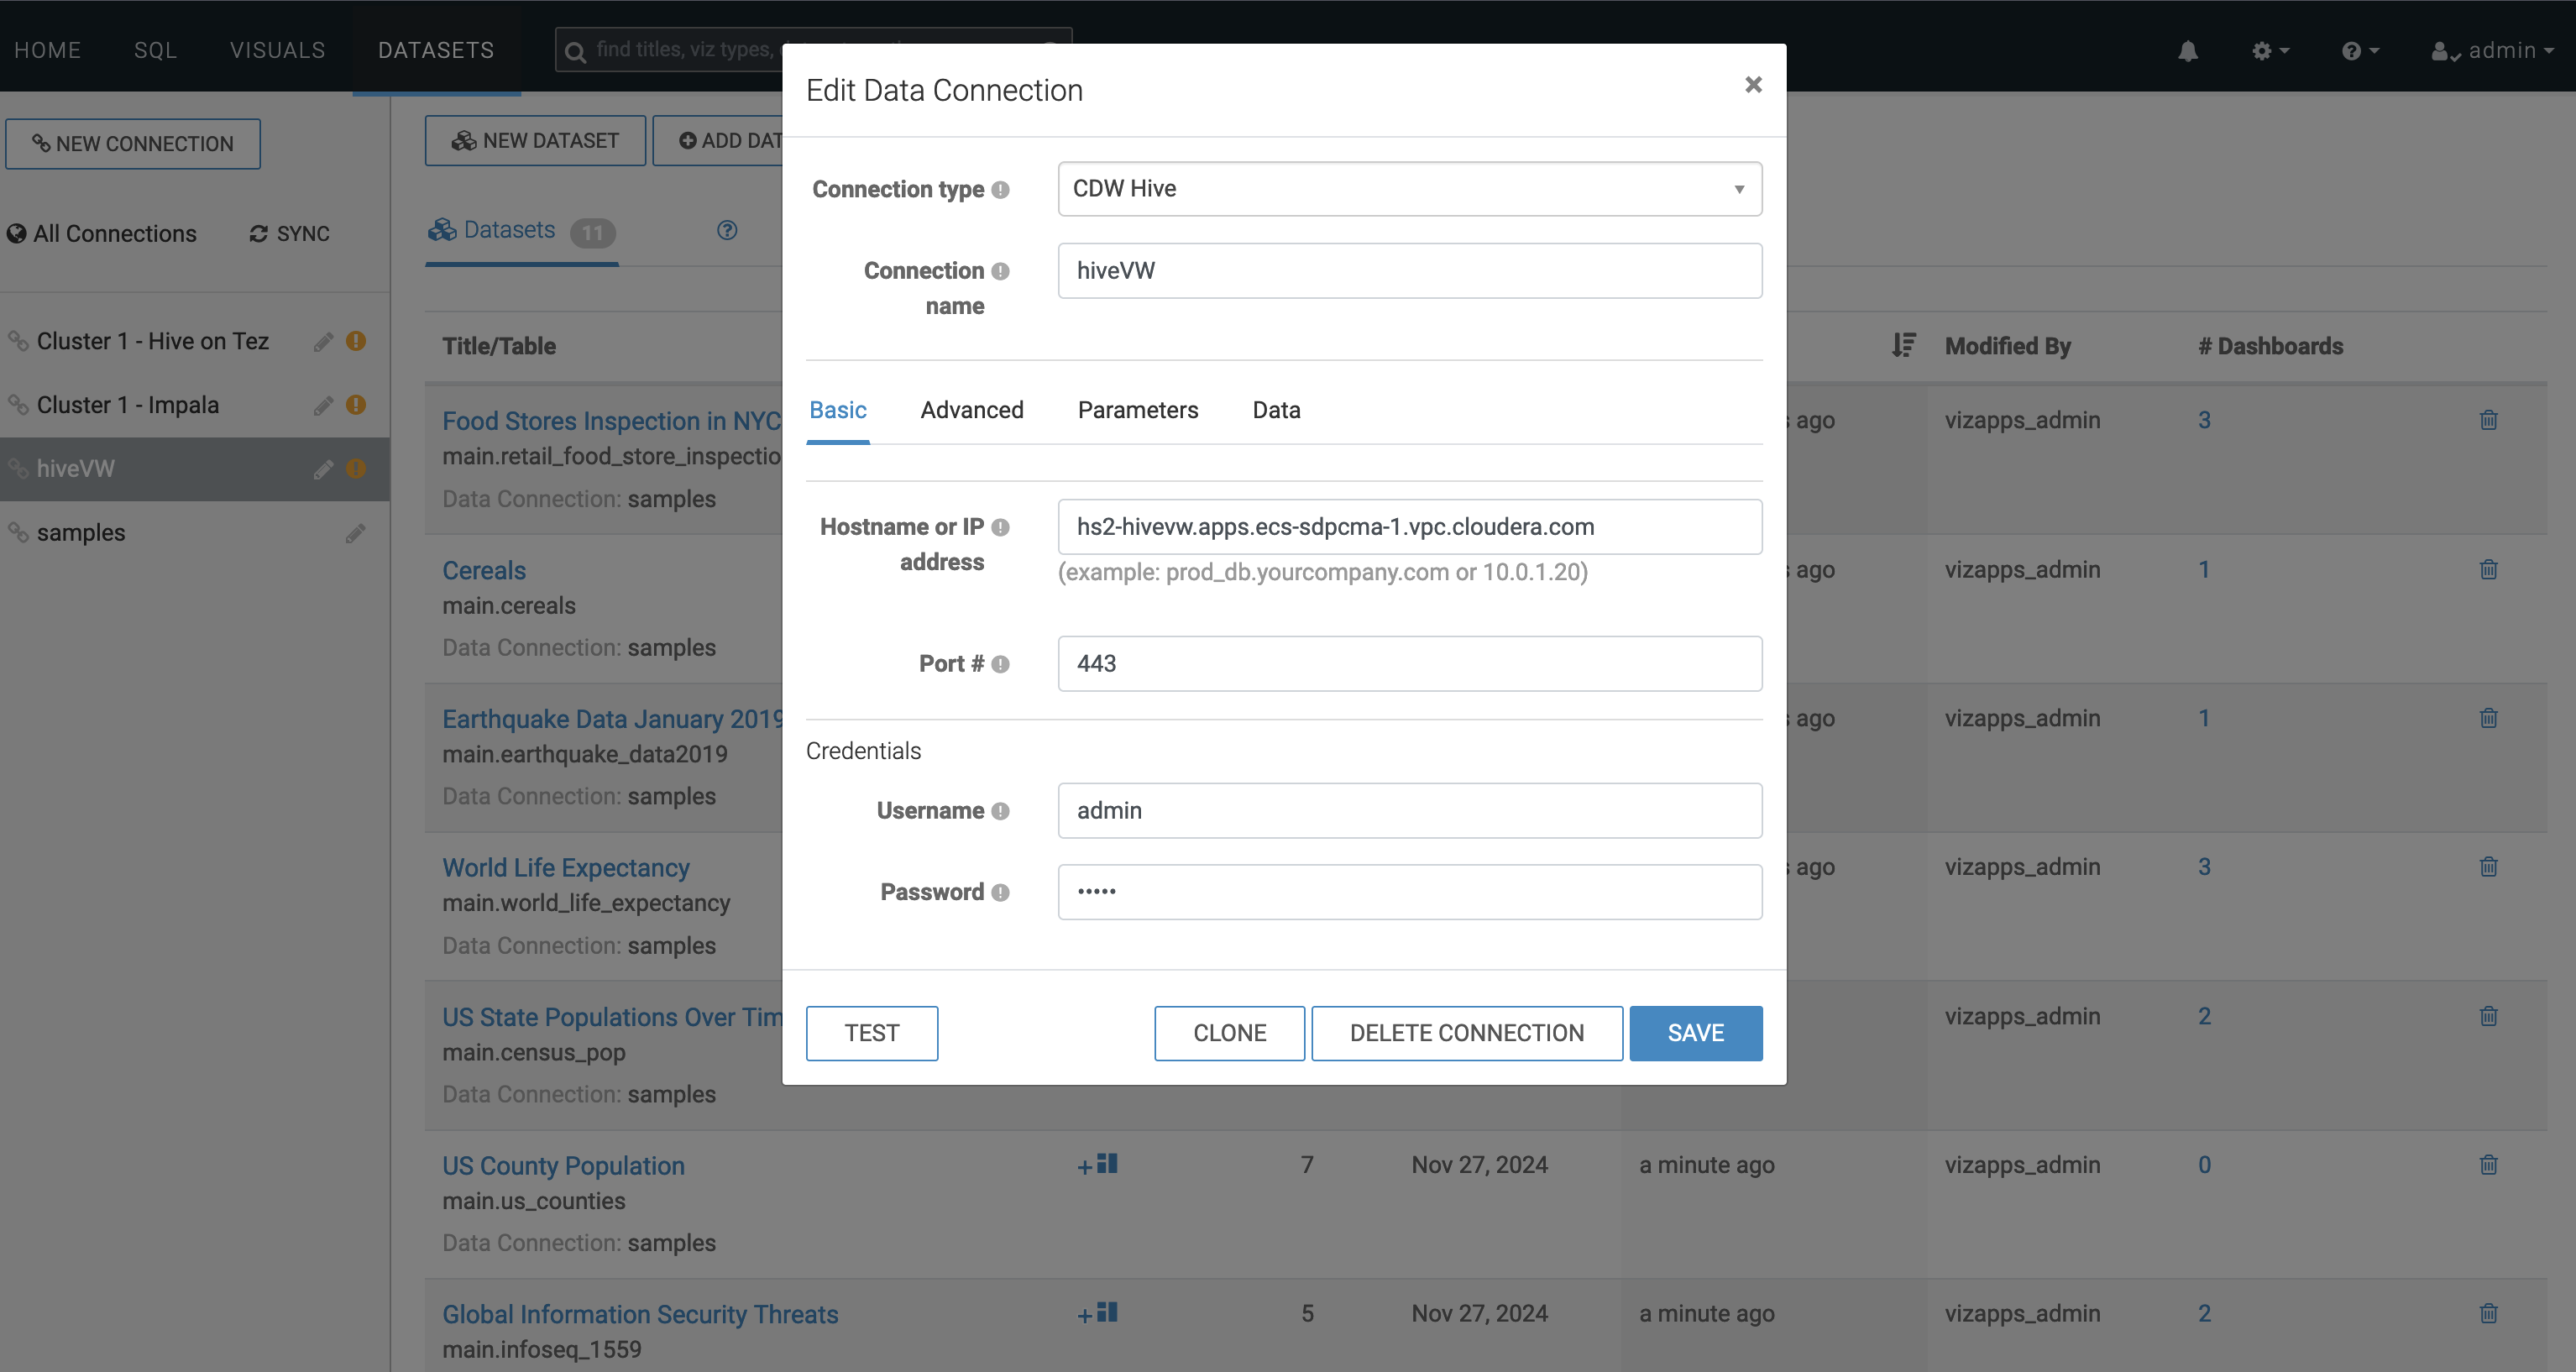
Cloudera Data Visualization on premises for Hive and Impala
For starting Cloudera Data Visualization on premises for Hive and Impala switch to Kerberos Authentication mode in the Edit Data Connection page:- Select the required connection in the left navigation and click Edit
Connection.
Figure 3. Selecting the required connection for editing 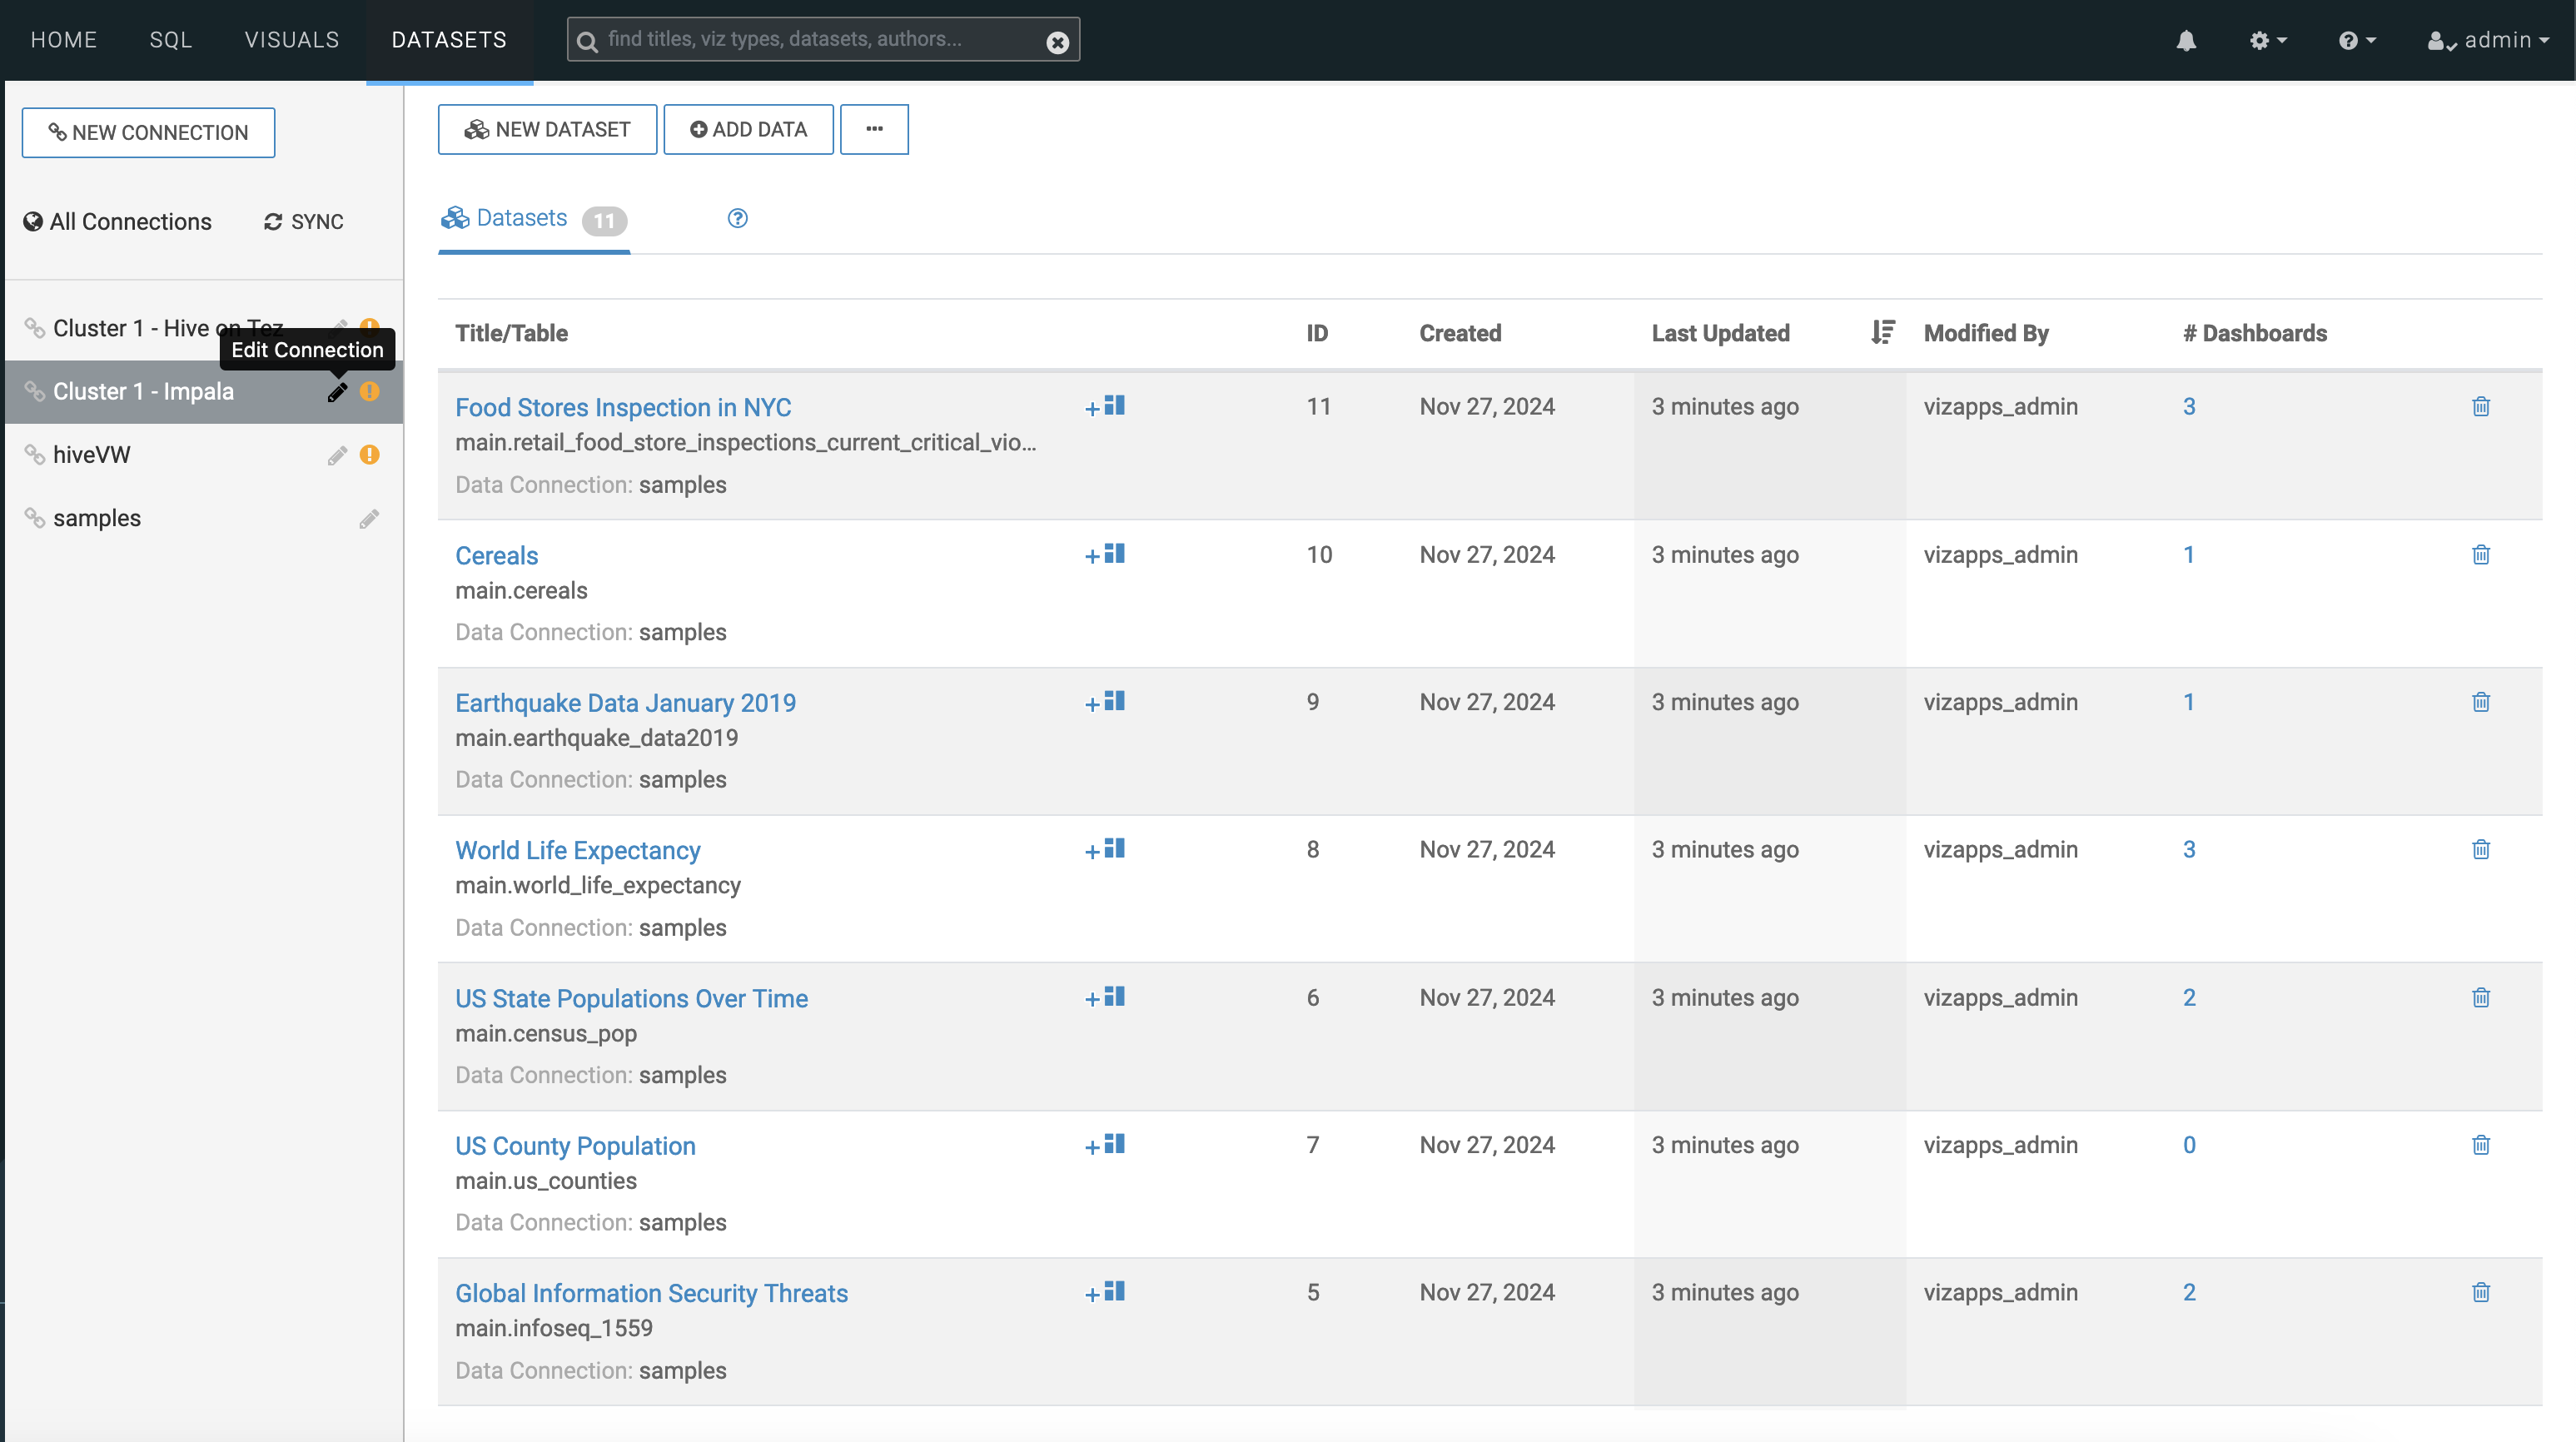
- Select the Advanced tab in the Edit Data
Connection window.
Figure 4. Selecting the Advanced tab 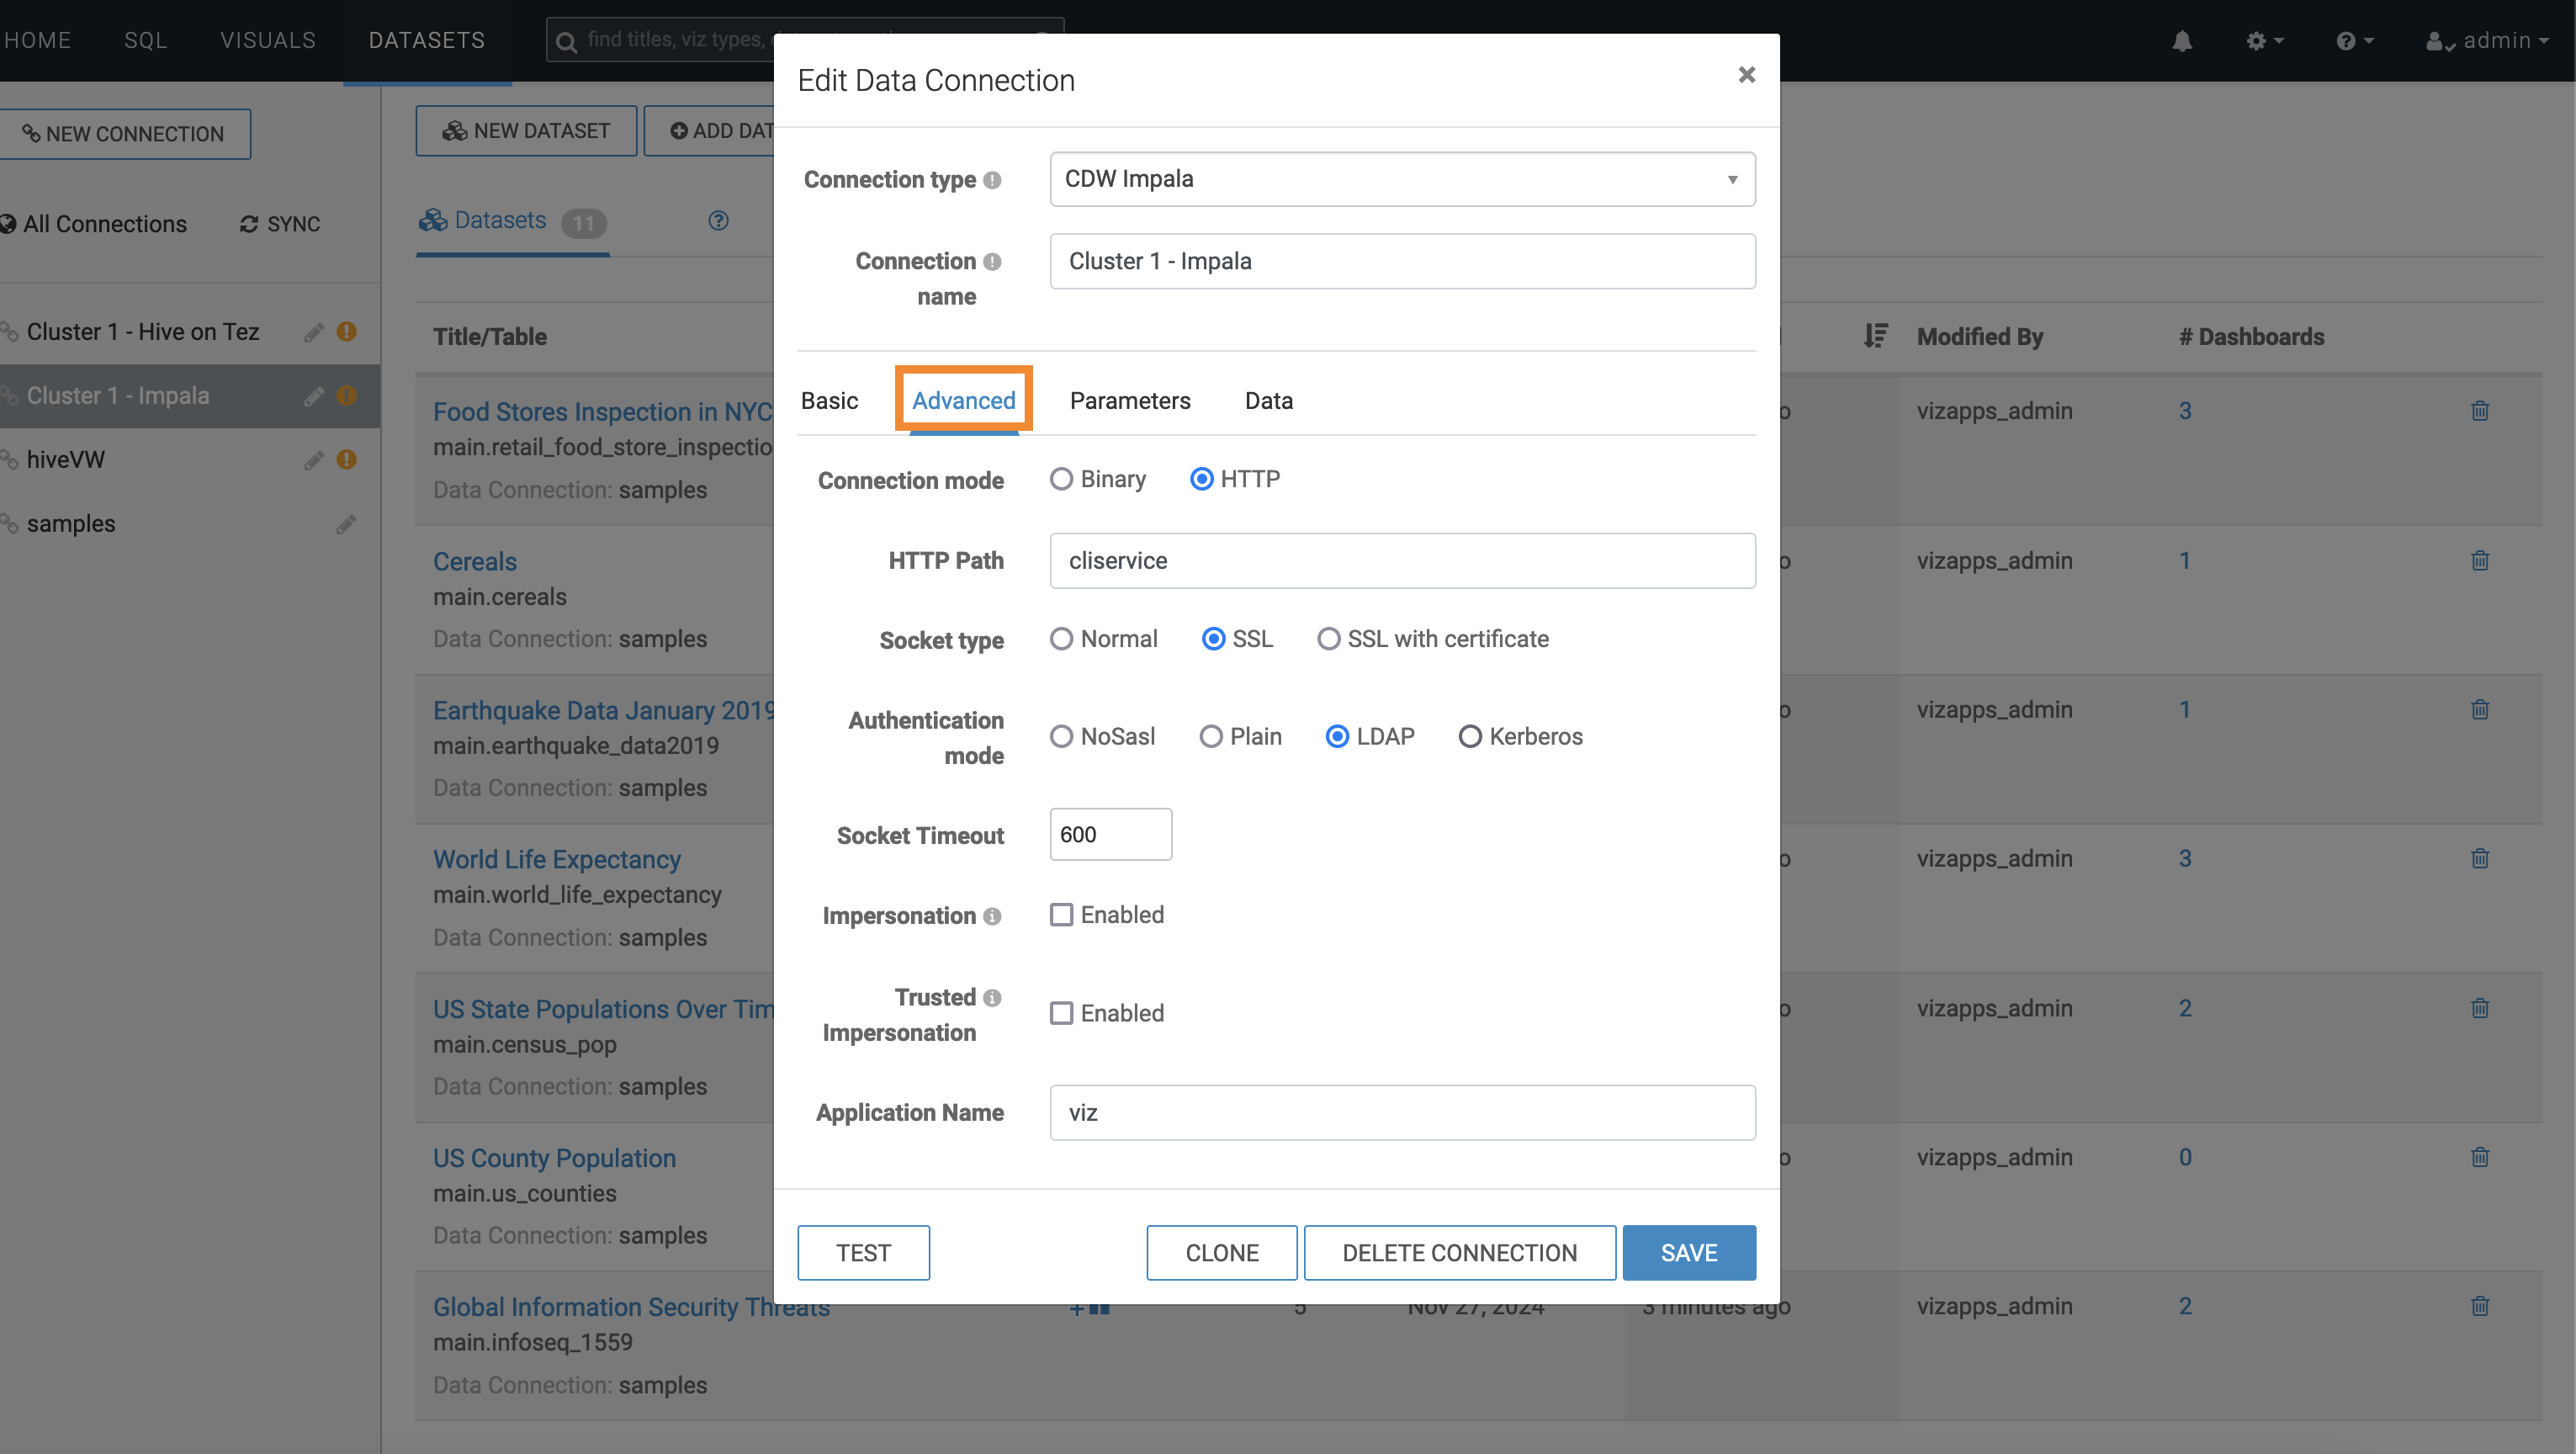
- Select Kerberos as Authentication
mode in the Edit Data Connection window.
Figure 5. Select Kerberos for authentication 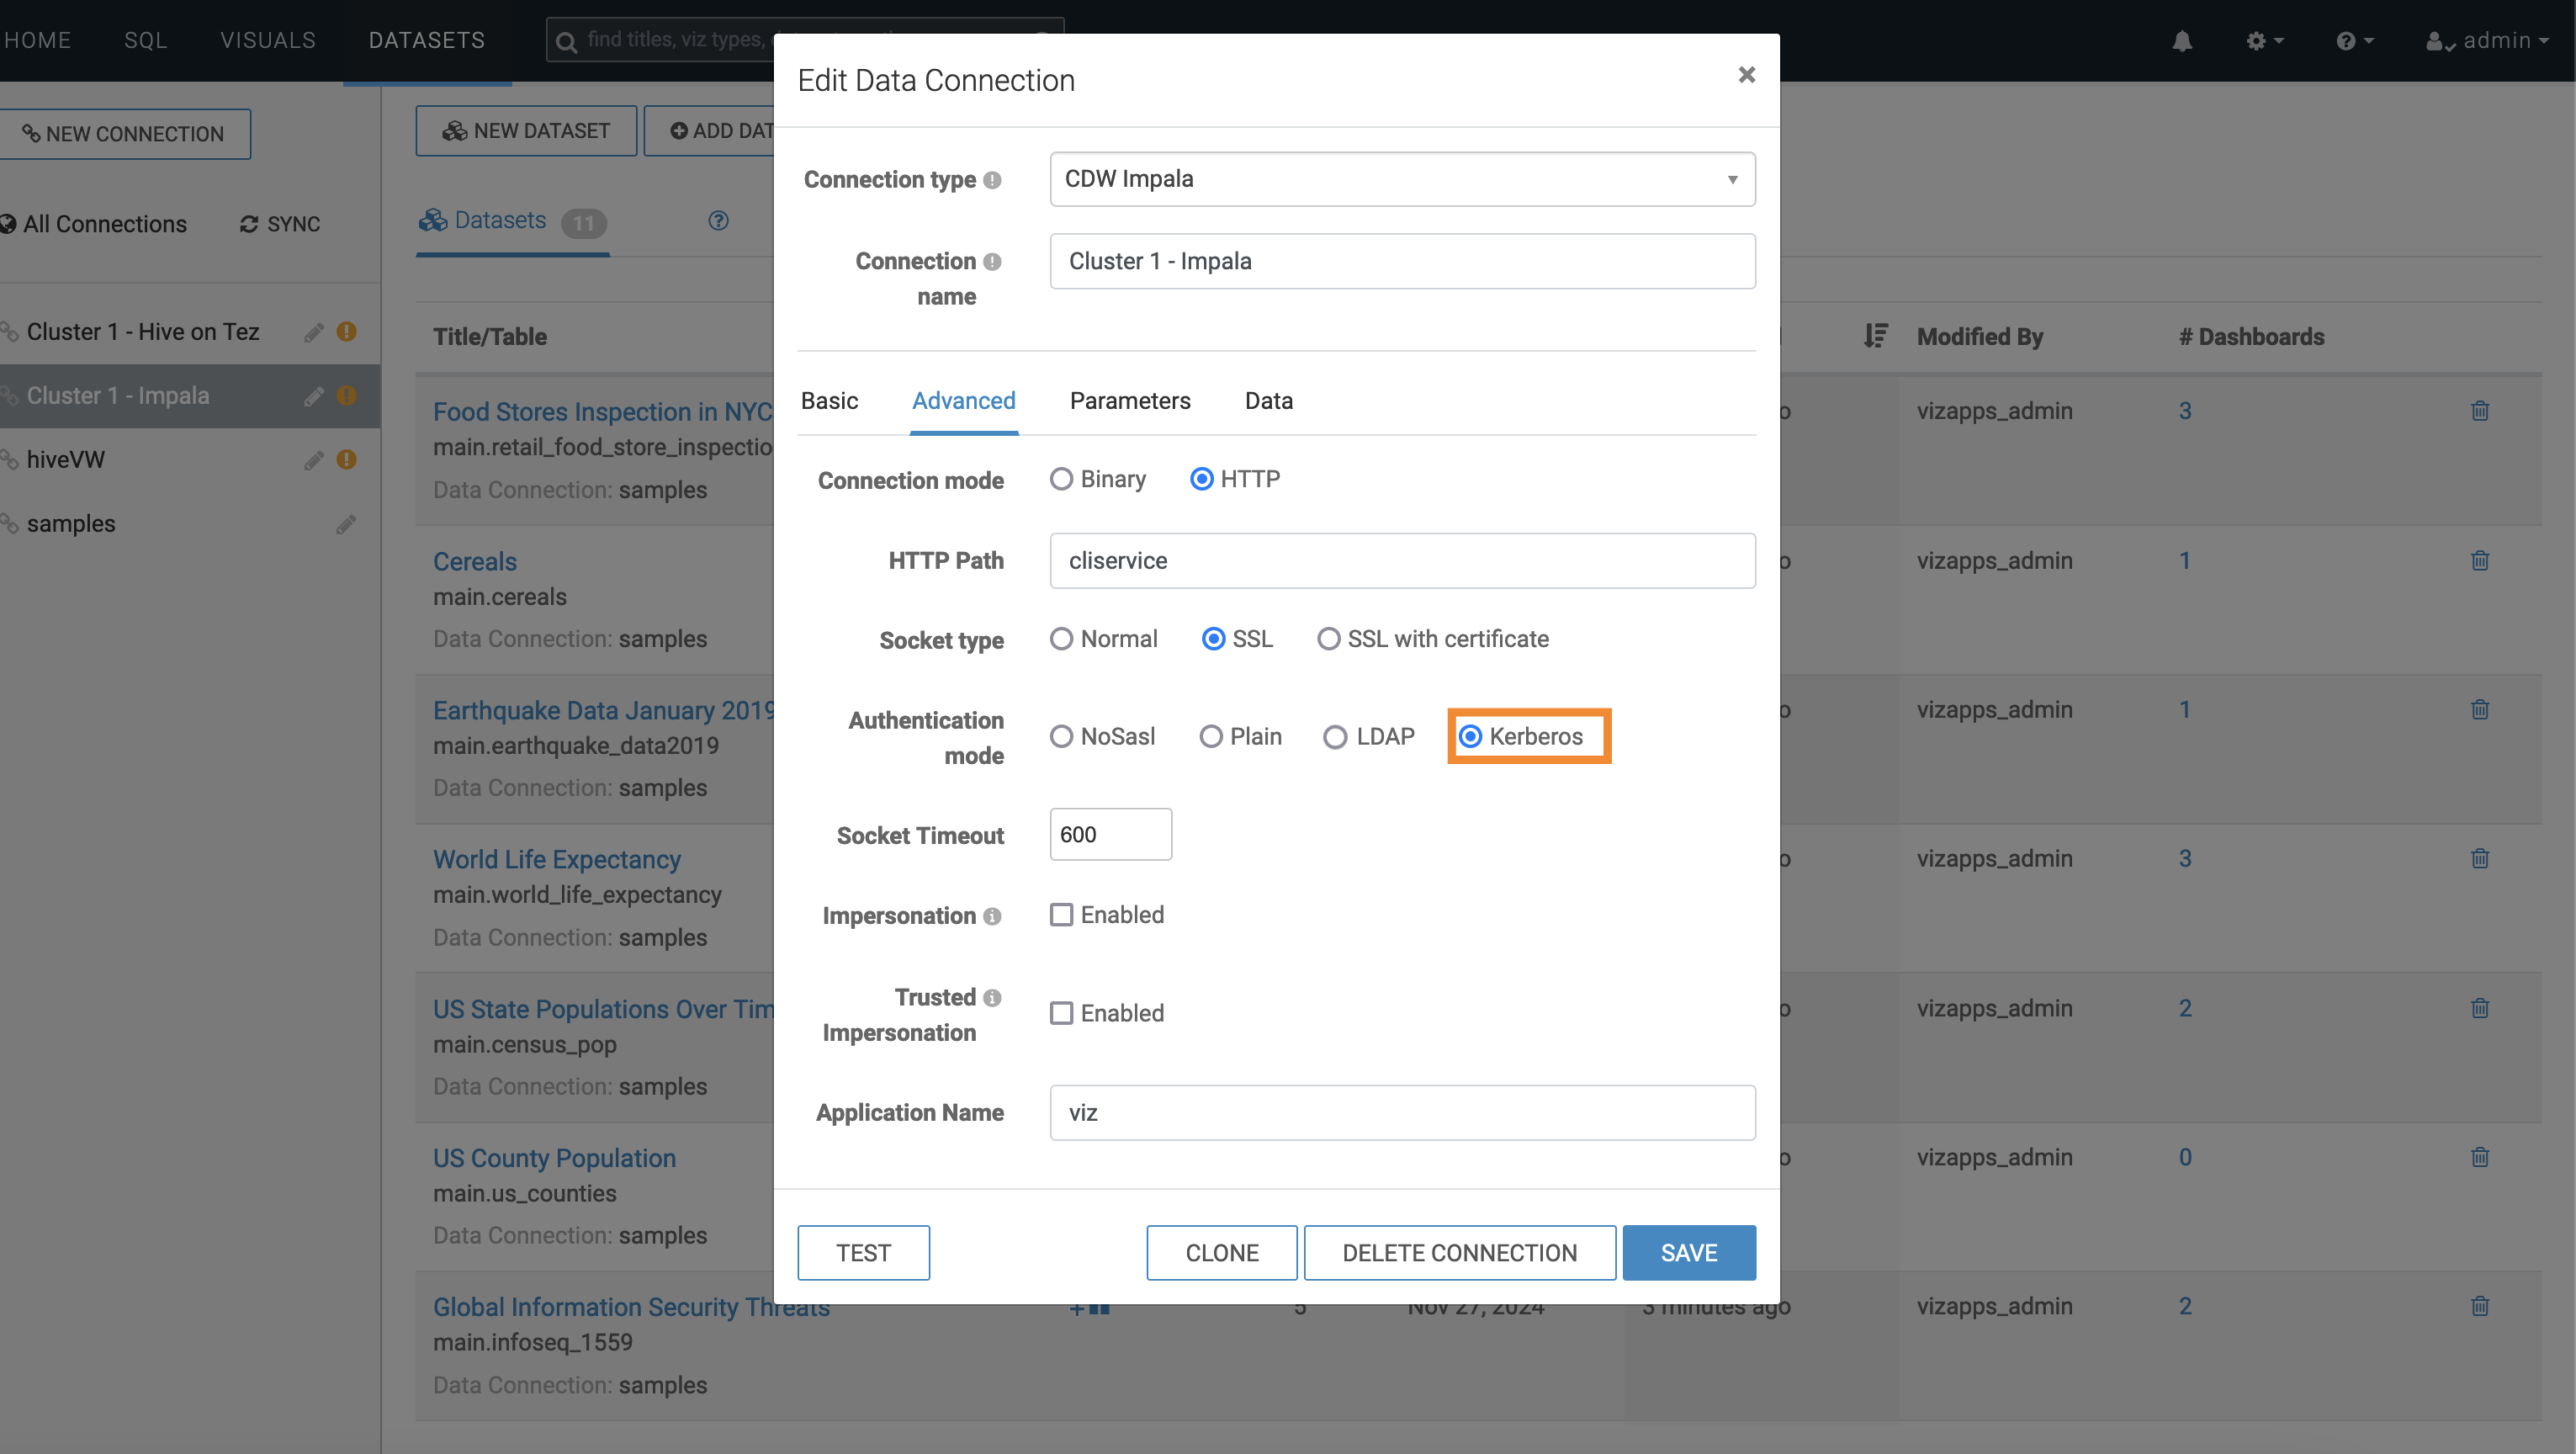
Workaround:
For details see, Workarounds with Cloudera Data Visualization with Hive and Impala.
- Select the required connection in the left navigation and click Edit
Connection.
- DSE-38164: AMP deployment is not possible in the proxy environment in Red Hat Openshift setup
-
When the model build is run, the proxy values are referenced from a file path and not from the environment variables. Consequently, the proxy values are not set properly for the models.
Workaround:
A new kubernetes secret needs to be created with the proxy values. Edit the web deployment and add this secret to the path specified.
- Connect to the kubernetes cluster node and export
KUBECONFIG. - Copy the script to the node and save it to file as
enableProxy.sh#!/bin/bash # Function to display usage usage() { echo "Usage: $0 -n namespace" exit 1 } # Parse command-line arguments while getopts ":n:" opt; do case ${opt} in n ) NAMESPACE=$OPTARG ;; \? ) echo "Invalid option: $OPTARG" 1>&2 usage ;; : ) echo "Invalid option: $OPTARG requires an argument" 1>&2 usage ;; esac done shift $((OPTIND -1)) # Check if namespace is provided if [ -z "$NAMESPACE" ]; then usage fi CONFIGMAP_NAME="cml-proxy-config" SECRET_NAME="proxy-config" NEW_SECRET_NAME="proxy-config-new" DEPLOYMENT_NAME="web" DATA_KEY="no_proxy" SECRET_FIELD="no.proxy" CONTAINER_NAME="web" MOUNT_PATH="/config/proxy" # Step 1: Retrieve the specified data from the ConfigMap configmap_value=$(kubectl get configmap "$CONFIGMAP_NAME" -n "$NAMESPACE" -o json | jq -r --arg key "$DATA_KEY" '.data[$key]') if [ -z "$configmap_value" ]; then echo "Error: Key '$DATA_KEY' not found in ConfigMap '$CONFIGMAP_NAME'." exit 1 fi echo "Retrieved value from ConfigMap: $configmap_value" # Step 3: Retrieve the existing Secret existing_secret=$(kubectl get secret "$SECRET_NAME" -n "$NAMESPACE" -o json) if [ -z "$existing_secret" ]; then echo "Error: Secret '$SECRET_NAME' not found." exit 1 fi # Step 4: Modify the specified field in the Secret with the value from the ConfigMap modified_secret_data=$(echo "$existing_secret" | jq --arg field "$SECRET_FIELD" --arg value "$configmap_value" ' .data[$field] = ($value | @base64)' ) # Step 5: Create a new Secret with the modified data temp_file=$(mktemp) echo "$modified_secret_data" | jq '.metadata.name = "'$NEW_SECRET_NAME'" | del(.metadata.uid, .metadata.resourceVersion, .metadata.creationTimestamp, .metadata.annotations)' > $temp_file kubectl apply -f $temp_file # Clean up rm $temp_file echo "New secret '$NEW_SECRET_NAME' created successfully." # Step 6: Mount the new Secret to the 'web' container in the specified Deployment # Get the current deployment spec deployment_spec=$(kubectl get deployment "$DEPLOYMENT_NAME" -n "$NAMESPACE" -o json) if [ -z "$deployment_spec" ]; then echo "Error: Deployment '$DEPLOYMENT_NAME' not found." exit 1 fi # Extract the existing volumes existing_volumes=$(echo "$deployment_spec" | jq -r '.spec.template.spec.volumes // []') # Find the index of the "web" container container_index=$(echo "$deployment_spec" | jq -r --arg CONTAINER_NAME "$CONTAINER_NAME" ' .spec.template.spec.containers | map(.name == $CONTAINER_NAME) | index(true) // "null"' ) # Check if the container named "web" exists if [ "$container_index" == "null" ]; then echo "Error: Container with name '$CONTAINER_NAME' not found in deployment '$DEPLOYMENT_NAME'." exit 1 fi # Extract the volumeMounts for the "web" container existing_volume_mounts=$(echo "$deployment_spec" | jq -r --argjson index "$container_index" ' .spec.template.spec.containers[$index].volumeMounts // []' ) # Define the new volume and volumeMount new_volume=$(echo "[{\"name\": \"$NEW_SECRET_NAME\", \"secret\": {\"secretName\": \"$NEW_SECRET_NAME\"}}]" | jq -r .) new_volume_mount=$(echo "[{\"name\": \"$NEW_SECRET_NAME\", \"mountPath\": \"$MOUNT_PATH\"}]" | jq -r .) # Combine existing and new volumes updated_volumes=$(echo "$existing_volumes $new_volume" | jq -s 'add') updated_volume_mounts=$(echo "$existing_volume_mounts $new_volume_mount" | jq -s 'add') # Patch the deployment with the new volumes and volume mounts kubectl patch deployment "$DEPLOYMENT_NAME" -n "$NAMESPACE" --type='json' -p=" [ { \"op\": \"replace\", \"path\": \"/spec/template/spec/volumes\", \"value\": $updated_volumes }, { \"op\": \"replace\", \"path\": \"/spec/template/spec/containers/$container_index/volumeMounts\", \"value\": $updated_volume_mounts } ]" echo "New secret '$NEW_SECRET_NAME' mounted to the 'web' container in the deployment '$DEPLOYMENT_NAME' successfully." - Run the script with the following command and change the Cloudera AI
namespace:
chmod +x enableProxy.sh && ./enableProxy.sh.sh -n <cml-namespace> - Monitor the web pods under the Cloudera AI namespace.
- Connect to the kubernetes cluster node and export
- OPSX-5766: The system is reaching the configured limit of inotify instances
-
Running too many sessions or nodes might lead to crashing fluentbit sidecar containers. Cloudera AI reports that the session is running but the users might experience limitations, that is, for example, Cloudera AI Workbench does not work. This is because the system reaches the configured limit of
inotifyinstances.Workaround:
The nodes must have the system variable
fs.inotify.max_user_instancesconfigured to a reasonable value.This can be set by running the following in the node:sudo sysctl fs.inotify.max_user_instances=8192 sudo sysctl -pTo persist the above configuration with node restarts, add the below line to /etc/sysctl.conf:fs.inotify.max_user_instances=8192 - DSE-42079: Cloudera AI Workbenches are not compatible with the Unified Timezone feature
-
When you enable the Unified timezone feature, the Cloudera Embedded Container Service cluster timezone is synchronized with the Cloudera Manager Base time zone, and the Cloudera AI sessions will fail to launch with Exit Code 34. You will also see timestamp discrepancies with workloads. For more information, see ENGESC-28507.
Workaround:
If you use Cloudera AI Workbenches, disable the Unified Timezone feature by following the instructions in Cloudera Embedded Container Service unified time zone.
- DSE-34314: Templating Cloudera Base AutoTLS properties needed in Cloudera AI sessions
-
Spark pushdown does not work if Atlas and Spark Lineage checks are enabled for Spark.
Workaround:
To use Spark pushdown, you need to disable Atlas and Spark Lineage checks in the Spark configurations.
- DSE-41424: Better handling for data connection validation errors
-
In Cloudera AI on premises, Cloudera AI Workbench fails to start under the following conditions:
- If the
HIVE_ON_TEZservice is not present, or if the following configurations are missing:hiveserver2_load_balancerhive.server2.transport.modeKerberos_princ_name
- If the
IMPALAservice is not present on your Base cluster, or if the following configurations are missing:Hs2_port or hs2_http_portKerberos_princ_name
Workaround:
- Disable the data connection auto-discovery
feature.
kubectl exec -it <db-pod> -n <workspace-namespace> psql -U sense # set the flag to false sense=# update site_config set enable_discover_dataconn_restart = false; UPDATE 1 - Restart web pods to apply changes.
- Check and ensure that there are no incorrect entries in the database.
- Back up the
workspace_data_connectionsand theproject_data_connectionstables.[postgres@db-0 /]$ pg_dump -U sense -t workspace_data_connections -f /data-versioned/workspace_data_connections_dump.sql [postgres@db-0 /]$ pg_dump -U sense -t project_data_connections -f /data-versioned/project_data_connections_dump.sql - Delete the
tables.
DELETE FROM workspace_data_connections;
DELETE FROM project_data_connections;
- If the
- DSE-40756: Resource Profile field displays empty on Job Settings page
-
After creating or upgrading a job and saving a Resource Profile, the Resource Profile field on the Job Settings pages might appear empty.
There is no workaround.
- DSE-47904: Resource Profile is not visible for jobs and applications
-
After creating or upgrading a job and saving a Resource Profile, the Resource Profile field on the Application Settings pages might appear empty.
There is no workaround.
Technical Service Bulletins
- TSB 2025-822 Cloudera AI Workbench Web Service Crashes after Upgrading to Cloudera Data Services 1.5.4 SP1
-
Customers using Cloudera AI Workbench without Hive on TEZ or Impala, or using these services configured for High Availability on their Cloudera on premises cluster can experience crashes of the Cloudera AI Workbench web service at startup after upgrading to the latest Cloudera Data Services on premises 1.5.4 SP1 builds.
Knowledge article
For the latest update on this issue, see the corresponding Knowledge article: Cloudera Customer Advisory 2025-822: Cloudera AI Workbench Web Service Crashes after Upgrading to Cloudera Data Services 1.5.4 SP1.
