Select a specific Cloudera AI Inference service instance and a model version
from Cloudera AI Registry to create a new model endpoint.
The following steps illustrate how to create a Llama 3.1 model endpoint.
In the Cloudera
console, click the Cloudera AI tile.
The Cloudera AI Workbenches page is
displayed.
Click Model Endpoints in the left navigation pane.
The Model Endpoints page is displayed.
Click Create Endpoint.
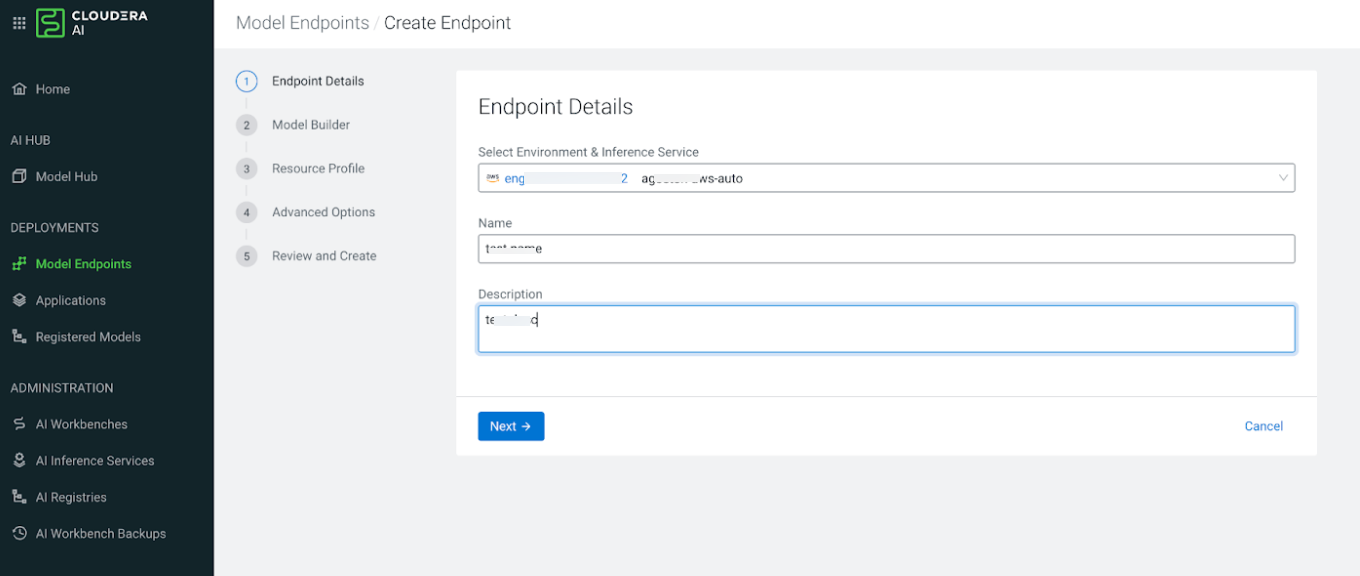
Configure the Endpoint Details.
Figure 1. Endpoint Details page
In the Select Environment & Inference Service field,
select your Cloudera environment and the Cloudera AI Inference service instance on which you want to create the model
endpoint.
Enter a unique Name for the model endpoint.
Optional: Provide a short Description of the model endpoint. The
description must be fewer than 5000 characters.
Click Next.
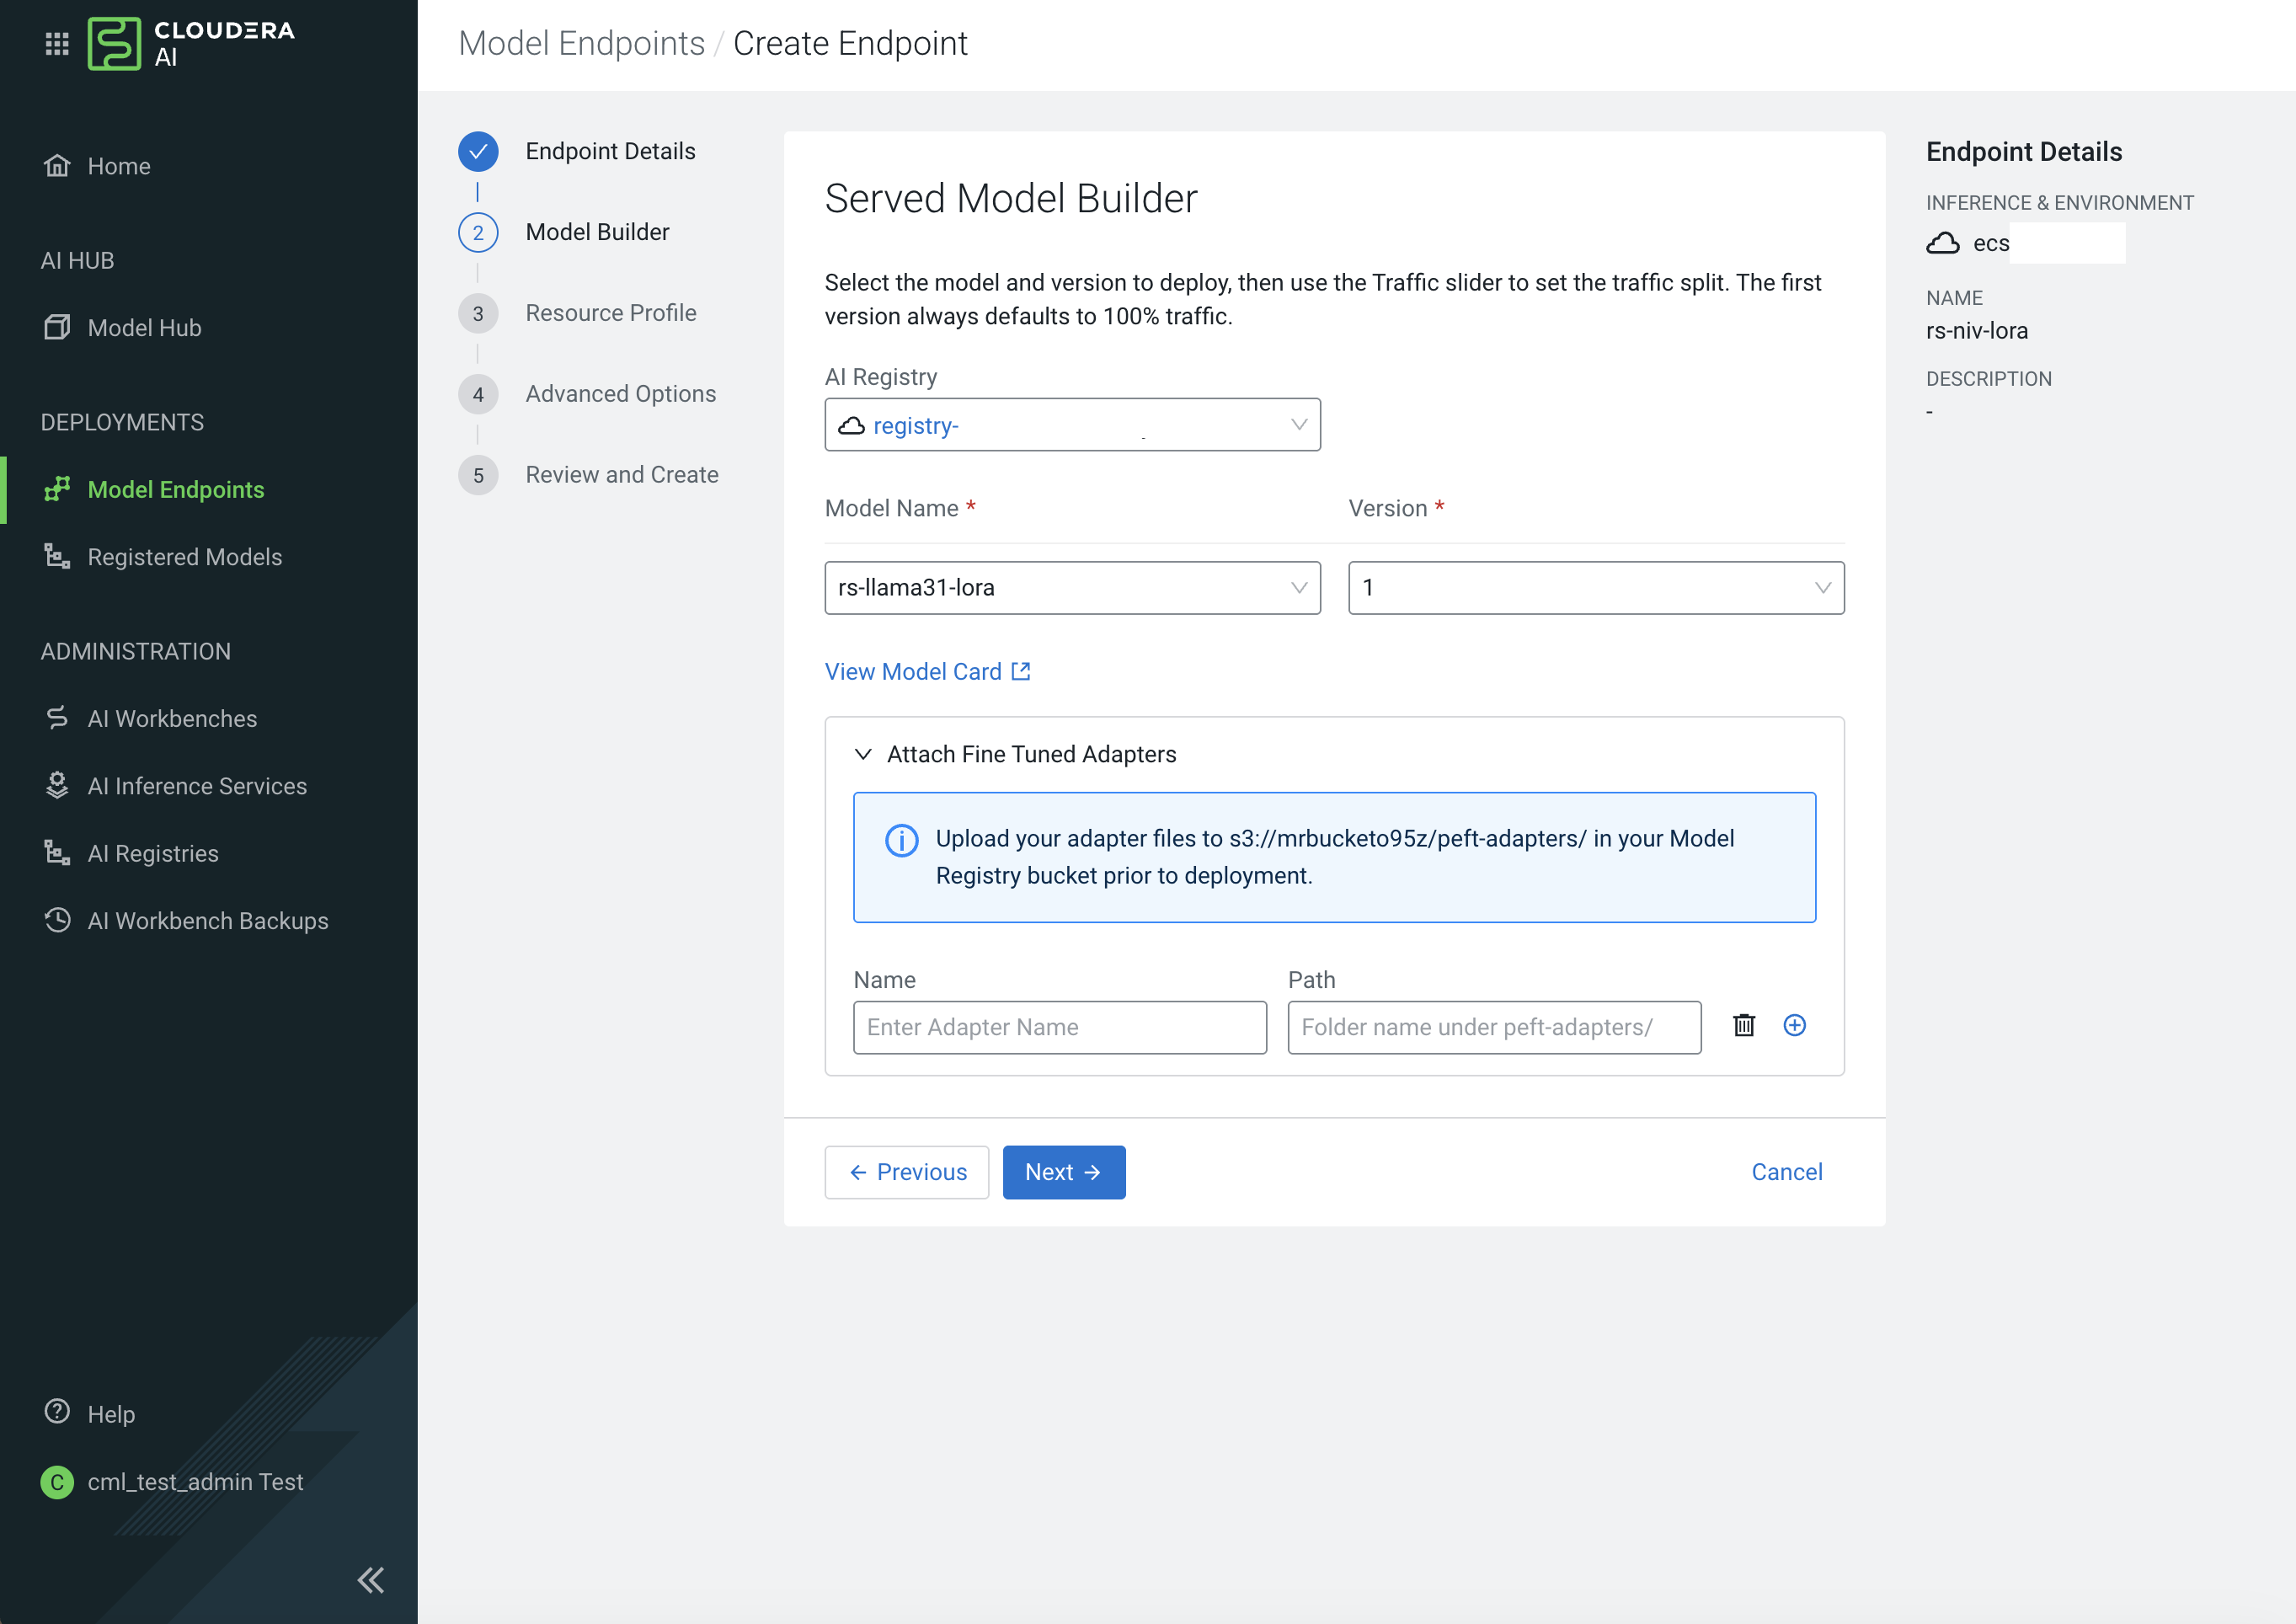
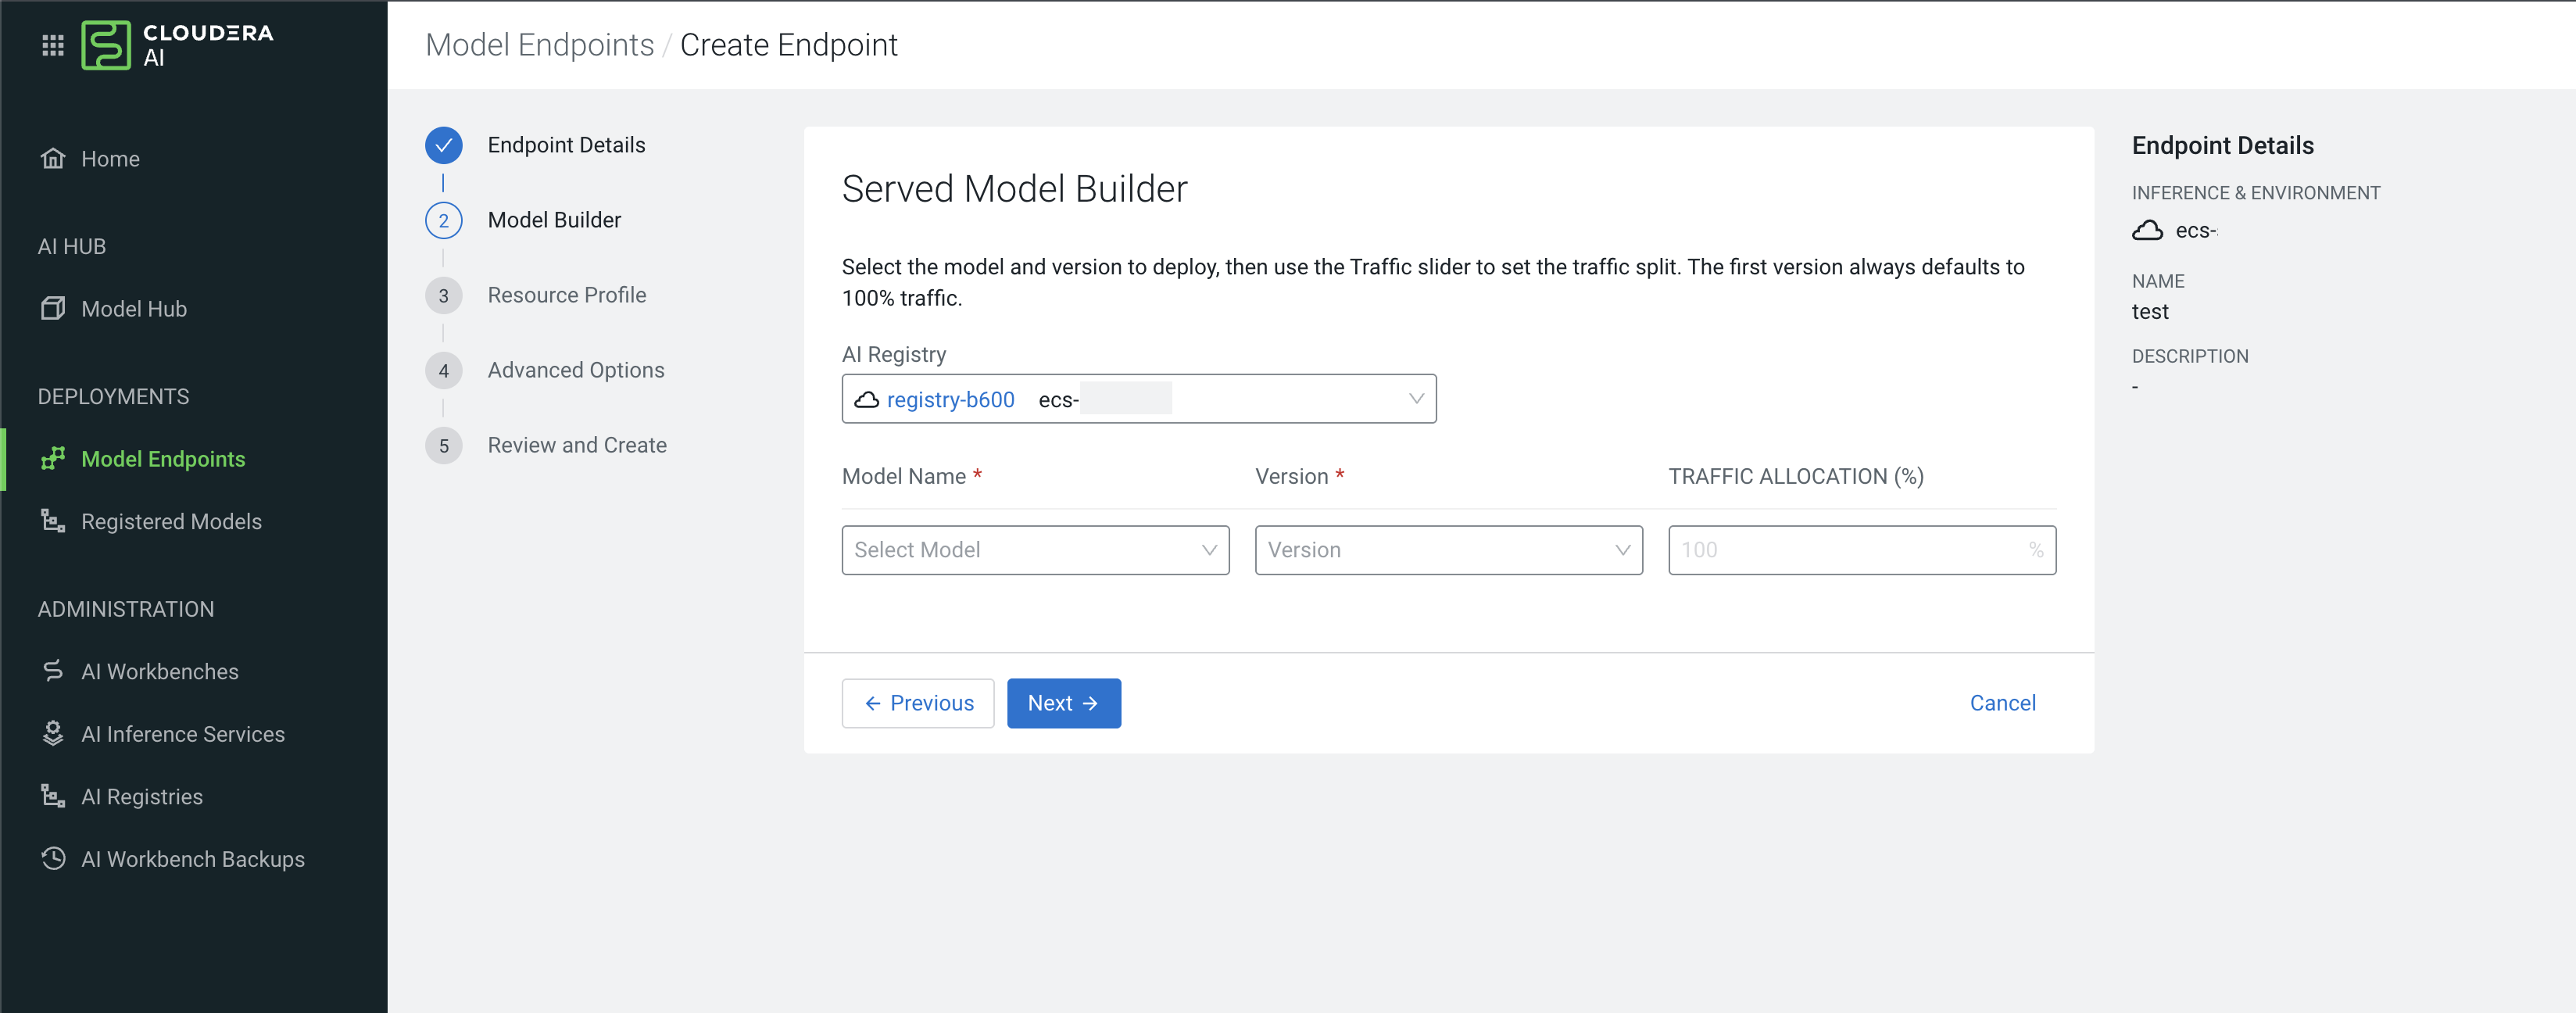
Specify the configuration on the Served Model Builder
page.
Figure 2. Configure the Served Model Builder page in Cloudera AI 1.5.5 SP4 and higher
releases
Figure 3. Configure the Served Model Builder page in Cloudera AI 1.5.5 SP3 and
lower releases
Select the AI Registry from the drop-down list.
From the Model Name drop-down list, select the registered
model you want to deploy.
Select the specific Version of the model.
Specify the Traffic Allocation (%) between different model
versions that you deploy. This value is always set to 100% for the
first model version, which you cannot change.
Select a specific Task for this model, such as text
generation, embedding, or reranking. If left empty, the model will perform its default
task.
Add one or more fine-tuned adapters to the model.
Cloudera AI Inference service enables you to attach multiple fine-tuned
adapters to a single model endpoint during deployment. When you deploy an endpoint
with adapters, the platform creates a Knative service in the
serving-default namespace and uses an init container, such as the
storage-initializer, to download the base model and adapters from
the S3 bucket to local storage volumes,
/mnt/adapters/<name>/.
Enter the display name for the adapter model, for example,
sql-lora in the Name field in the
Attach Fine Tuned Adapters section.
Enter the S3 directory name located under
peft-adapters/ in the Cloudera AI Registry bucket, for example,
llama-3.1-8b-sql-lora in the Path
field.
You can add multiple adapters by clicking the sign. All adapters must
share the same base model.
If any attached adapter has a rank (r) greater than 16, identify
the maximum rank value and set the required NIM_PASSTHROUGH_ARGS
environment variable.
Go to the environment variables section in the endpoint configuration.
Add the NIM_PASSTHROUGH_ARGS environment variable.
Set the variable value to specify the maximum LoRA rank, for example,
--max-lora-rank 128.
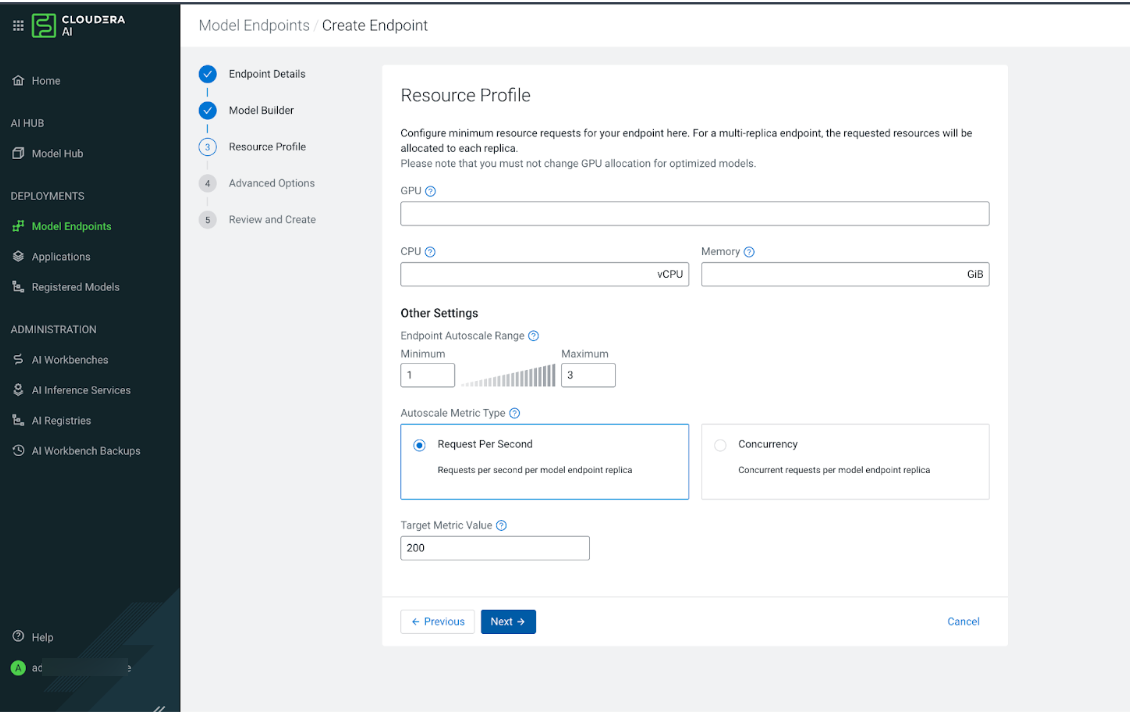
Figure 4. Resource Profile page for Cloudera AI 1.5.5 SP4 and
higher releases
Figure 5. Resource Profile page for Cloudera AI 1.5.5 SP3 and
lower releases
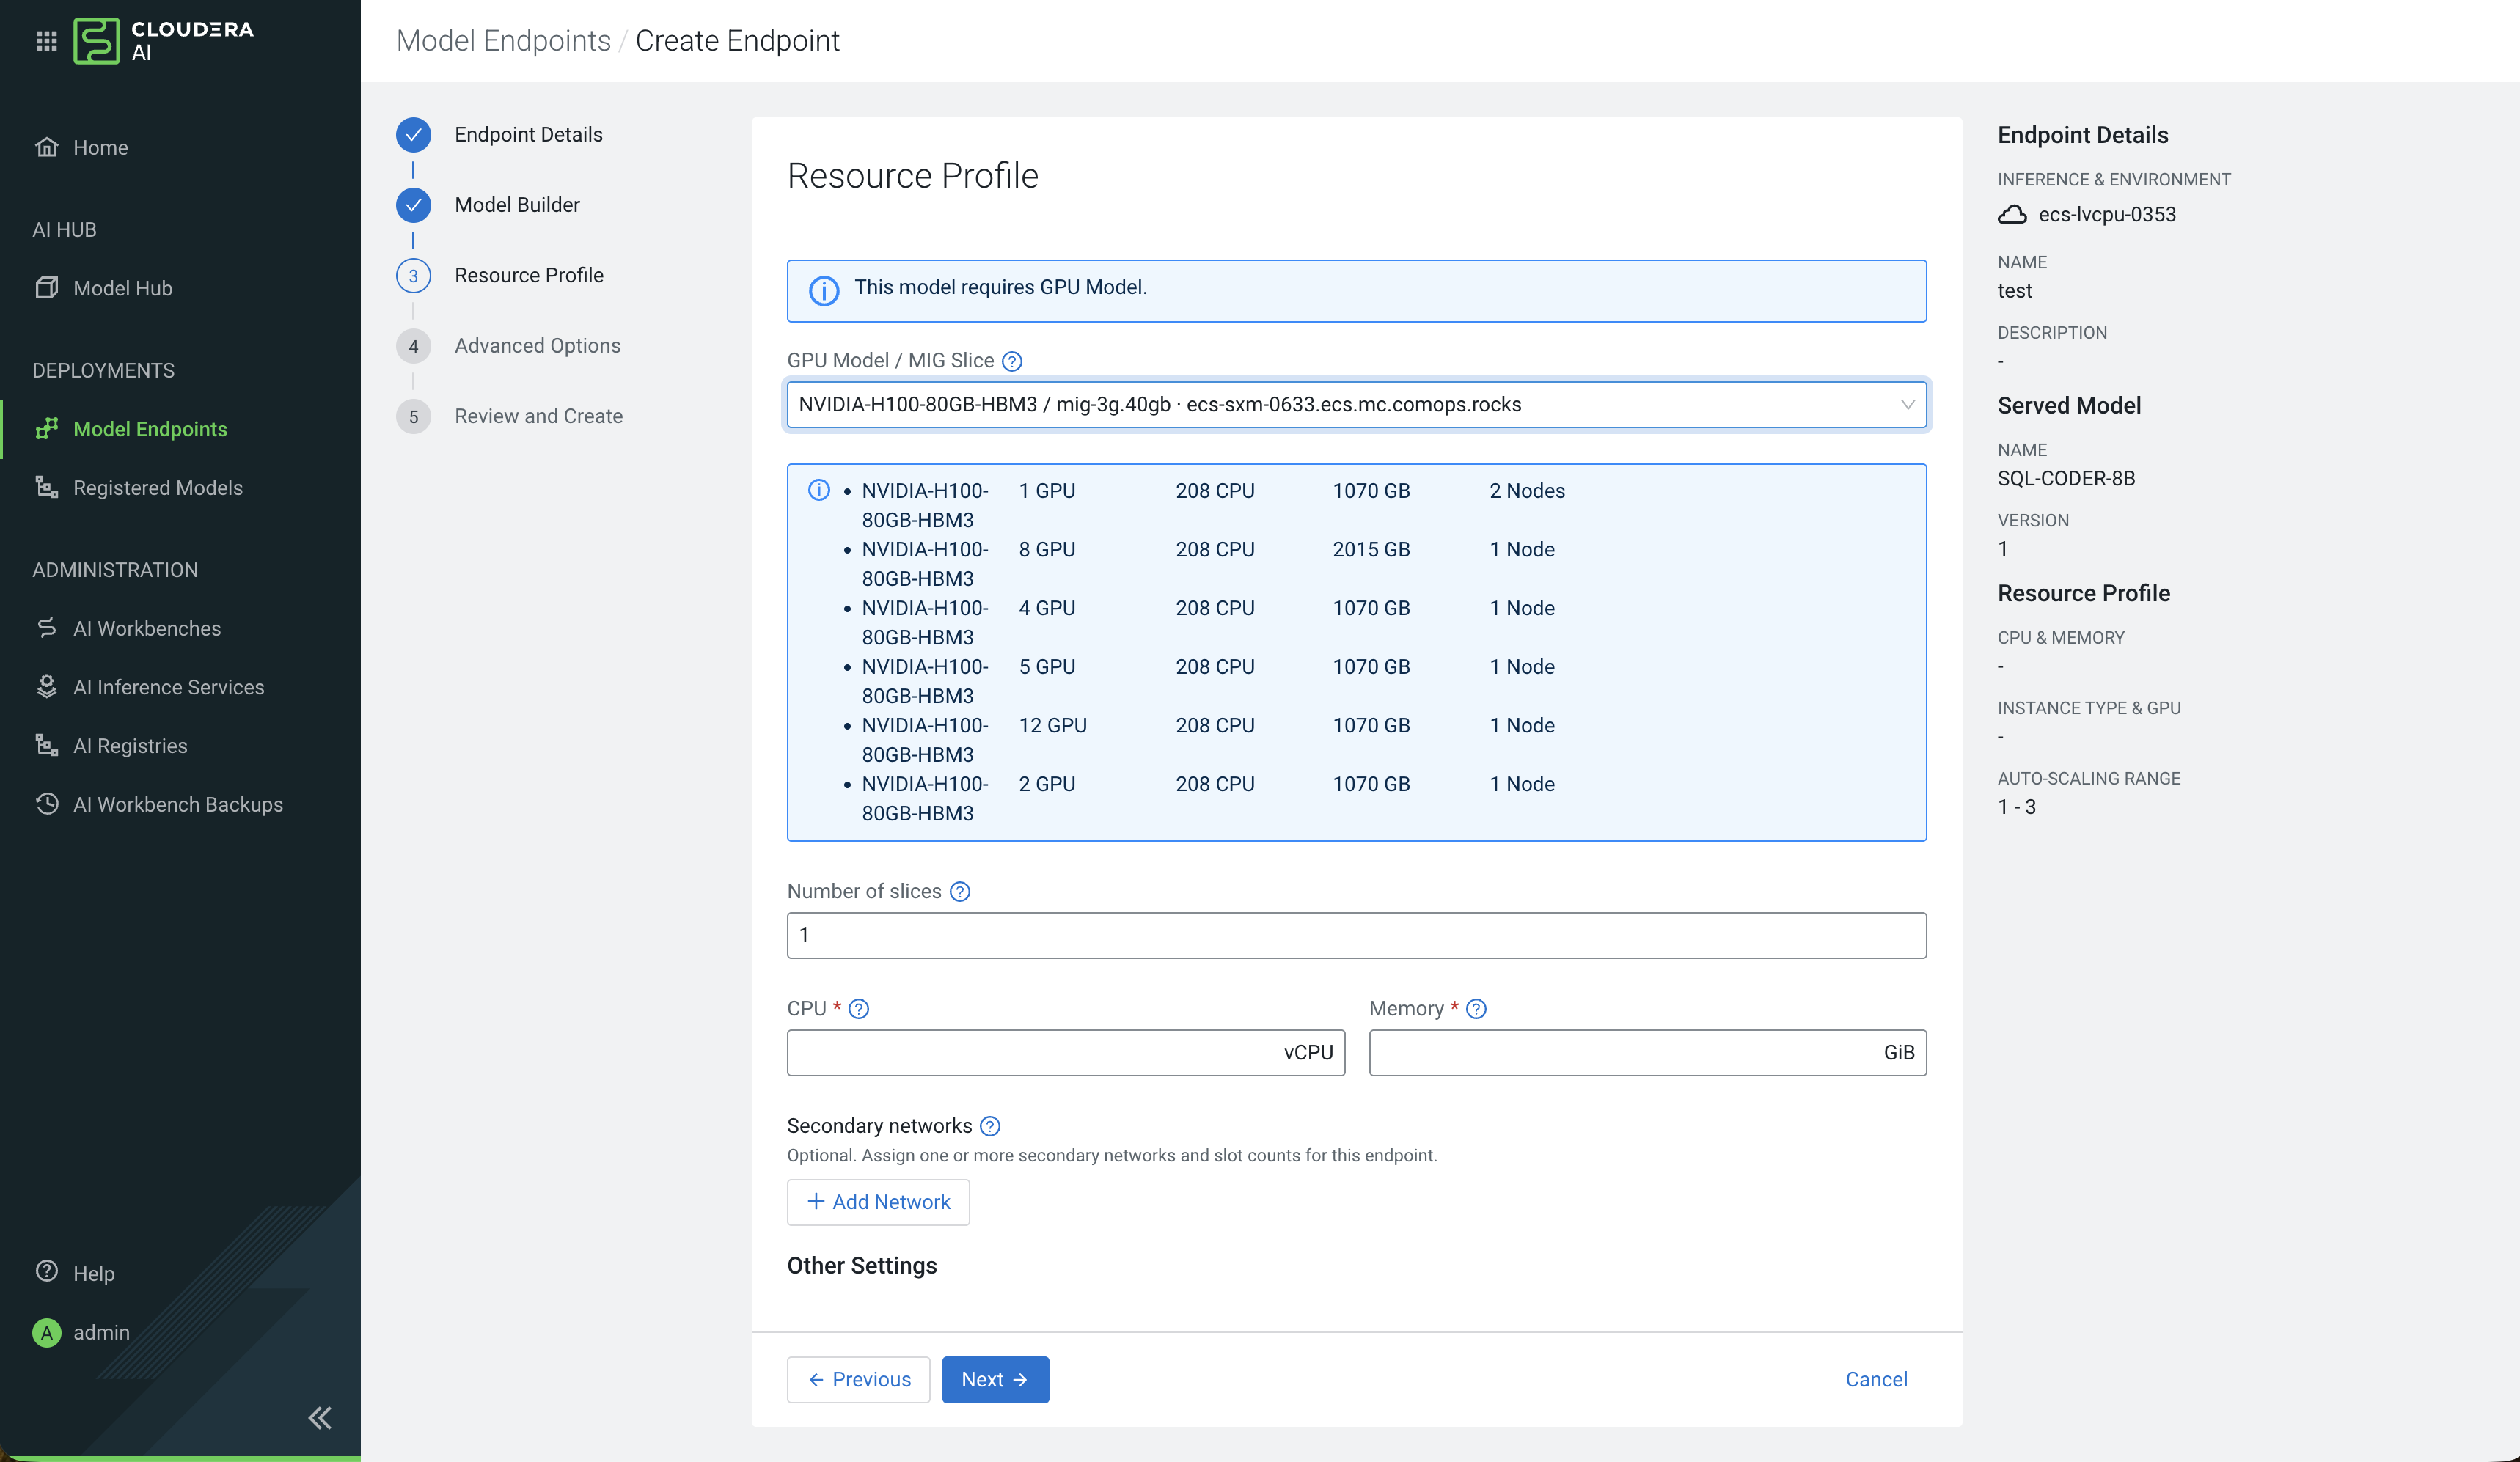
Select the GPU Model / MIG Slice and define the
Number of slices.
Multi-Instance GPU (MIG) support in Cloudera AI, available
in Cloudera AI 1.5.5 SP4 and higher releases, enables you to
partition a physical GPU into isolated virtual instances so that multiple model
deployments can run simultaneously and improve hardware utilization. MIG support in
the Cloudera AI Inference service is dynamic, allowing you to select
different slice profiles based on your available hardware.
Specify the required CPU in vCPU and Memory
in GiB. If using a GPU instance, also specify the
GPU count.
Select the required secondary network and define its
quantity.
The Quantity field defines the number of network interfaces or
Virtual Functions (VFs) to allocate for the secondary network.
The Secondary Networks field might not be visible if the
Network Operator interface configuration differs from the default Cloudera AI network configuration. To make the
Secondary Networks option available, complete the following
one time configuration of the interface names in the Control Plane database.
Download the cluster kubeconfig and open an interactive shell
in the embedded-db-0 pod in the CDP
namespace.
Connect to the PostgreSQL shell.
bash
psql
Connect to the target database.
postgres=# \c db-mlx
You are connected to the db-mlx database
as user postgres.
Check for the existing configuration key.
Verify whether the
CAIIRdmaNetworkMappings setting already exists in the
mlx_configuration
table.
SELECT variable_name, variable_value FROM mlx_configuration WHERE variable_name = 'CAIIRdmaNetworkMappings';
Insert the secondary network mappings for NVIDIA GPUDirect Remote Direct Memory
Access (RDMA).
Example
command:
INSERT INTO mlx_configuration (variable_name, variable_value) SELECT 'CAIIRdmaNetworkMappings', 'default/rail0-network:nvidia.com/sriovlegacy0,default/rail1-network:nvidia.com/sriovlegacy1,default/rail2-network:nvidia.com/sriovlegacy2,default/rail3-network:nvidia.com/sriovlegacy3,default/rail4-network:nvidia.com/sriovlegacy4,default/rail5-network:nvidia.com/sriovlegacy5,default/rail6-network:nvidia.com/sriovlegacy6' WHERE NOT EXISTS ( SELECT 1 FROM mlx_configuration WHERE variable_name = 'CAIIRdmaNetworkMappings' );
In
this example,
default/rail[0-8]-network:nvidia.com/sriovlegacy[0-8]
represents a sample network interface name used as a template. Update these
values to match the network interface configuration in your
environment.
Confirm that the new configuration row was stored
correctly.
SELECT variable_name, variable_value FROM mlx_configuration WHERE variable_name = 'CAIIRdmaNetworkMappings';
In the Endpoint Autoscale Range section, specify the
Minimum and Maximum number of replicas
for the model endpoint. Based on the selected autoscaling parameter, the system scales
the number of replicas to handle the incoming load.
Select one of the following Autoscale Metric Types:
Select Request Per Second (RPS) to scale based on the
number of requests per second per replica.
Select Concurrency to scales based on the number of
concurrent requests per replica.
If you select to scale as per RPS and the Target Metric
Value is set to 200, the system automatically adds a
new replica when a single replica is handling 200 or more requests per second. If the
RPS falls below 200, the system scales down the model endpoint by terminating a
replica.
In the Target Metric Value field enter the threshold that
triggers a scaling event.
If you select to scale as per RPS and the Target Metric
Value is set to 200, the system automatically adds a
new replica when a single replica is handling 200 or more requests per second. If the
RPS falls below 200, the system scales down the model endpoint by terminating a
replica.
Click Next.
Configure the Advanced Options.
Add required Environment Variables for the model.
Select a key, for example, NIM_LOG_LEVEL, from the
Name drop-down list and enter the corresponding
Value in the text field.
Optional: In the Persistent Volume Storage section, enable persistent
volume usage by selecting the corresponding checkbox.
This feature is available for Cloudera AI Inference service
1.5.5 SP4 and higher releases.
By enabling this feature, model weights will not be downloaded to the
node root volume, but to a persistent volume provisioned by the storage provisioner
of the Kubernetes cluster.
Cloudera recommends allocating a persistent volume (PV) size that is at
least double the size of the model artifacts. This ensures sufficient capacity for
the overhead of temporary files created during the download process.
In the Tags section, add any custom key and value pairs to
help organize your resources.
Click Next.
Review and Create the endpoint.
Verify all selected details, including the environment, model version, resource
allocation, and scaling range.
Click Create Endpoint to begin the deployment.
It can take tens of minutes for the model endpoint to become ready. The deployment
time depends on the following factors:
The time required to pull the necessary container images.
The time required to download model artifacts to the cluster nodes from the
Cloudera AI Registry.
In this example, the model endpoint is for the instruct variant of
Llama 3.1 8B, which is optimized to run on two NVIDIA A10G GPUs per replica. . For NVIDIA NIM models that specify GPU models and count, the UI
automatically populates the GPU field on the resource
configuration page.
 sign. All adapters must
share the same base model.If any attached adapter has a rank (
sign. All adapters must
share the same base model.If any attached adapter has a rank (