Creating Hive replication policy
Before you create a Hive replication policy in Cloudera Replication Manager, you must ensure that the prerequisites are complete and the required Ranger policy is set in Ranger.
-
On the Management Console > Replication Manager > Replication Policies page, click Add Policy.
The Create Replication Policy wizard appears.
-
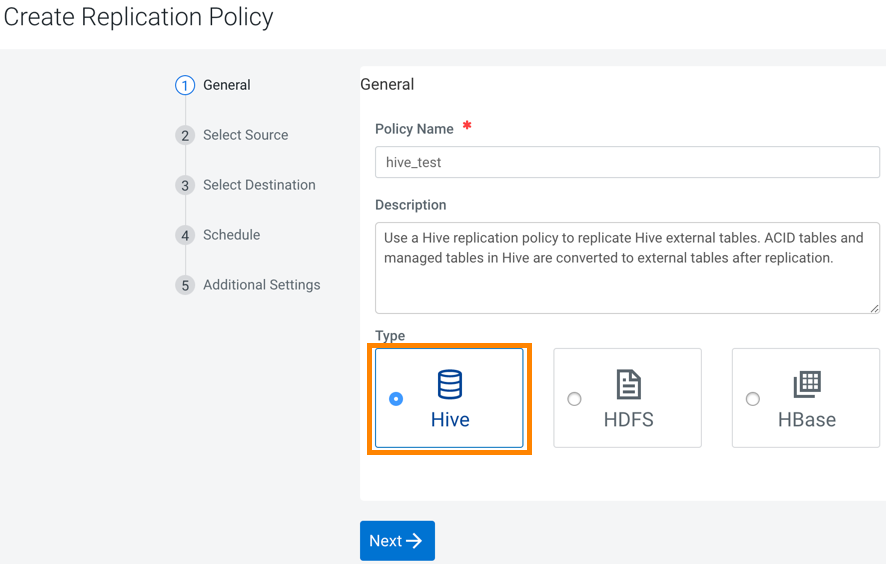
On the General page, choose or enter the following
information:
Option Description Hive Creates a Hive replication policy. Policy Name Enter a unique name for the replication policy. Description Optional. Enter a brief description about the replication policy. The following image shows a sample General page in the Create Replication Policy wizard:
- Click Next.
-
On the Select Source page, enter or choose the options as
required:
Option Description Source cluster Choose a classic cluster as a source cluster. Source Databases and Tables Enter the database name and table name. Click Add to enter more databases and tables as necessary. Run As Username (on source) Optional. The replication policy uses the Default username to replicate data. Enter another username if you want the replication policy to use it to replicate data. Ensure that the user has the necessary permissions to replicate data.
- Click Next.
-
On the Select Destination page, tenter or choose the options as
required:
Option Description Destination Data Lake or Data Hub Choose a Data Lake or Data Hub as the destination cluster. The Managed Warehouse Path and the Hive External Table Base Directory Path for the Data Lake appears.
Cloud Credential on Source Choose the required cloud credential. The cloud credentials that you register for the selected source cluster on the Cloud Credentials page appear in this field. You can also add cloud credentials using the Add Cloud Credential link. Run as Username Optional. The replication policy uses the Default username to replicate data. Enter another username if you want the replication policy to use it to replicate data.
-
Click Validate Policy.
Replication Manager verifies whether the details provided are correct.
- Click Next.
-
On the Schedule page, choose or enter the following
information:
Option Description Run Now Starts to replicate the existing HDFS data after the replication policy creation is complete. Choose the frequency to replicate data periodically. Schedule Run Runs the replication policy to replicate data at a later time. Choose the date and time for the first run, and then choose the frequency to replicate data periodically. Frequency Choose one of the following options:
- Does Not Repeat
- Custom - In the Custom
Recurrence dialog box, choose the time, date, and the
frequency to run the policy.
Replication Manager ensures that the same number of seconds elapse between the runs. For example, if you choose the Start Time as January 19, 2022 11.06 AM and Interval as 1 day, Replication Manager runs the replication policy for the first time at the specified time in the timezone the replication policy was created in, and then runs it exactly after 1 day that is, after 24 hours or 86400 seconds.
- Click Next.
-
On the Additional Settings page, enter or choose the values as
necessary:
Option Description YARN Queue Name Enter the name of the YARN queue for the cluster to which the replication job is submitted if you are using Capacity Scheduler queues to limit resource consumption. The default value for this field is default. Maximum Maps Slots Set the maximum number of map tasks (simultaneous copies) per replication job. The default value is 20. Maximum Bandwidth Adjust this setting so that each map task is throttled to consume only the specified bandwidth. Each map task ((simultaneous copy) is restricted to consume only the specified bandwidth. This is not always exact. The map throttles back its bandwidth consumption during a copy in such a way that the net bandwidth used tends towards the specified value. You can adjust this setting so that each map task is throttled to consume only the specified bandwidth so that the net bandwidth used tends towards the specified value. The default value for the bandwidth is 100MB per second for each mapper.
Number of concurrent HMS connections Enter the number of concurrent Hive Metastore connections. The connections are used to concurrently import and export metadata from Hive. Increase the number of threads to improve Replication Manager performance. By default, a new replication policy uses 4 connections. - If you set the value to 1 or more, Replication Manager uses multi-threading with the number of connections specified.
- If you set the value to 0 or fewer, Replication Manager uses single threading and a single connection.
Sentry Permissions Choose Include Sentry Permissions with Metadata to migrate Sentry permissions during the replication job. Otherwise, choose Exclude Sentry Permissions from Metadata to not migrate Sentry permissions during the replication job. Skip URI Privileges Select this option if you do not want to include URI privileges when you migrate Sentry permissions. During migration, the URI privileges are translated to point to an equivalent location in S3. If the resources have a different location in Amazon S3, do not migrate the URI privileges because the URI privileges might not be valid.
Replication Option Choose Metadata and Data to replicate metadata and data in files and directories. Otherwise, choose Metadata only to replicate the metadata of files and directories Directory for metadata file Enter / or a valid folder path in the target cluster to save the metadata file. If the field is empty or if the specified folder does not exist, Replication Manager creates a new folder. Force Overwrite Select to overwrite data in the destination metastore if incompatible changes are detected. For example, if the destination metastore was modified, and a new partition was added to a table, this option forces deletion of that partition, overwriting the table with the version found on the source. If you do not choose the option and the Hive replication process detects incompatible changes on the source cluster, Hive replication fails. This sometimes occurs with recurring replications, where the metadata associated with an existing database or table on the source cluster changes over time.
Invalidate Impala Metadata on Destination Choose the option to run the Impala INVALIDATE METADATA statement per table on the destination cluster after completing the replication. The statement purges the metadata of the replicated tables and views within the destination cluster’s Impala upon completion of replication, allowing other Impala clients at the destination to query these tables successfully with accurate results. You must run the INVALIDATE METADATA statement manually for the following scenarios:- If the destination Cloudera Manager does not have an Impala service.
- If the source contains User Defined Functions (UDF).
Replication Strategy Choose one of the following replication strategies to determine whether the file replication tasks should be distributed among the mappers statically or dynamically. - Static distributes file replication tasks among the mappers up front to achieve an uniform distribution based on the file sizes.
- Dynamic distributes the file replication tasks in small sets to the mappers, and as each mapper completes its tasks, it dynamically acquires and processes the next unallocated set of tasks.
MapReduce Service Choose the MapReduce or YARN service to use. Log Path Enter an alternate path for the logs, if required. Error Handling Select the following options as necessary: - Skip Checksum Checks
- Determines whether to skip checksum checks on the copied
files. If selected, checksums are not validated. Checksums are checked by
default. Checksums are used for two purposes:
- To skip replication of files that have already been copied. If Skip Checksum Checks is selected, the replication job skips copying a file if the file lengths and modification times are identical between the source and destination clusters. Otherwise, the job copies the file from the source to the destination.
- To redundantly verify the integrity of data. However, checksums are not required to guarantee accurate transfers between clusters. HDFS data transfers are protected by checksums during transfer and storage hardware also uses checksums to ensure that data is accurately stored. These two mechanisms work together to validate the integrity of the copied data.
- Skip Listing Checksum Checks - Whether to skip checksum check when comparing two files to determine whether they are same or not. If skipped, the file size and last modified time are used to determine if files are the same or not. Skipping the check improves performance during the mapper phase. Note that if you select the Skip Checksum Checks option, this check is also skipped.
- Abort on Error - Whether to abort the job on an error. If selected, files copied up to that point remain on the destination, but no additional files are copied. Abort on Error is not selected by default.
- Abort on Snapshot Diff Failures - If a snapshot diff fails during replication, the replication policy uses a complete copy to replicate data. If you select this option, the policy aborts the replication when it encounters an error instead.
Preserve Choose the required options to preserve the block size, replication count, permissions (including ACLs), and extended attributes (XAttrs) as they exist on the source file system, or to use the settings as configured on the destination file system. By default source system settings are preserved. When Permission is selected, and both the source and destination clusters support ACLs, replication preserves ACLs. Otherwise, ACLs are not replicated. When Extended attributes is selected, and both the source and destination clusters support extended attributes, replication preserves them. (This option only displays when both source and destination clusters support extended attributes.)
If you select one or more of the Preserve options and you are replicating to S3 or ADLS, the values all of these items are saved in metadata files on S3 or ADLS. When you replicate from S3 or ADLS to HDFS, you can select which of these options you want to preserve.
Delete Policy Choose the required options to determine whether the files that were deleted on the source should also be deleted from the destination directory. This policy also determines the handling of files in the destination location that are unrelated to the source. Options include: - Keep Deleted Files - Retains the destination files even when they no longer exist at the source. This is the default option.
- Delete to Trash - If the HDFS trash is enabled, files are moved to the trash folder. This is not supported when replicating to S3 or ADLS.
- Delete Permanently - Uses the least amount of space; use with caution.
Alerts Choose to generate alerts for various state changes in the replication workflow. You can choose to generate an alert On Failure, On Start, On Success, or On Abort of the replication job. You can configure alerts to be delivered by email or sent as SNMP traps. If alerts are enabled for events, you can search for and view the alerts on the Events tab, even if you do not have email notification configured. For example, if you choose Command Result that contains the Failed filter on the Diagnostics > Events page, the alerts related to the On Failure alert for all the replication policies for which you have set the alert appear. For more information, see Managing Alerts and Configuring Alert Delivery.
- Click Create.
The administrator can verify whether the job starts and runs as expected using the following steps:
- For HDFS data replication, check the cloud storage path (for example, S3 bucket path) to verify whether the data was successfully copied in the specified bucket.
- For Hive metadata replication, verify whether the specified source database, along with tables, partitions, UDFs and column stats are available in the Data Lake HMS instance. For this, the administrator can use a Data Hub cluster and run the corresponding queries using Hue or beeline.
- For Ranger policies, query the Ranger policies to ensure that the Sentry policies are properly mapped as Ranger policies for the right users and groups.