

Manage workspaces
You can create new workspaces and manage existing workspaces from the Cloudbreak web UI and CLI.
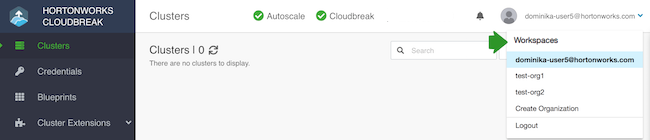
To manage workspaces, navigate to the Workspaces page accessible from the dropdown in the top-right corner in the Cloudbreak web UI:
Create a workspace
Any user can create a workspace by using the following steps:
Steps
- Click on Create Workspace.
- Provide a name and description.
- Click Create.
After creating a workspace, your workspace will be available and you will be added as a member of this workspace with the full access rights. Your workspace will be accessible from the dropdown in the top-right corner. The next step is to add users to your workspace.
Add a user to a workspace
A workspace owner can add users to a workspace by using the following steps:
Steps
- Click on the workspace name.
- Under Users, select one or more the users that you would like to add and
click on the
 button.
 - This will add the user(s) to the workspace and the selected users will appear
under Members.
Automatically, the "All: Read" access permission is assigned to a newly added user. You can edit the access permissions once your user appears under Members.
When a user is invited to a workspace, there is no notification in the UI and a page refresh is needed in order for the new workspace to be visible in the web UI.
Edit user's access
A workspace owner can edit user's access to a workspace by using the following steps:
Steps
- Click on the workspace name.
- Under Members, select one or more users and click on Edit permissions.
- Select or deselect permissions.
- Click Save.
Remove users from a workspace
A workspace owner can remove users from a workspace by using the following steps:
Steps
- Click on the workspace name.
- Under Members, select one or more users.
- Click on
 .
. - Confirm delete.
When a user is removed from a workspace, there is no notification in the UI and a page refresh is needed in order for the workspace to be removed from the web UI.
Delete a workspace
A workspace owner can delete a workspace by using the following steps:
Steps
- Select the checkbox next to the workspace name.
- Click on the
 icon.
icon. - Confirm delete.
A page refresh is needed in order for the workspace to be removed from the web UI.
Managing workspaces from the CLI
You can create new workspaces and manage existing workspaces from the CLI.
To create an manage workspaces from the CLI, use the following commands:
-
cb workspace(describe, list, create, delete, add-user, remove-user) -
cb user(list)
For more information, refer to the CLI documentation