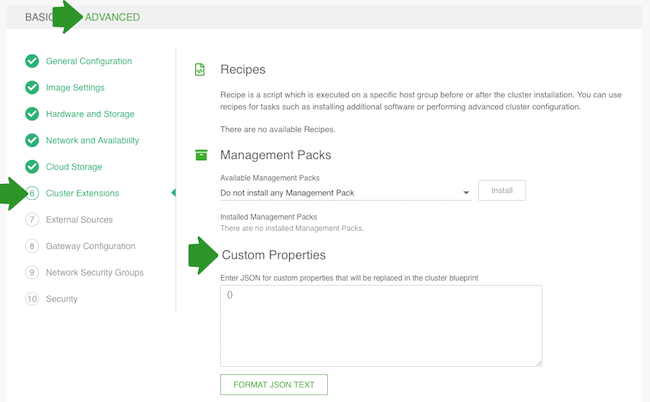
Custom properties
The "Custom Properties "option allows you to set properties on a per-cluster basis by having them injected in the cluster blueprint.
Through this option, Cloudbreak allows you to create dynamic blueprints with property variables and set properties on a per-cluster basis by providing property values during cluster creation.
Setting custom properties
In order to set custom properties for a cluster you must:
- Create a blueprint that includes property variables for the properties that you want to set.
- When creating a cluster, select the blueprint and then specify the property values under Cluster Extensions > Custom Properties in the advanced view of the cluster wizard.
In the cluster creation phase, the property values in the blueprint will be replaced based on the input, picking up the parameter values that you provided.
Steps
- Prepare a blueprint which includes a template for the properties that you would like
to set. Make sure to:
- Include these templates in the “configurations” section of your blueprint.
- Use the mustache format. Cloudbreak supports mustache kind of templating with {{{ }}} syntax.
Example: This example provides a template for setting three properties:
-
fs.trash.interval -
hadoop.tmp.dir -
hive.exec.compress.output
... { "core-site": { "fs.trash.interval": "{{{ fs.trash.interval }}}", "hadoop.tmp.dir": "{{{ my.tmp.directory }}}" } }, { "hive-site": { "hive.exec.compress.output": "{{{ hive.exec.compress.output }}}" } }, ... - When creating a cluster:
- Under General Configuration > Cluster Type, select the blueprint prepared in the previous step.
- In the advanced view of the cluster wizard, under Cluster Extensions >
Custom Properties, include a JSON file which defines the property
values:

Example: The following JSON entry sets the values for the properties from the previous step:
{ "fs.trash.interval": "4320", "hive.exec.compress.output": "true", "my.tmp.directory": "/hadoop/tmp" } - As a result, the values of
hive.exec.compress.output,my.tmp.directoryandfs.trash.intervalwill be replaced in the blueprint based on the input that you provided.Example: The property values will be replaced for the cluster as follows based on what was defined in the previous step:
...
{
  "core-site": {
    "fs.trash.interval": "4320",
    "hadoop.tmp.dir": "/hadoop/tmp"
  }
},
{
  "hive-site": {
    "hive.exec.compress.output": "true"
  }
},

