

Connecting Processors
Each Processor has a set of defined "Relationships" that it is able to send
data to. When a Processor finishes handling a FlowFile, it transfers it to one of these
Relationships. This allows a user to configure how to handle FlowFiles based on the result
of Processing. For example, many Processors define two Relationships:
success and failure. Users are then able to
configure data to be routed through the flow one way if the Processor is able to
successfully process the data and route the data through the flow in a completely
different manner if the Processor cannot process the data for some reason. Or, depending
on the use case, it may simply route both relationships to the same route through the
flow.
Now that we have added and configured our GetFile processor and applied the
configuration, we can see in the top-left corner of the Processor an Alert icon (  ) signaling that the Processor is not in a valid state. Hovering over
this icon, we can see that the
) signaling that the Processor is not in a valid state. Hovering over
this icon, we can see that the success relationship has not been
defined. This simply means that we have not told NiFi what to do with the data that the
Processor transfers to the success Relationship.
In order to address this, let's add another Processor that we can connect the GetFile Processor to, by following the same steps above. This time, however, we will simply log the attributes that exist for the FlowFile. To do this, we will add a LogAttributes Processor.
We can now send the output of the GetFile Processor to the LogAttribute Processor.
Hover over the GetFile Processor with the mouse and a Connection Icon (  ) will appear over the middle of the Processor. We can drag this icon
from the GetFile Processor to the LogAttribute Processor. This gives us a dialog to choose
which Relationships we want to include for this connection. Because GetFile has only a
single Relationship,
) will appear over the middle of the Processor. We can drag this icon
from the GetFile Processor to the LogAttribute Processor. This gives us a dialog to choose
which Relationships we want to include for this connection. Because GetFile has only a
single Relationship, success, it is automatically selected for
us.
Clicking on the Settings tab provides a handful of options for configuring how this Connection should behave:
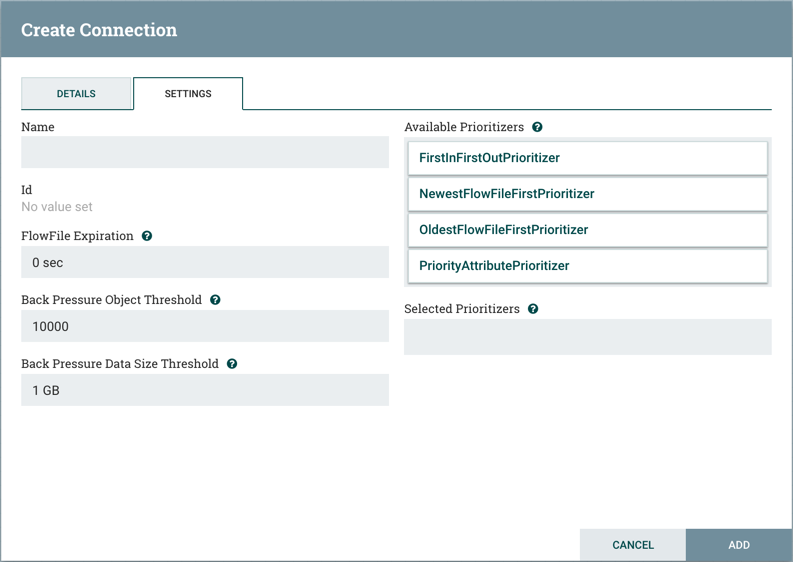
We can give the Connection a name, if we like. Otherwise, the Connection name will be based on the selected Relationships. We can also set an expiration for the data. By default, it is set to "0 sec" which indicates that the data should not expire. However, we can change the value so that when data in this Connection reaches a certain age, it will automatically be deleted (and a corresponding EXPIRE Provenance event will be created).
The backpressure thresholds allow us to specify how full the queue is allowed to become before the source Processor is no longer scheduled to run. This allows us to handle cases where one Processor is capable of producing data faster than the next Processor is capable of consuming that data. If the backpressure is configured for each Connection along the way, the Processor that is bringing data into the system will eventually experience the backpressure and stop bringing in new data so that our system has the ability to recover.
Finally, we have the Prioritizers on the right-hand side. This allows us to control how the data in this queue is ordered. We can drag Prioritizers from the "Available prioritizers" list to the "Selected prioritizers" list in order to activate the prioritizer. If multiple prioritizers are activated, they will be evaluated such that the Prioritizer listed first will be evaluated first and if two FlowFiles are determined to be equal according to that Prioritizer, the second Prioritizer will be used.
For the sake of this discussion, we can simply click Add to add the
Connection to our graph. We should now see that the Alert icon has changed to a Stopped
icon (  ). The LogAttribute Processor, however, is now invalid because its
success Relationship has not been connected to anything. Let's
address this by signaling that data that is routed to success by
LogAttribute should be "Auto Terminated," meaning that NiFi should consider the
FlowFile's processing complete and "drop" the data. To do this, we
configure the LogAttribute Processor. On the Settings tab, in the right-hand side we can
check the box next to the success Relationship to Auto Terminate the
data. Clicking OK will close the dialog and show that both Processors
are now stopped.