Configuring Ranger Admin HA
This section describes how to configure Ranger Admin HA with or without SSL on an Ambari-managed cluster. Please note that the configuration settings used in this section are sample values. You should adjust these settings to reflect your environment (folder locations, passwords, file names, and so on).
Prerequisites
Copy the keystore/truststore files into a different location (e.g.
/etc/security/serverKeys) than the/etc/<component>/conffolder.Make sure that the JKS file names are unique.
Make sure that the correct permissions are applied.
Make sure that passwords are secured.
Configuring Ranger Admin HA (Without SSL)
Use the following procedure to set up a load-balancer and enable Ranger Admin on an Ambari-managed cluster.
Use SSH to connect to the cluster node where you will set up the load-balancer. In this procedure, we use the IP address 172.22.71.37.
Use the following command to switch to the
/usr/localdirectory:cd /usr/local
Download the
httpdfile and its dependencies (aprandapr-util):wget https://archive.apache.org/dist/httpd/httpd-2.4.16.tar.gz wget https://archive.apache.org/dist/apr/apr-1.5.2.tar.gz wget https://archive.apache.org/dist/apr/apr-util-1.5.4.tar.gz
Extract the contents of these files:
tar -xvf httpd-2.4.16.tar.gz
tar -xvf apr-1.5.2.tar.gz
tar -xvf apr-util-1.5.4.tar.gz
Run the following commands to move
aprandapr-utilto thesrclibdirectory underhttpd:mv apr-1.5.2/ apr mv apr httpd-2.4.16/srclib/ mv apr-util-1.5.4/ apr-util mv apr-util httpd-2.4.16/srclib/
Install PCRE (Perl-Compatible Regular Expressions Library):
yum install pcre pcre-devel
![[Note]](../common/images/admon/note.png)
Note Here we are using yum install, but you can also download the latest bits from http://www.pcre.org/
Install
gcc(ANSI-C Compiler and Build System):yum install gcc
Run the following commands to configure the source tree:
cd /usr/local/httpd-2.4.16
./configure
Run the following command to make the build:
make
Run the install:
make install
Run the following commands to confirm the preceding configuration steps:
cd /usr/local/apache2/bin
./apachectl start
curl localhost
This should return:
<html><body><h1>It works!</h1></body></html>
Run the following commands to create a backup
conffile.cd /usr/local/apache2/conf cp httpd.conf ~/httpd.conf.backup
Edit the
httpd.conffile:vi /usr/local/apache2/conf/httpd.conf
Make the following updates:
If you are not running the load-balancer on the default port 80, change the default listening port in line
Listen 80to match the port setting.Un-comment the following module entries (remove the
#symbol at the beginning of each line):LoadModule proxy_module modules/mod_proxy.so LoadModule proxy_http_module modules/mod_proxy_http.so LoadModule proxy_ajp_module modules/mod_proxy_ajp.so LoadModule proxy_balancer_module modules/mod_proxy_balancer.so LoadModule slotmem_shm_module modules/mod_slotmem_shm.so LoadModule lbmethod_byrequests_module modules/mod_lbmethod_byrequests.so LoadModule lbmethod_bytraffic_module modules/mod_lbmethod_bytraffic.so LoadModule lbmethod_bybusyness_module modules/mod_lbmethod_bybusyness.so
Update the ServerAdmin email address, or comment out that line.
#ServerAdmin you@example.com
At the end of the
httpd.conffile, add the following line to read the custom configuration file:Include conf/ranger-cluster.conf
Create a custom
conffile:vi ranger-cluster.conf
Make the following updates:
Add the following lines, then change the
<VirtualHost *:88>port to match the default port you set in thehttpd.conffile in the previous step.# # This is the Apache server configuration file providing SSL support. # It contains the configuration directives to instruct the server how to # serve pages over an https connection. For detailing information about these # directives see <URL:http://httpd.apache.org/docs/2.2/mod/mod_ssl.html> # # Do NOT simply read the instructions in here without understanding # what they do. They're here only as hints or reminders. If you are unsure # consult the online docs. You have been warned. #Listen 80 <VirtualHost *:88> ProxyRequests off ProxyPreserveHost on Header add Set-Cookie "ROUTEID=.%{BALANCER_WORKER_ROUTE}e; path=/" env=BALANCER_ROUTE_CHANGED <Proxy balancer://rangercluster> BalancerMember http://172.22.71.38:6080 loadfactor=1 route=1 BalancerMember http://172.22.71.39:6080 loadfactor=1 route=2 Order Deny,Allow Deny from none Allow from all ProxySet lbmethod=byrequests scolonpathdelim=On stickysession=ROUTEID maxattempts=1 failonstatus=500,501,502,503 nofailover=Off </Proxy> # balancer-manager # This tool is built into the mod_proxy_balancer # module and will allow you to do some simple # modifications to the balanced group via a gui # web interface. <Location /balancer-manager> SetHandler balancer-manager Order deny,allow Allow from all </Location> ProxyPass /balancer-manager ! ProxyPass / balancer://rangercluster/ ProxyPassReverse / balancer://rangercluster/ </VirtualHost>
![[Note]](../common/images/admon/note.png)
Note The URLs listed in the
BalancerMemberentries are the IP addresses of the Ranger Admin hosts. In this example, the Ranger Admin host addresses are:http://172.22.71.38:6080 http://172.22.71.39:6080
Run the following commands to restart the
httpdserver:cd /usr/local/apache2/bin ./apachectl restart
If you use a browser to check the load-balancer host (with port) as specified in the
BalanceMemberentries in theranger-cluster.conffile, you should see the Ranger Admin page.Now you can enable Ranger Admin HA using Ambari. On the Ambari dashboard of the first Ranger host, select Services > Ranger, then select Service Actions > Enable Ranger Admin HA to launch the Enable Ranger Admin HA Wizard.
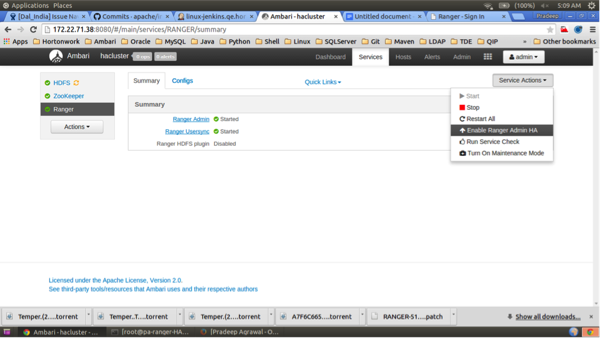
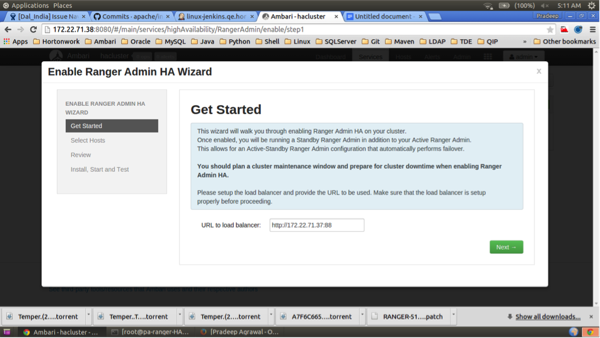
On the Get Started page, enter the load-balancer URL and port number (in this example, 172.22.71.37:88), then click Next.
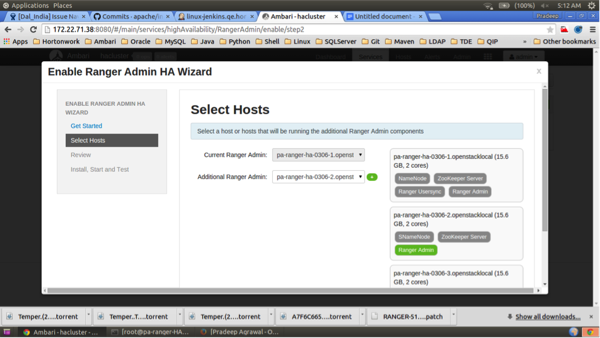
On the Select Hosts page, confirm the host assignments, then click Next.
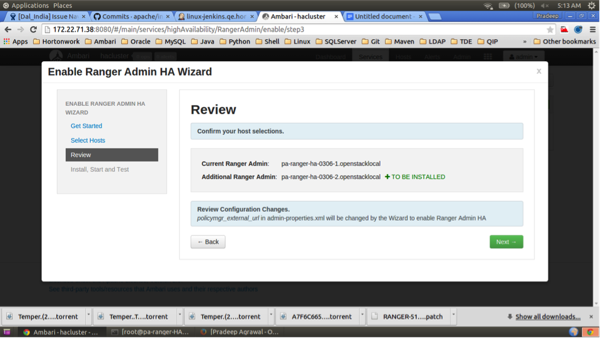
Check the settings on the Review page, then click Next.
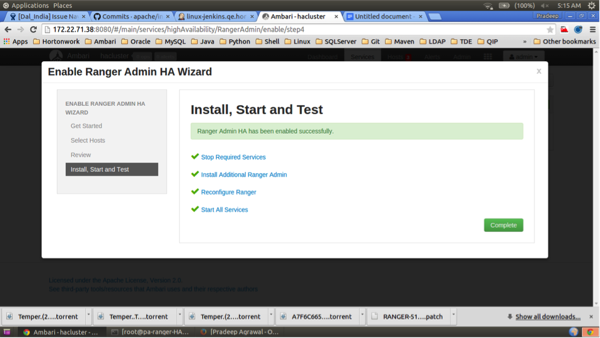
Click Complete on the Install, Start, and Test page to complete the installation.
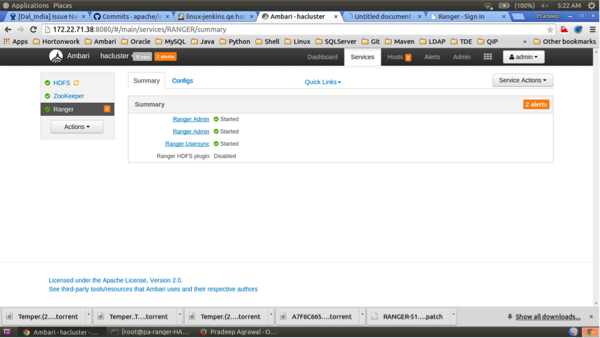
When the installation is complete, the Ranger Admin instances are listed on the Ranger Summary page. Select Actions > Restart All Required to restart all services that require a restart.
![[Note]](../common/images/admon/note.png)
Note For Oracle, clear the
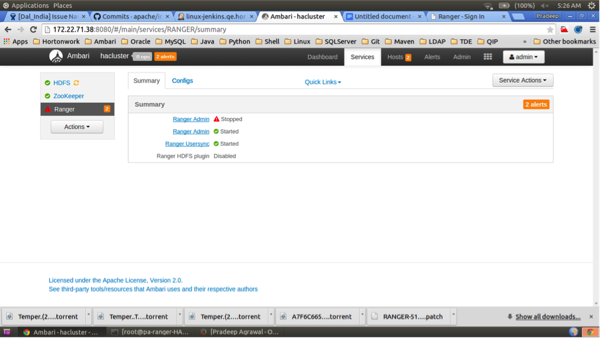
Setup DB and DB usercheck box under "Advanced ranger-env" to avoid DB setup.To test the load-balancer and Ranger HA configuration, select Ranger > Service Actions > Stop on one of the Ranger hosts.
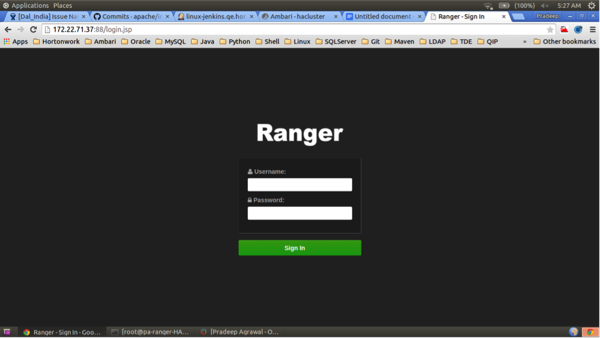
Use a browser to check the load-balancer host URL (with port). You should see the Ranger Admin page.
Configuring Ranger Admin HA (With SSL)
Use the following procedure to set up a load-balancer with SSL and enable Ranger Admin HA on an Ambari-managed cluster.
Use SSH to connect to the cluster node where you will set up the load-balancer. In this procedure, we use the IP address 172.22.71.37.
Use the following command to switch to the
/usr/localdirectory:cd /usr/local
Download the
httpdfile and its dependencies (aprandapr-util):wget https://archive.apache.org/dist/httpd/httpd-2.4.16.tar.gz wget https://archive.apache.org/dist/apr/apr-1.5.2.tar.gz wget https://archive.apache.org/dist/apr/apr-util-1.5.4.tar.gz
Extract the contents of these files:
tar -xvf httpd-2.4.16.tar.gz
tar -xvf apr-1.5.2.tar.gz
tar -xvf apr-util-1.5.4.tar.gz
Run the following commands to move
aprandapr-utilto thesrclibdirectory underhttpd:mv apr-1.5.2/ apr mv apr httpd-2.4.16/srclib/ mv apr-util-1.5.4/ apr-util mv apr-util httpd-2.4.16/srclib/
Install the required packages:
yum groupinstall "Development Tools"
yum install openssl-devel
yum install pcre-devel
Run the following commands to configure the source tree:
cd /usr/local/httpd-2.4.16
./configure --enable-so --enable-ssl --with-mpm=prefork --with-included-apr
Run the following command to make the build:
make
Run the install:
make install
Run the following commands to confirm the preceding configuration steps:
cd /usr/local/apache2/bin
./apachectl start
curl localhost
This should return:
<html><body><h1>It works!</h1></body></html>
Run the following commands to create a backup
conffile.cd /usr/local/apache2/conf cp httpd.conf ~/httpd.conf.backup
Edit the
httpd.conffile:vi /usr/local/apache2/conf/httpd.conf
Make the following updates:
If you are not running the load-balancer on the default port 80, change the default listening port in line
Listen 80to match the port setting.Un-comment the following module entries (remove the
#symbol at the beginning of each line):LoadModule proxy_module modules/mod_proxy.so LoadModule proxy_http_module modules/mod_proxy_http.so LoadModule proxy_ajp_module modules/mod_proxy_ajp.so LoadModule proxy_balancer_module modules/mod_proxy_balancer.so LoadModule slotmem_shm_module modules/mod_slotmem_shm.so LoadModule lbmethod_byrequests_module modules/mod_lbmethod_byrequests.so LoadModule lbmethod_bytraffic_module modules/mod_lbmethod_bytraffic.so LoadModule lbmethod_bybusyness_module modules/mod_lbmethod_bybusyness.so LoadModule ssl_module modules/mod_ssl.so
![[Note]](../common/images/admon/note.png)
Note If
LoadModule ssl_module modules/mod_ssl.sois not available in thehttpd.conffile, check to make sure that you performed all of the previous installation steps. The load balancer will not work properly without the SSL module.Update the ServerAdmin email address, or comment out that line.
#ServerAdmin you@example.com
Run the following command to restart the
httpdserver:/usr/local/apache2/bin/apachectl restart
You should now be able to use Curl or a browser to access the load-balancer server IP address (with the port configured in the
httpd.conffile) using the HTTPS protocol.Now you can enable Ranger Admin HA using Ambari. On the Ambari dashboard of the first Ranger host, select Services > Ranger, then select Service Actions > Enable Ranger Admin HA to launch the Enable Ranger Admin HA Wizard.

On the Get Started page, enter the load-balancer URL and port number (in this example, 172.22.71.37:88), then click Next.

On the Select Hosts page, confirm the host assignments, then click Next.

Check the settings on the Review page, then click Next.

Click Complete on the Install, Start, and Test page to complete the installation.

When the installation is complete, the Ranger Admin instances are listed on the Ranger Summary page. Select Actions > Restart All Required to restart all services that require a restart.

![[Note]](../common/images/admon/note.png)
Note For Oracle, clear the
Setup DB and DB usercheck box under "Advanced ranger-env" to avoid DB setup.To test the load-balancer and Ranger HA configuration, select Ranger > Service Actions > Stop on one of the Ranger hosts.

Use a browser to check the load-balancer host URL (with port). You should see the Ranger Admin page.

Use the following steps to generate the self-signed certificate:
Switch to the directory that will contain the self-signed certificate:
cd /tmp
Generate the private key:
openssl genrsa -out server.key 2048
Generate the CSR:
openssl req -new -key server.key -out server.csr
Generate the self-signed key:
openssl x509 -req -days 365 -in server.csr -signkey server.key -out server.crt
Generate the keystore in PEM format:
openssl pkcs12 -export -passout pass:ranger -in server.crt -inkey server.key -out lbkeystore.p12 -name httpd.lb.server.alias
Use the
keytoolto convert the PEM format keystore to JKS format:keytool -importkeystore -deststorepass ranger -destkeypass ranger -destkeystore httpd_lb_keystore.jks -srckeystore lbkeystore.p12 -srcstoretype PKCS12 -srcstorepass ranger -alias httpd.lb.server.alias
Create a truststore of the load-balancer self-signed keystore:
keytool -export -keystore httpd_lb_keystore.jks -alias httpd.lb.server.alias -file httpd-lb-trust.cer
Copy the generated key and certificate into the
/usr/local/apache2/conf/directory.cp server.crt /usr/local/apache2/conf/ cp server.key /usr/local/apache2/conf/
Add the following entry at the end of the
/usr/local/apache2/conf/httpd.conffile to read the custom configuration file:Include /usr/local/apache2/conf/ranger-lb-ssl.conf
Create a custom
conffile for the load-balancer SSL configuration:vi /usr/local/apache2/conf/ranger-lb-ssl.conf
Make the following updates:
Add the following lines, then change the
<VirtualHost
                      *:8443>
port to match the default port you set previously in thehttpd.conffile.<VirtualHost *:8443> SSLEngine On SSLProxyEngine On SSLCertificateFile /usr/local/apache2/conf/server.crt SSLCertificateKeyFile /usr/local/apache2/conf/server.key #SSLCACertificateFile /usr/local/apache2/conf/ranger_lb_crt.pem #SSLProxyCACertificateFile /usr/local/apache2/conf/ranger_lb_crt.pem SSLVerifyClient optional SSLOptions +ExportCertData SSLProxyVerify none SSLProxyCheckPeerCN off SSLProxyCheckPeerName off SSLProxyCheckPeerExpire off ProxyRequests off ProxyPreserveHost off Header add Set-Cookie "ROUTEID=.%{BALANCER_WORKER_ROUTE}e; path=/" env=BALANCER_ROUTE_CHANGED <Proxy balancer://rangercluster> BalancerMember http://172.22.71.39:6080 loadfactor=1 route=1 BalancerMember http://172.22.71.38:6080 loadfactor=1 route=2 Order Deny,Allow Deny from none Allow from all ProxySet lbmethod=byrequests scolonpathdelim=On stickysession=ROUTEID maxattempts=1 failonstatus=500,501,502,503 nofailover=Off </Proxy> # balancer-manager # This tool is built into the mod_proxy_balancer # module and will allow you to do some simple # modifications to the balanced group via a gui # web interface. <Location /balancer-manager> SetHandler balancer-manager Order deny,allow Allow from all </Location> ProxyPass /balancer-manager ! ProxyPass / balancer://rangercluster/ ProxyPassReverse / balancer://rangercluster/ </VirtualHost>
![[Note]](../common/images/admon/note.png)
Note The URLs listed in the
BalancerMemberentries are the IP addresses of the Ranger Admin hosts. In this example, the Ranger Admin host adresses are:http://172.22.71.38:6080 http://172.22.71.39:6080
Run the following command to restart the
httpdserver:/usr/local/apache2/bin/apachectl restart
If you use a browser to check the load-balancer host (with port), you should see the Ranger Admin page.
Run the following command to enable Usersync to communicate with Ranger via the load-balancer. This command copies the previously generated truststore file from the
/tmpdirectory imports the certificate into the Usersync truststore.keytool -import -file /tmp/httpd-lb-trust.cer -alias httpd.lb.server.alias -keystore /etc/ranger/usersync/conf/mytruststore.jks -storepass changeit
Restart Ranger Usersync.
Run the following command to enable the HDFS plug-in to communicate with Ranger via the load-balancer. This command copies the previously generated truststore file from the
/tmpdirectory imports the certificate into the HDFS truststore.keytool -import -file /tmp/httpd-lb-trust.cer -alias httpd.lb.server.alias -keystore /etc/hadoop/conf/ranger-plugin-truststore.jks -storepass changeit
Restart HDFS.
In the Ranger Admin UI, select Audit > Plugins. You should see an entry for your repo name with HTTP Response Code 200.
Use SSH to connect to the KDC server host. Use the
kadmin.localcommand to access the Kerberos CLI, then check the list of principals for each domain where Ranger Admin and the load-balancer are installed.kadmin.local kadmin.local: list_principals
For example, if Ranger Admin is installed on <host1> and <host2>, and the load-balancer is installed on <host3>, the list returned should include the following entries:
HTTP/ <host3>@EXAMPLE.COM
HTTP/ <host2>@EXAMPLE.COM
HTTP/ <host1>@EXAMPLE.COM
If the HTTP principal for any of these hosts is not listed, use the following command to add the principal:
kadmin.local: addprinc -randkey HTTP/<host3>@EXAMPLE.COM
![[Note]](../common/images/admon/note.png)
Note This step will need to be performed each time the Spnego keytab is regenerated.
Use the following
kadmin.localcommands to add the HTTP Principal of each of the Ranger Admin and load-balancer nodes to the Spnego keytab file:kadmin.local: ktadd -norandkey -kt /etc/security/keytabs/spnego.service.keytab HTTP/ <host3>@EXAMPLE.COM kadmin.local: ktadd -norandkey -kt /etc/security/keytabs/spnego.service.keytab HTTP/ <host2>@EXAMPLE.COM kadmin.local: ktadd -norandkey -kt /etc/security/keytabs/spnego.service.keytab HTTP/ <host1>@EXAMPLE.COM
Use the
exitcommand to exitktadmin.local.Run the following command to check the Spnego keytab file:
klist -kt /etc/security/keytabs/spnego.service.keytab
The output should include the principals of all of the nodes on which Ranger Admin and the load-balancer are installed. For example:
Keytab name: FILE:/etc/security/keytabs/spnego.service.keytab
KVNO Timestamp     	Principal
---- ----------------- --------------------------------------------------------
   1 07/22/16 06:27:31 HTTP/ <host3>@EXAMPLE.COM
   1 07/22/16 06:27:31 HTTP/ <host3>@EXAMPLE.COM
   1 07/22/16 06:27:31 HTTP/ <host3>@EXAMPLE.COM
   1 07/22/16 06:27:31 HTTP/ <host3>@EXAMPLE.COM
   1 07/22/16 06:27:31 HTTP/ <host3>@EXAMPLE.COM
   1 07/22/16 08:37:23 HTTP/ <host2>@EXAMPLE.COM
   1 07/22/16 08:37:23 HTTP/ <host2>@EXAMPLE.COM
   1 07/22/16 08:37:23 HTTP/ <host2>@EXAMPLE.COM
   1 07/22/16 08:37:23 HTTP/ <host2>@EXAMPLE.COM
   1 07/22/16 08:37:23 HTTP/ <host2>@EXAMPLE.COM
   1 07/22/16 08:37:23 HTTP/ <host2>@EXAMPLE.COM
   1 07/22/16 08:37:35 HTTP/ <host1>@EXAMPLE.COM
   1 07/22/16 08:37:36 HTTP/ <host1>@EXAMPLE.COM
   1 07/22/16 08:37:36 HTTP/ <host1>@EXAMPLE.COM
   1 07/22/16 08:37:36 HTTP/ <host1>@EXAMPLE.COM
   1 07/22/16 08:37:36 HTTP/ <host1>@EXAMPLE.COM
   1 07/22/16 08:37:36 HTTP/ <host1>@EXAMPLE.COM
Use
scpto copy the Spnego keytab file to every node in the cluster on which Ranger Admin and the load-balancer are installed. Verify that the/etc/security/keytabs/spnego.service.keytabfile is present on all Ranger Admin and load-balancer hosts.On the Ambari dashboard, select Ranger > Configs > Advanced, then select Advanced ranger-admin-site. Set the value of the
ranger.spnego.kerberos.principalproperty to*.
Click Save to save the configuration, then restart Ranger Admin.

