Enabling SSL for Ranger KMS
If you do not have access to Public CA-issued certificates, complete the following steps to create and configure self-signed certificates.
![[Note]](../common/images/admon/note.png) | Note |
|---|---|
The following examples contain sample values (folder locations, passwords, and filenames). Change these values according to your environment. |
Considerations:
Copy
keystore/truststorefiles into a different location (e.g./etc/security/serverKeys) than the/etc/<component>/conffolders.Make sure JKS file names are different from each other.
Make sure correct permissions are applied.
Make sure all passwords are secured.
For the test connection to be successful after enabling SSL, self-signed certificates should be imported to the Ranger admin’s trust store (typically JDK
cacerts).Property
ranger.plugin.service.policy.rest.ssl.config.fileshould be verified; for example:ranger.plugin.kms.policy.rest.ssl.config.file==>/etc/ranger/kms/conf/ranger-policymgr-ssl.xml
To enable SSL:
Stop the Ranger KMS service:

Go to the Ranger KMS (and plugin) installation location, and create a self-signed certificate:
cd /etc/ranger/kms/conf/keytool -genkey -keyalg RSA -alias rangerKMSAgent -keystore <ranger-kms-ks> -storepass myKeyFilePassword -validity 360 -keysize 2048chown kms:kms <ranger-kms-ks>chmod 400 <ranger-kms-ks>where
<ranger-kms-ks>is the name of the Ranger KMS keystore (for example,ranger-plugin-keystore.jks)Provide an identifiable string in response to the question "What is your first and last name?"
Important: In case multiple servers need to communicate with Ranger admin for downloading policies for the same service/repository, make sure to use the repo name or a common string across all nodes. Remember exactly what you entered, because this value will be required for the Common Name for Certificate field on the edit repository page in the policy manager UI.
To create the keystore, provide answers to the subsequent questions. Note: Press enter when prompted for a password.
Create a truststore for the Ranger KMS plugin, and add the public key of admin as a trusted entry into the truststore:
cd /etc/ranger/kms/conf/keytool -export -keystore <ranger-admin-ks> -alias rangeradmin -file <cert-filename>keytool -import -file <cert-filename> -alias rangeradmintrust -keystore <ranger-kms-ts> -storepass changeitchown kms:kms <ranger-kms-ts>chmod 400 <ranger-kms-ts>where
<ranger-admin-ks>is the location of the Ranger Admin keystore (for example,/etc/ranger/admin/conf/ranger-admin-keystore.jks)<ranger-kms-ts>is the name of the Ranger KMS plugin trustore (for example,ranger-plugin-truststore.jks)<cert-filename>is the name of the Ranger Admin certificate file (for example,ranger-admin-trust.cer)Note: Press enter when prompted for a password.
Update below properties available in
Advanced ranger-kms-policymgr-ssl:xasecure.policymgr.clientssl.keystore: Provide the location for the keystore that you created in the previous step.xasecure.policymgr.clientssl.keystore.password: Provide the password for the keystore (myKeyFilePassword).xasecure.policymgr.clientssl.truststore: Provide the location for the truststore that you created in the previous step.xasecure.policymgr.clientssl.truststore.password: Provide the password for the truststore (changeit).
Add the plugin's self-signed cert into Admin's trustedCACerts:
cd /etc/ranger/admin/confkeytool -export -keystore <ranger-kms-ks> -alias rangerKMSAgent -file <cert-filename> -storepass myKeyFilePasswordkeytool -import -file <cert-filename> -alias rangerkmsAgentTrust -keystore <ranger-admin-ts> -storepass changeitwhere
<ranger-kms-ks>is the path to the Ranger KMS keystore (for example,/etc/ranger/kms/conf/ranger-plugin-keystore.jks)<cert-filename>is the name of the certificate file (for example,ranger-kmsAgent-trust.cer)<ranger-admin-ts>is the name of the Ranger Admin truststore file (for example, the JDK cacerts file)Log into the Policy Manager UI (as
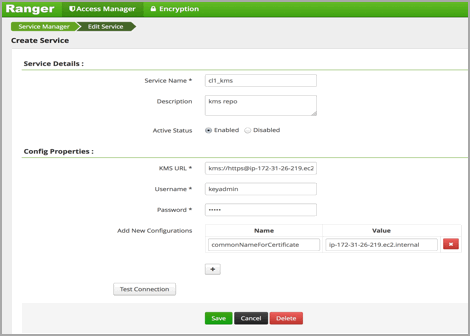
keyadminuser) and click on the Edit button of your KMS repository. Provide the CN name of the keystore for Common Name For Certificate (commonNameForCertificate), and save it. This property is not added by default.

Configuring the Ranger KMS Server
Go to the Ranger KMS config location and create a self-signed certificate:
cd /etc/ranger/kms/confkeytool -genkey -keyalg RSA -alias rangerkms -keystore <ranger-kms-ks> -storepass rangerkms -validity 360 -keysize 2048chown kms:kms ranger-kms-keystore.jkschmod 400 ranger-kms-keystore.jkswhere
<ranger-kms-ks>is the name of the Ranger KMS keystore (for example,ranger-plugin-keystore.jks)Provide an identifiable string in response to the question "What is your first and last name?" To create the keystore, provide answers to all subsequent questions to create the keystore Note: Press enter when prompted for a password.
Edit the following properties and values in
Advanced ranger-kms-site:ranger.service.https.attrib.keystore.file: Add file path of ranger-kms-keystore.jksranger.service.https.attrib.client.auth: wantranger.service.https.attrib.keystore.keyalias: Add the alias used for creating ranger-kms-keystore.jksranger.service.https.attrib.keystore.pass: Add password used for creating ranger-kms-keystore.jksranger.service.https.attrib.ssl.enabled: true
Update
kms_portinAdvanced kms-envto9393. Ambari will recommend the value to{{ranger.service.https.port}}.Save your changes and start Ranger KMS.
In your browser (or from Curl) when you access the Ranger KMS UI using the HTTPS protocol on the
ranger.service.https.portlisted in Ambari, the browser should respond that it does not trust the site. Proceed, and you should be able to access Ranger KMS on HTTPS with the self-signed cert that you just created.Export the Ranger KMS certificate:
cd /usr/hdp/<version>/ranger-kms/confkeytool -export -keystore <ranger-kms-ks> -alias rangerkms -file <cert-filename>where
<ranger-kms-ks>is the name of the Ranger KMS keystore (for example,ranger-kms-keystore.jks)<cert-filename>is the name of the certificate file (for example,ranger-kms-trust.cer)Import the Ranger KMS certificate into the Ranger admin truststore:
keytool -import -file <cert-filename> -alias rangerkms -keystore
                        <ranger-admin-ts> -storepass changeit
where
<cert-filename>is the name of the certificate file (for example,ranger-kms-trust.cer)<ranger-admin-ts>is the name of the Ranger Admin truststore file (for example, JDK cacerts)![[Note]](../common/images/admon/note.png)
Note Make sure Ranger Admin’s truststore properties (
ranger.truststore.fileandranger.truststore.password) are correctly configured inranger-admin-site.xml.Import the Ranger KMS certificate into the Hadoop client truststore:
keytool -import -file <cert-filename> -alias rangerkms -keystore
                        <ts-filename> -storepass bigdata
where
<cert-filename>is the name of the certificate file (for example,ranger-kms-trust.cer)<ts-filename>is the name of Hadoop client truststore file (for example,/etc/security/clientKeys/all.jks)Restart Ranger Admin and Ranger KMS.
Login to Policy Manager UI with keyadmin credentials. Under default KMS Repo configuration, replace KMS URL configuration value with the new SSL-enabled KMS URL. For example:
Previous KMS URL =
kms://http@internal host
                                name:http_port/kms
New KMS URL =
kms://https@internal host
                                name:https_port/kms
Now in the Policy Manager UI>Audit>Plugin tab, you should see an entry for your service name with HTTP Response Code = 200.

