Deploying and managing Kafka Connect connectors in SMM
Learn how to use the SMM UI to deploy new Kafka Connect connectors using the Connector
Setup wizard, as well as how to reconfigure, pause, resume, restart, and delete existing
connectors. Additionally, learn about the various features and options SMM provides for editing
connector configurations.
Deploying a Kafka Connect connector in SMM
Kafka Connect connectors are deployed in SMM using the Connector Setup wizard. Learn
how to deploy a new connector using the wizard.
By default, you can use the Connector Setup wizard to deploy any connector that
is shipped with Cloudera Runtime. The only exceptions are the FileStream example
connectors (FileStreamSourceConnector and FileStreamSinkConnector). Although
these connectors are part of the Kafka distribution and are shipped with
Cloudera Runtime, they are not available by default in the Connector Setup
wizard. This is because neither connector is considered production ready. If you
want to deploy an instance of these connectors, you must install them first. For
more information, see Installing Kafka Connect
connectors.
Third-party connectors can be deployed using the wizard, but must be installed
first. For more information, see Installing Kafka Connect
connectors.
Before deploying any connector, Cloudera recommends that you review the
documentation of the connector. For more information regarding each connector
shipped in CDP, see Connectors.
Click Connect in the navigation sidebar.
Click the New Connector option.
This option is available on all Kafka Connect related pages of the SMM UI.
Clicking this option starts the Connector Setup wizard and
redirects you to the Select A Template page. This page
contains all connectors available for deployment in the form of selectable
cards. Each card includes the following information about the connector:
The connector's fully qualified class name.
The connector's display name. If no display name is available,
the card includes the unqualified classname.
The version of the connector.
By default, the page includes all connectors shipped with Cloudera Runtime.
Third-party connectors that you install manually are also visible on this page
following installation.
Select a connector from the Source Templates or
Sink Templates section.
The Connector Configuration page appears. Most connectors shipped with Cloudera Runtime come with a default
configuration template to ease configuration. If a template is available for a
specific connector, the property keys and values are automatically populated
when you select the connector. The properties and values included in the
templates depend on the selected connector. In general, the templates include
all mandatory properties that are required for successful deployment. However,
most connectors also have a number of additional properties that might not be
part of the template. As a result, Cloudera recommends that you always review
the documentation for the specific connector that you want to deploy.
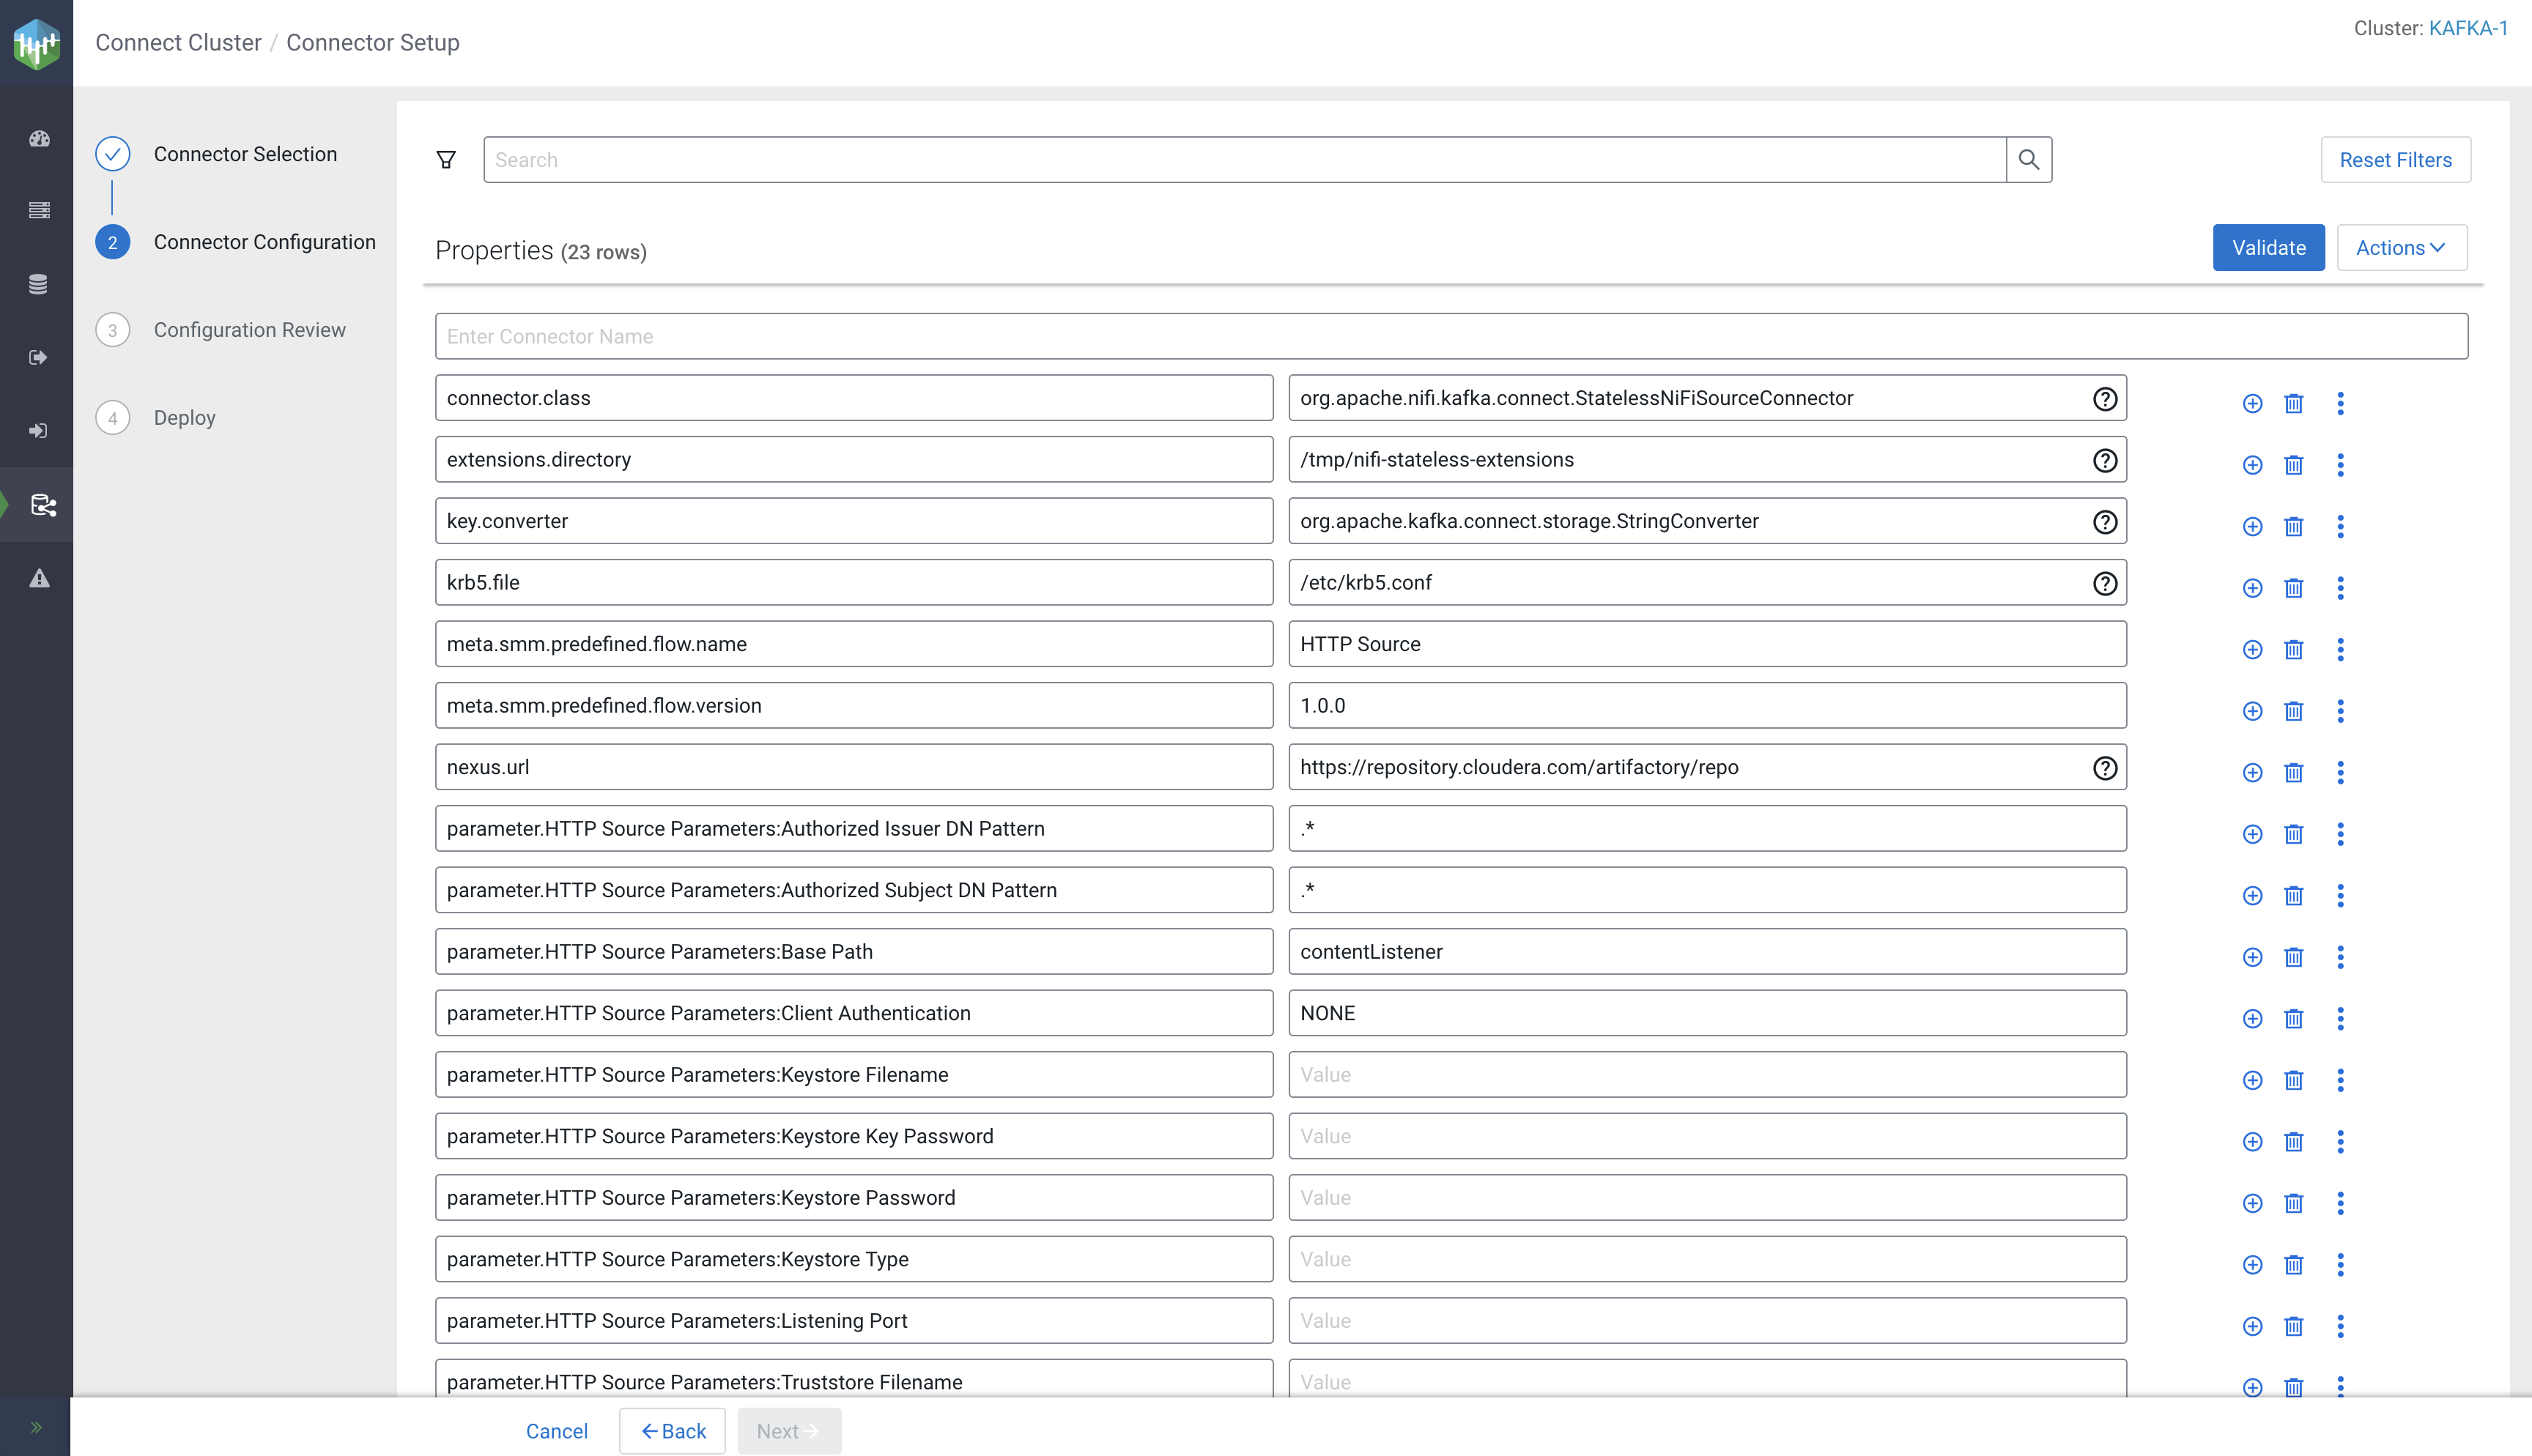
Configure the properties of the connector.
The Connector Configuration page includes various
features and options that you can use to configure your connector. Each row in
the Properties section represents the key and value of a
property. Using the different buttons and other options available, you can add,
delete, import, or otherwise modify the configuration. For more details on the
configuration features available on this page, see Connector configuration
features in SMM.
Click Validate after you are done configuring the
connector.
Validating the configuration is mandatory when you deploy or modify a
connector. If SMM finds any errors in the configuration, the properties that
contain errors are highlighted in red, and an error message with the details
regarding the configuration issue is displayed. Resolve any errors until
validation passes.
Click Next.
The Next option is disabled until validation passes.
After you click Next, the Configuration
Review page appears.
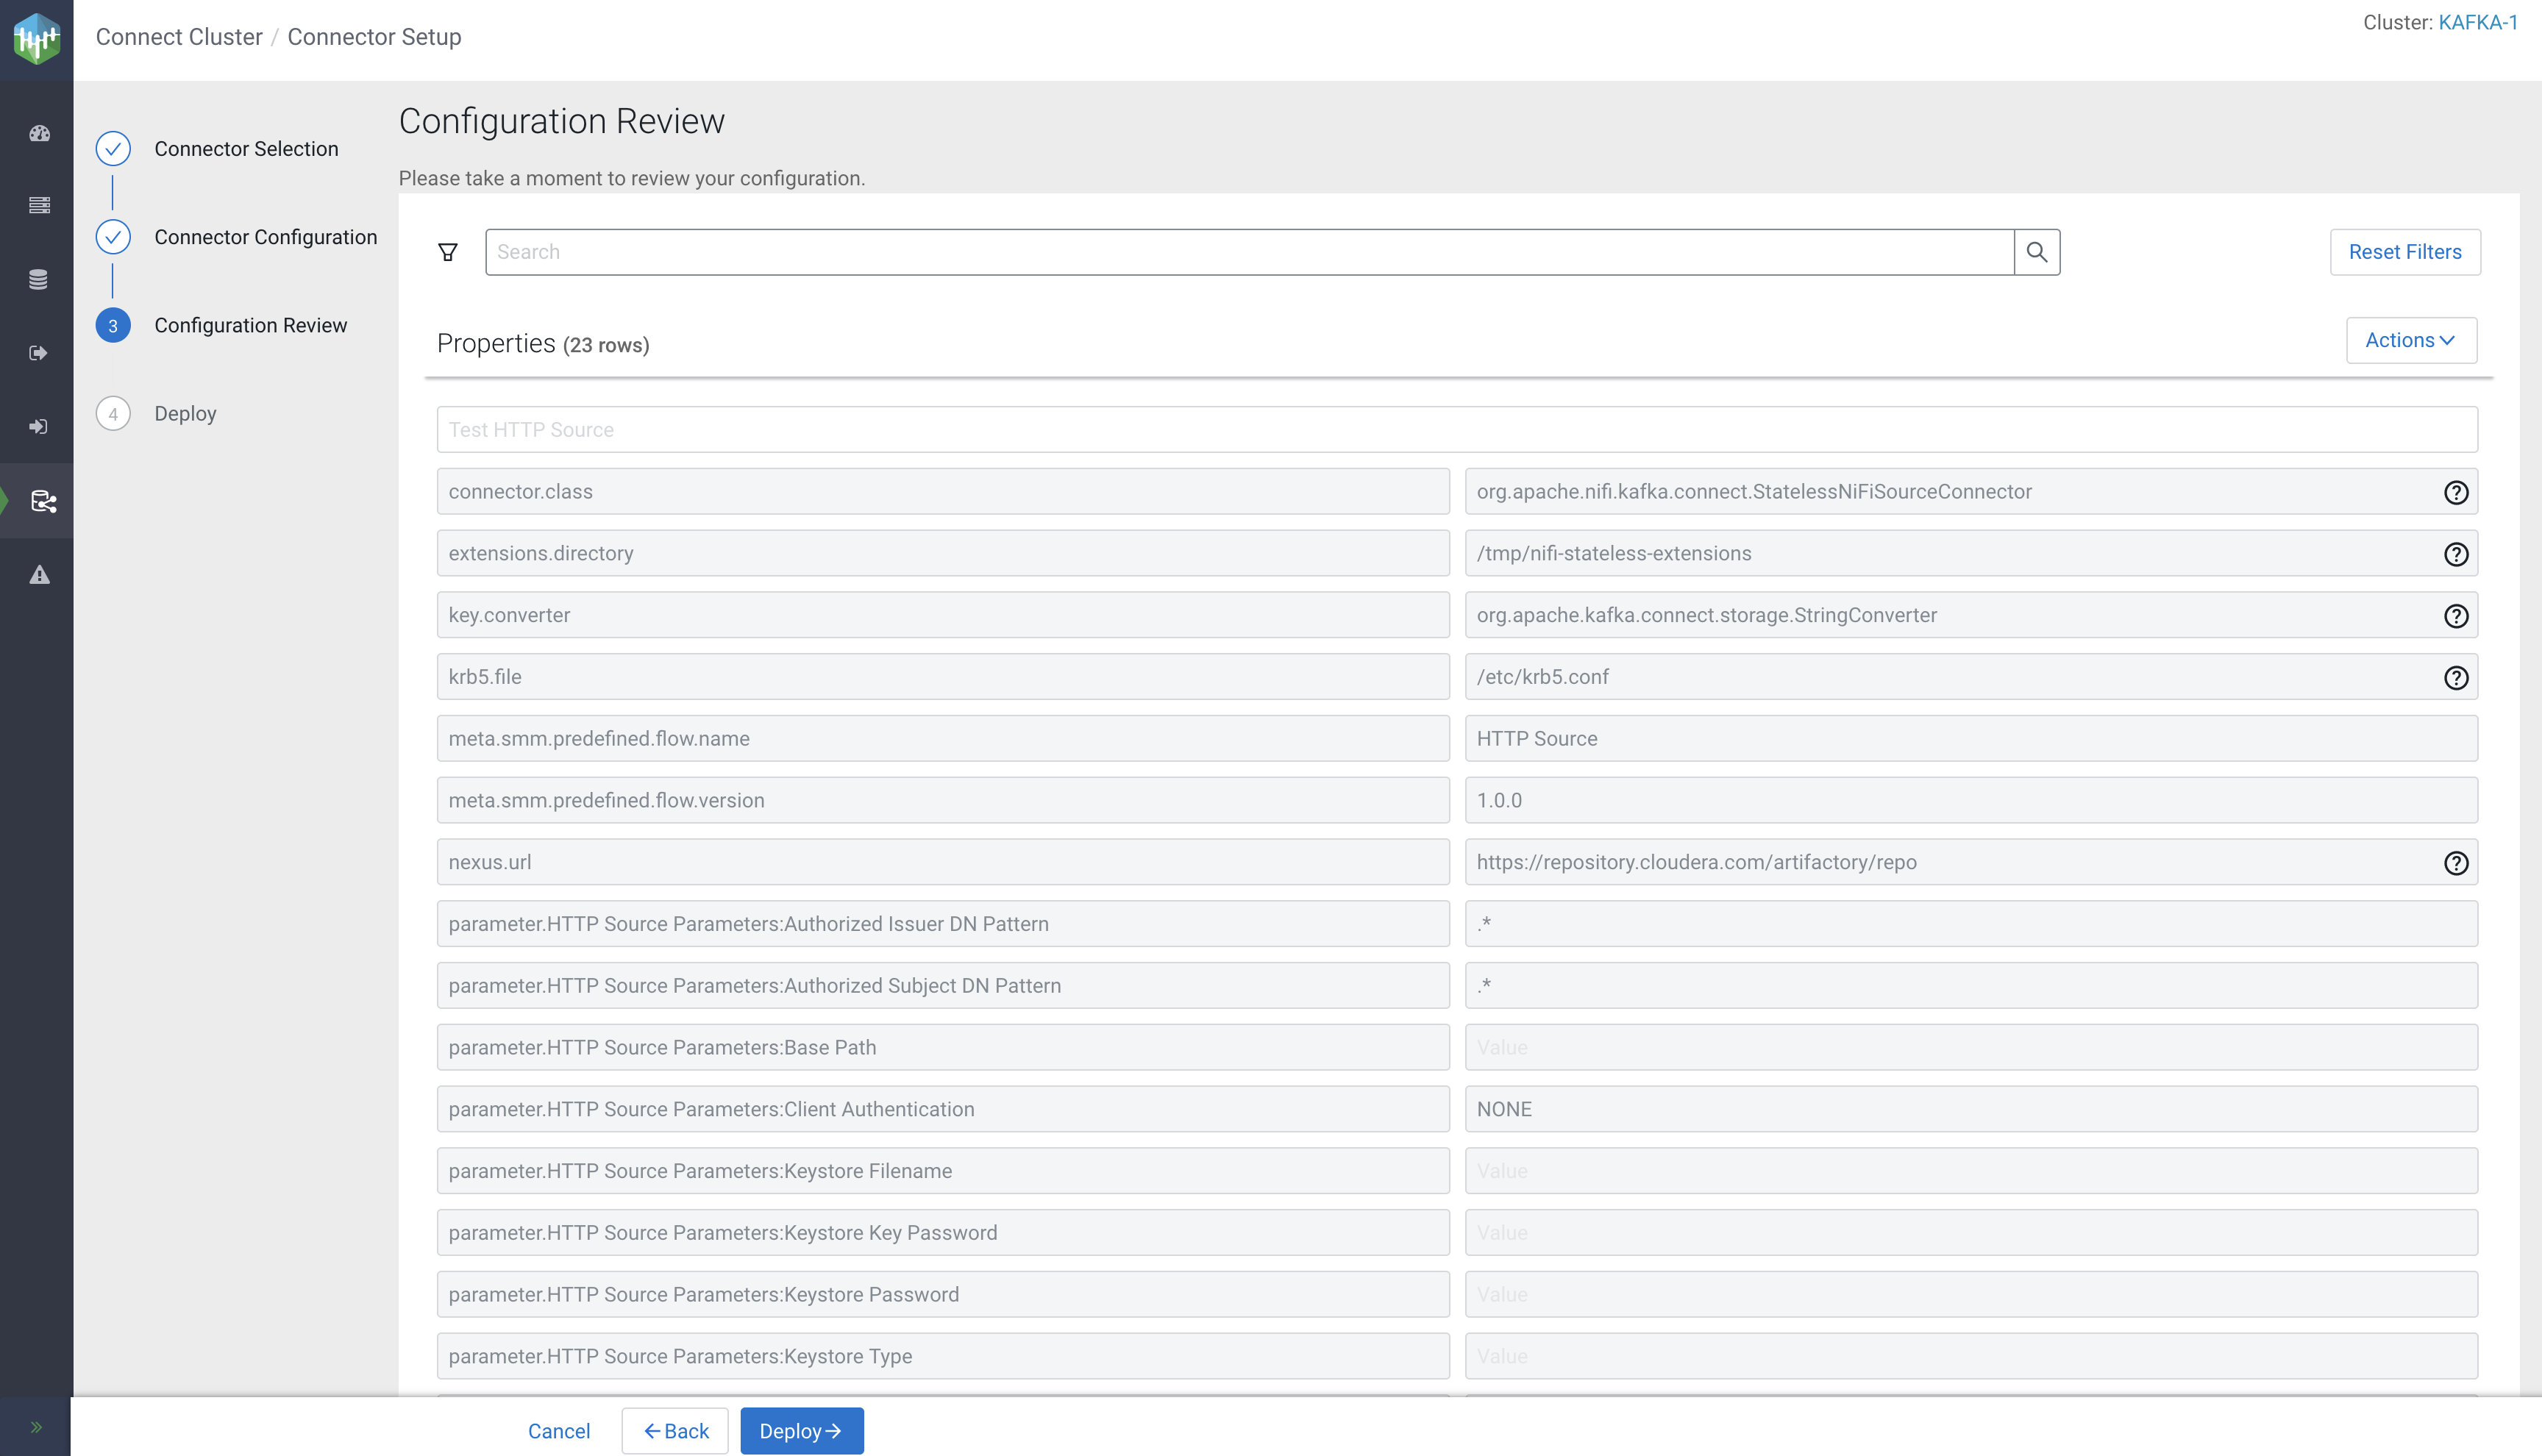
Review your connector configuration.
The Configuration Review page allows you to review the
connector configuration. Use this page to ensure that all properties are
correctly configured for your use case.
Most configuration options are
disabled on this page. However, you can use the search and filtering options
to search for properties. Additionally, you can export the connector
configuration for later use with Actions > Export. If you find any errors, go back to the Connector
Configuration page, make any necessary changes, and
revalidate the configuration before continuing.
Click Deploy to deploy the connector.
After you click Deploy, the Connector
Deployment Status modal is displayed that shows the status of the
deployment.
After the connector is deployed, you can monitor the
connector on the Connect Cluster page or the connector's profile
page. For more information, see The Kafka Connect UI.
Pausing, resuming, restarting, and deleting a Kafka Connect connector in SMM
Learn how to pause, resume, restart, or delete an existing Kafka Connect Connector in
SMM.
Click Connect in the navigation sidebar.
Identify the connector you want to manage.
Click
(Profile) beside the connector.
Click
Pause, Resume,
Restart, or Delete.
If you select Delete, you must confirm the action
in a pop-up window.
Reconfiguring Kafka Connect connectors in SMM
Learn how to edit the configuration of a running Kafka Connect connector using the
SMM UI.
Click Connect in the navigation sidebar.
Identify the connector you want to modify.
Click
(Profile) beside the connector.
Go to the Connector Settings tab.
Click
Edit at the bottom-left corner of the page.
All properties except connector name become editable.
Configure the properties of the connector.
The Connector Settings page includes various features
and options that you can use to configure your connector. Each row in the
Properties section represents the key and value of a
property. Using the different buttons and other options available, you can add,
delete, import, or otherwise modify the configuration. For more details on the
configuration features available on this page, see Connector configuration
features in SMM.
Click Validate after you are done configuring the
connector.
Validating the configuration is mandatory when you deploy or modify a
connector. If SMM finds any errors in the configuration, the properties that
contain errors are highlighted in red, and an error message with the details
regarding the configuration issue is displayed. Resolve any errors until
validation passes.
Click Update .
Connector configuration features in SMM
Learn about the various configuration features and options that you can use when
configuring Kafka Connect connectors in SMM.
The SMM UI includes two pages where you configure Kafka Connect connector properties. The
Connector Configuration step of the Connector Setup
wizard and the Connector Profile > Connector Settings tab. Both pages include various features and options that are designed to help you
with connector configuration. The following sections go over each of the configuration options
available on the UI.
Configuring properties
Each row on the Connector Configuration page represents the key (name)
and configuration value of a specific property. You can use the icons next to each property to
add or remove properties. Clicking next to a property opens a context menu that includes additional
configuration options. The options available in the context menu depend on the property. For example, you can edit and
reset the connector.class property, but you cannot configure its type.
Adding properties
Click to add a new
property. An empty row appears for the new property. Enter property keys in the left field and
property values in the right field. When you select a key field, a list of suggested
properties appear that are valid for the connector. The list is automatically filtered when
you start typing.
Deleting properties
Click to delete a property.
Use Actions > Remove to remove all properties from the configuration with the exception of
connector.class.
Editing properties
Click
Edit to edit the configuration value of a property in a separate window. Use this
option if the value you add is long, complex, or consists of multiple lines.
If you are
deploying a NiFi Stateless Sink or Source connector, the modal that opens with for the
flow.snapshot property is unique and includes the
Browse... and Save and Enhance options.
Browse... enables you to upload a flow definition JSON from your
machine, Save and Enhance adds the parameters specified in your flow
definition to the connector configuration. For more information on
flow.snapshot configuration, see Configuring flow.snapshot for
Stateless NiFi connectors.
Resetting properties
You can use Reset value to reset the value of a single property.
Alternatively, you can use Actions > Reset to reset the full configuration. The reset options behave uniquely depending on
the configuration page that you use them on.
When deploying new connectors using the
Connector Configuration page of the wizard:
Reset
value resets the value to the default value set in the configuration template.
This option is not available for properties that are not part of the template.
Actions > Reset resets all configuration properties and reverts the configuration to the
default configuration template.
When editing the configuration of existing connectors on the Connector Profile > Connector Settings page:
Reset
value resets the value to the last value that the connector was deployed with.
This option is not available for new properties that you add to the configuration while
editing the configuration.
Actions > Reset resets all configuration properties and reverts to the configuration that
the connector was last deployed with.
Type configuration
The String
,
Boolean, Number, and Password options enable you to set the type of the
property. Setting the type of a property changes the property's value field depending on the
type you select.
String
sets the type of the property to string and changes the input field to a single
line text box.
Number sets the type to number and changes the input field to a text box that
only allows negative and positive whole numbers and decimals.
Boolean sets the type of the property to boolean and changes the input field to
a checkbox.
Password sets the type of the property to password.
Selecting
Password hides (locks) the value on the UI and stores it in a secure manner.
Once the connector is deployed, properties marked as passwords are encrypted and stored
securely in an internal Kafka topic. The actual values only resolve at runtime. These
values cannot be retrieved or otherwise read from the configuration of the connector. In
most cases, you use this option to hide passwords or other types of sensitive credentials
found in connector configurations, however, you can use this option for any property value
that your organization considers sensitive.
Property search and filtering
At the top of the page you can find a search bar that you can use to search and filter for
connector properties. Search only works for property keys, values are disregarded. When you
search for a string, the Properties section of the page is automatically
filtered and only the relevant properties are shown. The number of matches is displayed next to
Properties.
In addition to searching, you can filter properties based on their group and importance. To do
so, click the filter icon and select the relevant group and importance that you want to search
for. To clear all applied filters, click Reset Filters.
Viewing property help
Hovering over (Help), found next
to some property values, displays information about that property. What information is displayed
is property dependent, but at minimum you are presented with a description of the property. If
available, the group, importance, and expected type of a property is also displayed. The icon is only available for properties
that have their metadata (description, type, group, and so on) defined.
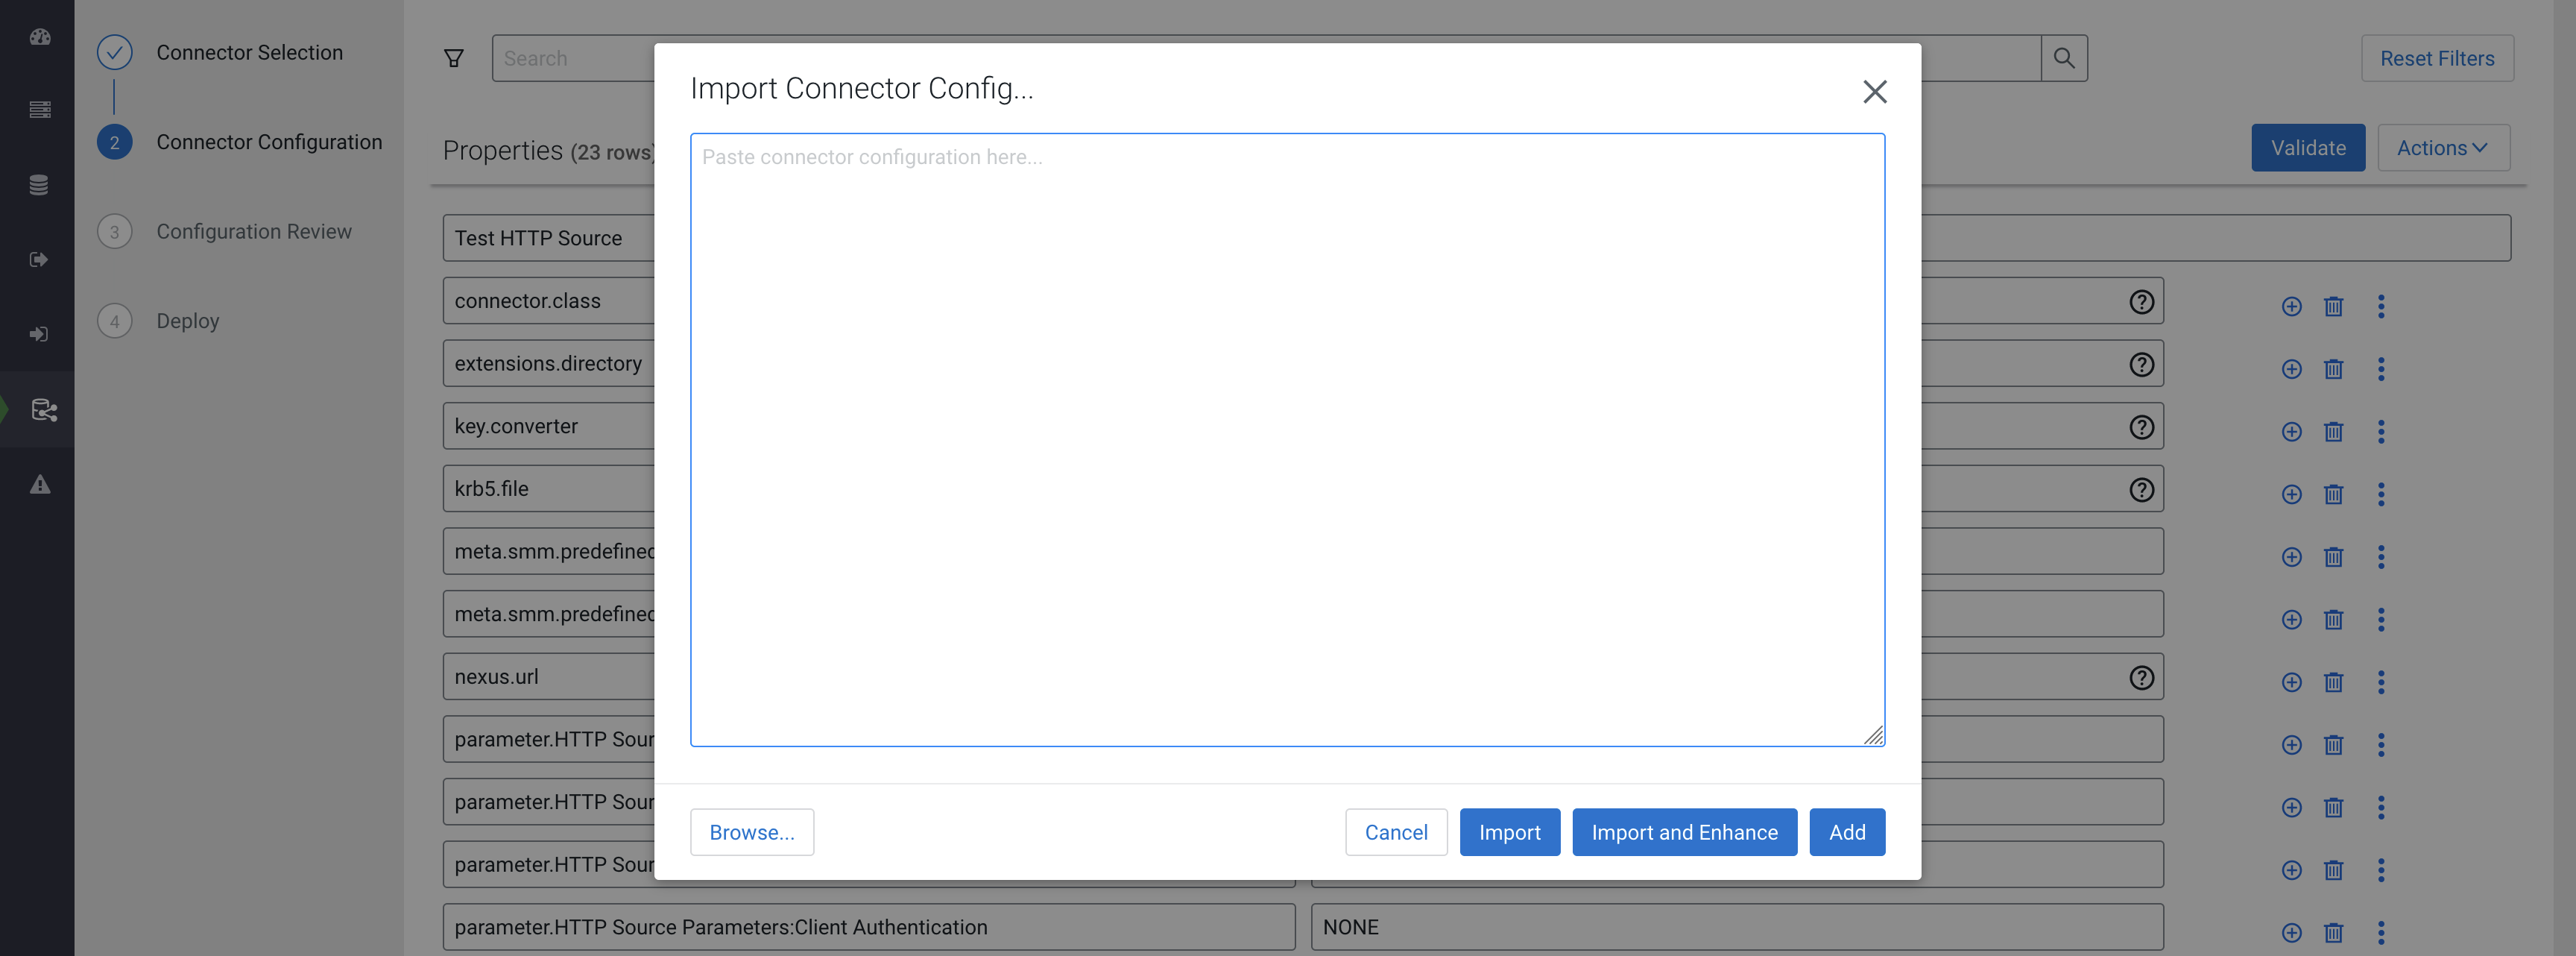
Importing configurations
To import a configuration, click Actions > Import. Clicking Import opens the Connector
Config… modal.
Using the modal you can:
Type or paste your configuration.
Use Browse… to upload the contents of a file from your machine.
The configuration that you add can be a full configuration that contains all properties
necessary for the connector. Alternatively, it can be a partial configuration that contains a
select number of properties that you want to add to the configuration. The configuration you
include in the text box must be in JSON format. For example:
After adding properties, you can use the Import, Import and
Enhance, or Add options to import the configuration. Each
option imports the properties in a different way.
Import
This option populates the Properties
section with the keys and values you added in the Import Connector
Config... modal. This option overwrites all existing properties in the
configuration.
Import and Enhance
This option populates the
Properties section with the keys and values you added in the
Import Connector Config... modal. Additionally, properties that are most
likely needed for the respective connector are also added.
Import and
Enhance is used specifically for the NiFi Stateless Source and NiFi Stateless
Sink connectors. When this option is used, SMM parses the dataflow specified in
flow.snapshot, extracts all parameters that are available in the dataflow,
and adds them to the connector configuration. This option overwrites all existing properties
in the configuration.
Add
This option amends the existing configuration with the
properties from the Import Connector Config... modal. Use this option if
you want to batch import additional properties to your configuration. For example, you can use
this option to batch add security properties.
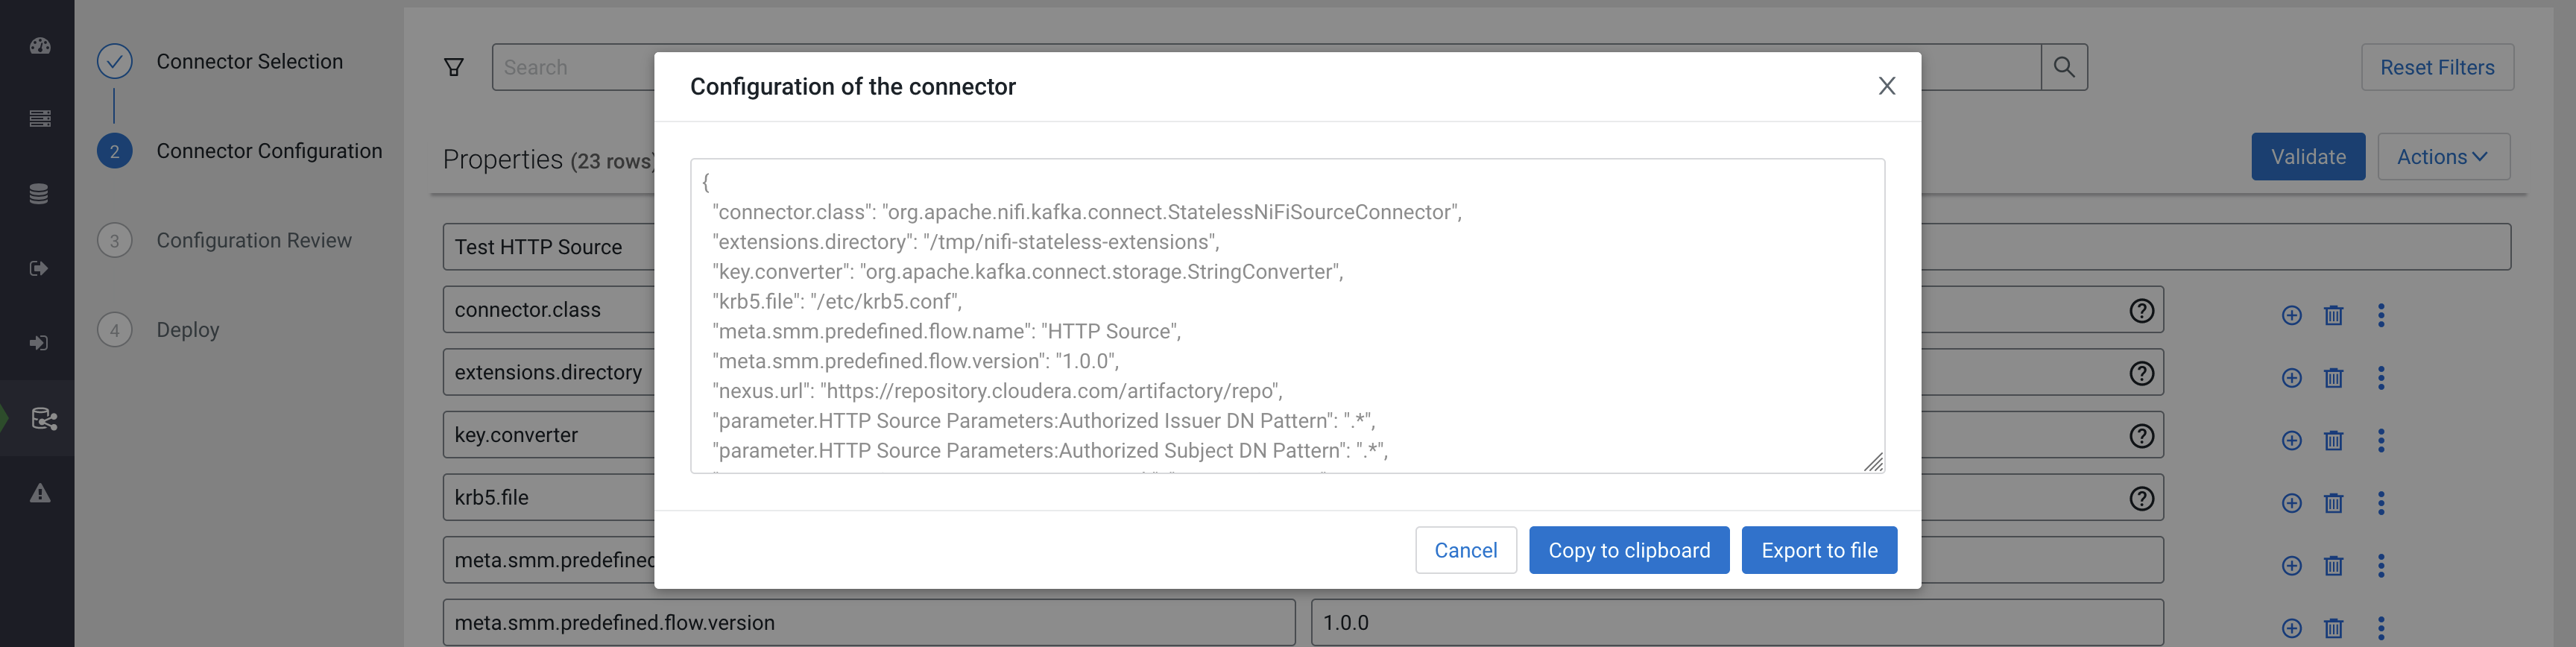
Exporting Configurations
To export a configuration, click Actions > Export. Clicking Export opens the Configuration of the
connector modal.
Click Copy to Clipboard to copy the configuration to the clipboard.
Click Export to file to download the configuration as a JSON
file.
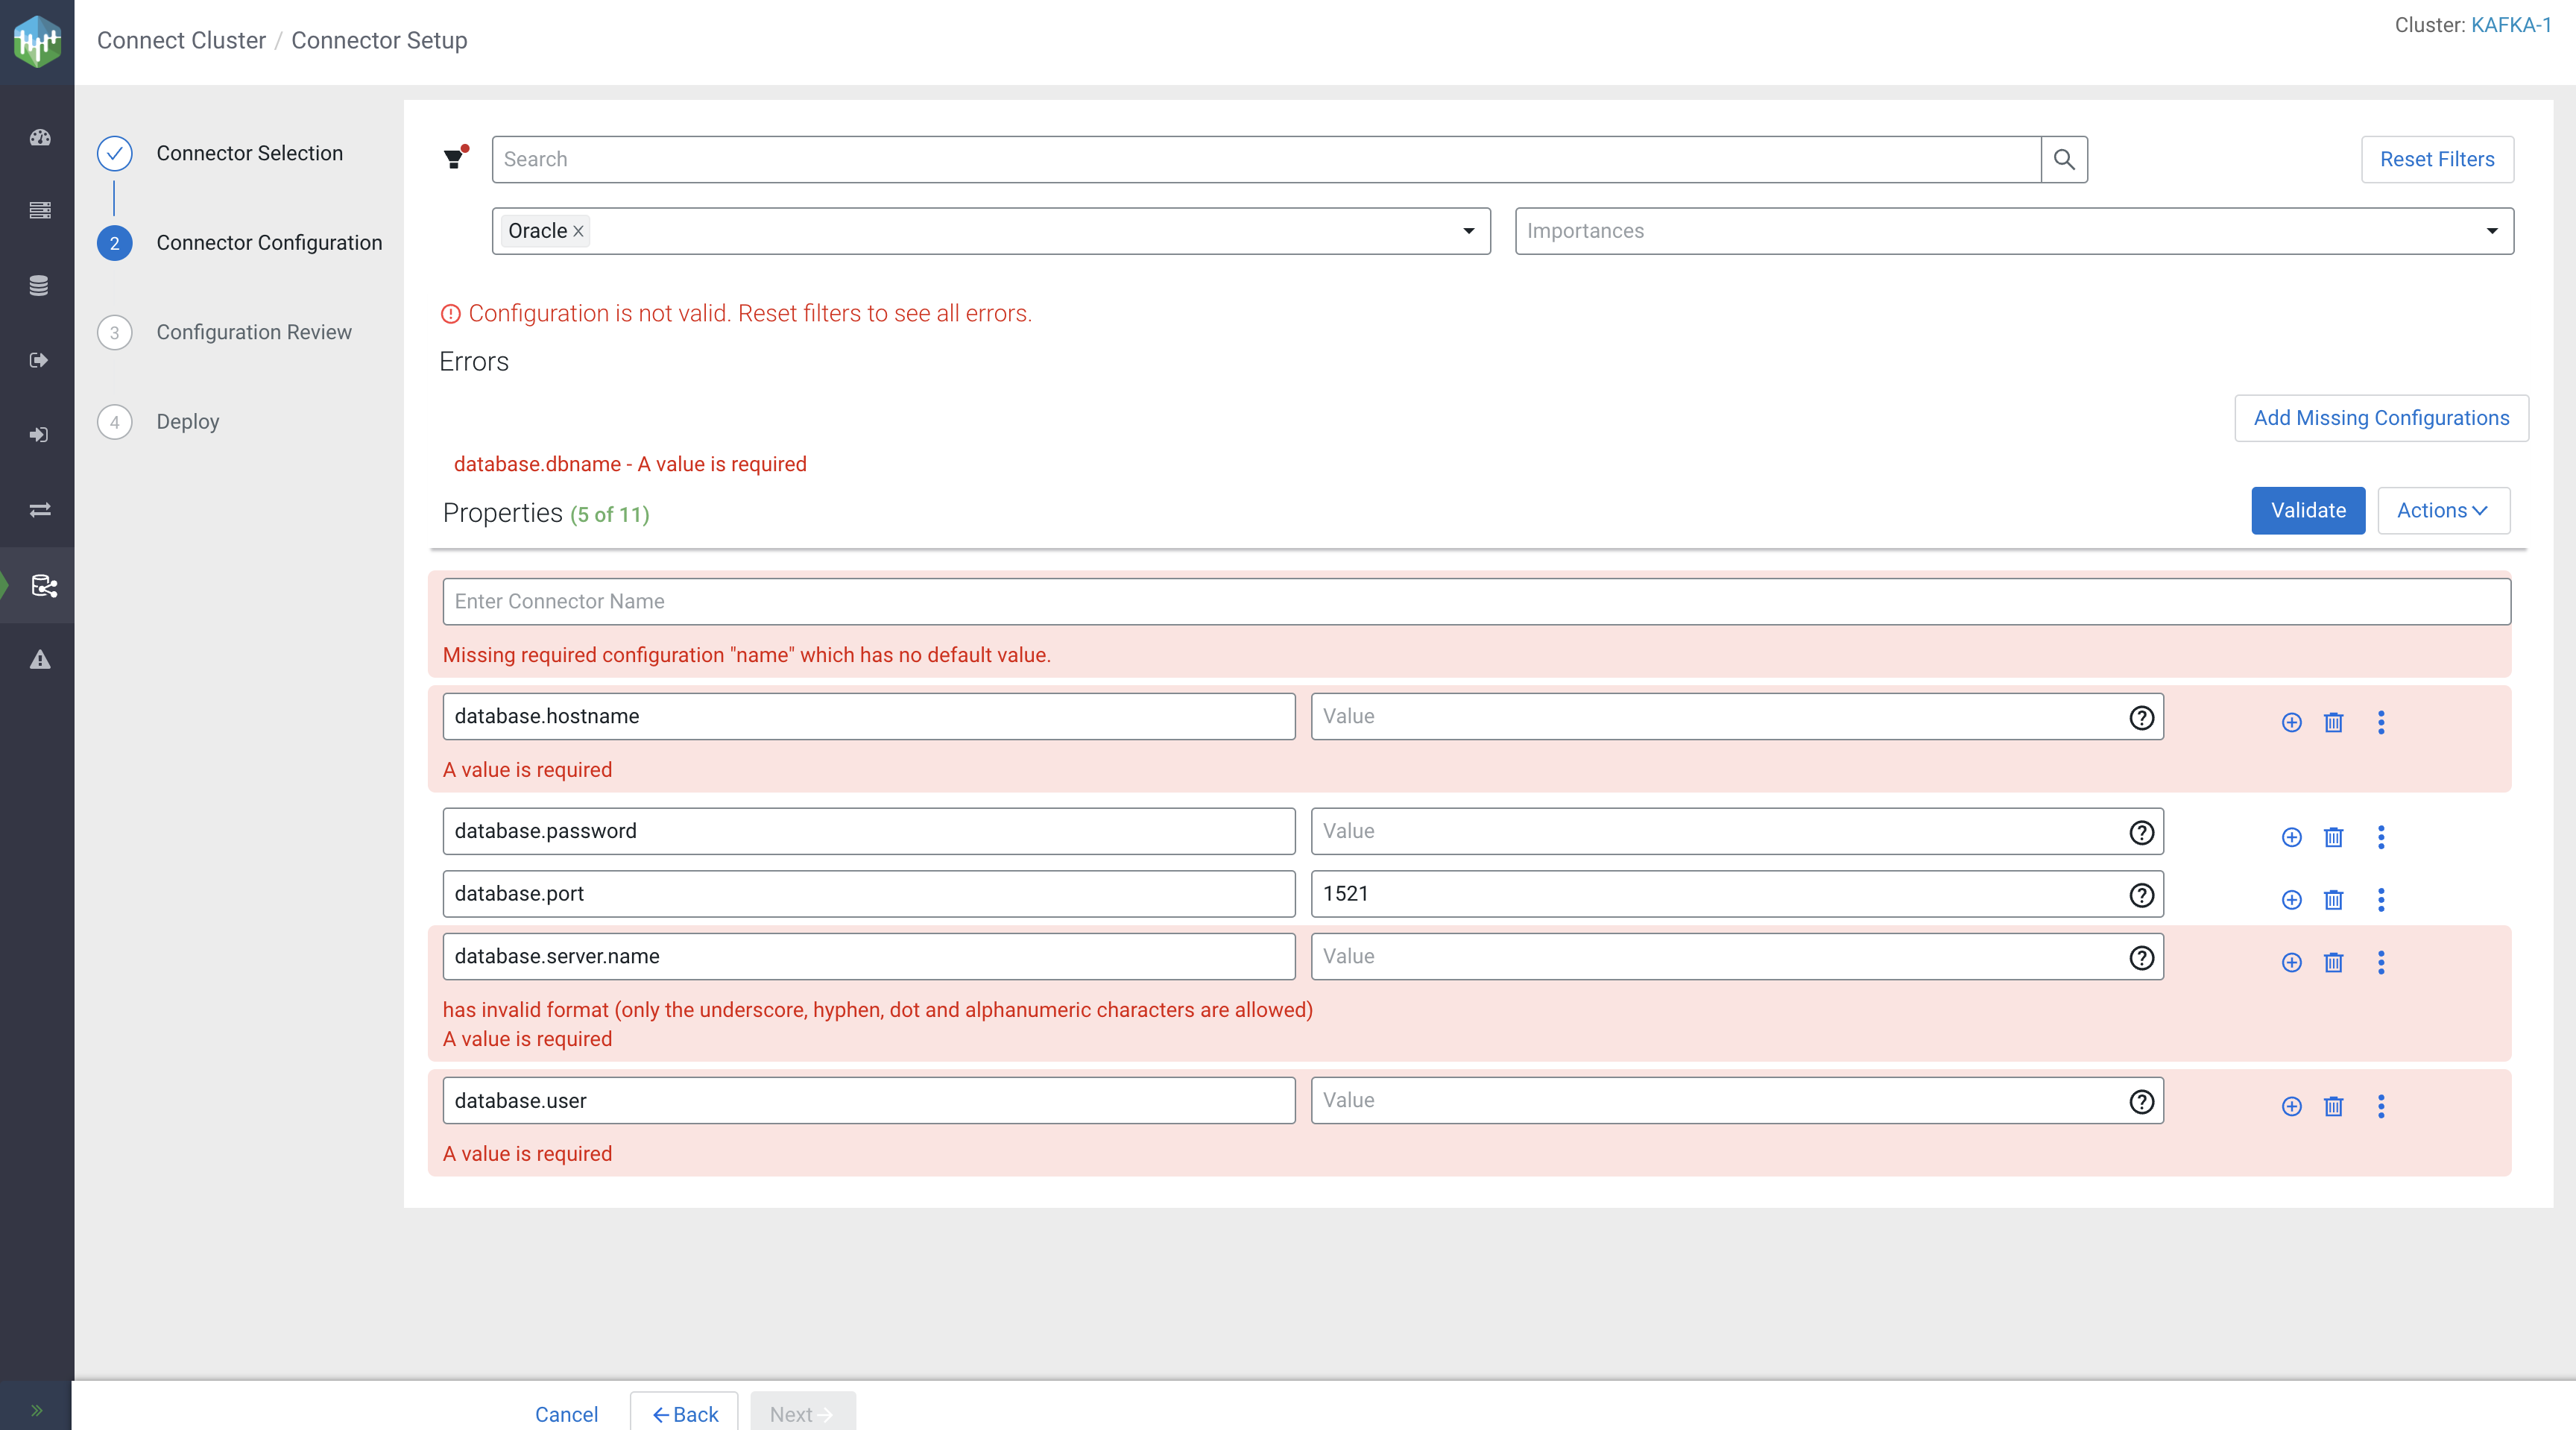
Validating configurations
Before you can deploy or redeploy a connector, you must validate the configuration. This is
done using Validate. If SMM finds any errors in the configuration, the
properties that contain errors are highlighted in red, and an error message with the details
regarding the configuration issue is displayed.
If the configuration is missing a mandatory property, the name of the missing property is
displayed in an Errors section on the top of the page. You can add
missing mandatory properties by clicking Add missing configurations.
This option adds both property keys and values. Values are populated using the following
logic.
If the connector was previously deployed and you are updating the configuration, the
default value used will be the value that the connector was last deployed with.
If you are configuring a new connector, the default value from the sample
configuration is used.
If you are configuring a new connector and there is no sample configuration or the
sample configuration does not contain the property, the value defined in the
ConfigDef class of the connector is used.
If the connector configuration is filtered when you run the validation and SMM finds errors
with properties that are filtered, an error message is displayed on the top of the page
notifying you that not all validation errors are visible. In a case like this, click
Reset Filters to view all validation errors.
 Connect in the navigation sidebar.
 New Connector option.
This option is available on all Kafka Connect related pages of the SMM UI. Clicking this option starts the Connector Setup wizard and redirects you to the Select A Template page. This page contains all connectors available for deployment in the form of selectable cards.
New Connector option.
This option is available on all Kafka Connect related pages of the SMM UI. Clicking this option starts the Connector Setup wizard and redirects you to the Select A Template page. This page contains all connectors available for deployment in the form of selectable cards.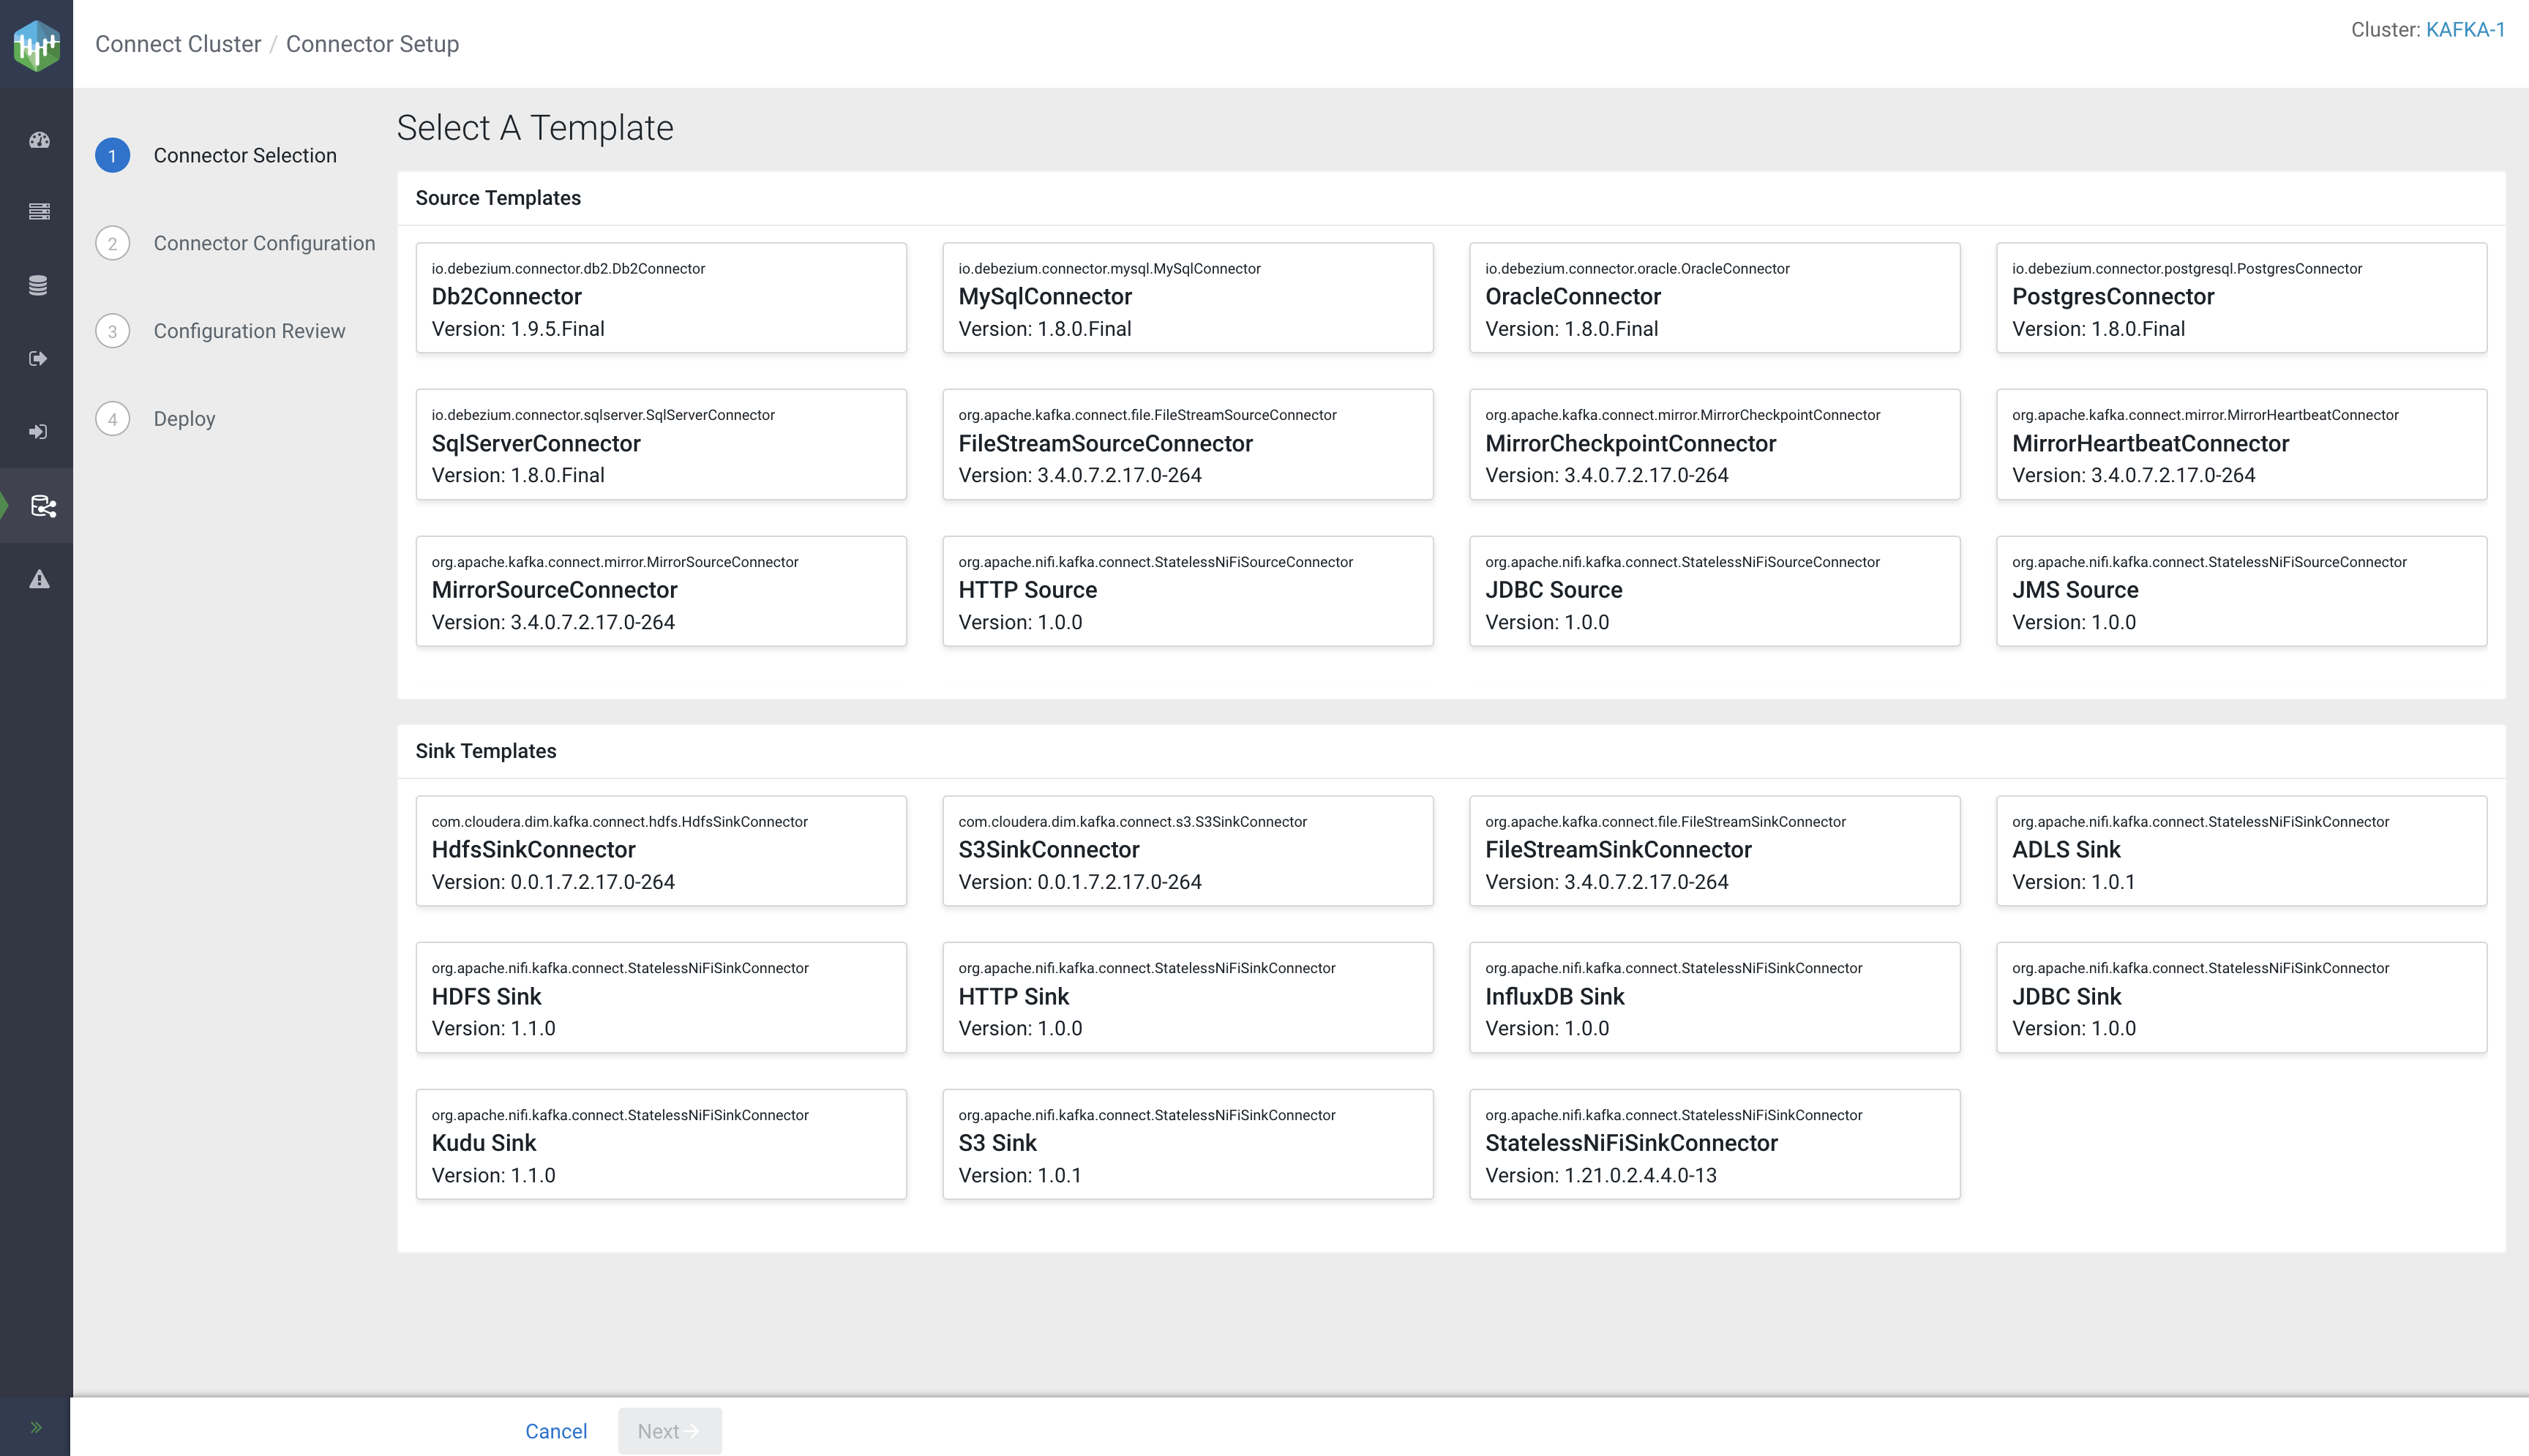

 (Profile) beside the connector.
 Pause,
  Resume,
  Restart, or
  Delete.
If you select
Delete.
If you select Edit at the bottom-left corner of the page.
All properties except connector name become editable.
Edit at the bottom-left corner of the page.
All properties except connector name become editable.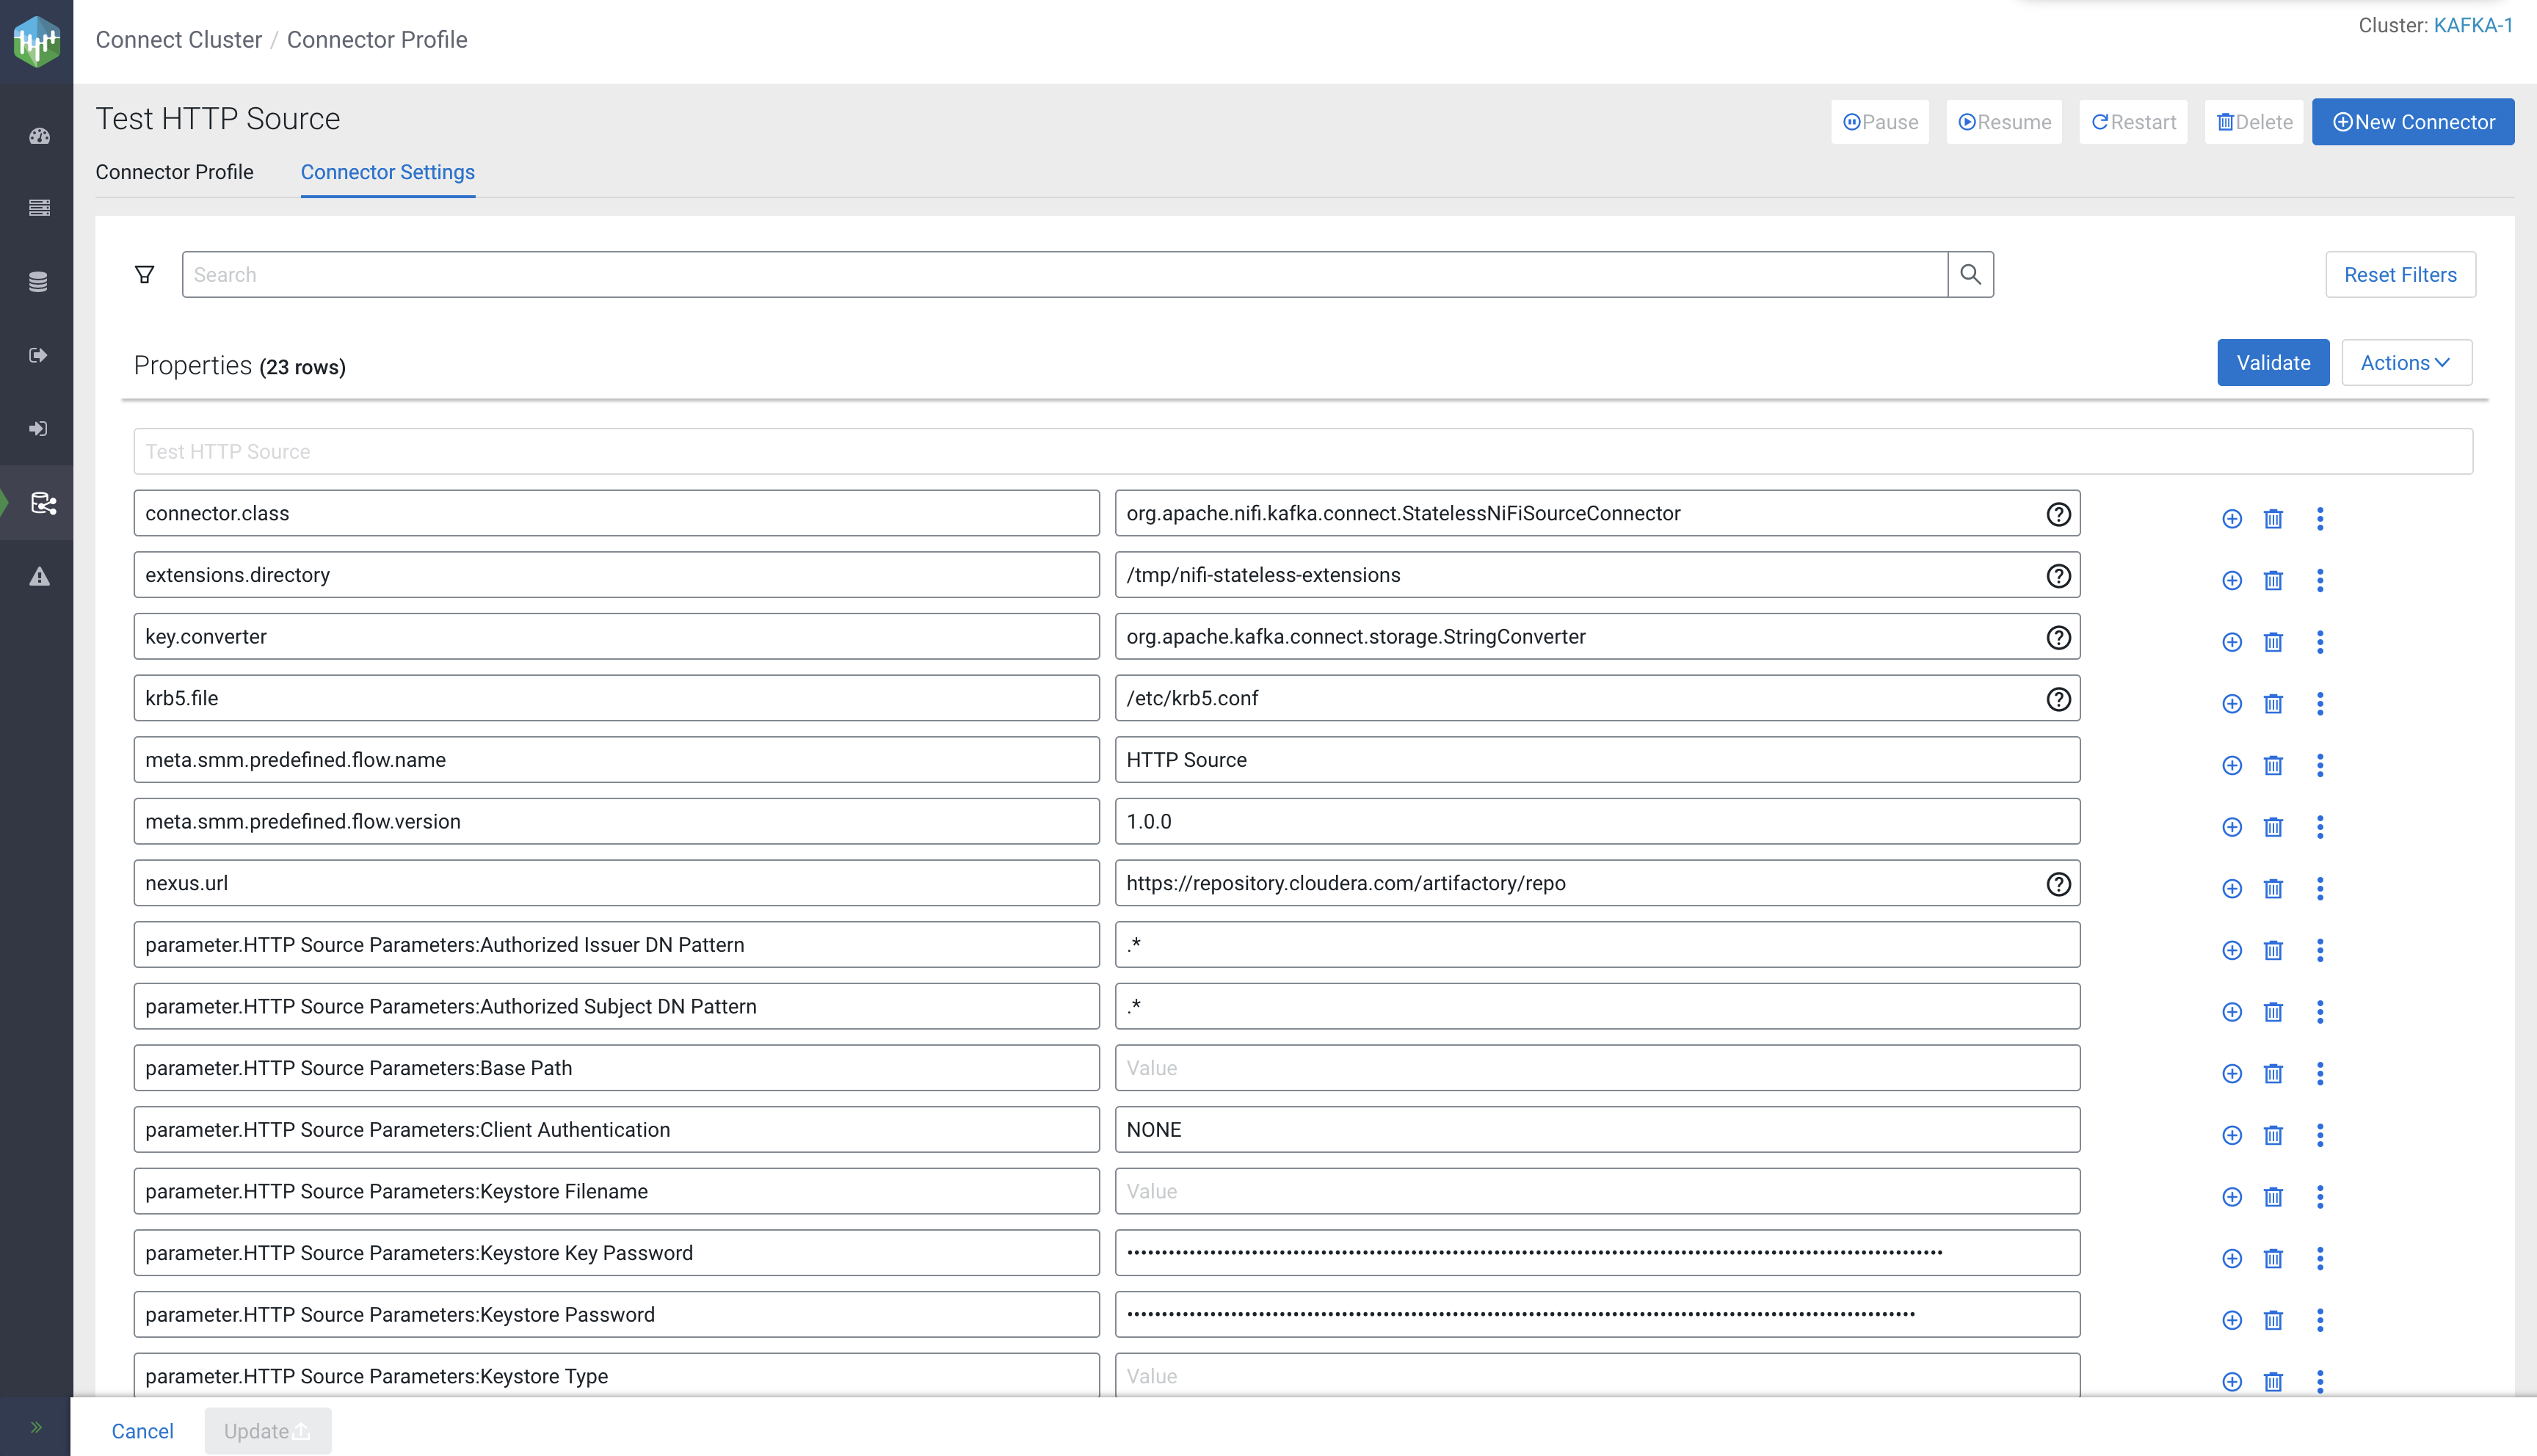
 .
.
 next to a property opens a context menu that includes additional
configuration options. The options available in the
next to a property opens a context menu that includes additional
configuration options. The options available in the 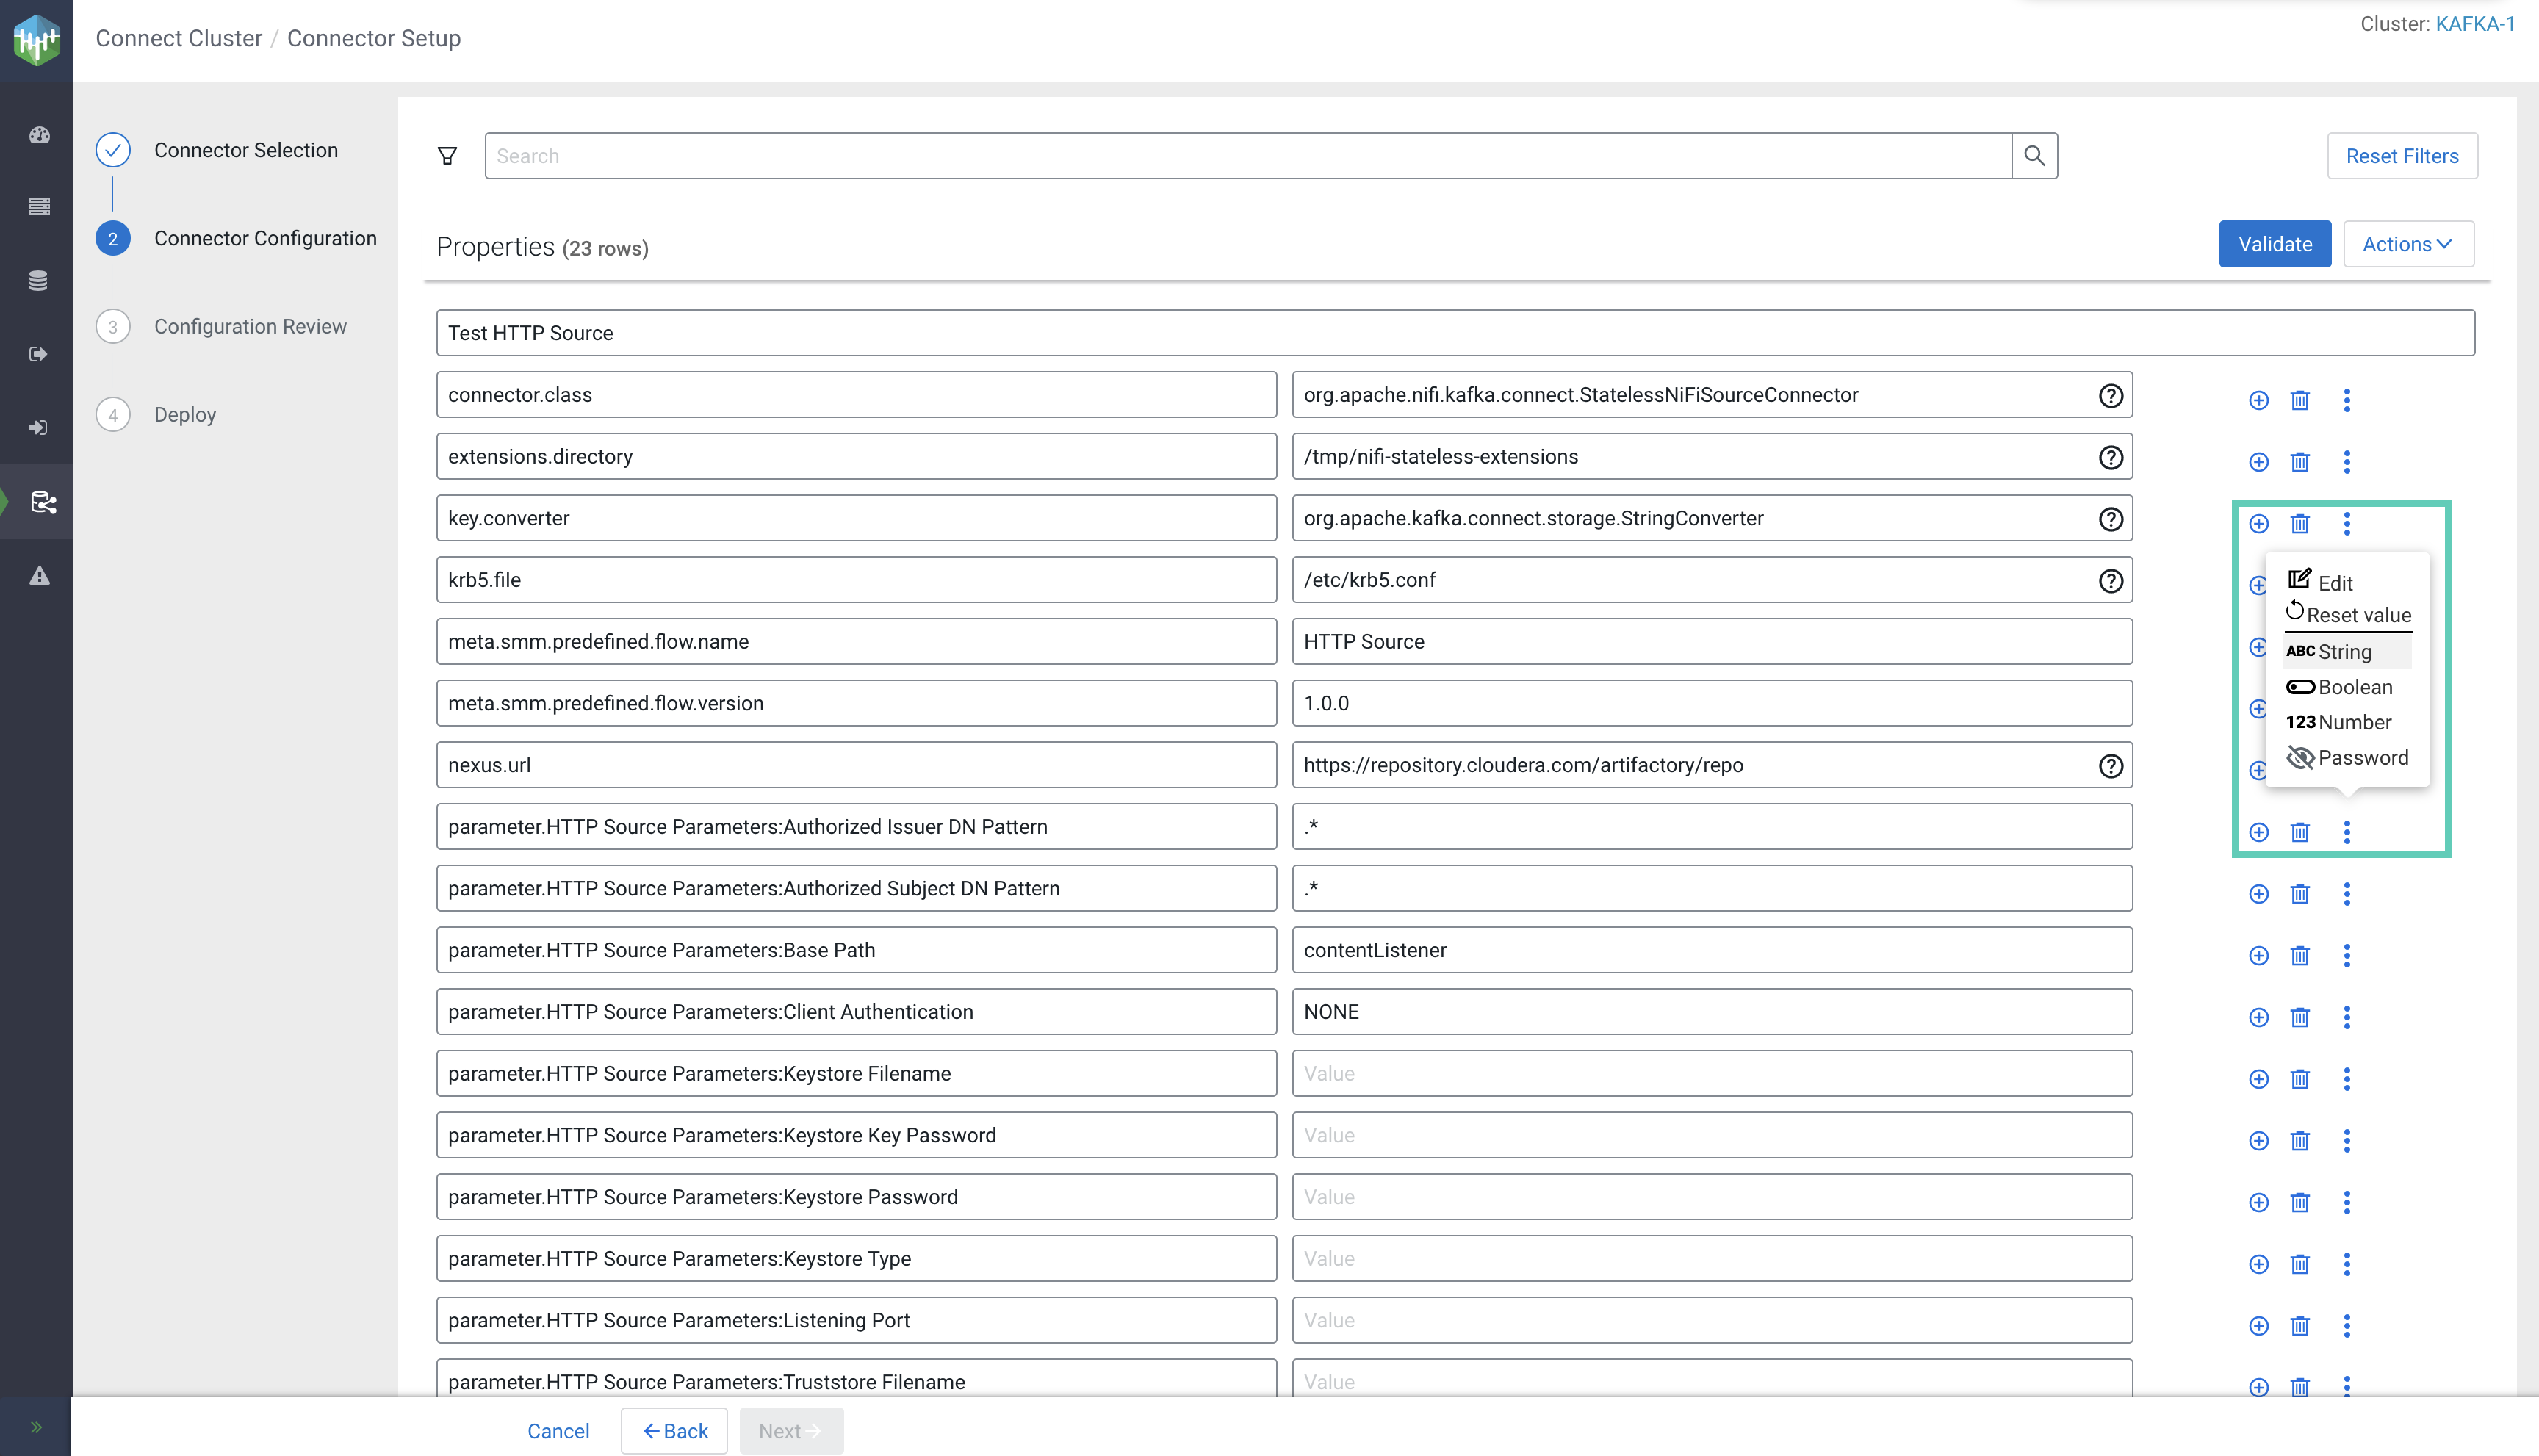
 Edit to edit the configuration value of a property in a separate window. Use this
option if the value you add is long, complex, or consists of multiple lines.
Edit to edit the configuration value of a property in a separate window. Use this
option if the value you add is long, complex, or consists of multiple lines. Reset value to reset the value of a single property.
Alternatively, you can use to reset the full configuration. The reset options behave uniquely depending on
the configuration page that you use them on. When deploying new connectors using the Connector Configuration page of the wizard:
Reset value to reset the value of a single property.
Alternatively, you can use to reset the full configuration. The reset options behave uniquely depending on
the configuration page that you use them on. When deploying new connectors using the Connector Configuration page of the wizard: String
,
String
,  Boolean,
  Number, and
  Password options enable you to set the type of the
property. Setting the type of a property changes the property's value field depending on the
type you select.
Password options enable you to set the type of the
property. Setting the type of a property changes the property's value field depending on the
type you select.
 (Help), found next
to some property values, displays information about that property. What information is displayed
is property dependent, but at minimum you are presented with a description of the property. If
available, the group, importance, and expected type of a property is also displayed. The
(Help), found next
to some property values, displays information about that property. What information is displayed
is property dependent, but at minimum you are presented with a description of the property. If
available, the group, importance, and expected type of a property is also displayed. The