Step 9: Complete Post-Upgrade steps for upgrades to Cloudera Private Cloud Base
Steps to perform after upgrading a cluster.
Loading Filters ... 7.13.1 7.11.3 7.7.3 7.7.1 7.6.7 7.6.1 7.4.4 7.3.1 7.1.9.1000 7.1.9 7.1.8 7.1.7.3000 7.1.7.2000 7.1.7.1000 7.1.7 7.1.6 7.3.1 7.1.9.1000 7.1.9 7.1.8 7.1.7.3000 7.1.7.2000 7.1.7.1000 7.1.7
hdfs dfs -ls /user/yarn/mapreduce/mr-framework//user/yarn/mapreduce/mr-framework/3.1.1.7.1.7.78-12-mr-framework.tar.gz- Cloudera Manager > Yarn > Actions > Install YARN MapReduce Framework JARs
- Cloudera Manager > Tez > Actions > Upload Tez tar file to HDFS
- Cloudera Manager > Oozie > Actions > Install Oozie ShareLib
-
hdfs dfs -ls -R /user/yarn/mapreduce/mr-framework/ -
hdfs dfs -ls -R /user/tez/ -
hdfs dfs -ls /user/oozie/share/lib/
Kafka – clear protocol and log format versions
- Remove the following properties from the Kafka Broker Advanced
Configuration Snippet (Safety Valve) for kafka.properties configuration
property.
inter.broker.protocol.versionlog.message.format.version
- Save your changes.
- Perform a rolling restart:
- Select the Kafka service.
- Click .
- In the pop-up dialog box, select the options you want and click Rolling Restart.
- Click Close once the command has finished.
Kafka – run the Create Kafka Log Directory Free Capacity Check command
- In Cloudera Manager, select the Kafka service.
- Click .
Once created, the trigger is available on the page. Note that the Status page also contains a new chart which is introduced in 7.1.9. The chart is called Log Directory Free Capacity. It shows the capacity of each Kafka Broker log directory.
Kafka producer – disable idempotence or update Ranger policies
- Explicitly disable idempotence for your producers. This can be done by setting
enable.idempotencetofalsefor your producer applications. For more information, see Producer Configs in the Apache Kafka documentation. - Update your policies in Ranger and ensure that producers have Idempotent Write permission on the cluster resource. For more information, see Configuring resource-based policies.
Kafka Connect – resolve ClassNotFoundException
Error: ClassNotFoundException exception occurred: com.cloudera.dim.kafka.config.provider.CmAgentConfigProvider
exception occurred: com.cloudera.dim.kafka.config.provider.CmAgentConfigProviderplugin.path in Cloudera Manager, which does not contain the expected
plugin JARs. Complete the following steps to resolve the issue:- Manually install missing symlinks or alternatives relevant to kafka-connect by
checking
cloudera-scm-agent.log. - Ensure that the kafka-connect libraries are present in
/var/lib/kafkaor change theplugin.pathto a value where these libraries are present.If required, manually copy the JARs to the location configured in
plugin.path. - If the issue persists, set the
plugin.pathto:
This is the location where kafka-connect libraries are set when installing parcels./opt/cloudera/parcels/CDH-[***VERSION***]/lib/kafka_connect_ext/libs
Kafka Connect – configure Kerberos ATL rules
Kafka Connect now uses the cluster-wide Kerberos auth-to-local (ATL) rules by default. A
new configuration property called Kafka Connect SPNEGO Auth To Local
Rules is introduced. This property is used to manually specify the ATL rules.
During an upgrade, the property is set to DEFAULT to ensure backward
compatibility. If you want to use the cluster-wide Kerberos ATL rules for custom Kerberos
principals, you need to clear the existing value from the Kafka Connect SPNEGO
Auth To Local Rules property in .
Schema Registry - create the Ranger Schema Registry Plugin Audit Directory
- In Cloudera Manager, select the Schema Registry service.
- Click .
Schema Registry – configure Kerberos Name Rules
The default value for Schema Registry Kerberos Name Rules is changed. Schema Registry now automatically applies the cluster-wide auth-to-local (ATL) rules by default. However, the previous value of the Schema Registry Kerberos Name Rules property is preserved during an upgrade. You must manually clear the property following an upgrade to transition to the new default value in when using Custom Kerberos Principal.
Schema Registry – manually update Atlas policies in Ranger to include the schemaregistry user
Following an upgrade, Schema Registry might not have the required permissions in Ranger to access Atlas. As a result, you must update the policies manually. Otherwise, Schema Registry's integration with Atlas might not function in secure clusters where Ranger authorization is enabled.
- Access the Ranger Console (Ranger Admin web UI).
- Click the cm_atlas resource-based service.
- Add the
schemaregistryuser to theall - *policies. - Click .
- Add the
schemaregistryuser to thedefault.policy.usersproperty.
Schema Registry – configure Schema Registry to use V2 of its fingerprinting mechanism
Following an upgrade, Cloudera recommends that you configure Schema Registry to use fingerprinting V2. Fingerprinting V2 resolves an issue in V1 where schemas were not created under certain circumstances. For more information on the original issues as well as Schema Registry fingerprinting, see TSB-713. Note that even if you switch to V2, some issues might still persist, see TSB-718 for more information.
- In Cloudera Manager, select the Schema Registry service.
- Go to Configuration.
- Set the Fingerprint Version property to VERSION_2.
- Select .
- Click Regenerate Fingerprints to start the action.
- Restart Schema Registry.
Streams Messaging Manager – update the replication factor of internal topics
In Cloudera Runtime 7.1.9, the default replication factor of the __smm*
internal SMM topics is increased to 3. The replication factor of these topics is not updated
when you upgrade a cluster. As a result, Cloudera recommends that you increase the
replication factor of these topics to 3 with the kafka-reassign-partitions
tool following the upgrade. For more information, see kafka-reassign-partitions.
Streams Messaging Manager – reconnect SMM with SRM
- In Cloudera Manager, select the SMM service.
- Go to Configuration.
- Find and enable the STREAMS_REPLICATION_MANAGER Service property.
- Click Save Changes.
- Restart the service.
Streams Messaging Manager – configure Kerberos Name Rules
The default value for Kerberos Name Rules is changed. SMM now automatically applies the cluster-wide auth-to-local (ATL) rules by default. However, the previous value of the Kerberos Name Rules property is preserved during an upgrade. You must manually clear the property following an upgrade to transition to the new default value in when using Custom Kerberos Principal.
Streams Messaging Manager – update Prometheus configuration
The default port that the Kafka Connect metrics reporter uses as well as the property that configures the port are changed. If you are using Prometheus as the metrics store for SMM, you must update your Prometheus configuration to include the new port.
- In Cloudera Manager, select the Kafka service.
- Go to Configuration.
- Take note of the values of Secure Jetty Metrics Port and
Jetty Metrics Port properties.
Which property value you take note of depends on whether Kafka Connect is secured using TLS/SSL. Kafka Connect is secured with TLS/SSL if Enable TLS/SSL for Kafka Connect is selected. Take note of Jetty Metrics Port if Kafka Connect is not secured. Take note of Secure Jetty Metrics Port if Kafka Connect is secured.
- If Enable Basic Authentication for Metrics Reporter is selected
take note of the following properties:
- Jetty Metrics User Name
- Jetty Metrics Password
- Update the
kafka_connectjob section in your prometheus.yml configuration file with the new port number. If Basic Authentication is enabled, add the username and password as well. For example:- job_name: 'kafka_connect' metrics_path: '/api/prometheus-metrics' basic_auth: username: 'email@username.me' password: 'password' static_configs: - targets: ['my-cluster-1.com:28087','my-cluster-2.com:28087','my-cluster-3.com:28087'] - Reload your Prometheus configuration.
For more information, see Configuration in the Prometheus documentation.
Streams Replication Manager – disable legacy protocol and data format
- In Cloudera Manager select the Streams Replication Manager service.
- Go to configuration and clear the following properties:
- Use Legacy Intra Cluster Host Name Format
- Use Legacy Internal Changelog Data Format
- Restart the SRM service.
Streams Replication Manager – reconfigure the Log Format property
- In Cloudera Manager select the SRM service.
- Go to Configuration and configure the Log Format property.
- Restart the SRM service.
Streams Replication Manager – export consumer group offsets
In Cloudera Runtime 7.1.8 and higher, the separator configured with
replication.policy.separator in Streams Replication Manager applies to
the names of the offsets-syncs and checkpoints internal
topics if the default replication (DefaultReplicationPolicy) policy is in
use.
srm-control tool to use the default separator, which is the
dot (.). For
example:srm-control offsets --config [***CONFIG FILE***] --source [SOURCE_CLUSTER] --target [TARGET_CLUSTER] --group [GROUP1] --export > out.csv--config contains
the following configuration
entryreplication.policy.separator=.Streams Replication Manager – delete unused internal topics
kafka-streams-application-reset \
    --bootstrap-server [***SRM SERVICE HOST***] \
    --config-file [***PROPERTIES FILE***] \
    --application-id srm-service
kafka-streams-application-reset \
    --bootstrap-server [***SRM SERVICE HOST***] \
    --config-file [***PROPERTIES FILE***] \
--application-id srm-service-statusStreams Replication Manager – enable internal topics based remote topic discovery
The Remote Topics Discovery With Internal Topic property is not selected during the upgrade by default. Ensure that you select the property following an upgrade and restart the SRM service. This property enables SRM to track remote (replicated) topics using an internal Kafka topic instead of relying on the naming convention of the replication policy that is in use. This enables the SRM service to provide better monitoring insights on replications.
Streams Replication Manager – transition IdentityReplicationPolicy configuration
- In Cloudera Manager, select the SRM service.
- Go to Configuration.
- Clear the following entry from Streams Replication Manager's Replication
Config.
replication.policy.class=org.apache.kafka.connect.mirror.IdentityReplicationPolicy - Select Enable Prefixless Replication.
- Ensure that Remote Topics Discovery With Internal Topic is
selected.
If this property is not selected when the IdentityReplicationPolicy is in use, replication monitoring provided by the SRM Service does not function. This property is enabled by default when Enable Prefixless Replication is selected.
- Restart the SRM service.
Cruise Control – reconfigure goals to customized values
Provide the customized values for the Cruise Control goal sets, if you needed to copy them
before upgrading your cluster. Furthermore, you must rename any mentioning of
com.linkedin.kafka.cruisecontrol.analyzer.goals.RackAwareGoal to
com.linkedin.kafka.cruisecontrol.analyzer.goals.RackAwareDistributionGoal
as Cruise Control will not be able to start otherwise. For more information, see the Cruise Control Known Issues.
Cruise Control – configure Kerberos ATL rules
Cruise Control now uses the cluster-wide Kerberos auth-to-local (ATL) rules by default. A
new configuration property called SPNEGO Principal to Local Rules is
introduced. This property is used to manually specify the ATL rules. During an upgrade, the
property is set to DEFAULT to ensure backward compatibility. If you want to
use the cluster-wide Kerberos ATL rules for custom Kerberos principals, you need to clear
the existing value from the SPNEGO Principal to Local Rules property
in .
Migrating a YARN Queue Manager database to an external database
CREATE ROLE qmadmin PASSWORD 'password' SUPERUSER CREATEDB CREATEROLE INHERIT LOGIN;
CREATE DATABASE "configstore";
ALTER DATABASE "configstore" OWNER TO qmadmin;
- In your Cloudera Manager instance, navigate to .
- Click the Configuration tab.
- In the left navigation menu under Category, click Database.
- Enter the following fields that are required for the PostgreSQL database that is to be
used. You will have these values from the query that was run in the prerequisite:
- QueueManager Config Service Database Name
- QueueManager Config Service Database Host
- QueueManager Config Service Database Port
- QueueManager Config Service Database User
- QueueManager Config Service Database User Password
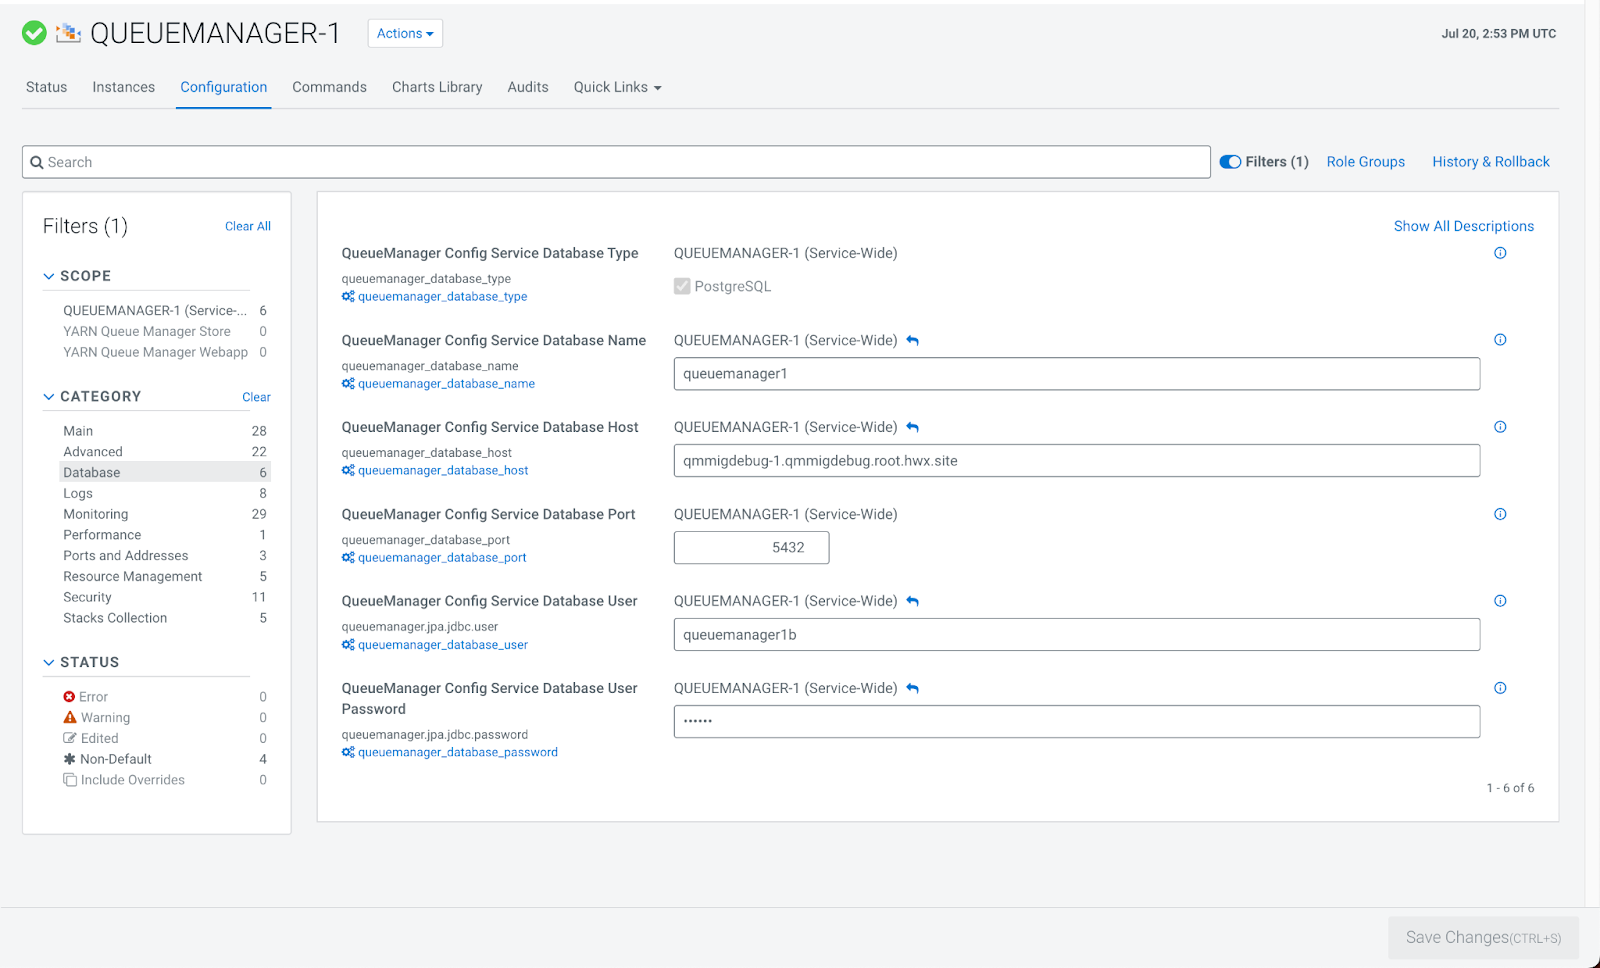
- Click Save Changes.
- In Queue Manager, navigate to Actions and click Restart. The data migration to the PostgreSQLdata database may take a few minutes after Queue Manager is restarted.
Ozone - Steps to enable HDFS dependency on running Ozone
- Log in to Cloudera Manager
- Navigate to Clusters
- Select the Ozone service
- Navigate to the Configurations tab
- Search for the HDFS Service configuration
- Select the checkbox
Step result: This will enable the HDFS dependency on running Ozone. For more information, see the HDFS dependency on running Ozone documentation.
Considerations when upgrading Ranger RMS
Prior to CDP-7.1.7, Ranger RMS synchronizes only table metadata. Database metadata mappings were not downloaded from HMS. After migrating from CDP versions before 7.1.7 to CDP 7.1.8+, only pre-existing table mappings will be available. Any newly created tables or database mappings will be synchronized in RMS. Any pre-existing database mappings will not be present. To ensure the pre-existing databases are mapped correctly, you must perform a full-sync after completing the upgrade.
Oozie - Updating column types in Oozie Database
If the Oracle database is used for Oozie, then you must update the
APP_PATH column type to store values with more than 255 characters. This
ensures Oozie does not get stuck in PREP state when your application path exceeds the 255
character limit. If the APP_PATH column type is not updated, then Oozie
fails to run the jobs with the following database error message Data too long
for column 'app_path'. This scenario is also applicable to coordinator and
bundle jobs. For database types other than Oracle, this update is not mandatory for using
Oozie. It works without the update if the APP_PATH value does not exceed
255 characters. Also, Oozie's internal database schema validation fails with an unexpected
APP_PATH column type. However, this validation does not have any effect.
It just logs it's result.
APP_PATH column type in the
WF_JOBS, BUNDLE_JOBS, and
COORD_JOBS tables in the Oozie database for the following
conditions:- When you use the Oracle database for Oozie service.
- When you are upgrading CDP Runtime from earlier versions to 7.1.9 SP1 CHF1 version or later.
If you do not execute the following statements on the Oozie Oracle database, then the Oozie service fails to run the jobs with a database persistence error. This update is not mandatory, but highly recommended for other database types, such as MySQL, MariaDB, and PostgreSQL, due to the internal database schema validation.
- On the Oozie Oracle database - The following example uses the Oracle sqlplus
command-line
tool:
sqlplus <OOZIE_DB_USERNAME>@localhost/<SERVICE_NAME> SQL> ALTER TABLE <TABLE_NAME> ADD (APP_PATH_TMP CLOB); Table altered. SQL> UPDATE <TABLE_NAME> SET APP_PATH_TMP = APP_PATH; X rows updated. SQL> ALTER TABLE <TABLE_NAME> DROP COLUMN APP_PATH; Table altered. SQL> ALTER TABLE <TABLE_NAME> RENAME COLUMN APP_PATH_TMP TO APP_PATH; Table altered. - On the Oozie MySQL database - The following example uses the MySQL mysql command-line
tool:
$ mysql -u root -p Enter password: mysql> use <OOZIE_DATABASE_NAME>; Database changed mysql> ALTER TABLE <TABLE_NAME> MODIFY COLUMN app_path text; Query OK, X rows affected (0.03 sec) Records: X Duplicates: 0 Warnings: 0 mysql> exit Bye - On the Oozie MariaDB database - The following example uses the MariaDB mysql
command-line tool:
$ mysql -u root -p Enter password: MariaDB [(none)]> use <OOZIE_DATABASE_NAME>; Database changed MariaDB [OOZIE_DATABASE_NAME]> ALTER TABLE <TABLE_NAME> MODIFY COLUMN app_path text; Query OK, X rows affected (2.11 sec) Records: X Duplicates: 0 Warnings: 0 MariaDB [OOZIE_DATABASE_NAME]> exit Bye - On the Oozie PostgreSQL database - The following example uses the PostgreSQL psql
command-line tool:
$ psql -U postgres
Password for user postgres: *****

postgres=# \c <OOZIE_DATABASE_NAME>;
You are now connected to database "<OOZIE_DATABASE_NAME>" as user "postgres".

OOZIE_DATABASE_NAME=# ALTER TABLE <TABLE_NAME> ALTER COLUMN app_path type text;
ALTER TABLE

OOZIE_DATABASE_NAME=# \q