Troubleshooting replication policies in Cloudera Replication Manager
The troubleshooting scenarios in this topic help you to troubleshoot issues in the
Cloudera Replication Manager.
Different methods to identify errors related to failed replication policy
What are the different methods to identify errors while troubleshooting a failed
replication policy?
You can choose one of the following methods to identify the errors
to troubleshoot a job failure:
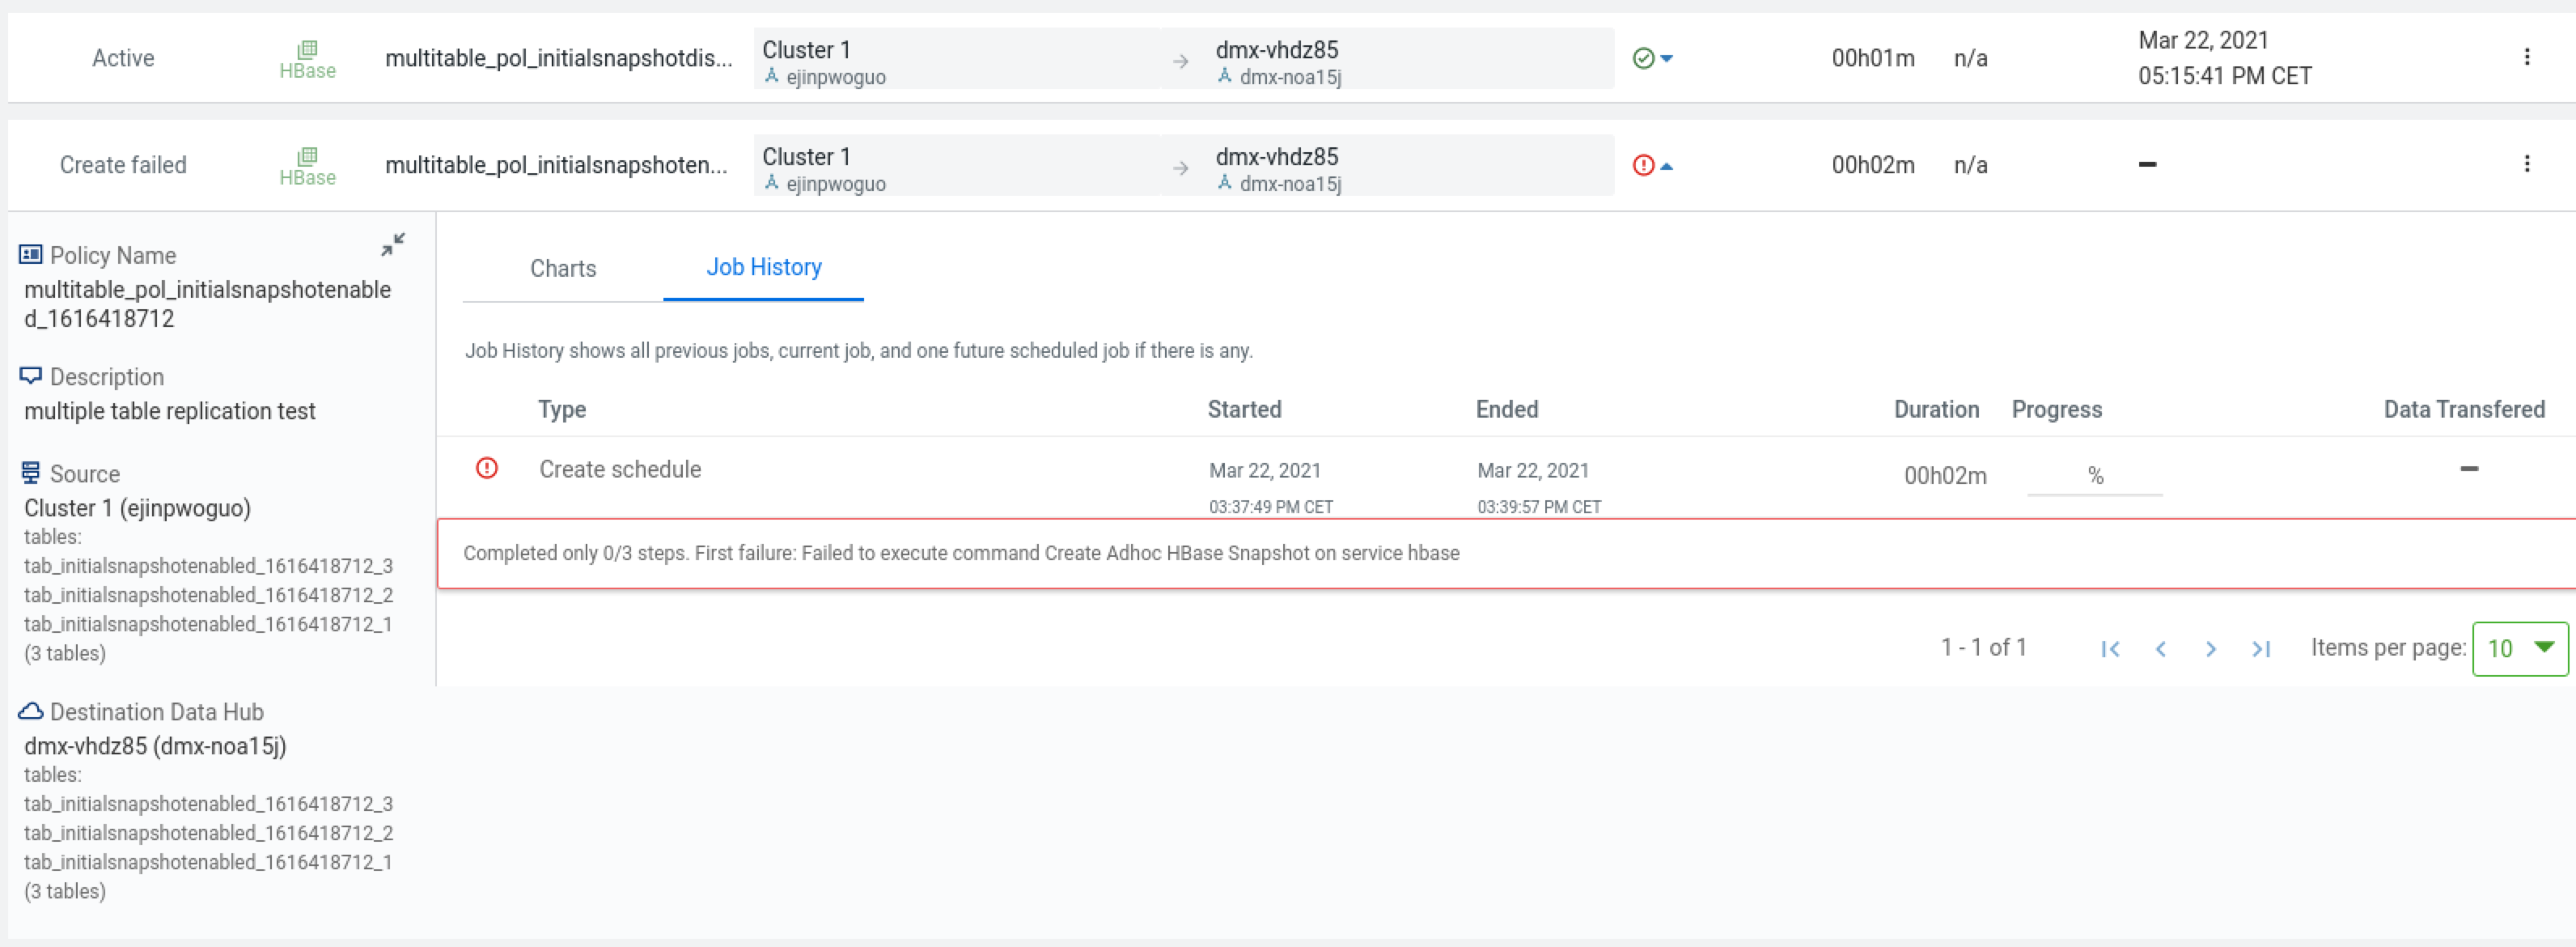
On the Replication Policies page, click the failed
job in the Job History pane. The errors for the
failed job appear.
The following sample image shows the Job
History pane for a replication policy job:
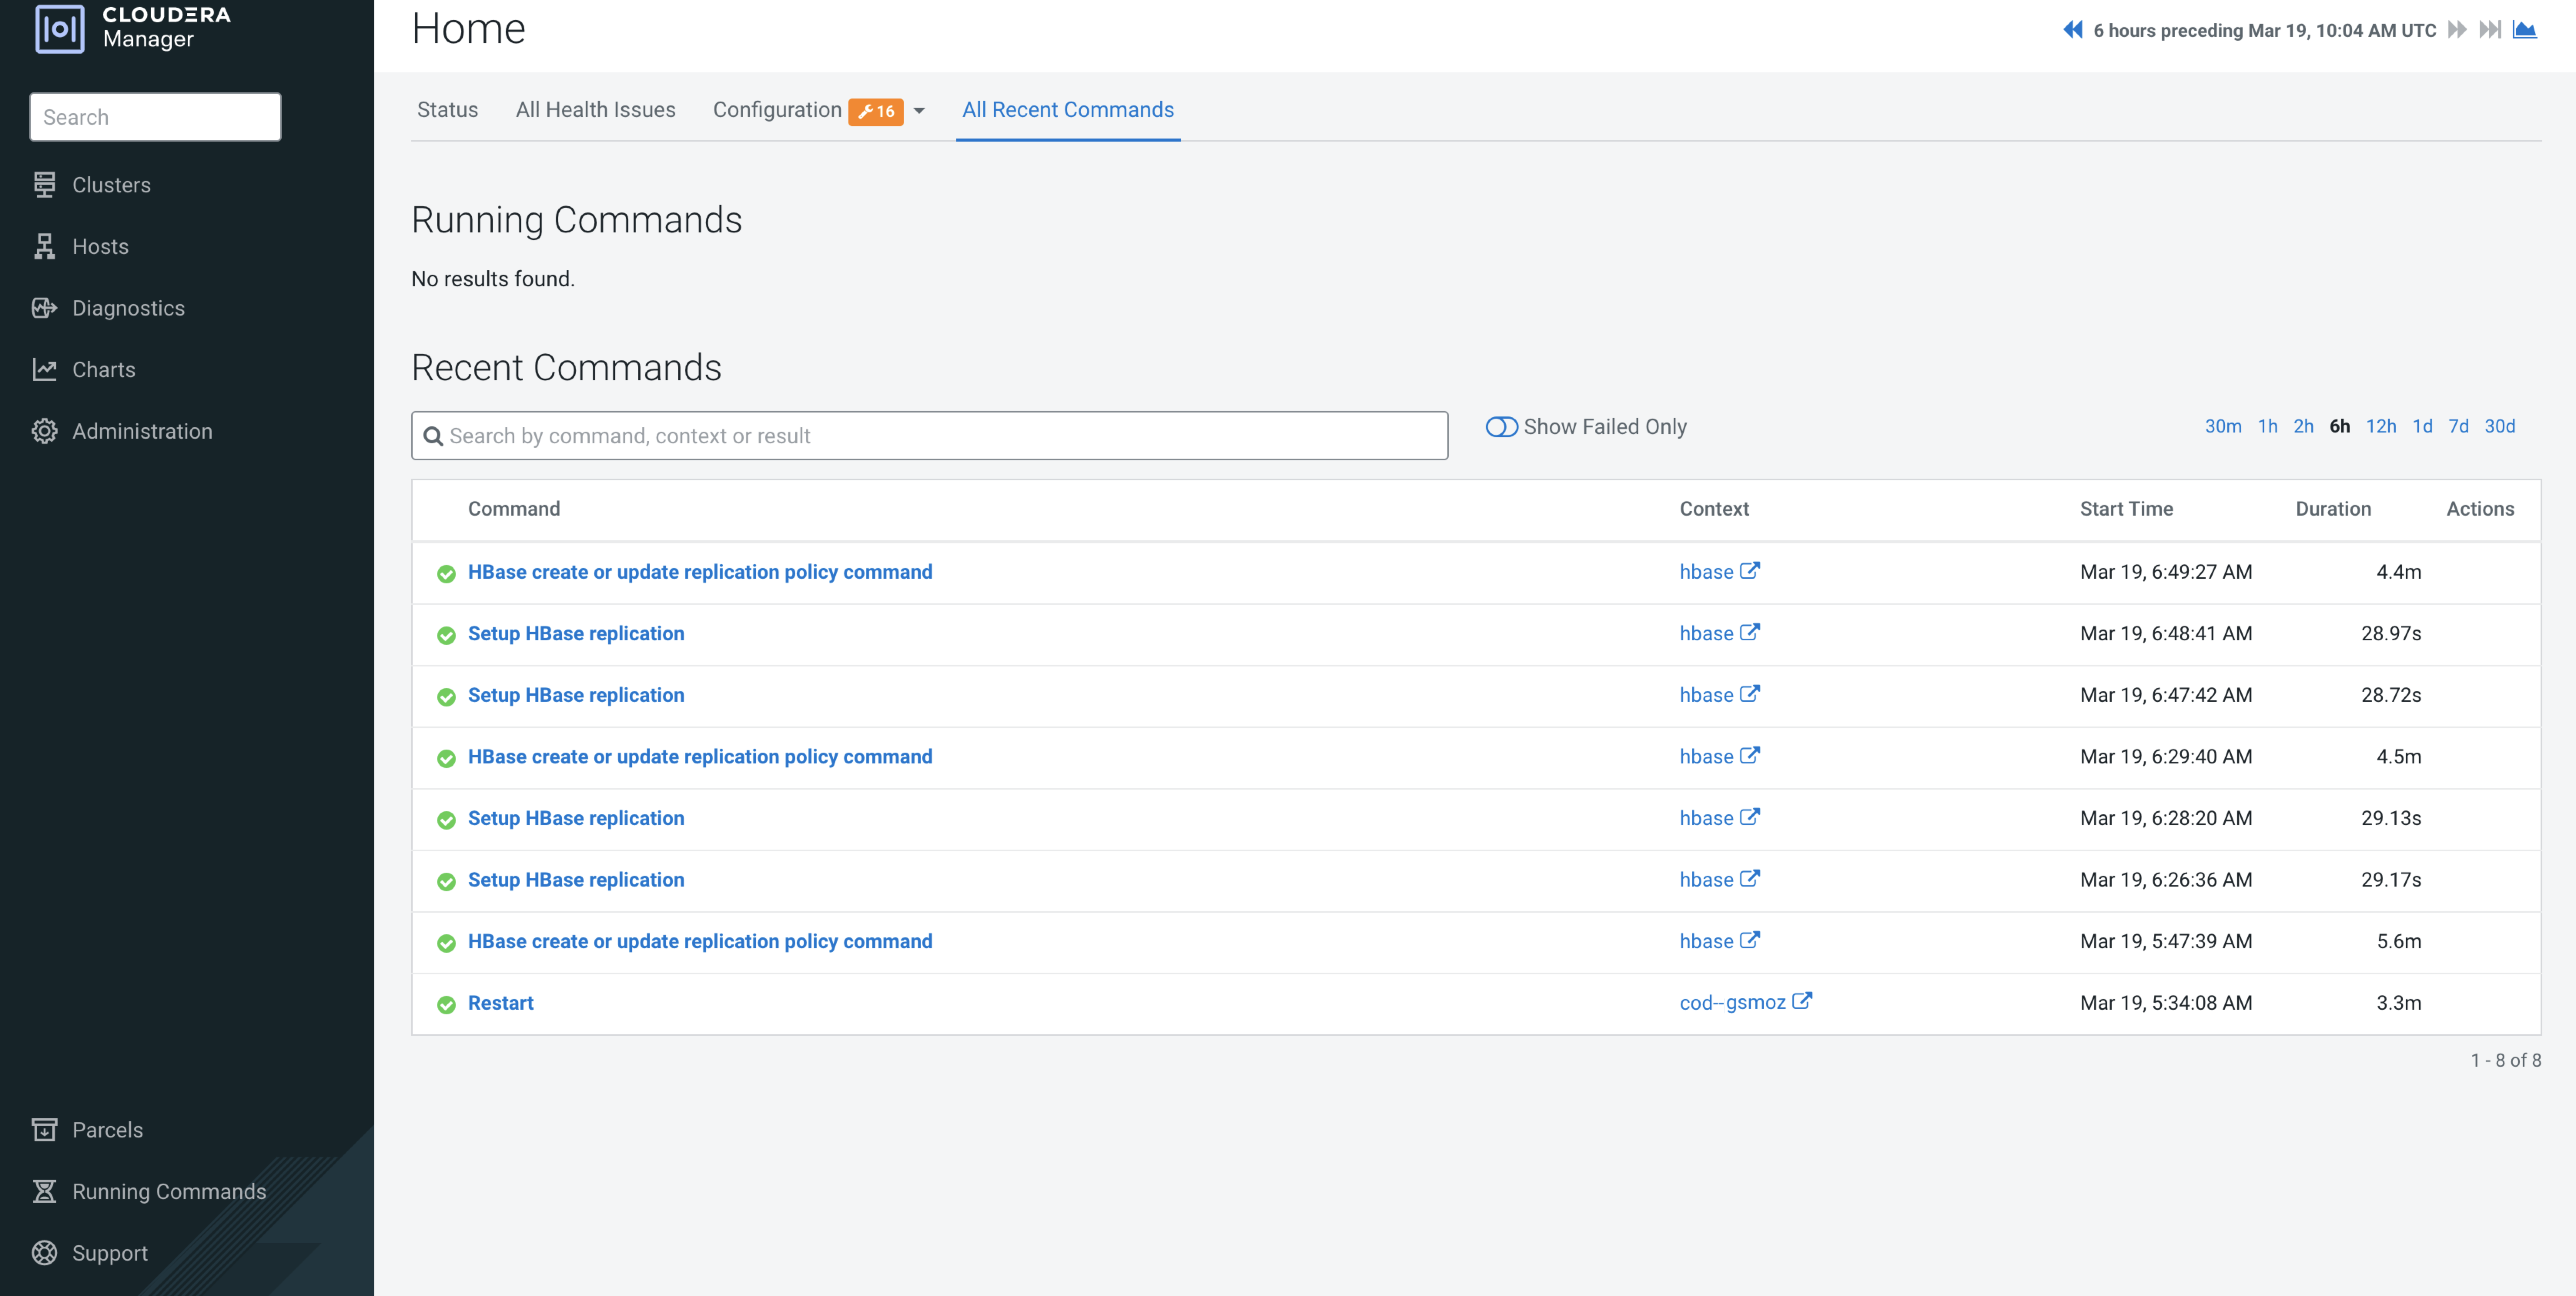
In the source and target Cloudera Manager, click
Running Commands on the left navigation bar.
The recent command history shows the failed commands.
The following sample image shows the Running
Commands page for an HBase replication policy:
On the source cluster and target cluster, open the service logs to
track the errors (For example, HBase service logs).
You can also search on the Cloudera Manager > Diagnostics > Logs page to view the logs.
Replication Policies page does not display all the replication policies
The "Replication Policies" page might not display all the replication policies
depending on various factors. In such scenarios, you can choose to reload the page, choose a
load page option, or use CDP CLIs to view and monitor the replication policies and its
statistics.
Problem
When a Cloudera Manager instance is slow, that is while handling
more than 650 replication policies or when it is generally under heavy load, it
might slow down the ‘policy list request’ operation. In such scenarios, the
replication policies take more time than expected to appear, or might not get
displayed on the Replication Policies page.
Solution
Force reload page using the option on the
Replication Policies page.
You can use this option if the ‘policy list request’ operation has
timed out on the Cloudera Manager. You can identify
this scenario when the cluster that stores the replication policies
shows up in the Error list. Click to see the error list and the list of unreachable clusters.
Omit the job history of the policies to speed up the ‘policy list
query’ operation using the Never load history
option.
If the Replication Manager UI still performs slowly and you are not
able to view the job history and monitor the dashboards, Cloudera
recommends that you use CDP CLIs for Replication Manager. The CDP CLI
commands for Replication Manager are under the
replicationmanager CDP CLI option.
HDFS replication policy fails due to export HTTPS_PROXY environment variable
HDFS replication policies fail when the export HTTPS_PROXY environment variable is
set to access AWS through proxy servers. How to resolve this issue?
Remedy
To resolve this issue, perform the following steps:
Open the core-site.xml file on the source
cluster.
Enter the following properties in the file:
<property>
  <name>fs.s3a.proxy.host</name>
  <description>Hostname of the (optional) proxy server for S3 connections.</description>
</property>

<property>
  <name>fs.s3a.proxy.port</name>
  <description>Proxy server port. If this property is not set
    but fs.s3a.proxy.host is, port 80 or 443 is assumed (consistent with
    the value of fs.s3a.connection.ssl.enabled).</description>
</property>
Save and close the file.
Restart the source Cloudera Manager.
Run the failed HDFS replication policies in Replication Manager.
Replication Manager completes the replication successfully.
Cannot find destination clusters for HBase replication policies
When you ping destination clusters using their host names, the source cluster hosts
for HBase replication policies do not find the destination clusters. How to resolve this
issue?
Cause
This might occur for on-premises clusters such as Cloudera Base on premises clusters or CDH clusters
because the source clusters are not on the same network as the destination Data
Hub. Therefore, hostnames cannot be resolved by the DNS service on the source
cluster.
Remedy
Add the destination Region Server and Zookeeper IP to host name
mappings in the /etc/hosts files of all the Region
Servers on the source cluster.
The following snippet shows the contents in a sample
/etc/hosts
file:
HBase replication policy fails when Perform Initial Snapshot is chosen
An HBase replication policy fails for COD on Microsoft Azure when the "Perform
Initial Snapshot" option is chosen but data replication is successful when the option is not
chosen. How to resolve this issue?
Cause
This issue appears when the required managed identity of source roles are not
assigned.
Remedy
Assign the managed identity of source roles, Storage Blob
Data Owner or Storage Blob Data
Contributor, to the destination storage data container
and vice versa for bidirectional replication.
The roles allow writing a snapshot in the destination cluster
container.
Optimize HBase replication policy performance when replicating HBase tables with several
TB data
Can HBase replication policy performance be optimized when replicating HBase tables
with several TB of data if the "Perform Initial Snapshot" option is chosen during HBase
replication policy creation?
Complete the following manual steps to optimize HBase replication policy
performance when replicating several TB of HBase data if you choose the
Perform Initial Snapshot option during the HBase
replication policy creation process.
Remedy
Before you create the HBase replication policy, perform the following
steps:
Navigate to the source Cloudera Manager > YARN service > Configuration tab.
Search for the mapreduce.task.timeout
parameter.
Increase the value or set it to 0 to switch off the timeout.
Restart the YARN service.
Navigate to the source Cloudera Manager > HBase service > Configuration tab.
Search and configure the following key-value pairs:
Perform steps e through
g on the target Cloudera Manager.
When you create the HBase replication policy for the first time using
the above configured source cluster, you must increase the
Maximum Map Slots value to a higher number on
the Advanced Settings page.
If Store File Tracking (SFT) is enabled in the target COD, perform the
steps mentioned in the COD migration topic after the
replication policy creation is complete.
Partition metadata replication takes a long time to complete
How can partition metadata replication be improved when the Hive tables use several
Hive partitions?
Hive metadata replication process takes a long time to complete when the Hive
tables use several Hive partitions. This is because the Hive partition
parameters are compared during the import stage of the partition metadata
replication process and if the exported and existing partition parameters do not
match, the partition is dropped and recreated. You can configure a key-value
pair to support partition metadata replication.
Go to the Cloudera Manager > Clusters > Hive service > Configuration tab.
Search for the Hive Replication Environment Advanced
Configuration Snippet (Safety Valve) property.
Enter the
HIVE_IGNORED_PARTITION_PARAMETERS=[***COMMA
SEPARATED LIST OF HIVE PARTITION
PARAMETERS***] key-value pair.
The
partition parameter names you provide are not compared during the
import stage of the partition metadata replication process.
Therefore, even if the partition parameters do not match between the
exported and existing partitions, the partition is not dropped or
recreated. After you configure this key-value pair, the import stage
of the partition metadata replication process completes
faster.
Save the changes, and restart the Hive service.
Replicating Hive nested tables
Cloudera Replication Manager does not support Hive nested tables. What do I do
if there are Hive nested tables in the source cluster?
Cloudera Replication Manager does not support Hive nested tables for
replication. Therefore, it is recommended that you move the nested tables to a
different location in HDFS and then replicate Hive external tables. However, if
this is not possible, you can perform the following steps in the given order as
a workaround.
Solution
Create a Hive replication policy on the target cluster. Ensure that the Additional Settings > Replication Option > Metadata only option is selected to replicate the metadata of required
files and directories.
Create a HDFS replication policy on the source cluster to replicate the
table data.
Target HBase folder is deleted when HBase replication policy fails
When the snapshot export fails during the HBase replication policy job run, the
target HBase folder in the destination Data Hub or COD gets deleted.
You can either revoke the delete permission for the user, or ensure that you use an
access key/role that does not have delete permissions to the required storage
component.
The following steps show how to create an access key in AWS and an Azure service
principal, which do not have delete permission for the storage component.
Solution in AWS
If the Data Hub or COD is on Amazon S3, you can perform the
following steps to create an access key that does not have delete permission
for the storage component:
Login to AWS.
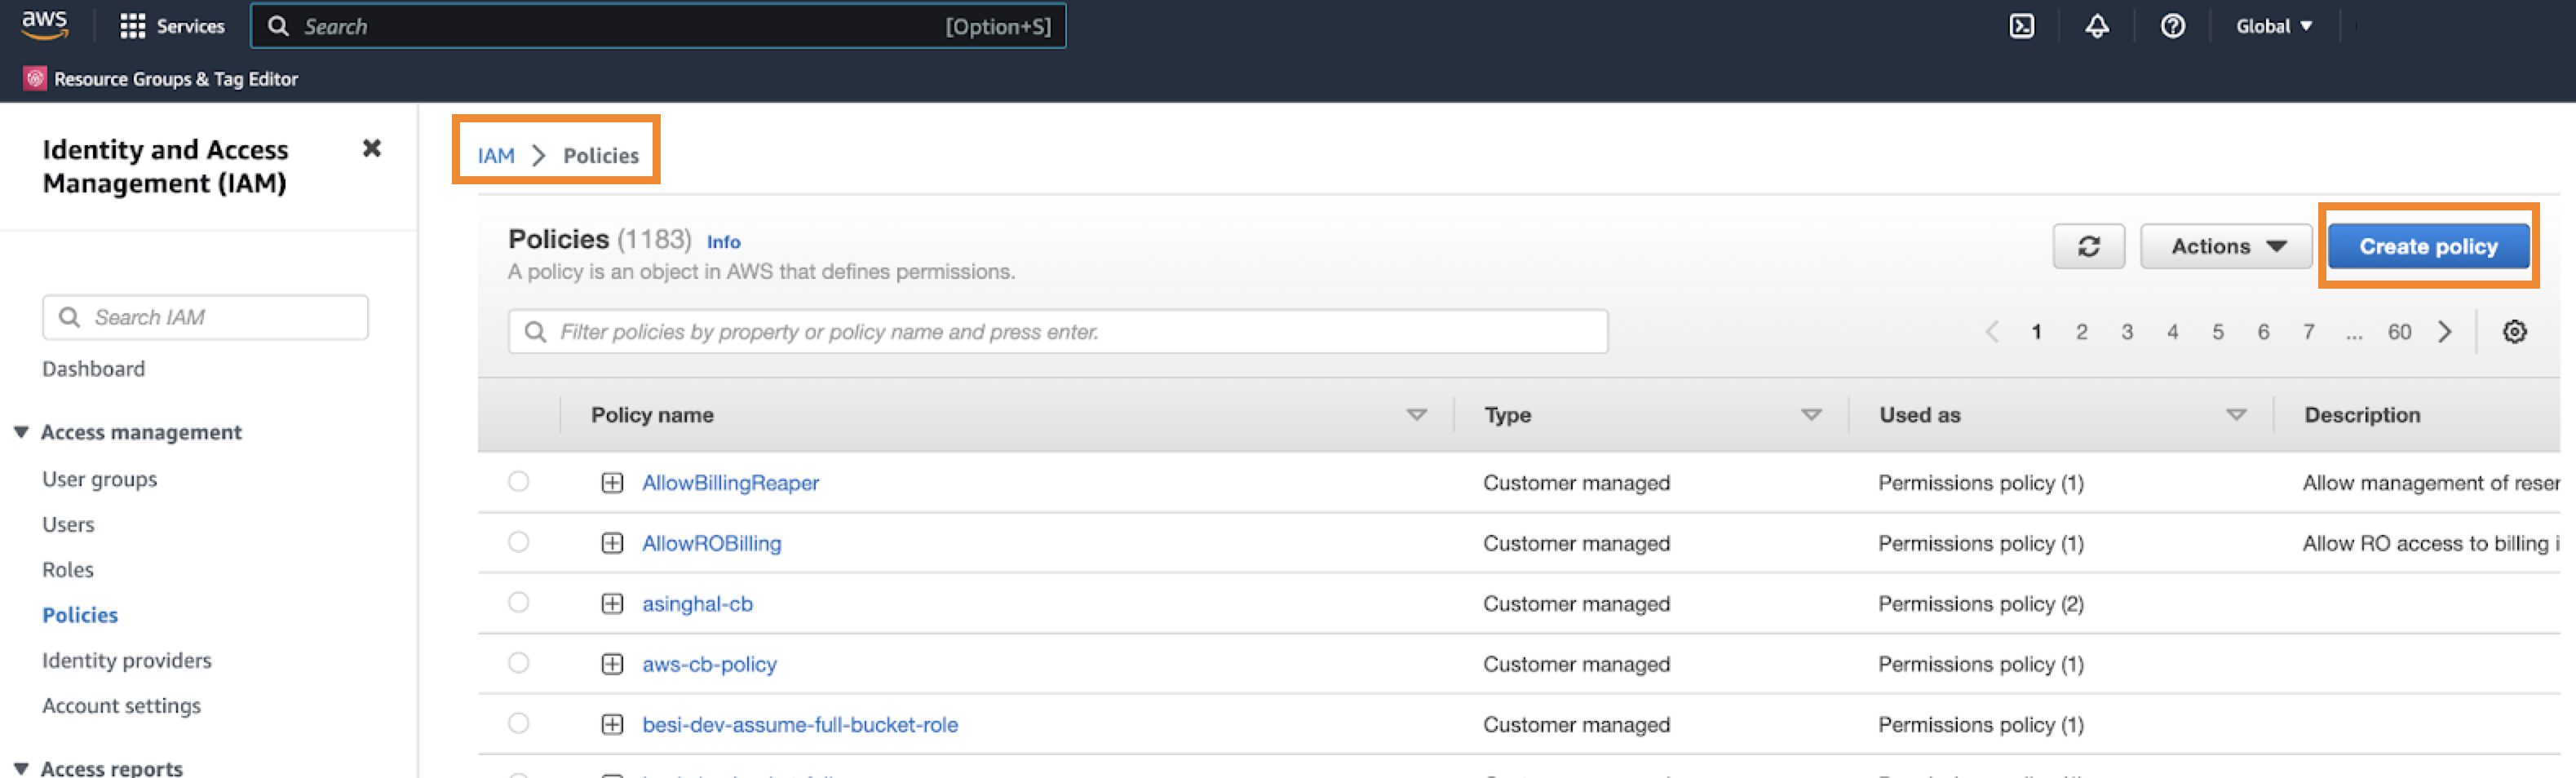
Click Create policy on the IAM > Policies > Create policy page.
The following sample image shows the Policies
page in the AWS > IAM section to create a policy.
Choose the S3 Service, and then choose the
following permissions for generic access (assign resources as
required):
List/ListBucket
Read/GetBucketLocation
Read/GetObject
Write/AbortMultipartUpload
Write/PutObject
Permissions
management/PutBucketPublicAccessBlock
Add Delete/DeleteObject permission to the target COD
cluster’s snapshot temporary folder.
For example, the target COD cluster’s snapshot temporary folder
might be located in [***TARGET COD S3
PATH***]/hbase/.hbase-snapshot/.tmp/*.
Enter a Name for the policy, add tags, and click
Create policy.
Click Add Users to create a user on the IAM > Users page.
Enter a Name, and click
Next.
Choose the Attach policies directly option on
the Set permission page, and then assign the
previously created policy to the user.
Optionally, add tags and create the user.
Click Create access key to create an access key
for the user on the IAM > Users > [***NEW USER***] page.
On the Security Credentials > Access keys page, choose Application running outside
AWS. Click Next.
Optionally, attach the tags, create and save the access key. This
access key is used as an external account for replication.
How do I verify whether the target HBase folder in the destination
Data Hub or COD does not get deleted if the snapshot export fails
during the HBase replication policy job run?
Perform the following steps to verify if the delete operation is
allowed for the access key that you previously created:
Run the aws configure --profile
delete-test command to setup the credentials
in AWS CLI.
Delete an arbitrarily created temporary file from the
account using the aws s3 --profile delete-test rm
--recursive s3://[***ACCOUNT
NAME***]/delete-testing/
command.
The delete operation is not allowed.
Solution in Microsoft Azure
If the Data Hub or COD is on ABFS, you can perform the following
steps to create an Azure service principal that does not have delete
permission for the storage component:
Login to Microsoft Azure.
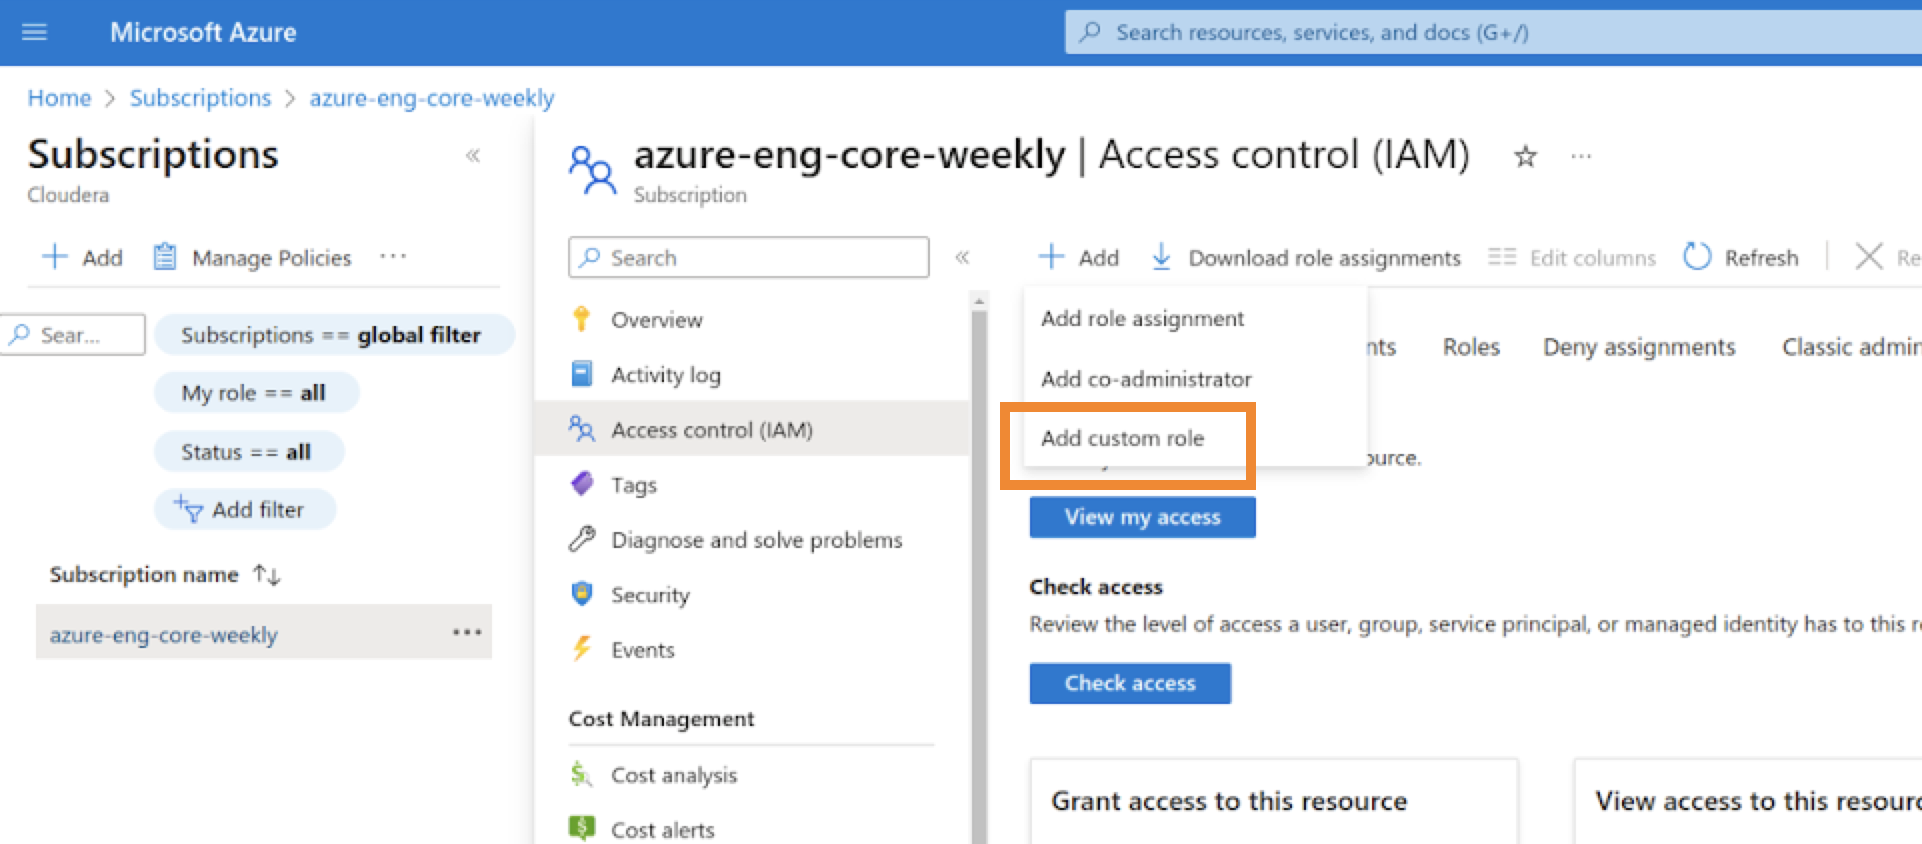
Click Add > Add a custom role on the Subscriptions > Select the subscription > Access Control (IAM) page in Microsoft Azure, and complete the following
steps:
On the Basics tab, provide a name for the
role, select Clone a role for the
Baseline permissions field, and choose
Storage Blob Data Contributor for the
Role to clone field. Click
Next.
On the Permissions tab, remove the
Microsoft.Storage/storageAccounts/blobServices/containers/delete
and
Microsoft.Storage/storageAccounts/blobServices/containers/blobs/delete
permissions.
Click Review + create.
The following sample image shows the Access
control (IAM) page in Microsoft Azure:
Click Add > Add role assignment on the Storage accounts > Select the account where snapshots will be
written > Access Control (IAM) page, and complete the following steps:
On the Role tab, select the custom role
previously created. Click Next.
On the Members tab, select
User, group, or service principal for
Assign access to field, and select the
required service principal.
Click Review + assign.
Click Review + assign on the
Conditions (optional) tab.
Click Add principal on the Storage accounts > [***ACCOUNT NAME***] > [***CONTAINER WHERE SNAPSHOTS ARE TO BE
WRITTEN***] > Manage ACL page.
Select the required service principal.
Choose the Execute permission for the
required container, and click Save.
How do I verify whether the target HBase folder in the destination
Data Hub or COD does not get deleted if the snapshot export fails
during the HBase replication policy job run?
To verify if the delete operation is allowed on the service principal
that you previously created, perform the following steps:
Open the Azure Cloud Shell terminal.
Login using the service principal that you created
previously using the az login --service-principal
-u [***CLIENT ID***] -p
[***CLIENT SECRET***] --tenant
[***TENANT ID***]
command.
Delete an arbitrarily created temporary file from the
account using the az storage fs file delete
--path [***TEMPORARY FILE***] -f data
--account-name [***ACCOUNT NAME***]
--auth-mode login command.
The delete operation is not allowed.
Replicate HBase data in existing and future tables
Errors might appear when you try to replicate HBase data from existing tables and
future tables in a database using the “Replicate Database” option during the HBase
replication policy creation process. These errors appear when there are compatibility
issues.
The following list shows a few errors that might appear and how to mitigate
these issues:
The error Destination cluster doesn't support replication of all
HBase tables. Please change the destination cluster or specify the
tables that should be replicated. appears during HBase
replication policy creation process. How to mitigate this issue?
This error appears if you choose the Select Source > Replicate Database option during the HBase replication policy creation
process for unsupported cluster versions.
To mitigate this issue,
ensure that the target Cloudera Manager version is
7.11.0 or higher and the source cluster version is CDH 6.x or higher
before you choose the Select Source > Replicate Database option during the HBase replication policy creation
process.
The error Exception in thread "main"
java.lang.IllegalArgumentException: Cannot add a peer
with
id=_repl__f1907207cdbc4a528777bb4a316_ba23f09f7328494bbcbf81f40b
because that id already exists appears after
creating subsequent HBase replication policies.
This error appears if you created an HBase peer manually using the
hbase shell to replicate all column families on a
source cluster using CDH 5.x.
You can replicate the HBase
data (existing tables and future tables) in a database only if the
target Cloudera Manager version is 7.11.0 or
higher and the source cluster version is CDH 6.x or higher.
Therefore, even if you create a peer using hbase shell
in the source cluster version CDH 5.16.2 or any other unsupported
version, errors might appear.
 option on the
Replication Policies page.
You can use this option if the ‘policy list request’ operation has timed out on the Cloudera Manager. You can identify this scenario when the cluster that stores the replication policies shows up in the Error list. Click
option on the
Replication Policies page.
You can use this option if the ‘policy list request’ operation has timed out on the Cloudera Manager. You can identify this scenario when the cluster that stores the replication policies shows up in the Error list. Click