Using MySQL for Cloudera Director Server
Cloudera Director stores various kinds of data, including information about deployments, database servers, users, CDH clusters, and Cloudera Manager instances. By default, this data is
stored in an embedded H2 database stored on the filesystem where the server is running at the following location:
/var/lib/cloudera-director-server/state.h2.db
Alternatively, you can use a MySQL database instead of the embedded H2 database, as described below.
Continue reading:
- Installing the MySQL Server
- Configuring and Starting the MySQL Server
- Installing the MySQL JDBC Driver
- Creating a Database for Cloudera Director Server
- Configuring Cloudera Director Server to use the MySQL Database
- Migrating Cloudera Director Server from H2 to MySQL
- Step 1: Preparation of databases
- Step 2: Export data from H2 database
- Step 3: Prepare MySQL database for data import
- Step 4: Import data to MySQL
Installing the MySQL Server
- Install the MySQL database.
After issuing the command, you may need to confirm that you want to complete the installation.
OS Command RHEL $ sudo yum install mysql-server
SLES $ sudo zypper install mysql $ sudo zypper install libmysqlclient_r15
Ubuntu and Debian $ sudo apt-get install mysql-server
Configuring and Starting the MySQL Server
- Determine the version of MySQL.
- Stop the MySQL server if it is running.
OS Command RHEL $ sudo service mysqld stop
SLES, Ubuntu, and Debian $ sudo service mysql stop
- Move old InnoDB log files /var/lib/mysql/ib_logfile0 and /var/lib/mysql/ib_logfile1 from /var/lib/mysql/ to a backup location.
- Determine the location of the option file, my.cnf,
and update it as follows::
- To prevent deadlocks, set the isolation level to read committed.
- Configure MySQL to use the InnoDB engine, rather than MyISAM. (The default storage engine for MySQL is MyISAM.) To check which engine your tables are using, run the following command from the MySQL shell:
mysql> show table status;
- To configure MySQL to use the InnoDB storage engine, add the following line to the [mysqld] section of the my.cnf option file:
[mysqld]
default-storage-engine = innodb
- Binary logging is not a requirement for Cloudera Director installations. Binary logging provides benefits such as MySQL replication or point-in-time incremental recovery after database restore. Examples of this configuration follow. For more information, see The Binary Log.
[mysqld]
default-storage-engine = innodb
transaction-isolation = READ-COMMITTED
# Disabling symbolic-links is recommended to prevent assorted security risks;
# to do so, uncomment this line:
# symbolic-links = 0

key_buffer_size = 32M
max_allowed_packet = 32M
thread_stack = 256K
thread_cache_size = 64
query_cache_limit = 8M
query_cache_size = 64M
query_cache_type = 1

max_connections = 550

#log_bin should be on a disk with enough free space. Replace '/var/lib/mysql/mysql_binary_log' with an appropriate path for your system.
#log_bin=/var/lib/mysql/mysql_binary_log
#expire_logs_days = 10
#max_binlog_size = 100M

# For MySQL version 5.1.8 or higher. Comment out binlog_format for lower versions.
binlog_format = mixed

read_buffer_size = 2M
read_rnd_buffer_size = 16M
sort_buffer_size = 8M
join_buffer_size = 8M

# InnoDB settings
innodb_file_per_table = 1
innodb_flush_log_at_trx_commit  = 2
innodb_log_buffer_size = 64M
innodb_buffer_pool_size = 4G
innodb_thread_concurrency = 8
innodb_flush_method = O_DIRECT
innodb_log_file_size = 512M

[mysqld_safe]
log-error=/var/log/mysqld.log
pid-file=/var/run/mysqld/mysqld.pid
- If AppArmor is running on the host where MySQL is installed, you might need to configure AppArmor to allow MySQL to write to the binary.
- Ensure that the MySQL server starts at boot.
OS Command RHEL $ sudo /sbin/chkconfig mysqld on $ sudo /sbin/chkconfig --list mysqld mysqld 0:off 1:off 2:on 3:on 4:on 5:on 6:off
SLES $ sudo chkconfig --add mysql
Ubuntu and Debian $ sudo chkconfig mysql on
- Start the MySQL server:
OS Command RHEL $ sudo service mysqld start
SLES, Ubuntu, and Debian $ sudo service mysql start
- Set the MySQL root password. In the following example, the current root password is blank. Press the Enter key when you're
prompted for the root password.
$ sudo /usr/bin/mysql_secure_installation
[...]
Enter current password for root (enter for none):
OK, successfully used password, moving on...
[...]
Set root password? [Y/n] y
New password:
Re-enter new password:
Remove anonymous users? [Y/n] Y
[...]
Disallow root login remotely? [Y/n] N
[...]
Remove test database and access to it [Y/n] Y
[...]
Reload privilege tables now? [Y/n] Y
All done!
Installing the MySQL JDBC Driver
Install the MySQL JDBC driver for the Linux distribution you are using.
| OS | Command |
|---|---|
| RHEL 5 or 6 |
|
| SLES |
$ sudo zypper install mysql-connector-java |
| Ubuntu or Debian |
$ sudo apt-get install libmysql-java |
Creating a Database for Cloudera Director Server
You can create the database on the host where the Cloudera Director server will run, or on another host that is accessible by the Cloudera Director server. The database must be configured to support UTF-8 character set encoding.
Record the values you enter for database names, usernames, and passwords. Cloudera Director requires this information to connect to the database.
- Log into MySQL as the root user:
$ mysql -u root -p
Enter password:
- Create a database for Cloudera Director server:
mysql> create database database DEFAULT CHARACTER SET utf8;
Query OK, 1 row affected (0.00 sec)

mysql > grant all on database.* TO 'user'@'%' IDENTIFIED BY 'password';
Query OK, 0 rows affected (0.00 sec)
database, user, and password can be any value. The examples match the names you provide in the Cloudera Director configuration settings described below in Configure Cloudera Director Server to use the MySQL Database.
Backing Up MySQL Databases
To back up the MySQL database, run the mysqldump command on the MySQL host, as follows:
$ mysqldump -hhostname -uusername -ppassword database > /tmp/database-backup.sql
Configuring Cloudera Director Server to use the MySQL Database
Before starting the Cloudera Director server, edit the "Configurations for database connectivity" section of /etc/cloudera-director-server/application.properties.
.
#
# Configurations for database connectivity.
#

# Optional database type (H2 or MySQL) (defaults to H2)
#lp.database.type: mysql

# Optional database username (defaults to "director")
#lp.database.username:

# Optional database password (defaults to "password")
#lp.database.password:

# Optional database host (defaults to "localhost")
#lp.database.host:

# Optional database port (defaults to 3306)
#lp.database.port:

# Optional database (schema) name (defaults to "director")
#lp.database.name:
Migrating Cloudera Director Server from H2 to MySQL
If you are already running Cloudera Director with an embedded H2 database, you can migrate to a MySQL database by following the steps in this section. The SQL dialect that H2 uses is
not compatible with MySQL, so this process requires the use of SQuirreL SQL, which translates the SQL dialect of H2 into that of
MySQL. Cloudera Director will be used to create the schema in the MySQL database because SQuirrel SQL’s translation will not create the database schema exactly as Cloudera Director requires.
Step 1: Preparation of databases
- Stop Cloudera Director and back up the H2 database file, state.h2.db. The H2 database file is located at /var/lib/cloudera-director-server/state.h2.db.
- Create a user on the MySQL server for Cloudera Director:
CREATE USER director IDENTIFIED BY password;
- Create a database on the MySQL server for exporting the data from H2:
CREATE DATABASE directorexport CHARACTER SET utf8;
GRANT ALL PRIVILEGES ON directorexport.* TO 'director'@'%';
- Create a database on the MySQL server for use by Cloudera Director:
CREATE DATABASE director CHARACTER SET utf8;
GRANT ALL PRIVILEGES ON director.* TO 'director'@'%';
Step 2: Export data from H2 database
- Install SQuirreL SQL.
- Download SQuirreL SQL from the SQuirreL SQL web site.
- Install SQuirreL SQL with the H2 and MySQL database plugins enabled.
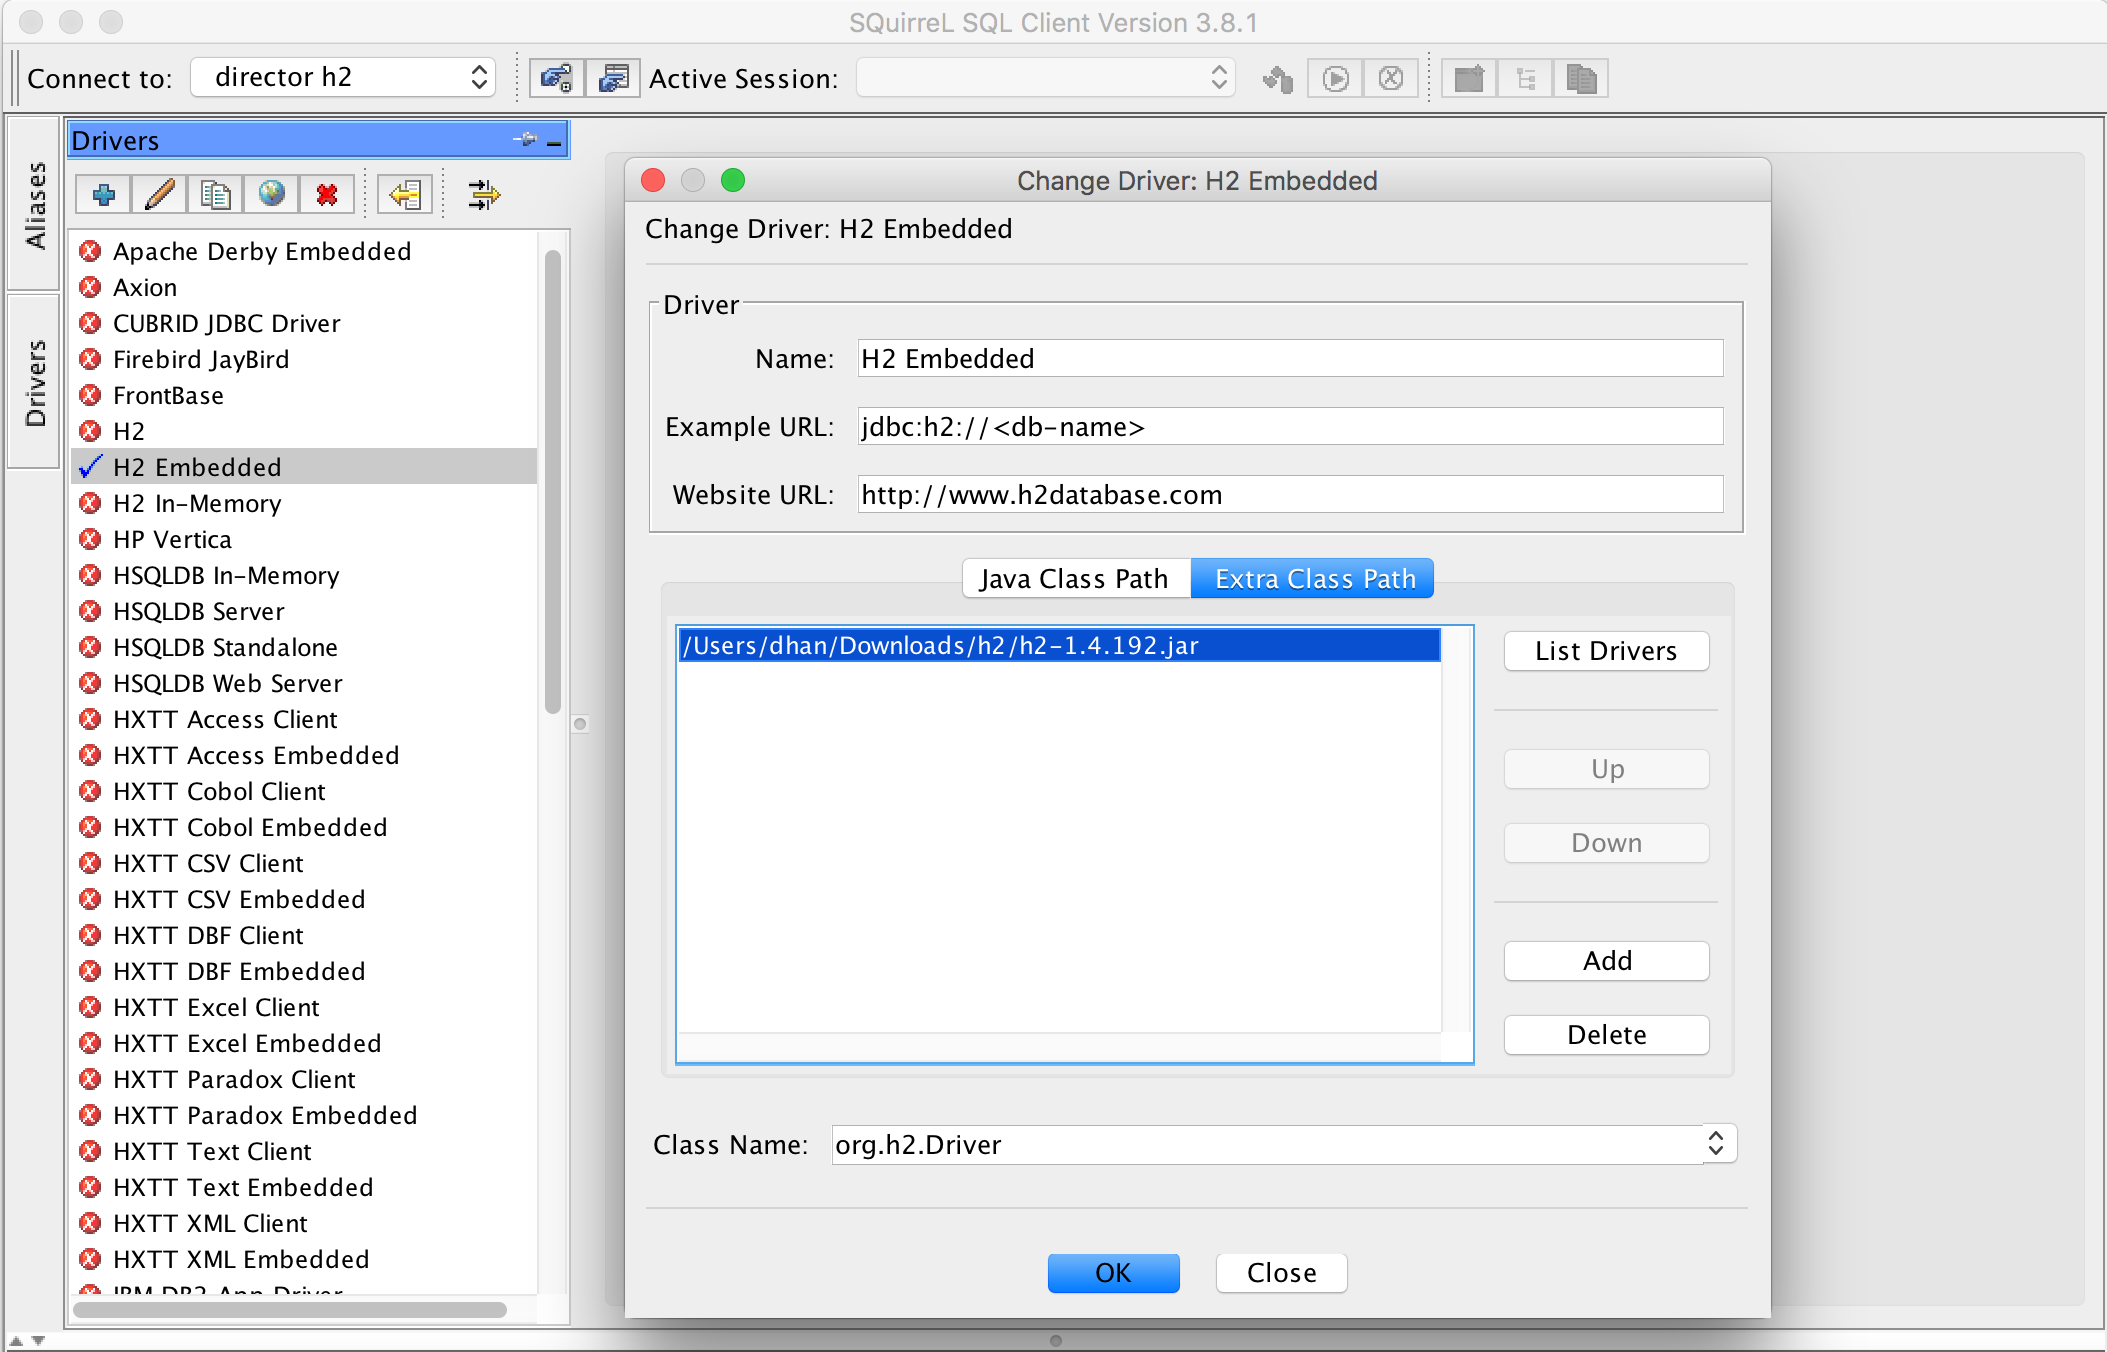
- Enable the H2 Embedded driver in SQuirreL SQL.
- Download H2 from http://www.h2database.com/html/download.html.
- Edit the H2 Embedded driver, adding the downloaded jar file to the Extra Class Path.
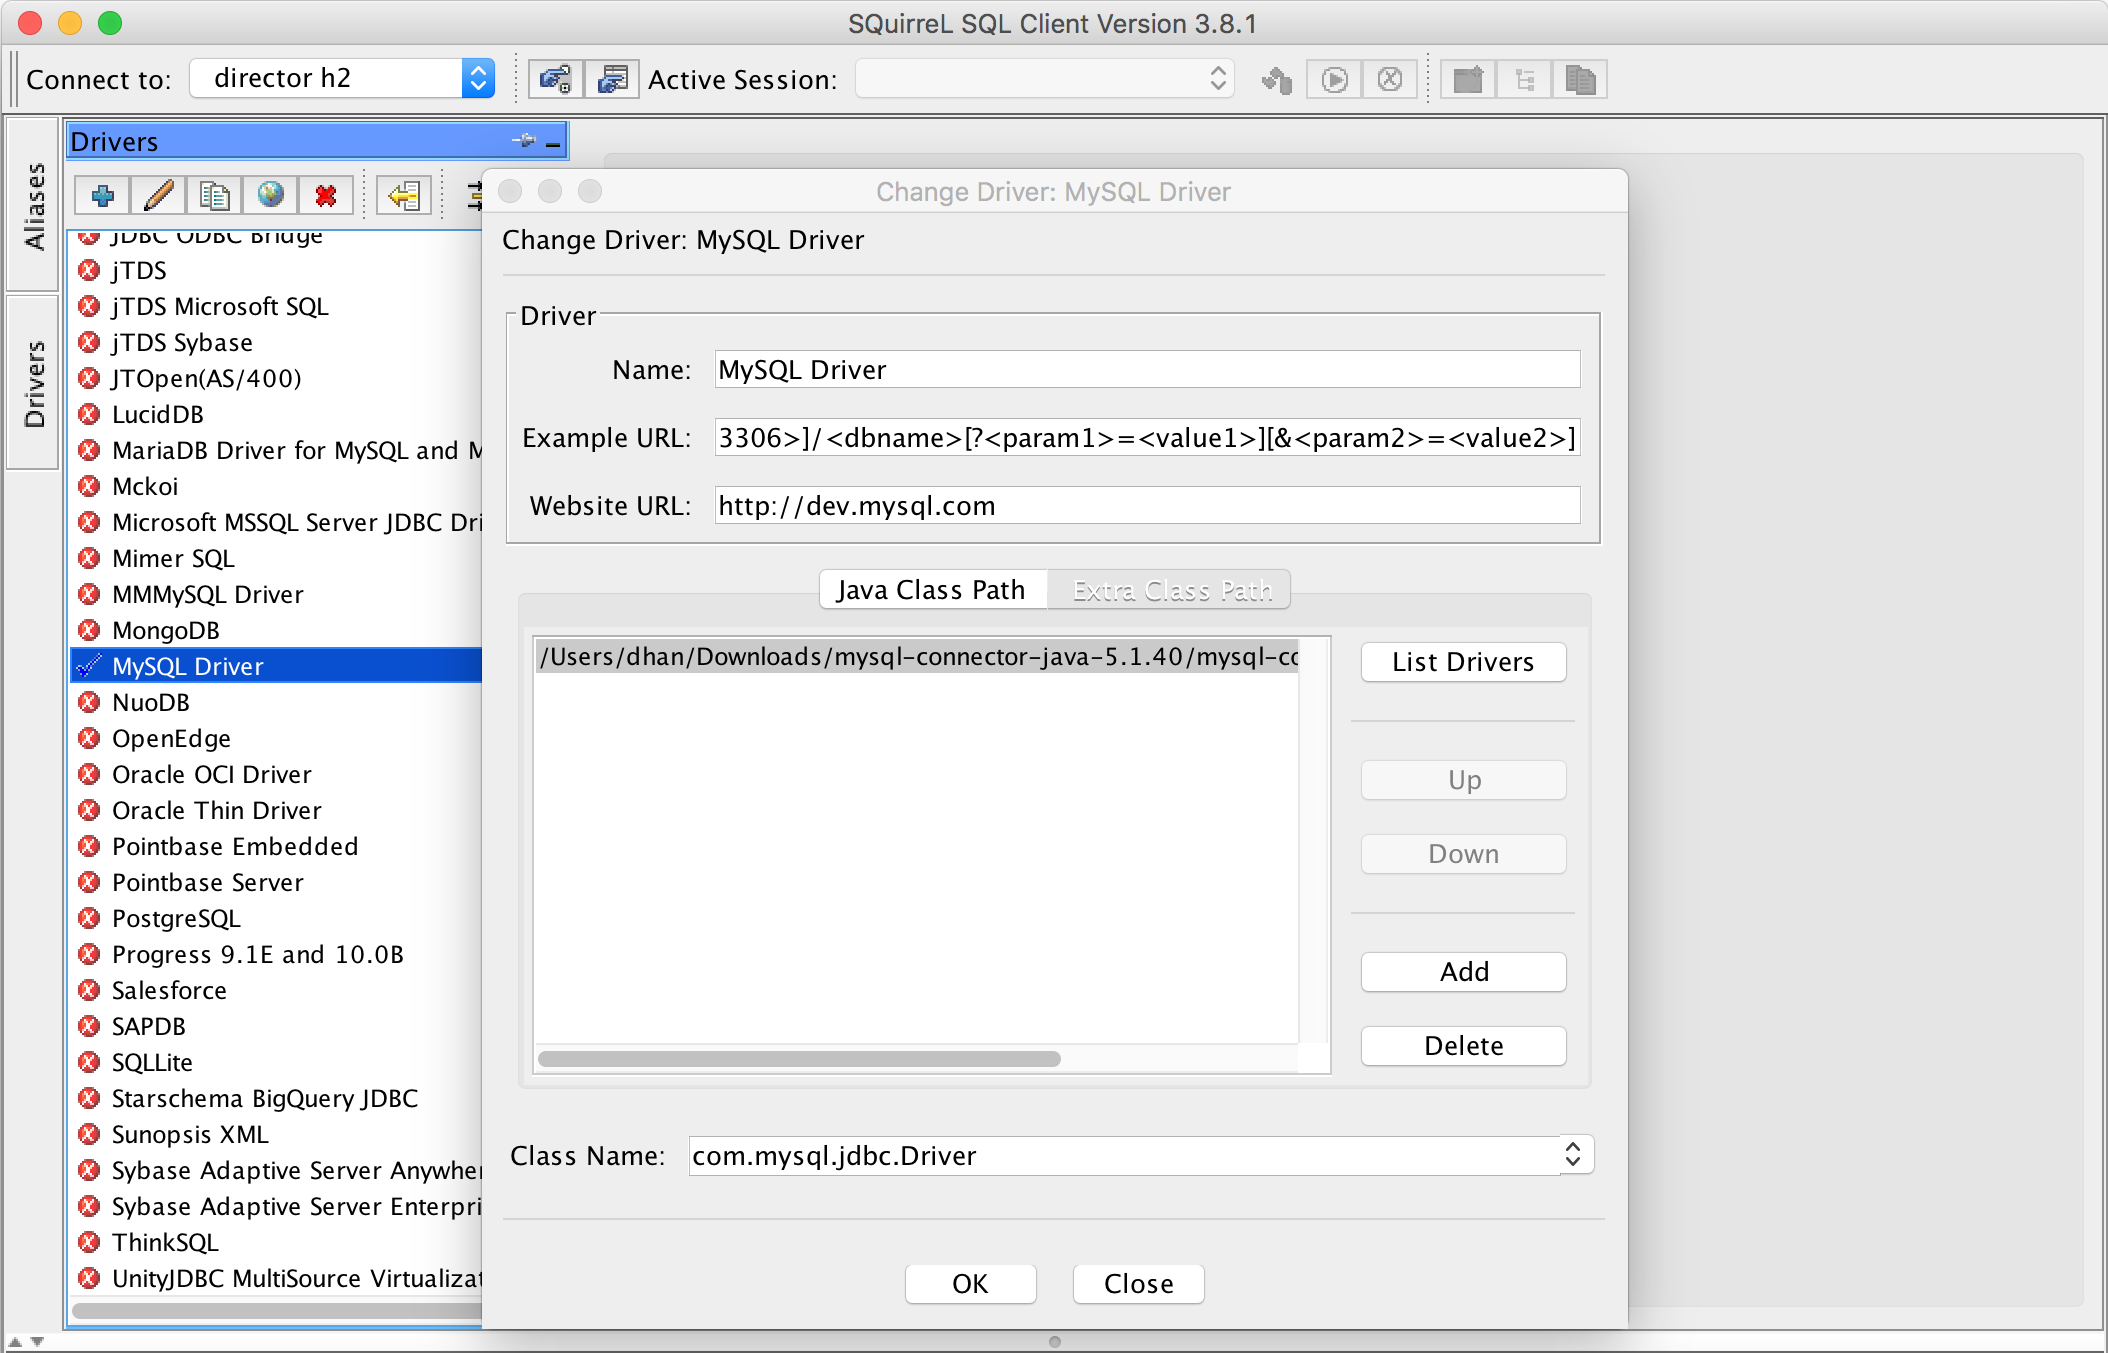
- Enable the “MySQL Driver” driver in SQuirreL SQL.
- Download the MySQL driver from the MySQL Downloads site.
- Edit the “MySQL Driver” driver, adding the MySQL connector jar to the Extra Class Path.
- Create an alias for the H2 database. Test the connection to make sure you can connect to the database.
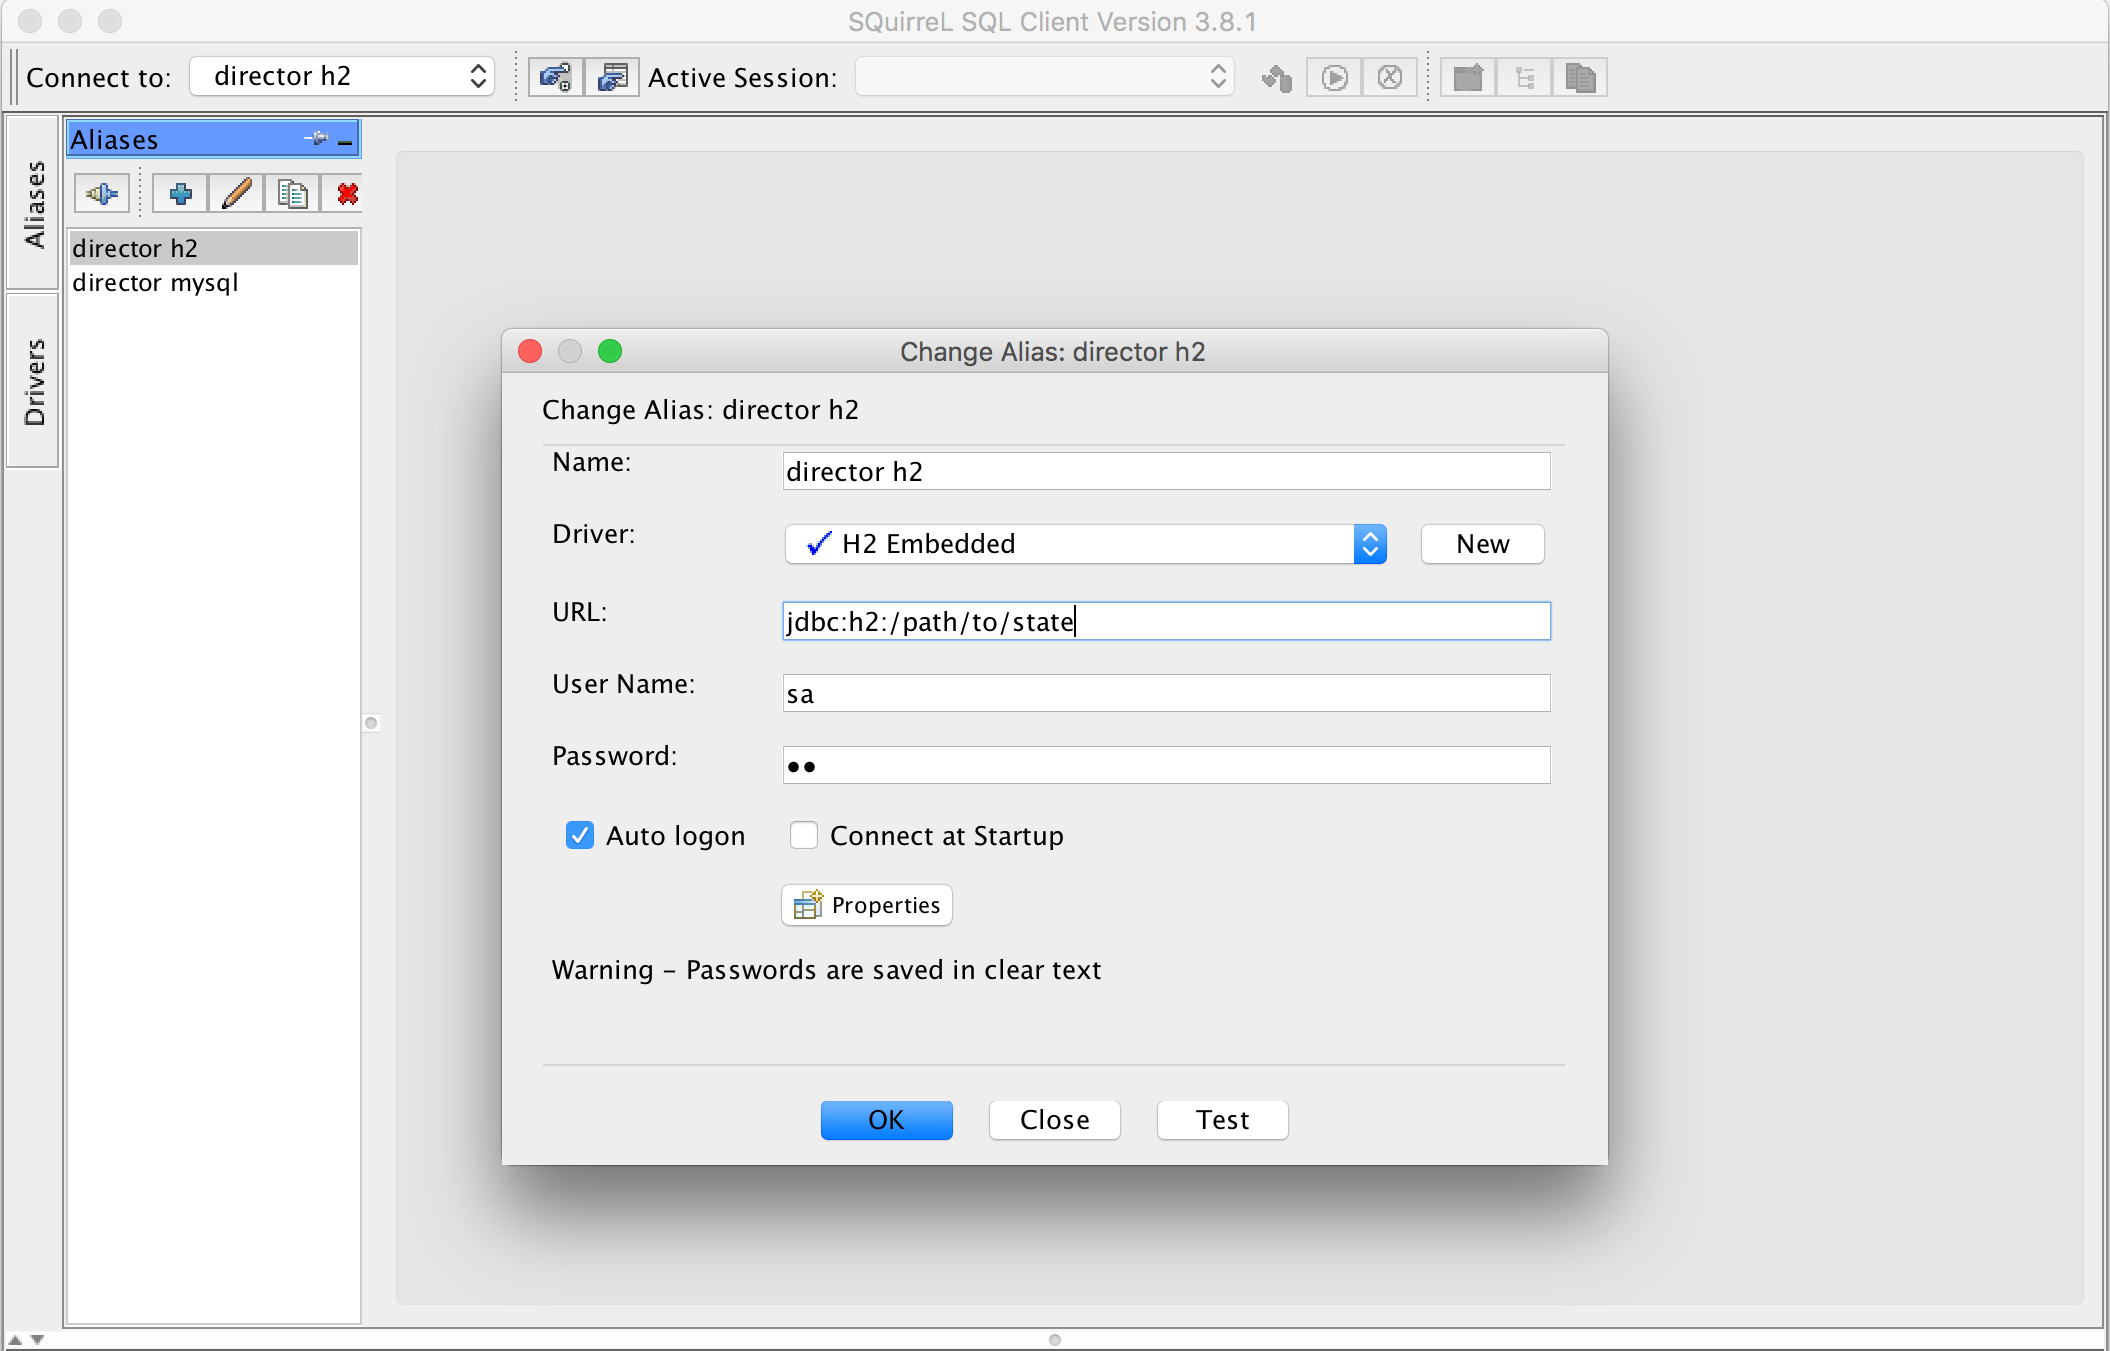
- Create alias for MySQL data export database. Test the connection to make sure you can connect to the database.

- Prepare the H2 database for data export. H2 generates names for indexes that are longer than what is permitted in MySQL, so you must rename the indexes in H2 to ensure that they do not
violate the MySQL length limit. For example:
ALTER INDEX DEPLOYMENTS_UNIQUE_PER_ENVIRONMENT_BY_DEPLOYMENT_NAME_INDEX_8 RENAME TO DEPLOYMENTS_UNIQUE_PER_ENVIRONMENT_BY_DEPLOYMENT_NAME
ALTER INDEX UK_EXTERNAL_DATABASE_SERVERS_UNIQUE_PER_ENVIRONMENT_BY_NAME_INDEX_8 RENAME TO UK_EXTERNAL_DATABASE_SERVERS_UNIQUE_PER_ENVIRONMENT_BY_NAME
- Prepare MySQL for data export.
- Depending on the Cloudera Director and MySQL versions you are running, you might need the following step. If you see the error message invalid default
value after performing the next step, you need to do this. Otherwise, this step
is optional.
select @@global.sql_mode
// Keep the value somewhere if you would like to restore the value
// at the end of this procedure. (See step 9c below.)
set @@global.sql_mode = "...";
// remove NO_ZERO_IN_DATE,NO_ZERO_DATE from previous value.
- Reconnect to the MySQL alias for this change to apply to your session.
- Depending on the Cloudera Director and MySQL versions you are running, you might need the following step. If you see the error message invalid default
value after performing the next step, you need to do this. Otherwise, this step
is optional.
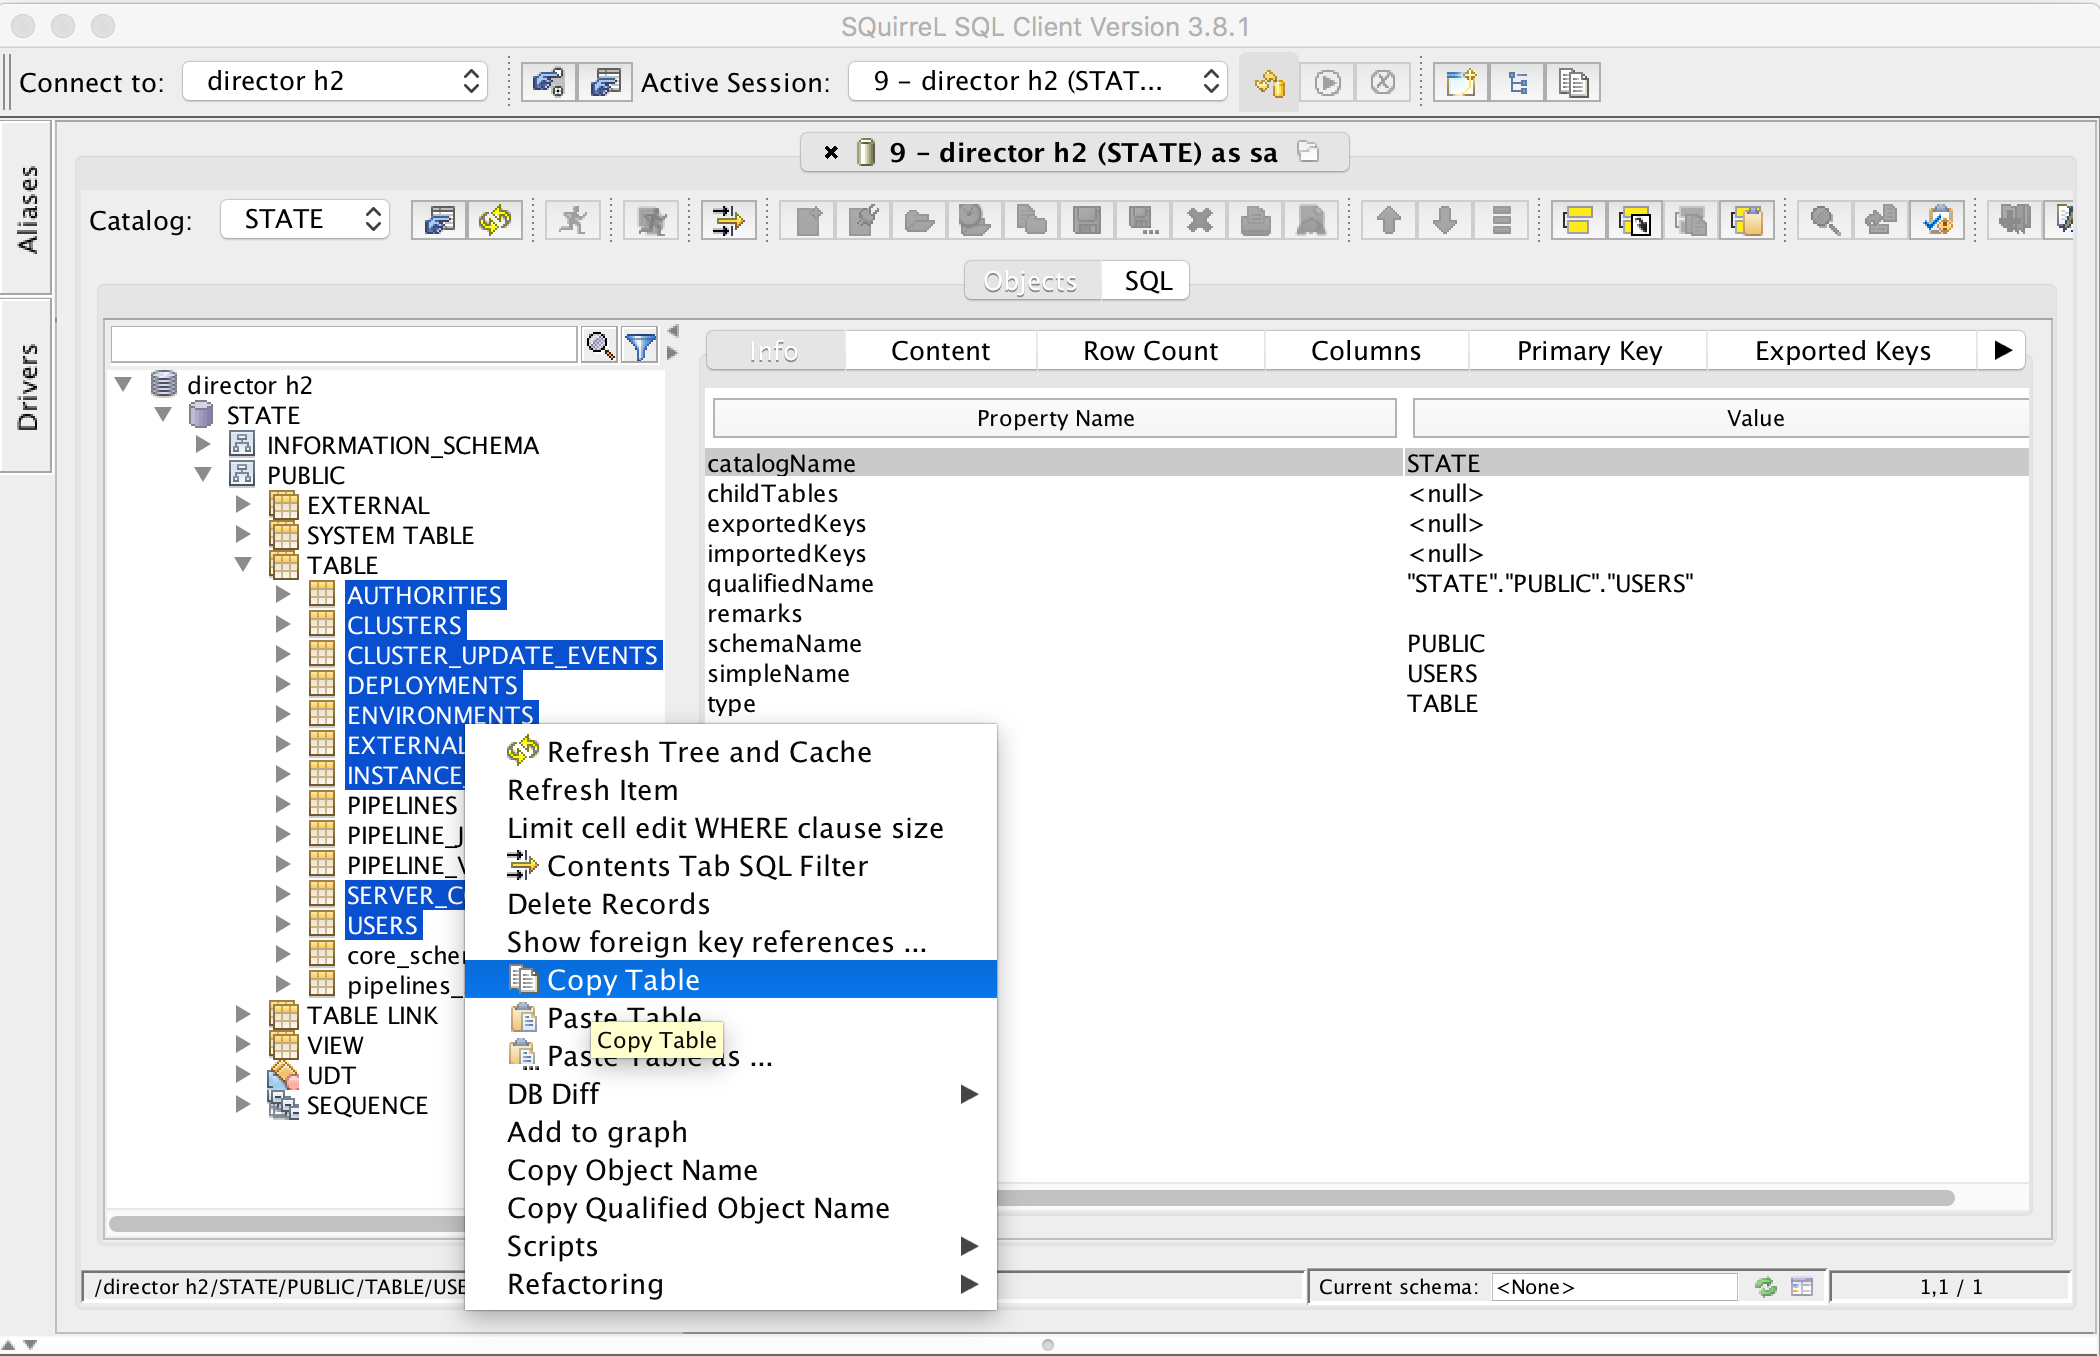
- Export data from H2 to MySQL.
- Go to the Alias pane in SQuirreL SQL, and connect to H2.
- Go to . Select all tables except for the PIPELINES* and *schema_versions tables, right click and select
Copy Table.
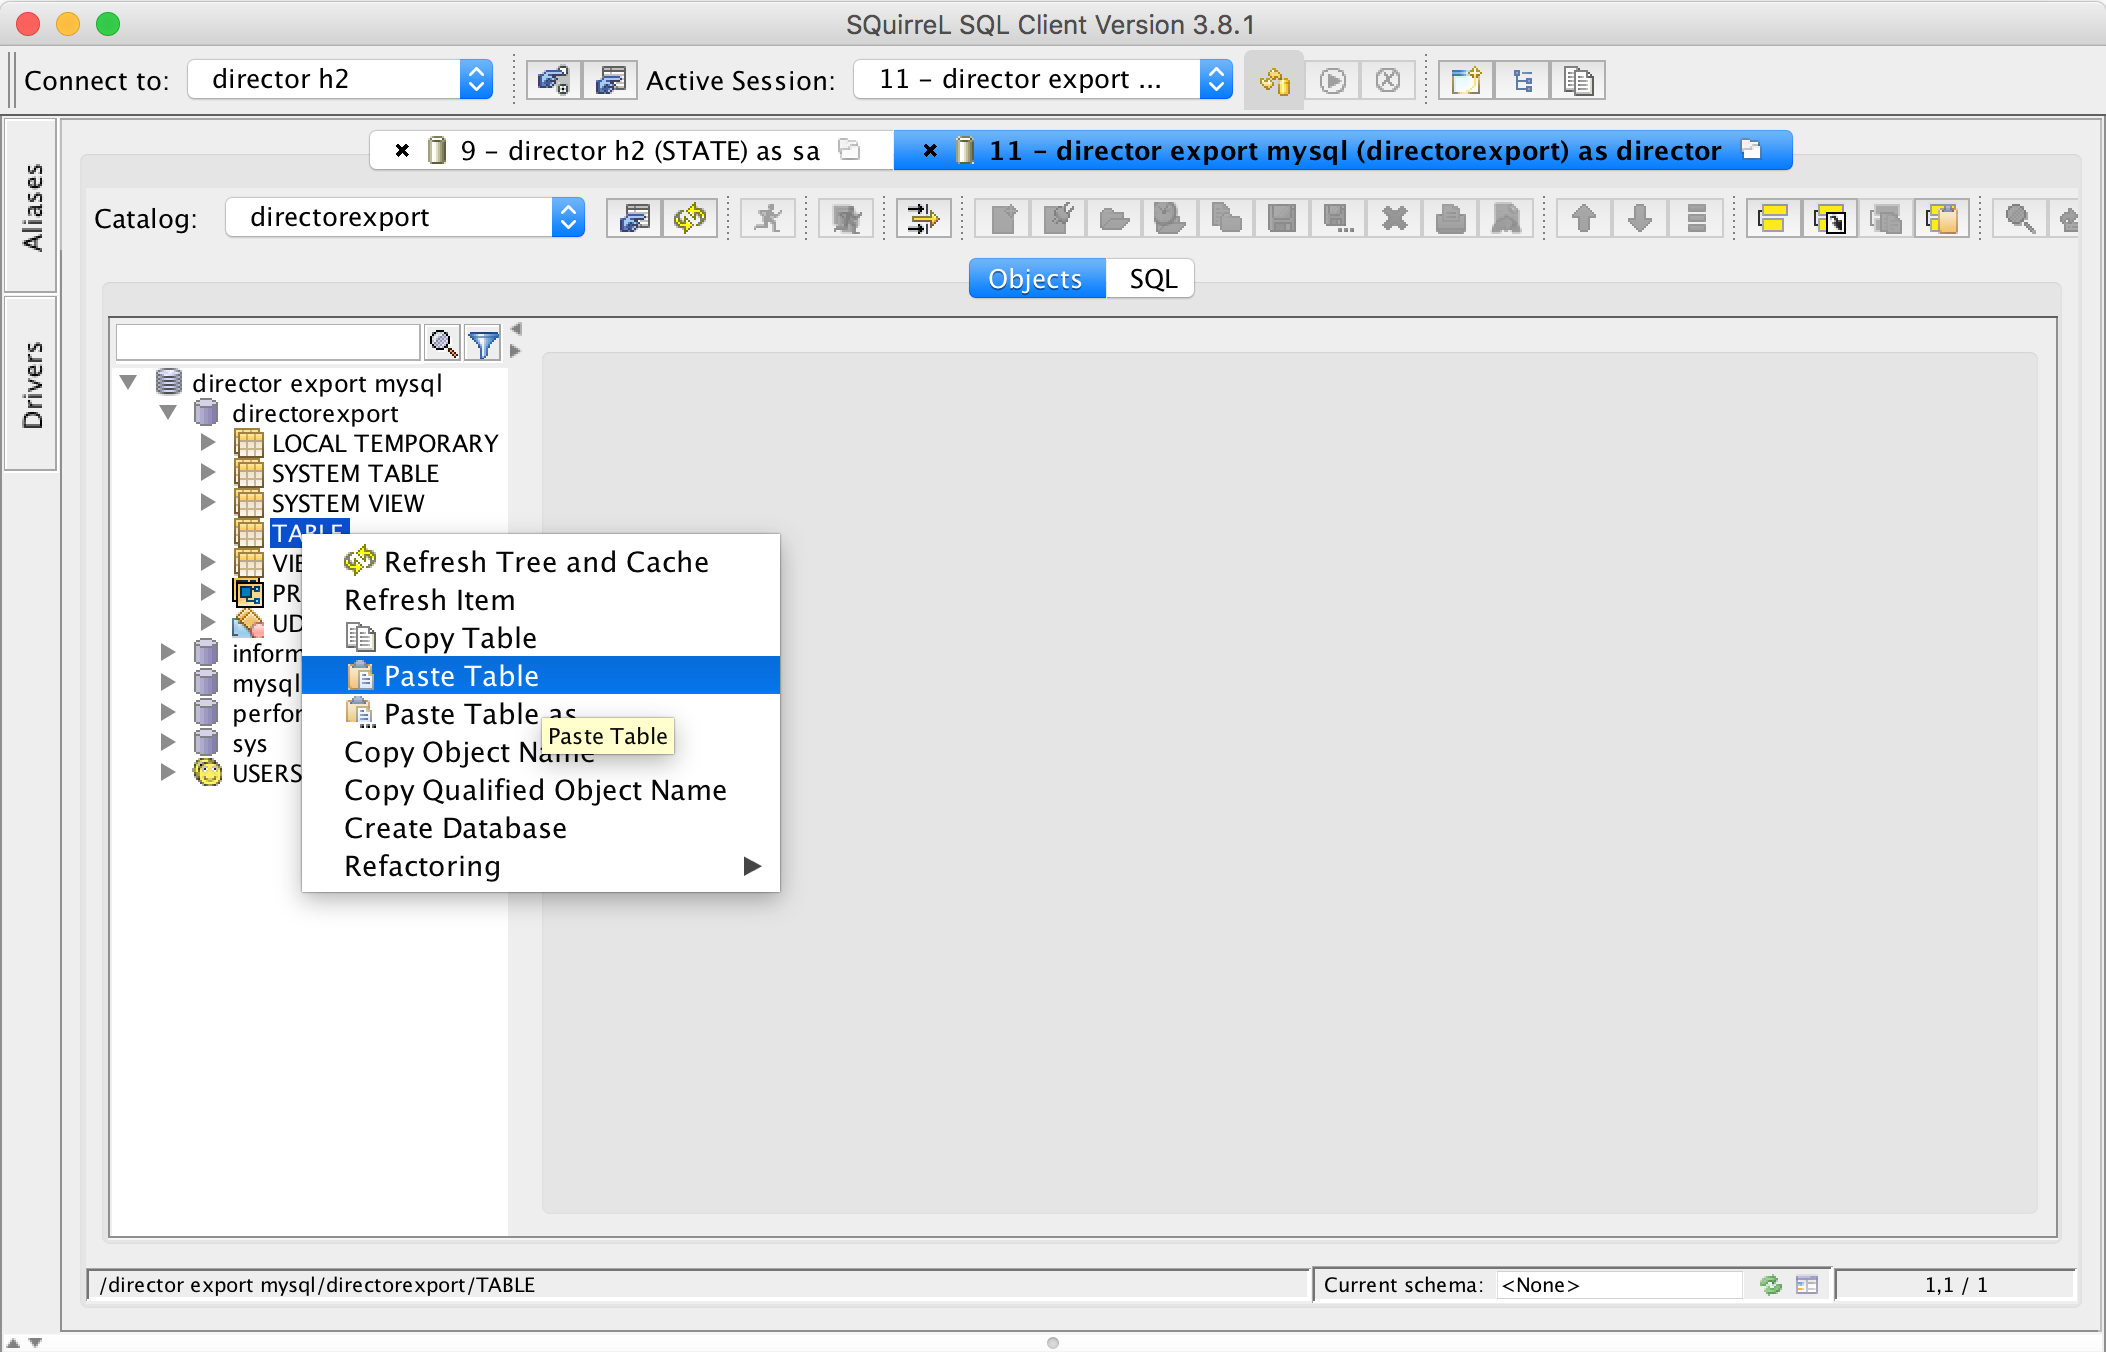
- Go to the Alias pane in SQuirreL SQL and connect to MySQL.
- Go to ,
right click TABLE and select Paste Table.
- Restore sql_mode, if desired (for more about sql_mode, see Prepare MySQL for data export above).
Step 3: Prepare MySQL database for data import
Start Cloudera Director with MySQL.
- Configure Cloudera Director to use MySQL, as described in Configuring Cloudera Director Server to use the MySQL Database.
- Start Cloudera Director with MySQL. When Cloudera Director starts, the database schema will be created.
- Stop Cloudera Director to prevent modification of the database during data import.
- Delete all values from the AUTHORITIES, USERS, and SERVER_CONFIGS tables. Cloudera Director populates these tables with some values by default. These values should be deleted so they
will not conflict with the imported data.
DELETE FROM AUTHORITIES;
DELETE FROM USERS;
DELETE FROM SERVER_CONFIGS;
Step 4: Import data to MySQL
- Dump the data only (no schema) from the export database. You can use the -h option if running mysqldump against a remote
host.
$ mysqldump -u [user] -p --no-create-info directorexport > directorexport.sql
- Import the data into Cloudera Director’s database. You may use the -h option if running mysql against a remote host.
$ mysql -u [user] -p director < directorexport.sql