Access Hive via JDBC
Hive can be accessed via JDBC through the gateway that is automatically installed and configured in your cluster. If your cluster configuration includes Hive LLAP, then Hive LLAP is configured with the gateway; otherwise, HiveServer2 is configured. In either case, the transport mode is “http” and the gateway path to Hive is "${CLUSTER_NAME}/${TOPOLOGY_NAME}/hive" (for example "test-cluster/db-proxy/hive").
Before you can start using Hive JDBC, you must download the SSL certificate to your truststore. After downloading the SSL certificate, the Hive JDBC endpoint is:
jdbc:hive2://{GATEWAY_HOST}:8443/;ssl=true;sslTrustStore=gateway.jks;trustStorePassword={GATEWAY_JKS_PASSWORD};transportMode=http;httpPath={CLUSTER_NAME}/{TOPOLOGY_NAME}/hive
Download SSL Certificate
By default, the gateway has been configured with a self-signed certificate to protect the Hive endpoint via SSL. Therefore, in order to use Hive via JDBC or Beeline client, you must download the SSL certificate from the gateway and add it to your truststore.
Steps
On Linux or OSX, you can download the self-signed SSL certificate by using the following commands:
export GATEWAY_HOST=IP_OF_GATEWAY_NODE
export GATEWAY_JKS_PASSWORD=GATEWAY_PASSWORD
openssl s_client -servername ${GATEWAY_HOST} -connect ${GATEWAY_HOST}:8443 -showcerts </dev/null | openssl x509 -outform PEM > gateway.pem
keytool -import -alias gateway-identity -file gateway.pem -keystore gateway.jks -storepass ${GATEWAY_JKS_PASSWORD}
Where:
GATEWAY_HOST - Set this to the IP address of the instance on which gateway is running (Ambari server node).
GATEWAY_JKS_PASSWORD - Create a password for the truststore that will hold the self-signed certificate. The password must be at least 6 characters long.
For example:
export GATEWAY_HOST=2-52-86-252-73
export GATEWAY_JKS_PASSWORD=Hadoop123!
openssl s_client -servername ${GATEWAY_HOST} -connect ${GATEWAY_HOST}:8443 -showcerts </dev/null | openssl x509 -outform PEM > gateway.pem
keytool -import -alias gateway-identity -file gateway.pem -keystore gateway.jks -storepass ${GATEWAY_JKS_PASSWORD}
After executing these commands, gateway.pem and gateway.jks files will be downloaded onto your computer to the location where you ran the commands.
Examples
Here are two examples of using tools to connect to Hive via JDBC:
Example: SQL Workbench/J
SQL Workbench/J is a cross-platform SQL tool that can be used to access database systems. In this example, we will provide a high-level overview of the steps required to setup SQL Workbench to access Hive via JDBC.
Prerequisite: Download the SSL Certificate
Step 1: Install SQL Workbench and Hive JDBC Driver
- Download and install SQL Workbench. Refer to http://www.sql-workbench.net/getting-started.html.
- Download the Hortonworks JDBC Driver for Apache Hive from https://hortonworks.com/downloads/#addons. Next, extract the driver package.
Step 2: Configure SQL Workbench with Hive JDBC Driver
- Launch SQL Workbench.
- The Select Connection Profile window should be open by default. If it is not, you can open it from File > Connect window.
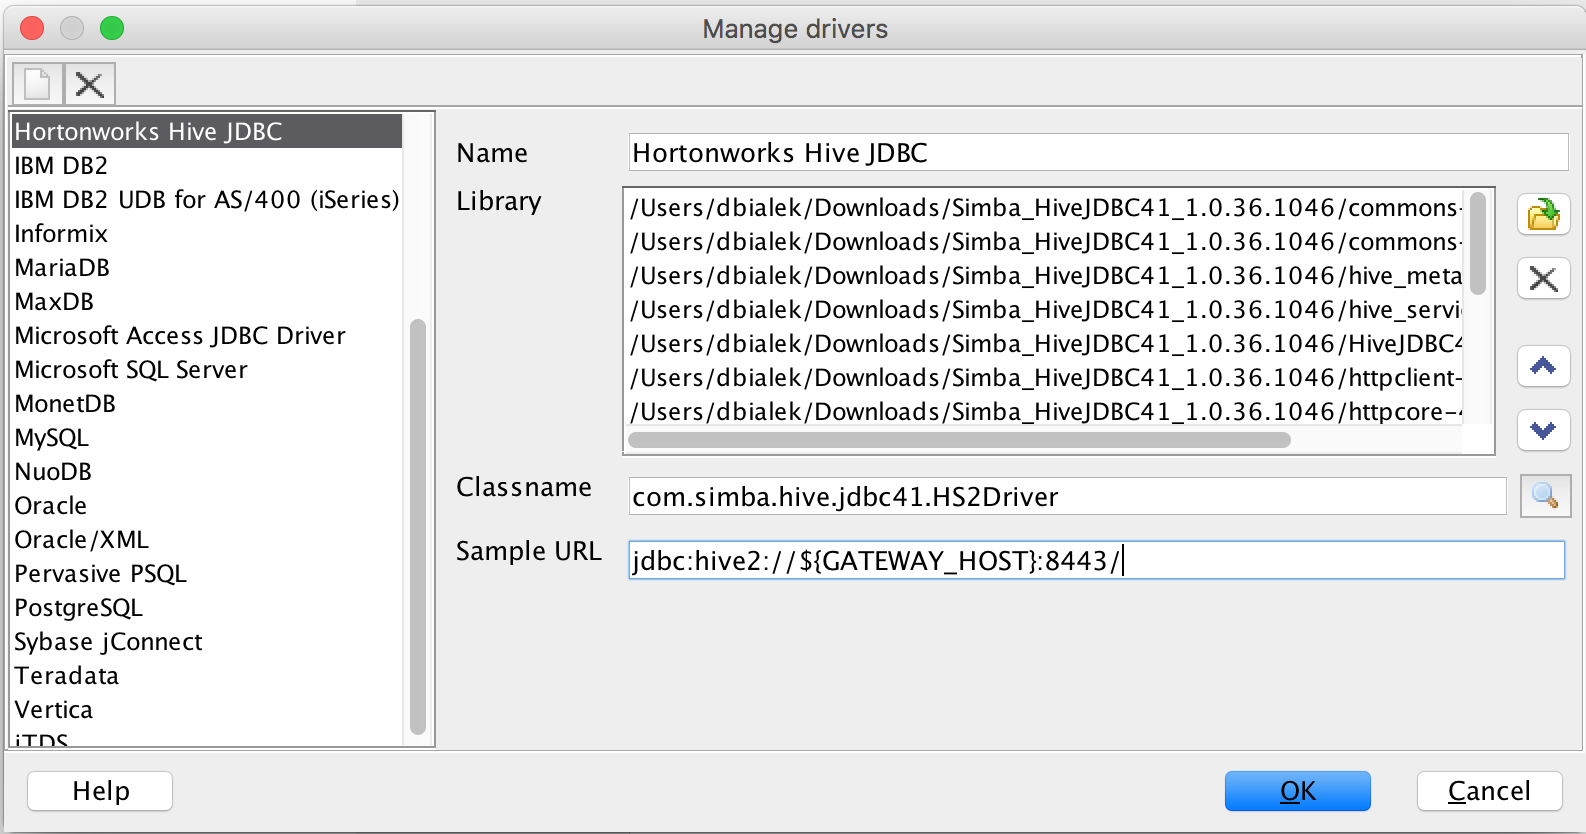
- Click Manage Drivers. The Manage drivers window will appear.
- Click
 to create a new driver, and enter the Name: “Hortonworks Hive JDBC”.
 - Click
 and then browse to the Hortonworks JDBC Driver for Apache Hive package that you downloaded earlier. Next, select the JDBC Driver JAR files in the package.
 - When prompted, select the “com.simba.hive.jdbc41.HS2Driver” driver.
- For the Sample URL, enter:
jdbc:hive2://${GATEWAY_HOST}:8443/ -
After performing these steps, your configuration should look similar to:
-
Click OK to save the driver.
Step 2: Create a Connection to Hive
- From the Select Connection Profile window, select the “Hortonworks Hive JDBC" from the Driver dropdown.
- For URL , enter the URL to the cluster instance where gateway is installed, such as
jdbc:hive2://52.52.98.57:8443/(where52.52.98.57is the public hostname of your gateway node). - For Username and Password, enter the credentials that you created when creating your cluster.
-
Click Extended Properties and add the following properties:
Property Value ssl 1 transportMode http httpPath Provide "${CLUSTER_NAME}/${TOPOLOGY_NAME}/hive". For examplehive-test/db-proxy/hivesslTrustStore Enter the path to the gateway.jks file. This file was generated when you downloaded the SSL certificate. trustStorePassword Enter the GATEWAY_JKS_PASSWORD that you specified when you downloaded the SSL certificate. After performing these steps, your configuration should look similar to:
-
Click OK to save the properties.
- Click Test to confirm a connection can be established.
- Click OK to make the connection and start using SQL Workbench to query Hive.
Example: Tableau
Tableau is a business intelligence tool for interacting with and visualizing data via SQL. Connecting Tableau to Hive requires the use of an ODBC driver. In this example, we will provide high-level steps required to set up Tableau to access Hive.
Prerequisite: Download the SSL Certificate
Step 1: Install ODBC Driver
- Download the Hortonworks ODBC Driver for Apache Hive from https://hortonworks.com/downloads/#addons. 2. Next, extract and install the driver.
Step 2: Launch Tableau and Connect to Hive
- Launch Tableau. If you do not already have Tableau, you can download a trial version from https://www.tableau.com/trial/download-tableau.
-
In Tableau, create a connection to a “Hortonworks Hadoop Hive” server. Enter the following:
Property Value Server Enter the public hostname of your controller node instance. Port 8443 Type HiveServer2 Authentication Username and Password Transport HTTP Username Enter the cluster username created when creating your cluster Password Enter the cluster password created when creating your cluster HTTP Path Provide "${CLUSTER_NAME}/${TOPOLOGY_NAME}/hive". For examplehive-test/db-proxy/hive -
Check the Require SSL checkbox.
- Click on the text underneath the checkbox to add a configuration file link.
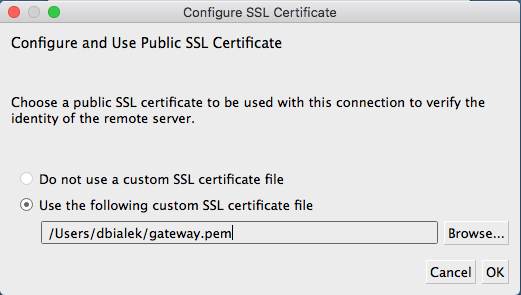
-
Specify to use a custom SSL certificate, and then browse to the SSL certificate gateway.pem file that was generated when you downloaded the SSL certificate as a prerequisite.
-
Click OK.
After performing these steps, your configuration should look similar to:
-
Click Sign In and you will be connected to Hive.


