Example: SQL Workbench/J
SQL Workbench/J is a cross-platform SQL tool that can be used to access database systems. In this example, we provide a high-level overview of the steps required to setup SQL Workbench to access Hive via JDBC.
Prerequisite:
Step 1: Install SQL Workbench and Hive JDBC Driver
- Download and install SQL Workbench. Refer to http://www.sql-workbench.net/getting-started.html.
- Download the Hortonworks JDBC Driver for Apache Hive from https://hortonworks.com/downloads/#addons. Next, extract the driver package.
Step 2: Configure SQL Workbench with Hive JDBC Driver
- Launch SQL Workbench.
- The Select Connection Profile window should be open by default. If it is not, you can open it from File > Connect window.
- Click Manage Drivers. The Manage drivers window will appear.
- Click
 to create a new driver, and enter the
Name: “Hortonworks Hive JDBC”.
 - Click
 and then browse to the Hortonworks JDBC Driver for
Apache Hive package that you downloaded earlier. Next, select the
JDBC Driver JAR files in the package.
 - When prompted, select the “com.simba.hive.jdbc41.HS2Driver” driver.
- For the Sample URL, enter:
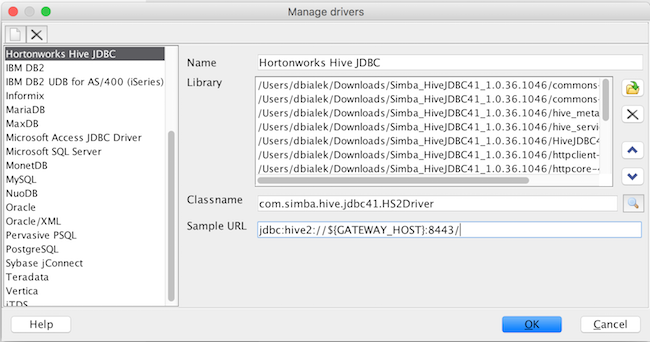
jdbc:hive2://${GATEWAY_HOST}:8443/ - After performing these steps, your configuration should look similar to:

- Click OK to save the driver.
Step 2: Create a Connection to Hive
- From the Select Connection Profile window, select the “Hortonworks Hive JDBC” from the Driver dropdown.
- For URL , enter the URL to the cluster
instance where gateway is installed, such as
jdbc:hive2://52.52.98.57:8443/(where52.52.98.57is the public hostname of your gateway node). - For Username and Password, enter the credentials that you created when creating your cluster.
- Click Extended Properties and add the following properties:
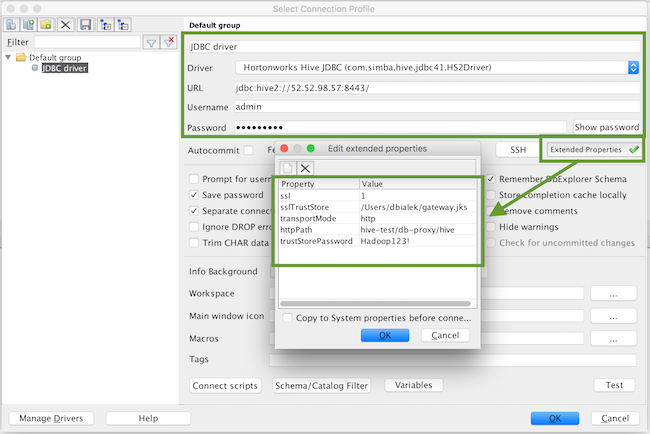
Property Value ssl 1 transportMode http httpPath Provide "${CLUSTER_NAME}/${TOPOLOGY_NAME}/hive". For examplehive-test/db-proxy/hivesslTrustStore Enter the path to the gateway.jks file. This file was generated when you downloaded the SSL certificate. trustStorePassword Enter the GATEWAY_JKS_PASSWORD that you specified when you downloaded the SSL certificate. After performing these steps, your configuration should look similar to:

- Click OK to save the properties.
- Click Test to confirm a connection can be established.
- Click OK to make the connection and start using SQL Workbench to query Hive.

