Configuring Spark Connect Sessions

Learn about how to configure a Spark Connect Session with CDE.

Before you create a Spark Connect Session, perform the following steps:
  1. Create a CDE Service.
  2. Create a CDE Virtual cluster. You must select All Purpose (Tier 2) in the Virtual Cluster option and Spark 3.4.1 as the Spark version.
  3. Initialize the virtual cluster.
  4. Initialize users in virtual clusters.
  5. If you are using an OpenShift cluster, then run the following command:
    $ oc -n openshift-ingress-operator annotate ingresscontrollers/default ingress.operator.openshift.io/default-enable-http2=true
  1. Perform the following steps on each user's machine:
    1. Create the ~/.cde/config.yaml configuration file and add the vcluster-endpoint and cdp-endpoint parameters. This allows the client machine to identify a virtual cluster. For more information, see vcluster-endpoint and cdp-endpoint.
      For example,
      cdp-endpoint: https://console-cdp.apps.example.com
      credentials-file: /Users/user1/.cde/credentials
      vcluster-endpoint: https://ffws6v27.cde-c9b822vr.apps.example.com/dex/api/v1
    2. Create an access key and update the credentials-file parameter in the ~/.cde/config.yaml configuration file with the path where the credentials file is located. This allows the client machine to acquire the short-lived access tokens.
      For example,
      [default]
      cdp_access_key_id=571ff....
      cdp_private_key=dvbYd....
      
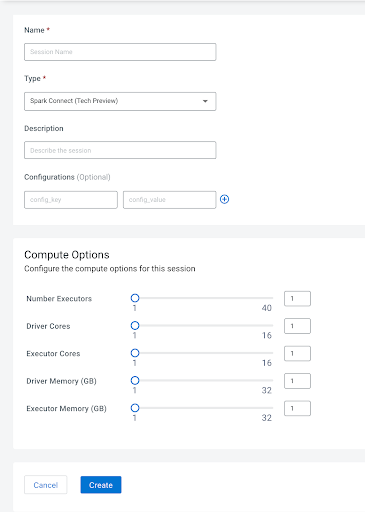
  2. Create a Spark Connect Session using one of the following methods:
    • Using the UI: Create a new session as per Creating Sessions in Cloudera Data Engineering but when you select the session type, select Spark Connect (Tech Preview) from the Type drop-down list.
    • Using the CLI: Create a Spark Connect Session by running the following command:
      cde session create --name [***SPARK-SESSION-NAME***] --type spark-connect
      
  3. On the CDE Home page, click Sessions and then select the Spark Connect Session that you have created.
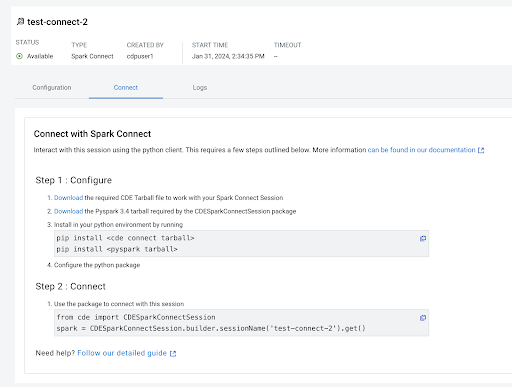
  4. Go to the Connect tab and download the required CDE Tar file and Pyspark 3.4 Tar file as displayed on the screen.
  5. Create a new Python virtual environment or use your existing one and install the Tar file after activating your Python virtual environment.
    python3 -m venv cdeconnect
    . cdeconnect/bin/activate
    
    pip install [***cdeconnect tarball***]
    pip install [***pyspark tarball***]
  6. If you have used the self-signed certificates while Initializing the virtual cluster, then you must configure the certificates for the CDE Virtual Cluster, Spark Connect gRPC server, and the control plane hosts to be trusted. Append all the certificates belonging to those hosts to the Python "certifi cacerts ca" truststore. Usually, the path of the truststore is venv/lib/python3.7/site-packages/certifi/cacert.pem. For trusting gRPC connections, export the following variable:
    # In bash_profile or terminal
    export GRPC_DEFAULT_SSL_ROOTS_FILE_PATH=venv/lib/python3.7/site-packages/certifi/cacert.pem
    
    # In a Jupyter notebook use the inbuilt %env magic
    %env GRPC_DEFAULT_SSL_ROOTS_FILE_PATH=~/<path-to-cert>