Creating virtual clusters

In Cloudera Data Engineering (CDE), a virtual cluster is an individual auto-scaling cluster with defined CPU and memory ranges. Jobs are associated with virtual clusters, and virtual clusters are associated with an environment. You can create as many virtual clusters as you need.

To create a virtual cluster, you must have an environment with Cloudera Data Engineering (CDE) enabled.

  1. In the Cloudera Data Platform (CDP) console, click the Data Engineering tile. The CDE Home page displays.
  2. Click Administration in the left navigation menu, select the environment you want to create a virtual cluster in.
  3. In the Virtual Clusters column, click at the top right to create a new virtual cluster.
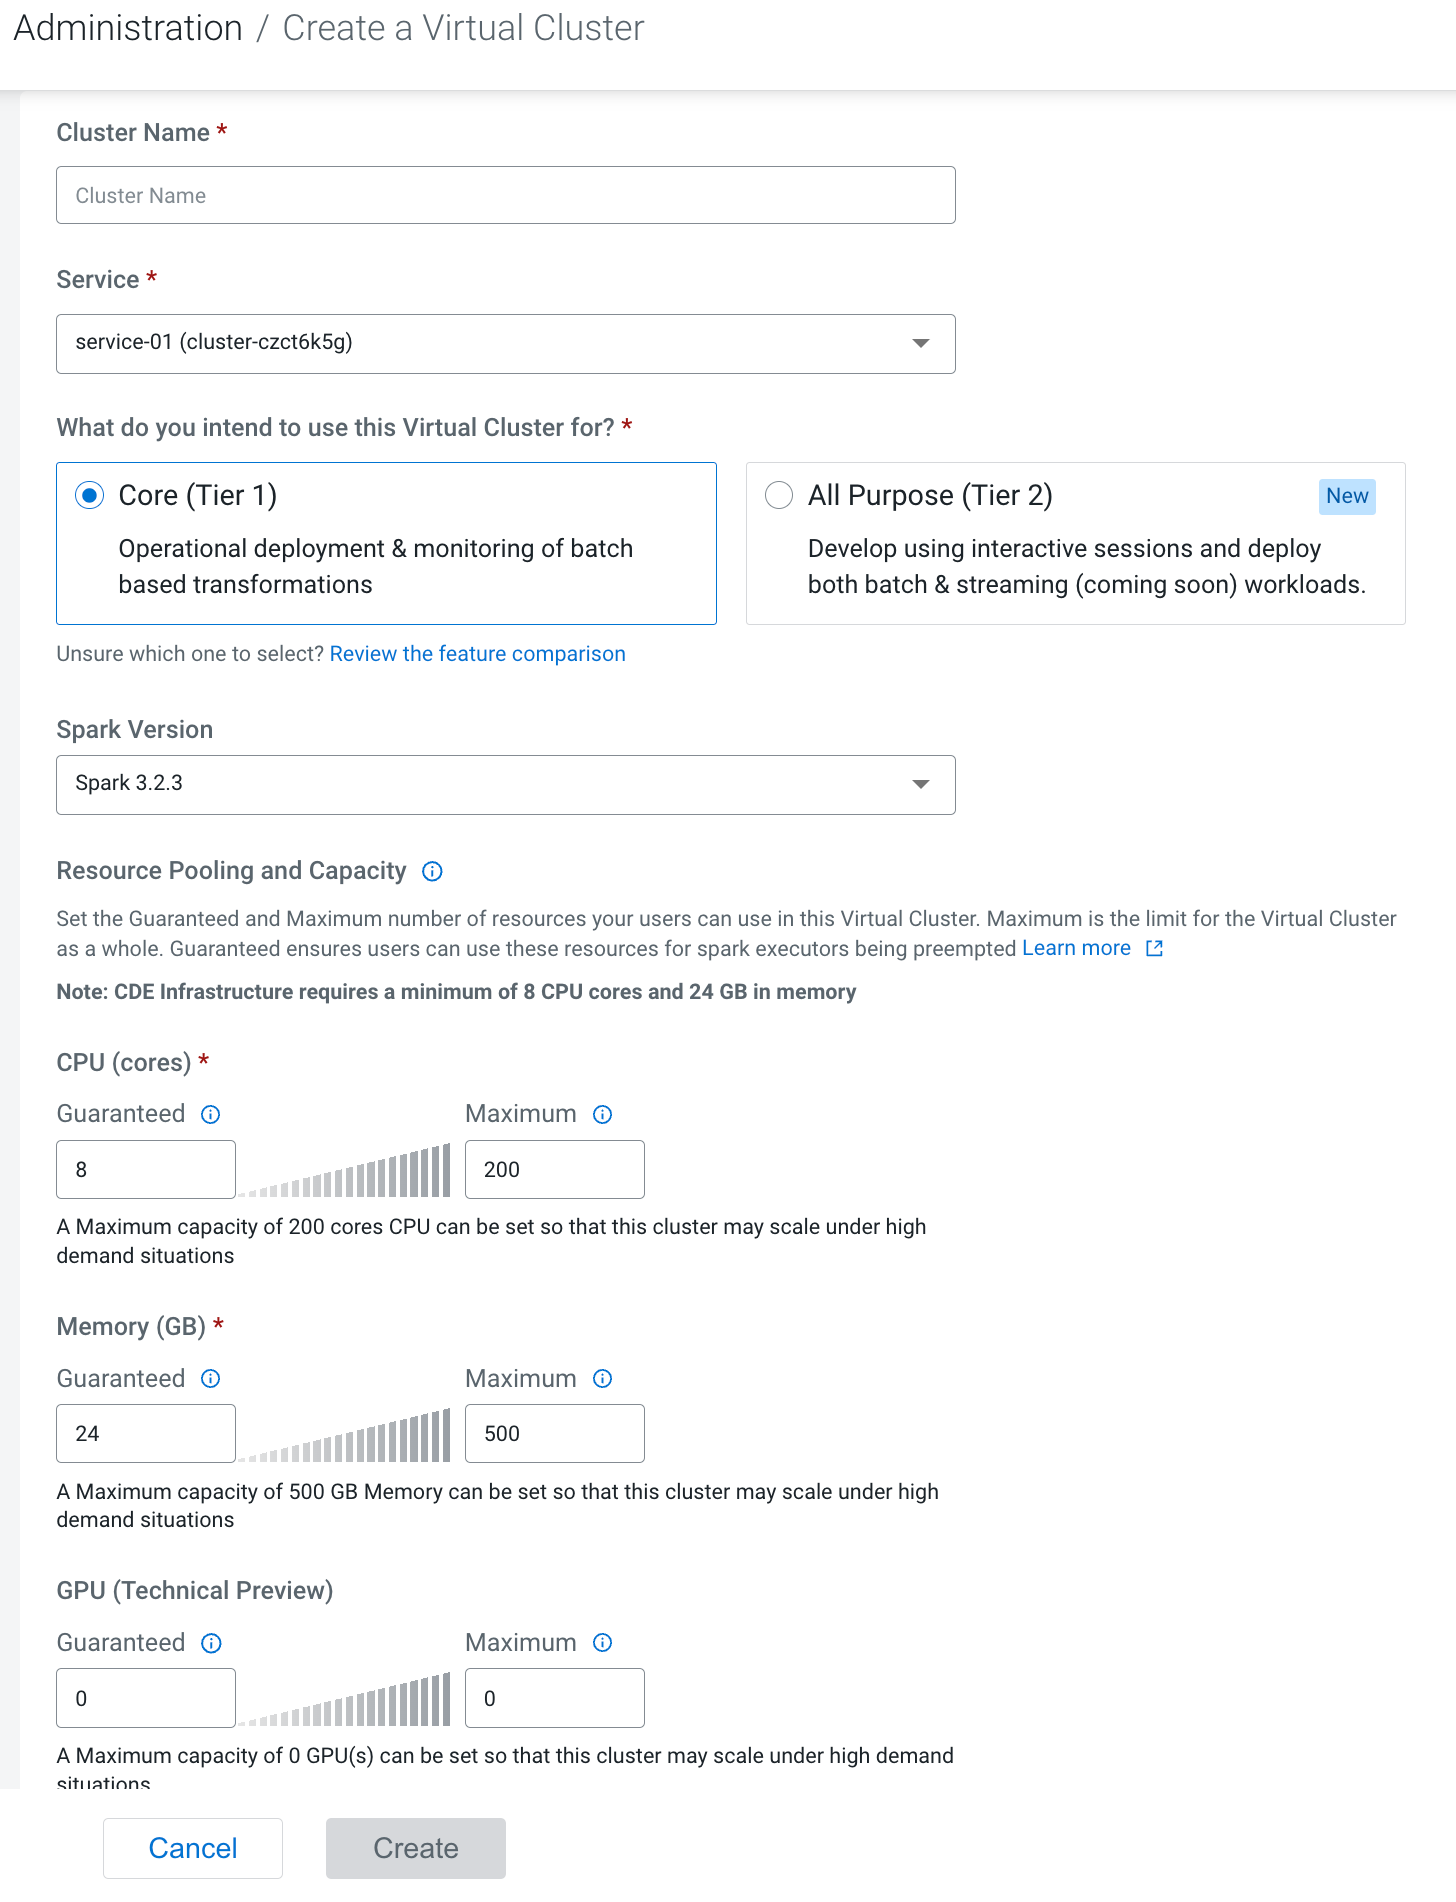
    If the environment has no virtual clusters associated with it, the page displays a Create a Virtual Cluster button that launches the same wizard.
  4. Enter a Cluster Name.
    Cluster names must include the following:
    • Begin with a letter
    • Be between 3 and 30 characters (inclusive)
    • Contain only alphanumeric characters and hyphens
  5. Select the CDE Service to create the virtual cluster in.
    The environment you selected before launching the wizard is selected by default, but you can use the wizard to create a virtual cluster in a different CDE service.
  6. Select one of the following CDE cluster types:
    • Core (Tier 1): Batch-based transformation and engineering options include:
      • Autoscaling Cluster
      • SDX/Lakehouse
      • Job Lifecycle
      • Monitoring
      • Workflow Orchestration
    • All Purpose (Tier 2) - Develop using interactive sessions and deploy both batch and streaming workloads. This option includes all options in Tier 1 with the following:
      • Shell Sessions - CLI and Web
      • JDBC/SparkSQL (Coming soon)
      • IDE (Coming Soon)
  7. In Capacity, specify the guaranteed and the maximum number of CPU cores, GPU cores, and Memory in gigabytes to configure elastic quota. The cluster can utilize resources up to the maximum set capacity to run the submitted Spark applications.

    You can get a minimum guaranteed and maximum capacity of resources (CPU and memory) using guaranteed quota and maximum quota. The guaranteed quota dictates the minimum amount of resources available for allocation for a VC at all times. The resources above the guaranteed quota and within the VC’s maximum quota can be used by any VC on demand if the cluster capacity allows for it.

    GPU (Technical Preview): You can set the guaranteed and maximum GPU resource quota for this virtual cluster for Spark 3 jobs to use.

    Elastic quotas allow the VC to acquire unused capacity in the cluster when their guaranteed quota limit gets exhausted. This ensures efficient use of resources in the cluster. At the same time, the maximum quota limits the threshold amount of resources a VC can claim in the cluster at any given time.

    For information about configuring resource pool and capacity, see Managing cluster resources using Quota Management.
  8. Select the Spark Version to use in the virtual cluster.
  9. Optional: Under Retention (Preview), click Enable Job Run and Log Retention Policy to configure the job run and log retention policy. The retention policy lets you specify how long to retain the job runs and logs, after which it will be deleted to save storage costs and improve performance. By default, in CDE there is no expiration period and both job runs and logs are retained forever. Provide the following to configure the duration:
    1. Enter Value: Enter a whole number greater than zero to set the duration. Ensure there are no decimals or other characters.
    2. Select Period: Select Hours, Days, or Weeks from the drop-down list to set the period of time for which job runs and logs are to be retained.
  10. Optional: Click Configure Email Alerting if you want to receive notification mails. Provide the following email configuration information:
    • Sender email address.
    • Your mail server hostname and port.
    • The username and password of the email user who will be logged into the mail server as the sender of the alert emails.
    • Select a secure connection method to be used when communicating with the SMTP server.
    • Click Test SMTP Configs to test the configurations set for SMTP. This helps you to test the SMTP configuration before creating the cluster.
  11. Click Create.
On the CDE Home page, select the environment to view the virtual cluster initialization status. You can also click the three-dot menu for the virtual cluster to view the logs.

You must initialize each virtual cluster you create and configure users before creating jobs.

Cloudera Data Engineering provides a suite of example jobs with a combination of Spark and Airflow jobs, which include scenarios such as reading and writing from object storage, running an Airflow DAG, and expanding on Python capabilities with custom virtual environments. For information about running example jobs, see CDE example jobs and sample data.