Encrypting EBS volumes with a CMK generated from AWS CloudHSM
This section provides steps for encrypting a Cloudera Data Hub
cluster with a CMK generated from a custom key store on AWS CloudHSM.
AWS CloudHSM is a cloud-based hardware security module (HSM) that enables you to
easily generate and use their own encryption keys in AWS. CloudHSM runs in your VPC and
provides you with the flexibility to integrate with many applications.
When using a custom key store, the default KMS key store is replaced by a dedicated
key store, which is hosted on a single tenant CloudHSM cluster on AWS. When a user generates a
CMK (Customer Managed Key), the key material is generated and stored in the CloudHSM and KMS
forwards all the data encryption requests to the CloudHSM.
To set this up, you need to create, initialize, and activate the HSM cluster, and then create
a CMK from HSM. Once done, you can use the CMK for encrypting Cloudera Data Hub clusters. Detailed steps are provided below.
Cross-account role permissions
If planning to use encryption, ensure that the cross-account IAM role used for the
provisioning credential includes the permissions mentioned in Permissions for using encryption.
Create a CloudHSM cluster
First, create a CloudHSM cluster.
Log in to your AWS account and navigate to CloudHSM.
In the top-right corner, verify that you are in the region where you would like to create
the CloudHSM cluster.
Click on Create Cluster in the top corner.
On the “Cluster configuration” page:
Select the VPC in which you wish to create the cluster. This should be the VPC
where your Cloudera environment should be running.
Under AZ(s), select the private subnets in the selected VPC (or create new
private subnets If subnets are not present). Make sure that each subnet exists in a
different availability zone.
Click Next.
On the “Backup retention” page, select a desired backup retention period (in days).
Click Next.
On the “Tags” page, add tags if required by your organization.
Review the cluster configuration and click on Create Cluster.
This creates a cluster in an uninitialized state. You need to
initialize the cluster before you can use it.
Initialize the CloudHSM cluster
Now that you have created the CloudHSM cluster, you should initialize it.
In the cluster created above, click on the Initialize button.
Select an Availability Zone (AZ) for the HSM and then choose Create.
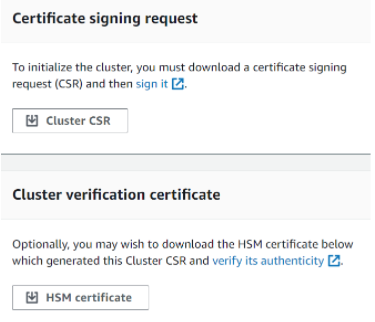
Once the CSR is ready, you get a link to download the CSR. Click on Cluster CSR
to download and save it.
Leave the browser tab open, as you will need to continue the steps later.
At this point, you need to sign the CSR to initialize the cluster. To sign the CSR the
below steps are required:
Create a private key.
You can create a private key using OpenSSL for
development and testing:
openssl genrsa -aes256 -out customerCA.key 2048
For
example:
$ openssl genrsa -aes256 -out customerCA.key 2048
Generating RSA private key, 2048 bit long modulus
........+++
............+++
e is 65537 (0x10001)
Enter pass phrase for customerCA.key:
Verifying - Enter pass phrase for customerCA.key:
For
a production scenario AWS recommends creating the private key in a more secure fashion
using an offline HSM or equivalent.
Use the private key to create a signing certificate.
You can use OpenSSL
to sign the certificate. After running the command, you will be prompted to answer a
few questions. The certificate will be valid for 10
years:
This
command creates a certificate file named customerCA.crt.
For
example:
$ openssl req -new -x509 -days 3652 -key customerCA.key -out customerCA.crt
Enter pass phrase for customerCA.key:
You are about to be asked to enter information that will be incorporated
into your certificate request.
What you are about to enter is what is called a Distinguished Name or a DN.
There are quite a few fields but you can leave some blank
For some fields there will be a default value,
If you enter '.', the field will be left blank.
-----
Country Name (2 letter code) [AU]:
State or Province Name (full name) [Some-State]:
Locality Name (eg, city) []:
Organization Name (eg, company) [Internet Widgits Pty Ltd]:
Organizational Unit Name (eg, section) []:
Common Name (e.g. server FQDN or YOUR name) []:
Email Address []:
Put the certificate generated in the previous step on every host from which you
are planning to connect to your AWS CloudHSM cluster.
If you rename the file
or store it in a path other than the root of your host, you should edit your client
configuration file accordingly.
Sign your cluster CSR using the CSR downloaded earlier and download your HSM
certificate.
The following example uses OpenSSL to sign the cluster's CSR. The
example uses your private key and the self-signed certificate that you created in
the previous
step:
$ openssl x509 -req -days 3652 -in <cluster ID>_ClusterCsr.csr \
   -CA customerCA.crt \
   -CAkey customerCA.key \
   -CAcreateserial \
   -out <cluster ID>_CustomerHsmCertificate.crt
Signature ok
subject=/C=US/ST=CA/O=Cavium/OU=N3FIPS/L=SanJose/CN=HSM:<HSM identifer>:PARTN:<partition number>, for FIPS mode
Getting CA Private Key
Enter pass phrase for customerCA.key:
This
command creates a file named <cluster
ID>_CustomerHsmCertificate.crt. You will use this file
as the signed certificate when you initialize the cluster.
Navigate back to your browser window and initialize the cluster. You will need to use
the signed HSM certificate and also the actual certificate to initialize the cluster.
Click Next on the “Sign certificate Signing request” page.
On the upload certificates page, do the following:
Next to “Cluster certificate”, click on Upload file. Next, locate and select
the HSM certificate. The file should be called <cluster
ID>_CustomerHsmCertificate.crt.
Next to “Issuing certificate”, choose Upload file. Then select your
signing certificate. If you completed the steps in the previous section, the file
should be called customerCA.crt.
Choose Upload and initialize.
Activate the CloudHSM cluster
Once you have initialized the cluster, you need to activate it. Activating the cluster
can be done through the command line using an Amazon EC2 instance with a CloudHSM client installed
on it.
Install the CloudHSM client on an Amazon EC2 instance. The instructions to install the CloudHSM
client on an Amazon EC2 instance are documented well in Install and Configure the AWS CloudHSM Client
(Linux). Make sure that the EC2 instance is on the same VPC that our cluster
is created on.
Attach the EC2 instance to the security group that was created as a result of
creating the HSM cluster.
To activate the CloudHSM cluster, you need to start the cloudhsm_mgmt_util
through a command line utility, which will connect to the new HSM node and automatically
enter the cloudHSM CLI. Follow the steps in Activate the Cluster (AWS docs).
Once the Cloud HSM is active, you can start creating CMK’s from the custom key store.
Create a CMK from CloudHSM
Now that you set up CloudHSM cluster, you can create a CMK from CloudHSM.
In the top-right corner, verify that you are in the region where you would like to create
the CMK.
Select Customer Managed Keys (CMK) from the KMS page.
Click on Create Key in the top left corner.
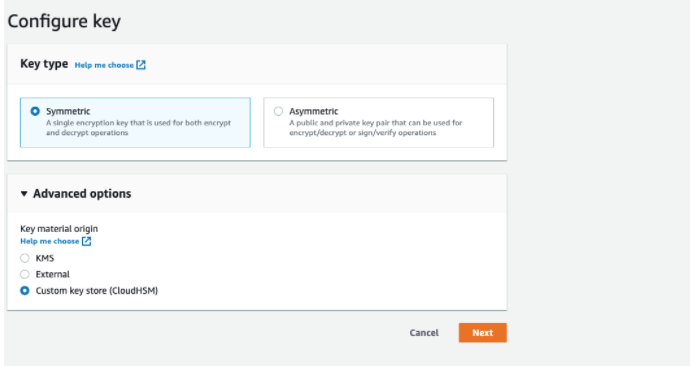
In the “Configure key” wizard, select Symmetric and then in the “Advanced options”
select the Custom key store (CloudHSM):
Click Next.
Add an alias to the key.
Click Next.
Provide required permissions to the key to encrypt and decrypt the data.
Click Next and then finish creating the key.
Once you've performed these steps, you are ready to create Cloudera Data Hub clusters with the CMK that you just created.
Encrypting data with a CMK on Cloudera Data Hub clusters
Use these steps to set up encryption for your Cloudera Data Hub
cluster data with the CMK created earlier.
Create an environment in the same VPC where the CloudHSM is hosted. Steps to
register a new environment in AWS cloud are documented in Register an AWS environment.
Once the environment is running, you can create Cloudera Data Hub clusters within the environment as described in
Create a Cloudera Data Hub
Cluster on AWS. Make sure to select the following in the Advanced
options of the cluster creation wizard:
Under Hardware and Storage, make sure to select the instance types
that support encryption.
Under Encryption Key, select the CMK that you have created earlier.
This CMK will be used to encrypt your data.
Repeat the process for all host groups where you would like to encrypt
data.
Finish creating the Cloudera Data Hub cluster.
Once the Cloudera Data Hub cluster is
running, the specified CMK is used to encrypt data stored in the cluster.