Customize the Hue Web UI
This topic describes which browsers to use to get the best experience with the Hue Web UI and how you can customize the UI in the following sections:
Continue reading:
Supported Browsers
- Chrome: Version history
- Firefox: Version history
- Internet Explorer: Version history
- Safari (Mac only): Version history
- Windows Edge: Version history
Customizing the Hue Web UI
To customize the Hue Web UI, you can add configuration properties in Cloudera Manager. You can customize the following Hue Web UI objects:
Continue reading:
Banner
banner_top_html=<H4>My company's custom Hue Web UI banner</H4>
To configure a custom banner:- In the Cloudera Manager Admin Console, select to navigate to the configuration page for Hue.
- In the Search text box, type top banner to locate the Top Banner Custom HTML banner_top_html configuration parameter.
- Add your custom HTML to the text box for the configuration parameter.
- Click Save Changes at the bottom of the page to save the configuration change.
-
Refresh the browser page and click the restart icon at the top of the page so the new configuration changes can be read by the server:
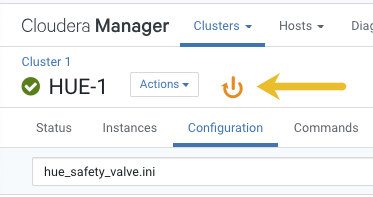
- In the Hue configuration page of Cloudera Manager, select to load Hue and view your custom banner.
Page Logo
You can also replace the Hue logo with a customized logo that is created with SVG code. You can add any type of logo you want, but your custom logo should be designed to fit into a 160 x 40 pixel space.
For example, here is the Hue logo shown below:
You can change this Hue logo by adding the appropriate SVG code to the logo_svg property under [desktop] [[custom]] in the Hue Service Advanced Configuration Snippet (Safety Valve) for hue_safety_valve.ini configuration parameter in Cloudera Manager as follows:
To replace the Hue logo with a custom logo:
- In the Cloudera Manager Admin Console, select to navigate to the configuration page for Hue.
-
In the Search text box type hue_safety_valve.ini to locate the configuration parameter:

-
Add the following parameters with your custom logo SVG code to the Hue Service Advanced Configuration Snippet (Safety Valve) for hue_safety_valve.ini configuration parameter:
[desktop]
[[custom]]
logo_svg='<custom_svg_code_for_logo>'
For example, the following SVG code replaces the Hue logo with a red heart:
[desktop] [[custom]] logo_svg='<g><path stroke="null" id="svg_1" d="m44.41215,11.43463c-4.05017,-10.71473 -17.19753,-5.90773 -18.41353,-0.5567c-1.672,-5.70253 -14.497,-9.95663 -18.411,0.5643c-4.35797,11.71793 16.891,22.23443 18.41163,23.95773c1.5181,-1.36927 22.7696,-12.43803 18.4129,-23.96533z" fill="#ffffff"/> <path stroke="null" id="svg_2" d="m98.41246,10.43463c-4.05016,-10.71473 -17.19753,-5.90773 -18.41353,-0.5567c-1.672,-5.70253 -14.497,-9.95663 -18.411,0.5643c-4.35796,11.71793 16.891,22.23443 18.41164,23.95773c1.5181,-1.36927 22.76959,-12.43803 18.41289,-23.96533z" fill="#FF5A79"/> <path stroke="null" id="svg_3" d="m154.41215,11.43463c-4.05016,-10.71473 -17.19753,-5.90773 -18.41353,-0.5567c-1.672,-5.70253 -14.497,-9.95663 -18.411,0.5643c-4.35796,11.71793 16.891,22.23443 18.41164,23.95773c1.5181,-1.36927 22.76959,-12.43803 18.41289,-23.96533z" fill="#ffffff"/> </g>' - Click Save Changes at the bottom of the page to save the configuration change.
-
Refresh the browser page and click the restart icon
 at the top of the page so the new configuration changes can be read by the
server.
at the top of the page so the new configuration changes can be read by the
server. -
In the Hue configuration page of Cloudera Manager, select to load Hue and view your custom logo.
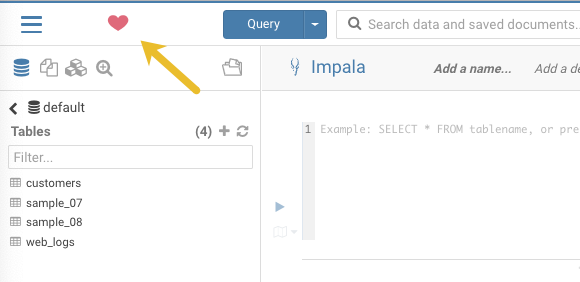
If you added the sample SVG code that defines a red heart as the logo, your Hue web UI looks like this:
Splash Screen
[desktop]
[[custom]]
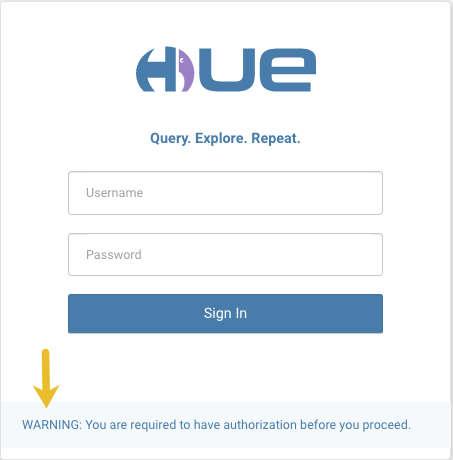
login_splash_html=WARNING: You are required to have authorization before you proceed.
The above configuration adds the following message to the Hue login screen:
To configure a splash screen in Cloudera Manager:
- In the Cloudera Manager Admin Console, select to navigate to the configuration page for Hue.
- In the Search text box, type hue_safety_valve.ini to locate the Hue Service Advanced Configuration Snippet (Safety Valve) for hue_safety_valve.ini configuration parameter.
-
Add the following parameters with your custom splash screen message to the Hue Service Advanced Configuration Snippet (Safety Valve) for hue_safety_valve.ini configuration parameter:
[desktop] [[custom]] login_splash_html=<custom_message> - Click Save Changes at the bottom of the page to save the configuration change.
- Refresh the browser page and click the restart icon at the top of the page so the new configuration changes can be read by
the server.
- In the Hue configuration page of Cloudera Manager, select to load Hue and view your custom splash screen message.
Cache Timeout
Enable Hue UI caching by setting a timeout in milliseconds. The default is 86400000 milliseconds or one day. Set the timeout to 0 to disable caching.
You can set the cache timeout using the cacheable_ttl property under [desktop][[custom]] in the Hue Service Advanced Configuration Snippet (Safety Valve) for hue_safety_valve.ini configuration property in Cloudera Manager as follows.
To set the cache timeout value:
- In the Cloudera Manager Admin Console, select to navigate to the configuration page for Hue.
- In the Search text box, type hue_safety_valve.ini to locate the Hue Service Advanced Configuration Snippet (Safety Valve) for hue_safety_valve.ini configuration parameter.
-
Add the following parameters with the cache timeout value to the Hue Service Advanced Configuration Snippet (Safety Valve) for hue_safety_valve.ini configuration parameter:
[desktop]
[[custom]]
cacheable_ttl=<value_in_milliseconds>
For example, the following configuration sets the cache timeout to the default value of 86400000 milliseconds:
[desktop] [[custom]] cacheable_ttl=86400000 - Click Save Changes at the bottom of the page to save the configuration change.
- Refresh the browser page and click the restart icon at the top of the page so the new configuration changes can be read by
the server and the new cache timeout limit takes effect.
Anonymous Usage Data Collection
Hue tracks anonymized pages and application versions to gather information about application usage levels. The data collected does not include hostnames or IDs.
You can restrict or enable data collection by setting the collect_usage parameter to false or true under the [desktop] configuration section in the Hue Service Advanced Configuration Snippet (Safety Valve) for hue_safety_valve.ini configuration property in Cloudera Manager.
To enable or disable anonymous usage data collection:
- In the Cloudera Manager Admin Console, select to navigate to the configuration page for Hue.
- In the Search text box, type hue_safety_valve.ini to locate the Hue Service Advanced Configuration Snippet (Safety Valve) for hue_safety_valve.ini configuration parameter.
-
Add the following parameter to the Hue Service Advanced Configuration Snippet (Safety Valve) for hue_safety_valve.ini configuration parameter:
[desktop]
...
# Help improve Hue with anonymous usage analytics.
# Use Google Analytics to see how many times an application or specific section of an application is used, nothing more.
## collect_usage=<false | true>
Where false disables data collection and true enables it.
- Click Save Changes at the bottom of the page to save the configuration change.
- Refresh the browser page and click the restart icon at the top of the page so the new configuration changes can be read by
the server and the new data collection setting takes effect.
