Configure SCIM with Azure AD
Cloudera supports SCIM with Microsoft Azure Active Directory (Azure AD).
- The Azure AD SAML 150 groups-per-claim limit.
- The Azure AD SAML
sAMAccountNamenot available on groups created in Azure AD limitation (this is where group names are sent as their Object IDs in SAML instead of their human readable name).
- You can only configure one identity provider per Cloudera account to use SCIM.
- Once you start using SCIM, you should not update users and groups in Cloudera, as they will get out of sync with Azure AD, and you may notice unexpected changes if/when Azure AD realizes the differences and attempts to re-sync the users/groups.
- Updating group names is not supported in Cloudera.
- Updating
userNameis not supported in CDP. You must use an Azure AD field that will not change as auserNameto map via SCIM to Cloudera. If that field is an opaque ID (for example, a UUID) then you should generate workload usernames from email as described below.
Once you are aware of the limitations, you can proceed to configuring Cloudera to use SCIM. The steps include:
Prerequisites
Prior to configuring Cloudera to use SCIM, ensure that you can meet the following requirements:
- Prior to configuring Cloudera to use SCIM, you should Configure Azure AD in Cloudera. SCIM is meant to be used in conjunction with SAML identity federation to synchronize users and groups from your identity provider to Cloudera.
- Setting up SCIM requires administrative operations in both Cloudera and Azure AD, and so it requires an Azure AD admin to perform the Azure AD steps.
- Additionally, you need to be a Cloudera account administrator or have the PowerUser role in Cloudera.
Enable SCIM for your identity provider in Cloudera
This task involves enabling SCIM for your identity provider and getting the SCIM URL that you will need to configure Azure AD so it can connect to Cloudera. Next, you create an access token for Azure AD to securely communicate with Cloudera for SCIM and get the access token secret you will need to configure Azure AD.
You will need to provide the lifetime for the access token used for Azure AD to communicate to Cloudera. Typical values are 1 year or 3 years; consult your security policies. You will need to rotate the access token before it expires.
In order to perform these steps, you need to be a Cloudera account administrator or have the PowerUser role in Cloudera.
Steps
-
Sign in to the Cloudera console.
-
Navigate to the Cloudera Management Console.
- Select User Management from the left pane.
-
Click on Identity Providers.
-
Select your identity provider, and from the
 (context menu) select Update
Identity Provider.
(context menu) select Update
Identity Provider. -
On the Update Identity Provider window, check the box for Enable SCIM. This will update the identity provider to be ready to accept SCIM API calls.
-
(Optional) If you use an opaque ID for SAML
NameIDand SCIMuserName, on the Update Identity Provider window, check the box for Generate workload username by email. Check this box if you use an opaque ID for SAMLNameIDand SCIMuserName. For more information, see Generating workload usernames based on email. -
Click Update.
-
Select your identity provider, and from the
(context menu) select
View Identity Provider. -
Copy the SCIM URL. You will need it later.
-
Click Close.
-
Select your identity provider and from the
(context menu) select
Update SCIM Access Tokens. -
On the Update SCIM Access Tokens window, click the button to Create SCIM Token.
-
Set your lifetime, in days. This is how long you will have before you need to rotate your SCIM access token. Note that you can always rotate your tokens earlier than their expiration date and you can revoke tokens at any time.
-
Click the Create button. This creates a SCIM access token that is used to authenticate SCIM API calls to this identity provider.
-
Your Access Token Secret will be shown. Copy it somewhere. You will need it later and it will not be shown again.
Set up SCIM in Azure AD
After enabling SCIM for your identity provider in Cloudera, you should set up SCIM in Azure AD. These steps must be performed by an Azure AD admin.
Steps
-
Sign in to the Azure Portal.
-
Navigate to Azure AD and then click on Enterprise Applications.
-
Select the application you used to configure identity federation to Cloudera. Or, if you are setting up SCIM in a new Azure AD app, create a new non-gallery enterprise application.
-
Under the Manage menu on the left, click Provisioning.
-
From the Provisioning Mode dropdown, select Automatic.
-
Expand the Admin Credentials section.
-
In the box for Tenant URL, paste in the SCIM URL that you saved earlier.
-
In the box for Secret Token, paste in the Access Token Secret that you saved earlier.
-
Click Test Connection and wait for success.
-
Click Save.
-
Still in the same Provisioning blade, expand the Mappings section. This section is grayed out until the connection has been successfully tested.
-
Click on Provision Azure Active Directory Groups.
Update the Attribute Mappings as follows:
As an outcome, your configuration should look similar to:Azure Active Directory Attribute customappsso Attribute Matching precedence displayName displayName 1 members members 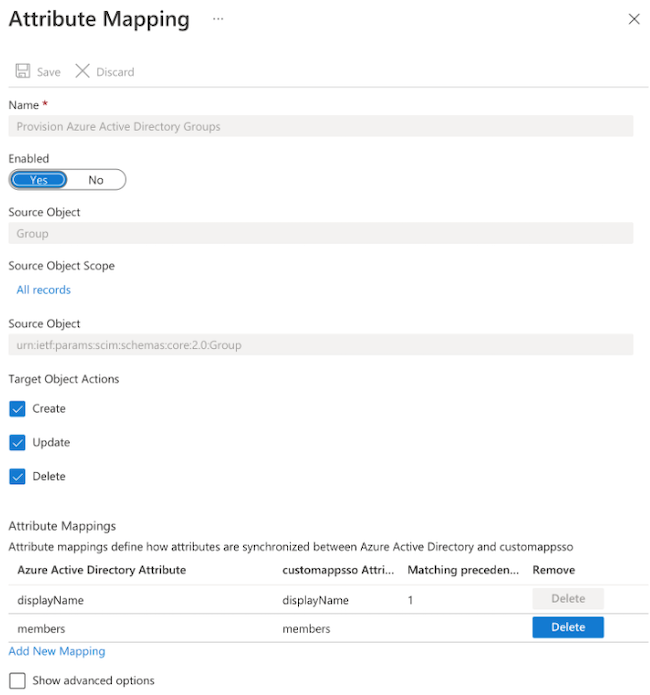
-
Click Save to save the group attribute mappings.
-
Close this blade to return to the Provisioning blade.
-
Click on Provision Azure Active Directory Users.
Update the Attribute Mappings as follows:
As an outcome, your configuration should look similar to:Azure Active Directory Attribute customappsso Attribute Matching precedence objectId userName 1 mail emails[type eq "work"].value givenName name.givenName surname name.familyName 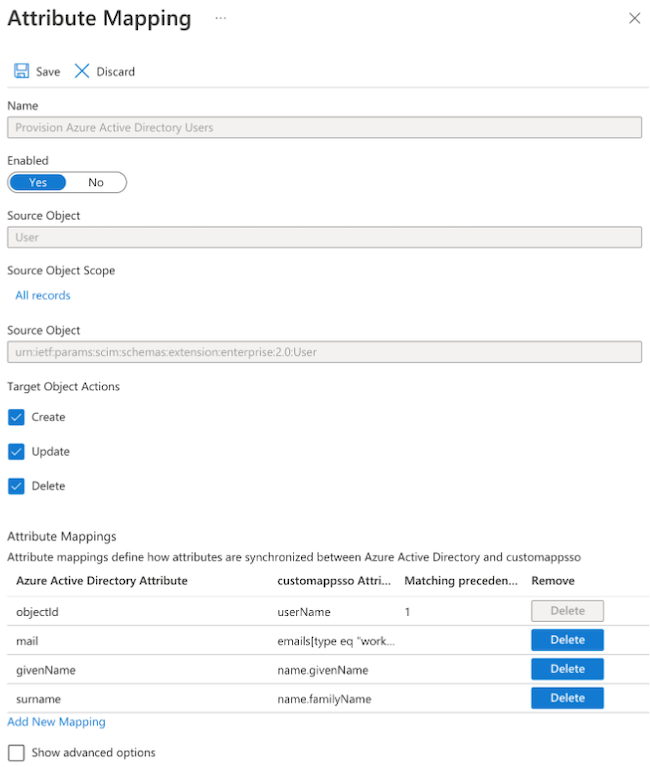
-
Click Save to save the user attribute mappings.
-
Close this blade to return to the Provisioning blade.
-
Click Save in the Provisioning blade.
-
Still in the Provisioning blade, expand the Settings section.
-
Set Scope to Sync only assigned users and groups.
-
Click Save.
-
Now in the blade for the application, under the Manage menu click Users and groups.
-
If there are no users or groups, add a few. You will use this to test SCIM later.
-
Back in the blade for the application, under the Manage menu click Provisioning.
-
Click Start provisioning.
-
Wait for the sync cycle to run.
The initial provisioning cycle may take a few minutes to start but subsequent provisioning cycles run using a fixed cadence. You can see the cadence under the View provisioning details expandable section. -
Once the provisioning cycle is complete, check your users and groups in Cloudera. If there are any errors, contact your Cloudera representative.